User Manual
Page 6
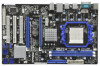
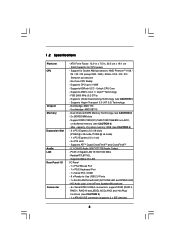
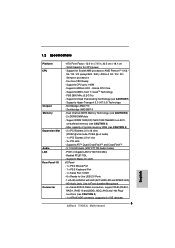
...Ports - 1 x RJ-45 LAN Port with LED (ACT/LINK LED and SPEED LED) - Southbridge: AMD SB710 - PCIE x1 Gigabit LAN 10/100/1000 Mb/s - HD Audio Jack: Line in , 30.5 cm x 19.1 cm - 1.2 Specifications Platform CPU Chipset Memory Expansion Slot Audio LAN Rear Panel I /O ... (except 920 / 940) / Athlon II X4 / X3 / X2 / Sempron processors - Supports Hyper-Transport 3.0 (HT 3.0) Technology - Support for CPU power - Supports ASRock UCC - FSB 2600 MHz (5.2 GT/s) - capacity of system memory: 8GB (see CAUTION 5) - 1 x ATA133 IDE connector (supports 2 x IDE devices) 6 Realtek RTL8111DL...
...Ports - 1 x RJ-45 LAN Port with LED (ACT/LINK LED and SPEED LED) - Southbridge: AMD SB710 - PCIE x1 Gigabit LAN 10/100/1000 Mb/s - HD Audio Jack: Line in , 30.5 cm x 19.1 cm - 1.2 Specifications Platform CPU Chipset Memory Expansion Slot Audio LAN Rear Panel I /O ... (except 920 / 940) / Athlon II X4 / X3 / X2 / Sempron processors - Supports Hyper-Transport 3.0 (HT 3.0) Technology - Support for CPU power - Supports ASRock UCC - FSB 2600 MHz (5.2 GT/s) - capacity of system memory: 8GB (see CAUTION 5) - 1 x ATA133 IDE connector (supports 2 x IDE devices) 6 Realtek RTL8111DL...
User Manual
Page 49
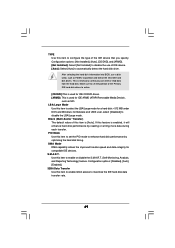
... the PIO mode to disable the LBA/Large mode. DMA Mode DMA capability allows the improved transfer-speed and data-integrity for a hard disk > 512 MB under DOS and Windows; Configuration options: [Not Installed], [Auto], [CD/DVD], and [ARMD]. [Not Installed]: Select [Not Installed] to disable the use a disk utility, such...
... the PIO mode to disable the LBA/Large mode. DMA Mode DMA capability allows the improved transfer-speed and data-integrity for a hard disk > 512 MB under DOS and Windows; Configuration options: [Not Installed], [Auto], [CD/DVD], and [ARMD]. [Not Installed]: Select [Not Installed] to disable the use a disk utility, such...
User Manual
Page 50
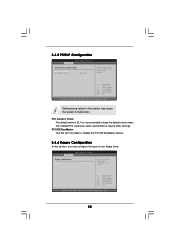
... is recommended to keep the default value unless the installed PCI expansion cards' specifications require other settings. BIOS SETUP UTILITY Advanced Floppy Configuration Floppy A [1.44 MB 312"] Select the type of PCI clocks for PCI device latency timer register. +F1 F9 F10 ESC Select Screen Select Item Change Option General Help...
... is recommended to keep the default value unless the installed PCI expansion cards' specifications require other settings. BIOS SETUP UTILITY Advanced Floppy Configuration Floppy A [1.44 MB 312"] Select the type of PCI clocks for PCI device latency timer register. +F1 F9 F10 ESC Select Screen Select Item Change Option General Help...
Quick Installation Guide
Page 5
Supports Hyper-Transport 3.0 (HT 3.0) Technology - PCIE x1 Gigabit LAN 10/100/1000 Mb/s - Realtek RTL8111DL - Supports ASRock UCC - Northbridge: AMD 770 - Support DDR3 1800(OC)/1600/1333/1066/800 non-ECC, un-buffered memory (see CAUTION 4) - 2 ... Wake-On-LAN I /O Connector - Six-Core CPU Ready - Supports Untied Overclocking Technology (see CAUTION 5) - 1 x ATA133 IDE connector (supports 2 x IDE devices) 5 ASRock 770DE3L Motherboard English HD Audio Jack: Line in , 30.5 cm x 19.1 cm - FSB 2600 MHz (5.2 GT/s) - Unlock CPU Core - Southbridge: AMD SB710 - Support for ...
Supports Hyper-Transport 3.0 (HT 3.0) Technology - PCIE x1 Gigabit LAN 10/100/1000 Mb/s - Realtek RTL8111DL - Supports ASRock UCC - Northbridge: AMD 770 - Support DDR3 1800(OC)/1600/1333/1066/800 non-ECC, un-buffered memory (see CAUTION 4) - 2 ... Wake-On-LAN I /O Connector - Six-Core CPU Ready - Supports Untied Overclocking Technology (see CAUTION 5) - 1 x ATA133 IDE connector (supports 2 x IDE devices) 5 ASRock 770DE3L Motherboard English HD Audio Jack: Line in , 30.5 cm x 19.1 cm - FSB 2600 MHz (5.2 GT/s) - Unlock CPU Core - Southbridge: AMD SB710 - Support for ...
RAID Installation Guide
Page 8
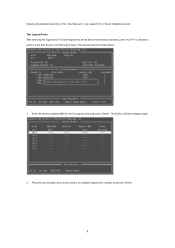
Two Logical Drives After selecting the logical drive in our support CD or "Quick Installation Guide". Enter the desired capacity (MB) for the first logical drive and press . The Define LD Menu displays again. 2. Press the up and down arrow keys to the first logical drive. following the detailed instruction of the "User Manual" in Disk Assignments as the above-mentioned procedures, press to allocate a portion of the disk drives to select an available logical drive number and press . 8 Then please follow the steps below. 1.
Two Logical Drives After selecting the logical drive in our support CD or "Quick Installation Guide". Enter the desired capacity (MB) for the first logical drive and press . The Define LD Menu displays again. 2. Press the up and down arrow keys to the first logical drive. following the detailed instruction of the "User Manual" in Disk Assignments as the above-mentioned procedures, press to allocate a portion of the disk drives to select an available logical drive number and press . 8 Then please follow the steps below. 1.


