Spec Sheet_i2769Vm
Page 1
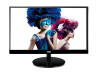
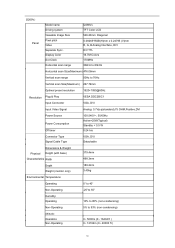
i2769Vm Cabinet Color Panel Pixel Pitch Display Area Brightness Contrast Ratio Response Time Viewing Angle Scanning Frequency Pixel Frequency Maximum Resolution Recommended Resolution Supported Resolutions Color Signal Input Digital Input Connectors Power Source Power Consumption Plug & Play User Control OSD Languages Regulations Built-in Speakers Other Features Glossy Black Bezel, Base; Hairline texture on Bottom Back Cover TFT Active Matrix LCD, LED Backlight 27" Widescreen, 16:9 Aspect Ratio 27" Viewable Image Size, Diagonal 0.311(H) x 0.311(V)mm 597.888(H) x 336.312(V) 250 cd/m2 ...
i2769Vm Cabinet Color Panel Pixel Pitch Display Area Brightness Contrast Ratio Response Time Viewing Angle Scanning Frequency Pixel Frequency Maximum Resolution Recommended Resolution Supported Resolutions Color Signal Input Digital Input Connectors Power Source Power Consumption Plug & Play User Control OSD Languages Regulations Built-in Speakers Other Features Glossy Black Bezel, Base; Hairline texture on Bottom Back Cover TFT Active Matrix LCD, LED Backlight 27" Widescreen, 16:9 Aspect Ratio 27" Viewable Image Size, Diagonal 0.311(H) x 0.311(V)mm 597.888(H) x 336.312(V) 250 cd/m2 ...
User's Manual_i2769Vm
Page 2
... Power ...5 Installation...6 Cleaning...7 Other ...8 Setup ...9 Contents in Box ...9 Setup Stand & Base ...10 Adjusting Viewing Angle...11 Connecting the Monitor...12 Adjusting ...14 Setting Optimal Resolution ...14 Windows 8 ...14 Windows Vista ...16 Windows XP ...18 Windows ME/2000...19 Hotkeys...20 Using"Mobile High-Defintion Link" ...22 OSD Setting...24 Luminance ...25 Image Setup ...28 Color Setup...30 Picture Boost ...32 OSD Setup ...34 Extra ...36 Exit...38 LED Indicator ...39 Driver ...40 Monitor Driver ...40 Windows 8 ...40 Windows 7 ...40 Windows Vista ...44 Windows XP ...46 Windows...
... Power ...5 Installation...6 Cleaning...7 Other ...8 Setup ...9 Contents in Box ...9 Setup Stand & Base ...10 Adjusting Viewing Angle...11 Connecting the Monitor...12 Adjusting ...14 Setting Optimal Resolution ...14 Windows 8 ...14 Windows Vista ...16 Windows XP ...18 Windows ME/2000...19 Hotkeys...20 Using"Mobile High-Defintion Link" ...22 OSD Setting...24 Luminance ...25 Image Setup ...28 Color Setup...30 Picture Boost ...32 OSD Setup ...34 Extra ...36 Exit...38 LED Indicator ...39 Driver ...40 Monitor Driver ...40 Windows 8 ...40 Windows 7 ...40 Windows Vista ...44 Windows XP ...46 Windows...
User's Manual_i2769Vm
Page 5
... your dealer or local power company. Do not overload power strips and extension cords. This will protect the monitor from the type of time. The monitor is equipped with a three-pronged grounded plug, a plug with certified computers which have an electrician install the correct outlet, or use an adapter to ground the appliance safely. Power The monitor should be operated only from...
... your dealer or local power company. Do not overload power strips and extension cords. This will protect the monitor from the type of time. The monitor is equipped with a three-pronged grounded plug, a plug with certified computers which have an electrician install the correct outlet, or use an adapter to ground the appliance safely. Power The monitor should be operated only from...
User's Manual_i2769Vm
Page 20
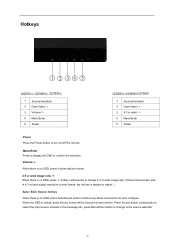
... /I2369VM /I2769VM 1 Source/Auto/Exit 2 Clear Vision/ 3 Volume/ > 4 Menu/Enter 5 Power > I2269VW /I2369V/I2769V 1 Source/Auto/Exit 2 Clear Vision/ 3 4:3 or wide / > 4 Menu/Enter 5 Power > Power Press the Power button to display the OSD or confirm the selection. Press Source button continuously to select the input source showed in the message bar, press Menu/Enter button to change 4:3 or wide image ratio. (If the product screen size is 4:3 or input signal resolution is wide format, the hot key is disable to adjust. ) Auto / Exit / Source hot...
... /I2369VM /I2769VM 1 Source/Auto/Exit 2 Clear Vision/ 3 Volume/ > 4 Menu/Enter 5 Power > I2269VW /I2369V/I2769V 1 Source/Auto/Exit 2 Clear Vision/ 3 4:3 or wide / > 4 Menu/Enter 5 Power > Power Press the Power button to display the OSD or confirm the selection. Press Source button continuously to select the input source showed in the message bar, press Menu/Enter button to change 4:3 or wide image ratio. (If the product screen size is 4:3 or input signal resolution is wide format, the hot key is disable to adjust. ) Auto / Exit / Source hot...
User's Manual_i2769Vm
Page 22
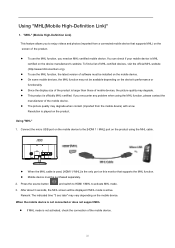
... of mobile devices, the picture quality may degrade when content (imported from a connected mobile device that supports the MHL function. z On some mobile devices, the MHL function may vary depending on the mobile device. If you encounter any problem when using the MHL cable. z Since the display size of software must be installed on the screen of the mobile device. 22...
... of mobile devices, the picture quality may degrade when content (imported from a connected mobile device that supports the MHL function. z On some mobile devices, the MHL function may vary depending on the mobile device. If you encounter any problem when using the MHL cable. z Since the display size of software must be installed on the screen of the mobile device. 22...
User's Manual_i2769Vm
Page 24
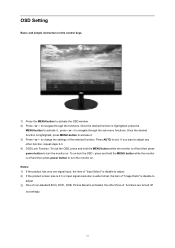
... the MENU-button to activate the OSD window. 2) Press < or > to turn the monitor on . Once the desired function is highlighted, press the MENU-button to adjust. 3) One of "Image Ratio" is off and then press power button to navigate through the functions. Notes: 1) If the product has only one signal input, the item of "Input Select" is disable to adjust. 2) If the product screen size is 4:3 or input signal resolution is wide...
... the MENU-button to activate the OSD window. 2) Press < or > to turn the monitor on . Once the desired function is highlighted, press the MENU-button to adjust. 3) One of "Image Ratio" is off and then press power button to navigate through the functions. Notes: 1) If the product has only one signal input, the item of "Input Select" is disable to adjust. 2) If the product screen size is 4:3 or input signal resolution is wide...
User's Manual_i2769Vm
Page 40
.... 5. Start Windows® 8 2. " and then click the "Browse my computer for the CD-ROM drive). 12. The files will automatically select the maximum refresh rate and corresponding Color Matching Profiles. Close all open windows and remove the CD. 15. Click on my computer". 11. Set the "View by clicking on the "Change display settings" button. 6. Select "Let me pick from the CD to your monitor model...
.... 5. Start Windows® 8 2. " and then click the "Browse my computer for the CD-ROM drive). 12. The files will automatically select the maximum refresh rate and corresponding Color Matching Profiles. Close all open windows and remove the CD. 15. Click on my computer". 11. Set the "View by clicking on the "Change display settings" button. 6. Select "Let me pick from the CD to your monitor model...
User's Manual_i2769Vm
Page 45
... "Monitor" tab. 4. Click "Update Driver..." button, then click on my computer". 7. If the message "Windows needs..." Check the "Browse my computer for your monitor model and click on the 'Have disk...' button and then select the appropriate drive F:\Driver (CD-ROM Drive). 8. Click on the 'Next' button. 9. Select your monitor is . Click "Close" → "Close" → "OK" → "OK" on the following screens displayed in...
... "Monitor" tab. 4. Click "Update Driver..." button, then click on my computer". 7. If the message "Windows needs..." Check the "Browse my computer for your monitor model and click on the 'Have disk...' button and then select the appropriate drive F:\Driver (CD-ROM Drive). 8. Click on the 'Next' button. 9. Select your monitor is . Click "Close" → "Close" → "OK" → "OK" on the following screens displayed in...
User's Manual_i2769Vm
Page 47
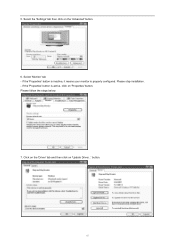
If the 'Properties' button is inactive, it means your monitor is active, click on 'Properties' button. If the 'Properties' button is properly configured. Click on the 'Driver' tab and then click on the 'Advanced' button. 6. Please stop installation. - button. 47 Select 'Monitor' tab - Select the 'Settings' tab then click on 'Update Driver...' Please follow the steps below. 7. 5.
If the 'Properties' button is inactive, it means your monitor is active, click on 'Properties' button. If the 'Properties' button is properly configured. Click on the 'Driver' tab and then click on the 'Advanced' button. 6. Please stop installation. - button. 47 Select 'Monitor' tab - Select the 'Settings' tab then click on 'Update Driver...' Please follow the steps below. 7. 5.
User's Manual_i2769Vm
Page 49
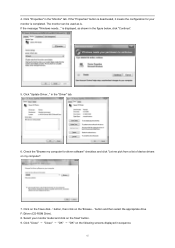
...' button. 9. Select 'Monitor' - Click on 'Control Panel'. 3. then click on 'Have disk...'. 8. Select 'Display a list of the known drivers for this device so that I can see the 'Digital Signature Not Found' window, click on 'Have Disk...'. 8. Select the 'Settings' tab then click on the 'Browse...' Click on 'Advanced...'. 5. Start Windows® 2000 2. If the 'Properties' button is properly configured. Click on the 'Open' button...
...' button. 9. Select 'Monitor' - Click on 'Control Panel'. 3. then click on 'Have disk...'. 8. Select 'Display a list of the known drivers for this device so that I can see the 'Digital Signature Not Found' window, click on 'Have Disk...'. 8. Select the 'Settings' tab then click on the 'Browse...' Click on 'Advanced...'. 5. Start Windows® 2000 2. If the 'Properties' button is properly configured. Click on the 'Open' button...

User's Manual_i2769Vm
Page 51
... status (On, Off, Sleep or Screen Saver); You can click "RESET" to set the e-Saver to timely shutdown when PC unit is powered off. 3) The monitor will automatically shutdown 20 minutes after the screen saver appears. the actual shutdown time depends on "driver/e-Saver/setup.exe" to start installing the e-Saver software, follow the install wizard to use AOC e-Saver monitor power management software! The AOC e-Saver features Smart...
... status (On, Off, Sleep or Screen Saver); You can click "RESET" to set the e-Saver to timely shutdown when PC unit is powered off. 3) The monitor will automatically shutdown 20 minutes after the screen saver appears. the actual shutdown time depends on "driver/e-Saver/setup.exe" to start installing the e-Saver software, follow the install wizard to use AOC e-Saver monitor power management software! The AOC e-Saver features Smart...
User's Manual_i2769Vm
Page 53
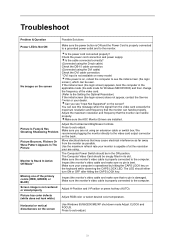
... the ON position. Make sure the monitor's video cable is bent. Press to the Setting the Optimal Resolution) If the initial screen (the login screen) does not appear, contact the Service Center or your computer is not centered or sized properly Picture has color defects (white does not look white) Is the power cord connected properly? Check the power cord connection and power supply. Adjust the Contrast and Brightness Controls. Adjust H-Position and V-Position or press hot-key (AUTO). No images on the screen Picture Is...
... the ON position. Make sure the monitor's video cable is bent. Press to the Setting the Optimal Resolution) If the initial screen (the login screen) does not appear, contact the Service Center or your computer is not centered or sized properly Picture has color defects (white does not look white) Is the power cord connected properly? Check the power cord connection and power supply. Adjust the Contrast and Brightness Controls. Adjust H-Position and V-Position or press hot-key (AUTO). No images on the screen Picture Is...

User's Manual_i2769Vm
Page 54
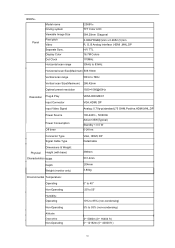
Specification General Specification I2269VWM Panel Model name Driving system Viewable Image Size Pixel pitch Video Separate Sync. Display Color Dot Clock I2269VWM TFT Color LCD 546.20mm Diagonal 0.08265*RGB(H)mm x 0.24795 (V)mm R, G, B Analog lnterface ,HDMI ,MHL,DP H/V TTL 16.7M Colors 170MHz Horizontal scan range 30kHz to 83kHz Horizontal scan Size(Maximum) 476.06mm Vertical scan range 50Hz to 76Hz Vertical scan Size(Maximum) 267.79mm Optimal preset resolution 1920×1080@60Hz Resolution Plug & Play Input Connector VESA DDC2B/C1 VGA,HDMI, DP Input Video Signal Analog: 0.7Vp...
Specification General Specification I2269VWM Panel Model name Driving system Viewable Image Size Pixel pitch Video Separate Sync. Display Color Dot Clock I2269VWM TFT Color LCD 546.20mm Diagonal 0.08265*RGB(H)mm x 0.24795 (V)mm R, G, B Analog lnterface ,HDMI ,MHL,DP H/V TTL 16.7M Colors 170MHz Horizontal scan range 30kHz to 83kHz Horizontal scan Size(Maximum) 476.06mm Vertical scan range 50Hz to 76Hz Vertical scan Size(Maximum) 267.79mm Optimal preset resolution 1920×1080@60Hz Resolution Plug & Play Input Connector VESA DDC2B/C1 VGA,HDMI, DP Input Video Signal Analog: 0.7Vp...
User's Manual_i2769Vm
Page 56
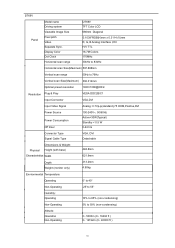
...I2269VW Panel Model name Driving system Viewable Image Size Pixel pitch Video Separate Sync. Display Color Dot Clock Horizontal scan range I2269VW TFT Color LCD 546.20mm Diagonal 0.08265*RGB(H)mm x 0.24795 (V)mm R, G, B Analog lnterface ,DVI H/V TTL 16.7M Colors 170MHz 30kHz to 83kHz Horizontal scan Size(Maximum) 476.06mm Vertical scan range 50Hz to 76Hz Vertical scan Size(Maximum) 267.79mm Optimal preset resolution 1920×1080@60Hz Resolution Plug & Play Input Connector VESA DDC2B/C1 VGA, DVI Input Video Signal Analog: 0.7Vp-p(standard),75 OHM,Positive,DVI Power Source Power...
...I2269VW Panel Model name Driving system Viewable Image Size Pixel pitch Video Separate Sync. Display Color Dot Clock Horizontal scan range I2269VW TFT Color LCD 546.20mm Diagonal 0.08265*RGB(H)mm x 0.24795 (V)mm R, G, B Analog lnterface ,DVI H/V TTL 16.7M Colors 170MHz 30kHz to 83kHz Horizontal scan Size(Maximum) 476.06mm Vertical scan range 50Hz to 76Hz Vertical scan Size(Maximum) 267.79mm Optimal preset resolution 1920×1080@60Hz Resolution Plug & Play Input Connector VESA DDC2B/C1 VGA, DVI Input Video Signal Analog: 0.7Vp-p(standard),75 OHM,Positive,DVI Power Source Power...

User's Manual_i2769Vm
Page 57
I2369V Panel Model name Driving system Viewable Image Size Pixel pitch Video Separate Sync. Display Color Dot Clock Horizontal scan range I2369V TFT Color LCD 584.2mm Diagonal 0.0884*RGB(H)mm x 0.2652 (V)mm R, G, B Analog lnterface ,DVI H/V TTL 16.7M Colors 170MHz 30kHz to 83kHz Horizontal scan Size(Maximum) 509.18mm Vertical scan range 50Hz to 76Hz Vertical scan Size(Maximum) 286.42mm Optimal preset resolution 1920×1080@60Hz Resolution Plug & Play Input Connector VESA DDC2B/C1 VGA,DVI Input Video Signal Analog: 0.7Vp-p(standard),75 OHM,Positive,DVI Power Source Power ...
I2369V Panel Model name Driving system Viewable Image Size Pixel pitch Video Separate Sync. Display Color Dot Clock Horizontal scan range I2369V TFT Color LCD 584.2mm Diagonal 0.0884*RGB(H)mm x 0.2652 (V)mm R, G, B Analog lnterface ,DVI H/V TTL 16.7M Colors 170MHz 30kHz to 83kHz Horizontal scan Size(Maximum) 509.18mm Vertical scan range 50Hz to 76Hz Vertical scan Size(Maximum) 286.42mm Optimal preset resolution 1920×1080@60Hz Resolution Plug & Play Input Connector VESA DDC2B/C1 VGA,DVI Input Video Signal Analog: 0.7Vp-p(standard),75 OHM,Positive,DVI Power Source Power ...
User's Manual_i2769Vm
Page 58
... Image Size Pixel pitch Video Separate Sync. Display Color Dot Clock Horizontal scan range I2369VM TFT Color LCD 584.20mm Diagonal 0.0884*RGB(H)mm x 0.2652 (V)mm R, G, B Analog lnterface ,HDMI ,MHL,DP H/V TTL 16.7M Colors 170MHz 30kHz to 83kHz Horizontal scan Size(Maximum) 509.18mm Vertical scan range 50Hz to 76Hz Vertical scan Size(Maximum) 286.42mm Optimal preset resolution 1920×1080@60Hz Resolution Plug & Play Input Connector VESA DDC2B/C1 VGA,HDMI, DP Input Video Signal Analog: 0.7Vp-p(standard),75 OHM,Positive,HDMI,MHL,DP Power Source Power...
... Image Size Pixel pitch Video Separate Sync. Display Color Dot Clock Horizontal scan range I2369VM TFT Color LCD 584.20mm Diagonal 0.0884*RGB(H)mm x 0.2652 (V)mm R, G, B Analog lnterface ,HDMI ,MHL,DP H/V TTL 16.7M Colors 170MHz 30kHz to 83kHz Horizontal scan Size(Maximum) 509.18mm Vertical scan range 50Hz to 76Hz Vertical scan Size(Maximum) 286.42mm Optimal preset resolution 1920×1080@60Hz Resolution Plug & Play Input Connector VESA DDC2B/C1 VGA,HDMI, DP Input Video Signal Analog: 0.7Vp-p(standard),75 OHM,Positive,HDMI,MHL,DP Power Source Power...
User's Manual_i2769Vm
Page 59
... Clock Horizontal scan range I2769V TFT Color LCD 686mm Diagonal 0.1038*RGB(H)mm x 0.3114 (V)mm R, G, B Analog lnterface ,DVI H/V TTL 16.7M Colors 170MHz 30kHz to 83kHz Horizontal scan Size(Maximum) 597.888mm Vertical scan range 50Hz to 76Hz Vertical scan Size(Maximum) 336.312mm Optimal preset resolution 1920×1080@60Hz Resolution Plug & Play Input Connector VESA DDC2B/C1 VGA,DVI Input Video Signal Analog: 0.7Vp-p(standard),75 OHM,Positive,DVI Power Source Power Consumption Off timer 100-240V~, 50/60Hz Active I2769V Panel Model...
... Clock Horizontal scan range I2769V TFT Color LCD 686mm Diagonal 0.1038*RGB(H)mm x 0.3114 (V)mm R, G, B Analog lnterface ,DVI H/V TTL 16.7M Colors 170MHz 30kHz to 83kHz Horizontal scan Size(Maximum) 597.888mm Vertical scan range 50Hz to 76Hz Vertical scan Size(Maximum) 336.312mm Optimal preset resolution 1920×1080@60Hz Resolution Plug & Play Input Connector VESA DDC2B/C1 VGA,DVI Input Video Signal Analog: 0.7Vp-p(standard),75 OHM,Positive,DVI Power Source Power Consumption Off timer 100-240V~, 50/60Hz Active I2769V Panel Model...

User's Manual_i2769Vm
Page 60
Display Color Dot Clock Horizontal scan range I2769VM TFT Color LCD 686mm Diagonal 0.1038*RGB(H)mm x 0.3114 (V)mm R, G, B Analog lnterface ,HDMI,MHL,DP H/V TTL 16.7M Colors 170MHz 30kHz to 83kHz Horizontal scan Size(Maximum) 597.888mm Vertical scan range 50Hz to 76Hz Vertical scan Size(Maximum) 336.312mm Optimal preset resolution 1920×1080@60Hz Resolution Plug & Play Input Connector VESA DDC2B/C1 VGA,HDMI, DP Input Video Signal Analog: 0.7Vp-p(standard),75 OHM,Positive,HDMI,MHL,DP Power Source Power Consumption Off timer 100-240V...
Display Color Dot Clock Horizontal scan range I2769VM TFT Color LCD 686mm Diagonal 0.1038*RGB(H)mm x 0.3114 (V)mm R, G, B Analog lnterface ,HDMI,MHL,DP H/V TTL 16.7M Colors 170MHz 30kHz to 83kHz Horizontal scan Size(Maximum) 597.888mm Vertical scan range 50Hz to 76Hz Vertical scan Size(Maximum) 336.312mm Optimal preset resolution 1920×1080@60Hz Resolution Plug & Play Input Connector VESA DDC2B/C1 VGA,HDMI, DP Input Video Signal Analog: 0.7Vp-p(standard),75 OHM,Positive,HDMI,MHL,DP Power Source Power Consumption Off timer 100-240V...
User's Manual_i2769Vm
Page 68
... application • Adjustment by non-authorized source • Repair, modification, or installation of options or parts by anyone other than an AOC Certified or Authorized Service Center • Improper environments like humidity and dusts • Damaged by violence • Excessive or inadequate heating or air conditioning or electrical powers failures, surges, or other irregularities All AOC LCD Monitors are produced according...
... application • Adjustment by non-authorized source • Repair, modification, or installation of options or parts by anyone other than an AOC Certified or Authorized Service Center • Improper environments like humidity and dusts • Damaged by violence • Excessive or inadequate heating or air conditioning or electrical powers failures, surges, or other irregularities All AOC LCD Monitors are produced according...
User's Manual_i2769Vm
Page 69
... (excluding Brazil) WARRANTY STATEMENT for AOC Color Monitors Including those Sold within North America as a result of: Shipping or improper installation or maintenance Misuse Neglect Any cause other than ordinary commercial or industrial application Adjustment by non-authorized source Repair, modification, or installation of options or parts by anyone other than an EPI Authorized Service Center Improper environment Excessive or...
... (excluding Brazil) WARRANTY STATEMENT for AOC Color Monitors Including those Sold within North America as a result of: Shipping or improper installation or maintenance Misuse Neglect Any cause other than ordinary commercial or industrial application Adjustment by non-authorized source Repair, modification, or installation of options or parts by anyone other than an EPI Authorized Service Center Improper environment Excessive or...


