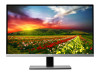
User's Manual_i2267Fw
Page 2
... Setup Stand & Base ...9 Adjusting Viewing Angle...11 Connecting the Monitor...12 Adjusting ...14 Setting Optimal Resolution ...14 Windows Vista ...14 Windows XP ...16 Windows ME/2000...17 Hotkeys ...18 OSD Setting...19 Luminance ...20 Image Setup ...22 Color Setup...24 Picture Boost ...26 OSD Setup ...28 Extra ...30 Exit...32 LED Indicator ...33 Driver ...34 Monitor Driver ...34 Windows 7 ...34 Windows Vista ...37 Windows XP ...39 Windows 2000 ...42 Windows ME...42 i-Menu ...43 e-Saver ...44 Screen+ ...45 Troubleshoot ...46 Specification...47 General Specification...47 Preset Display Modes...
... Setup Stand & Base ...9 Adjusting Viewing Angle...11 Connecting the Monitor...12 Adjusting ...14 Setting Optimal Resolution ...14 Windows Vista ...14 Windows XP ...16 Windows ME/2000...17 Hotkeys ...18 OSD Setting...19 Luminance ...20 Image Setup ...22 Color Setup...24 Picture Boost ...26 OSD Setup ...28 Extra ...30 Exit...32 LED Indicator ...33 Driver ...34 Monitor Driver ...34 Windows 7 ...34 Windows Vista ...37 Windows XP ...39 Windows 2000 ...42 Windows ME...42 i-Menu ...43 e-Saver ...44 Screen+ ...45 Troubleshoot ...46 Specification...47 General Specification...47 Preset Display Modes...
User's Manual_i2267Fw
Page 4
.... The monitor is equipped with a three-pronged grounded plug, a plug with power adapter). Do not overload power strips and extension cords. Manufacturers: I2367FH /I2267FWH 1) TPV ELECTRONICS(FUJIAN) CO., LTD model : ADPC1245 2) HONOR ELECTRONIC CO.,LTD model: ADS-65LSI-12-1 12045G I2367F/I2267FW /I2067F 1) TPV ELECTRONICS(FUJIAN) CO., LTD model : ADPC1236 2) HONOR ELECTRONIC CO., LTD model : ADS-45NP-12-1 12036G 4 For use only with...
.... The monitor is equipped with a three-pronged grounded plug, a plug with power adapter). Do not overload power strips and extension cords. Manufacturers: I2367FH /I2267FWH 1) TPV ELECTRONICS(FUJIAN) CO., LTD model : ADPC1245 2) HONOR ELECTRONIC CO.,LTD model: ADS-65LSI-12-1 12045G I2367F/I2267FW /I2067F 1) TPV ELECTRONICS(FUJIAN) CO., LTD model : ADPC1236 2) HONOR ELECTRONIC CO., LTD model : ADS-45NP-12-1 12036G 4 For use only with...
User's Manual_i2267Fw
Page 12
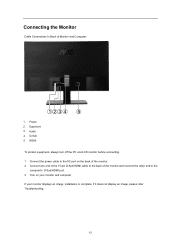
Power 2. Earphone 3. HDMI To protect equipment, always turn off the PC and LCD monitor before connecting. 1 Connect the power cable to the AC port on the back of the monitor. 2 Connect one end of the 15-pin D-Sub/HDMI cable to the back of Monitor and Computer: 1234 5 1. If it does not display an image, please refer Troubleshooting. 12 D-Sub 5. Audio 4. Connecting the Monitor Cable Connections In Back of the monitor and connect the other end to the computer's D-Sub/HDMI port. 3 Turn on your monitor displays an image, installation is complete. If your monitor and computer.
Power 2. Earphone 3. HDMI To protect equipment, always turn off the PC and LCD monitor before connecting. 1 Connect the power cable to the AC port on the back of the monitor. 2 Connect one end of the 15-pin D-Sub/HDMI cable to the back of Monitor and Computer: 1234 5 1. If it does not display an image, please refer Troubleshooting. 12 D-Sub 5. Audio 4. Connecting the Monitor Cable Connections In Back of the monitor and connect the other end to the computer's D-Sub/HDMI port. 3 Turn on your monitor displays an image, installation is complete. If your monitor and computer.
User's Manual_i2267Fw
Page 13
D-Sub 3. If your monitor and computer. Power 2. If it does not display an image, please refer Troubleshooting. 13 Connecting the Monitor Cable Connections In Back of the monitor and connect the other end to the computer's D-Sub/DVI port. 3 Turn on your monitor displays an image, installation is complete. DVI To protect equipment, always turn off the PC and LCD monitor before connecting. 1 Connect the power cable to the AC port on the back of the monitor. 2 Connect one end of the 15-pin D-Sub/DVI cable to the back of Monitor and Computer: 12 3 1.
D-Sub 3. If your monitor and computer. Power 2. If it does not display an image, please refer Troubleshooting. 13 Connecting the Monitor Cable Connections In Back of the monitor and connect the other end to the computer's D-Sub/DVI port. 3 Turn on your monitor displays an image, installation is complete. DVI To protect equipment, always turn off the PC and LCD monitor before connecting. 1 Connect the power cable to the AC port on the back of the monitor. 2 Connect one end of the 15-pin D-Sub/DVI cable to the back of Monitor and Computer: 12 3 1.
User's Manual_i2267Fw
Page 18
... OSD, press Volume adjust volume. 4:3 or wide image ratio / ∧ When there is no OSD, press Auto/Source button continuously about 2 second to do auto configure. When the OSD is no OSD, press ∧ hotkey continuously to change to adjust. ) Auto / Exit / Source hot key When there is closed, press Source button will be available in the message bar, press Menu/Enter button to change 4:3 or wide image ratio. (If the product screen size is 4:3 or input signal resolution...
... OSD, press Volume adjust volume. 4:3 or wide image ratio / ∧ When there is no OSD, press Auto/Source button continuously about 2 second to do auto configure. When the OSD is no OSD, press ∧ hotkey continuously to change to adjust. ) Auto / Exit / Source hot key When there is closed, press Source button will be available in the message bar, press Menu/Enter button to change 4:3 or wide image ratio. (If the product screen size is 4:3 or input signal resolution...
User's Manual_i2267Fw
Page 19
... product screen size is 4:3 or input signal resolution is wide format, the item of "Image Ratio" is disable to adjust. 3) One of non-standard ECO, DCR , DCB, Picture Boost is activated , the other function, repeat steps 2-3. 4) OSD Lock Function: To lock the OSD, press and hold the MENU button while the monitor is highlighted, press MENU-button to turn the monitor on . Once the desired function is off and then press power button...
... product screen size is 4:3 or input signal resolution is wide format, the item of "Image Ratio" is disable to adjust. 3) One of non-standard ECO, DCR , DCB, Picture Boost is activated , the other function, repeat steps 2-3. 4) OSD Lock Function: To lock the OSD, press and hold the MENU button while the monitor is highlighted, press MENU-button to turn the monitor on . Once the desired function is off and then press power button...
User's Manual_i2267Fw
Page 31
... HDMI 2 Source as Input Auto adjust the picture to default Select wide or 4:3 format for display Turn ON/OFF DDC-CI Support Reset the menu to default Select timing to turn off the monitor. Show the information of the main image and sub-image source 31 Press AUTO to adjust. 5. Press ∧or ∨ to exit. Show the information of the main image and sub-image source Select to Auto Detect input signal Select D-SUB Signal Source as Input Select DVI Source...
... HDMI 2 Source as Input Auto adjust the picture to default Select wide or 4:3 format for display Turn ON/OFF DDC-CI Support Reset the menu to default Select timing to turn off the monitor. Show the information of the main image and sub-image source 31 Press AUTO to adjust. 5. Press ∧or ∨ to exit. Show the information of the main image and sub-image source Select to Auto Detect input signal Select D-SUB Signal Source as Input Select DVI Source...

User's Manual_i2267Fw
Page 34
Driver Monitor Driver Windows 7 1.Start Windows® 7 2.Click on the 'Start' button and then click on the 'Display' icon. 34 Click on 'Control Panel'. 3.
Driver Monitor Driver Windows 7 1.Start Windows® 7 2.Click on the 'Start' button and then click on the 'Display' icon. 34 Click on 'Control Panel'. 3.
User's Manual_i2267Fw
Page 39
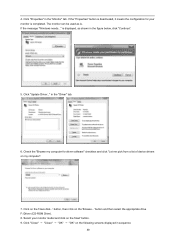
... be used as shown in the "Monitor" tab. Select your monitor is completed. Click "Update Driver..." If the "Properties" button is . in sequence. 39 Click "Properties" in the figure below, click "Continue". 5. is displayed, as is deactivated, it means the configuration for driver software" checkbox and click "Let me pick from a list of device drivers on the following screens displayed in the "Driver...
... be used as shown in the "Monitor" tab. Select your monitor is completed. Click "Update Driver..." If the "Properties" button is . in sequence. 39 Click "Properties" in the figure below, click "Continue". 5. is displayed, as is deactivated, it means the configuration for driver software" checkbox and click "Let me pick from a list of device drivers on the following screens displayed in the "Driver...

User's Manual_i2267Fw
Page 41
If the 'Properties' button is inactive, it means your monitor is active, click on 'Properties' button. Click on the 'Driver' tab and then click on the 'Advanced' button. 6. Select the 'Settings' tab then click on 'Update Driver...' Select 'Monitor' tab - Please follow the steps below. 7. Please stop installation. - button. 4 1 5. If the 'Properties' button is properly configured.
If the 'Properties' button is inactive, it means your monitor is active, click on 'Properties' button. Click on the 'Driver' tab and then click on the 'Advanced' button. 6. Select the 'Settings' tab then click on 'Update Driver...' Select 'Monitor' tab - Please follow the steps below. 7. Please stop installation. - button. 4 1 5. If the 'Properties' button is properly configured.
User's Manual_i2267Fw
Page 43
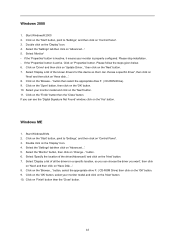
...' button. 10. Select the 'Monitor' button, then click on 'Control Panel'. 3. Click on the 'OK' button, select your monitor is active. Click on the 'Start' button, point to 'Settings', and then click on 'Change...' Start Windows® Me 2. button. 6. If the 'Properties' button is inactive, it means your monitor model and click on 'Control Panel'. 3. If the 'Properties' button is properly configured. Select 'Specify the location of all the drivers in a specific...
...' button. 10. Select the 'Monitor' button, then click on 'Control Panel'. 3. Click on the 'OK' button, select your monitor is active. Click on the 'Start' button, point to 'Settings', and then click on 'Change...' Start Windows® Me 2. button. 6. If the 'Properties' button is inactive, it means your monitor model and click on 'Control Panel'. 3. If the 'Properties' button is properly configured. Select 'Specify the location of all the drivers in a specific...
User's Manual_i2267Fw
Page 45
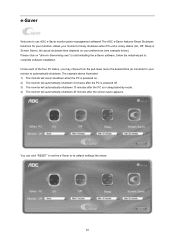
... status (On, Off, Sleep or Screen Saver); the actual shutdown time depends on "driver/e-Saver/setup.exe" to start installing the e-Saver software, follow the install wizard to timely shutdown when PC unit is in minutes) for your monitors, allows your monitor to automatically shutdown. You can click "RESET" to set the e-Saver to use AOC e-Saver monitor power management software! e-Saver Welcome to its default settings like below ).
... status (On, Off, Sleep or Screen Saver); the actual shutdown time depends on "driver/e-Saver/setup.exe" to start installing the e-Saver software, follow the install wizard to timely shutdown when PC unit is in minutes) for your monitors, allows your monitor to automatically shutdown. You can click "RESET" to set the e-Saver to use AOC e-Saver monitor power management software! e-Saver Welcome to its default settings like below ).
User's Manual_i2267Fw
Page 47
... properly connected to a grounded power outlet and to the video card output connector on the screen? Make sure your dealer. Adjust H-Position and V-Position or press hot-key (AUTO). Adjust the maximum resolution and frequency that no pin is on the keyboard while observing the CAPS LOCK LED. Can you are installed. Press to auto-adjust. 47 We recommend plugging the monitor directly to the monitor. Press to auto adjust. Horizontal or vertical disturbances on the screen Use Windows...
... properly connected to a grounded power outlet and to the video card output connector on the screen? Make sure your dealer. Adjust H-Position and V-Position or press hot-key (AUTO). Adjust the maximum resolution and frequency that no pin is on the keyboard while observing the CAPS LOCK LED. Can you are installed. Press to auto-adjust. 47 We recommend plugging the monitor directly to the monitor. Press to auto adjust. Horizontal or vertical disturbances on the screen Use Windows...
User's Manual_i2267Fw
Page 48
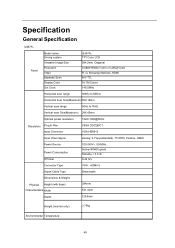
....7M Colors 148.5MHz Horizontal scan range 30kHz to 83kHz Horizontal scan Size(Maximum) 509.18mm Vertical scan range 50Hz to 76Hz Vertical scan Size(Maximum) 286.42mm Optimal preset resolution 1920×1080@60Hz Resolution Plug & Play Input Connector Input Video Signal VESA DDC2B/C1 VGA,HDMI×2 Analog: 0.7Vp-p(standard), 75 OHM, Positive、HDMI Power Source Power Consumption Off timer Connector Type 100-240V~, 50/60Hz Active Specification General Specification I2367FH Panel Model name Driving system Viewable Image Size Pixel pitch Video Separate Sync.
....7M Colors 148.5MHz Horizontal scan range 30kHz to 83kHz Horizontal scan Size(Maximum) 509.18mm Vertical scan range 50Hz to 76Hz Vertical scan Size(Maximum) 286.42mm Optimal preset resolution 1920×1080@60Hz Resolution Plug & Play Input Connector Input Video Signal VESA DDC2B/C1 VGA,HDMI×2 Analog: 0.7Vp-p(standard), 75 OHM, Positive、HDMI Power Source Power Consumption Off timer Connector Type 100-240V~, 50/60Hz Active Specification General Specification I2367FH Panel Model name Driving system Viewable Image Size Pixel pitch Video Separate Sync.
User's Manual_i2267Fw
Page 50
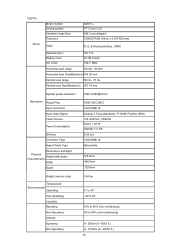
... 16.7M Colors 148.5 MHz Horizontal scan range 30 kHz - 83 kHz Horizontal scan Size(Maximum) 476.06 mm Vertical scan range 55 Hz - 75 Hz Vertical scan Size(Maximum) 267.79 mm Optimal preset resolution Resolution Plug & Play Input Connector Input Video Signal Power Source Power Consumption Off timer Connector Type Signal Cable Type Dimensions & Weight: Physical Height (with base) Characteristics Width Depth 1920 x1080@60 Hz VESA DDC2B/CI VGA,HDMI x2 Analog: 0.7Vp-p(standard), 75 OHM, Positive,HDMI 100...
... 16.7M Colors 148.5 MHz Horizontal scan range 30 kHz - 83 kHz Horizontal scan Size(Maximum) 476.06 mm Vertical scan range 55 Hz - 75 Hz Vertical scan Size(Maximum) 267.79 mm Optimal preset resolution Resolution Plug & Play Input Connector Input Video Signal Power Source Power Consumption Off timer Connector Type Signal Cable Type Dimensions & Weight: Physical Height (with base) Characteristics Width Depth 1920 x1080@60 Hz VESA DDC2B/CI VGA,HDMI x2 Analog: 0.7Vp-p(standard), 75 OHM, Positive,HDMI 100...

User's Manual_i2267Fw
Page 51
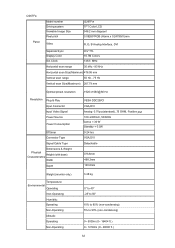
... 16.7M Colors 148.5 MHz Horizontal scan range 30 kHz - 83 kHz Horizontal scan Size(Maximum) 509.18 mm Vertical scan range 55 Hz - 75 Hz Vertical scan Size(Maximum) 286.42 mm Optimal preset resolution Resolution Plug & Play Input Connector Input Video Signal Power Source Power Consumption Off timer Connector Type Signal Cable Type Dimensions & Weight: Physical Height (with base) Characteristics Width Depth 1920 x1080@60 Hz VESA DDC2B/CI VGA,DVI Analog: 0.7Vp-p(standard), 75 OHM, Positive,DVI 100~240VAC...
... 16.7M Colors 148.5 MHz Horizontal scan range 30 kHz - 83 kHz Horizontal scan Size(Maximum) 509.18 mm Vertical scan range 55 Hz - 75 Hz Vertical scan Size(Maximum) 286.42 mm Optimal preset resolution Resolution Plug & Play Input Connector Input Video Signal Power Source Power Consumption Off timer Connector Type Signal Cable Type Dimensions & Weight: Physical Height (with base) Characteristics Width Depth 1920 x1080@60 Hz VESA DDC2B/CI VGA,DVI Analog: 0.7Vp-p(standard), 75 OHM, Positive,DVI 100~240VAC...
User's Manual_i2267Fw
Page 52
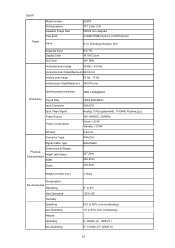
... 16.7M Colors 148.5 MHz Horizontal scan range 30 kHz - 83 kHz Horizontal scan Size(Maximum) 476.06 mm Vertical scan range 55 Hz - 75 Hz Vertical scan Size(Maximum) 267.79 mm Optimal preset resolution Resolution Plug & Play Input Connector Input Video Signal Power Source Power Consumption Off timer Connector Type Signal Cable Type Dimensions & Weight: Physical Height (with base) Characteristics Width Depth 1920 x1080@ 60 Hz VESA DDC2B/CI VGA,DVI Analog: 0.7Vp-p(standard), 75 OHM, Positive,DVI 100~240VAC...
... 16.7M Colors 148.5 MHz Horizontal scan range 30 kHz - 83 kHz Horizontal scan Size(Maximum) 476.06 mm Vertical scan range 55 Hz - 75 Hz Vertical scan Size(Maximum) 267.79 mm Optimal preset resolution Resolution Plug & Play Input Connector Input Video Signal Power Source Power Consumption Off timer Connector Type Signal Cable Type Dimensions & Weight: Physical Height (with base) Characteristics Width Depth 1920 x1080@ 60 Hz VESA DDC2B/CI VGA,DVI Analog: 0.7Vp-p(standard), 75 OHM, Positive,DVI 100~240VAC...
User's Manual_i2267Fw
Page 53
..., DVI Separate Sync. Display Color Dot Clock H/V TTL 16.7M Colors 140 MHz Horizontal scan range 30 kHz - 83 kHz Horizontal scan Size(Maximum) 442.8 mm Vertical scan range 55 Hz - 75 Hz Vertical scan Size(Maximum) 249.075 mm Optimal preset resolution Resolution Plug & Play Input Connector Input Video Signal Power Source Power Consumption Off timer Connector Type Signal Cable Type Dimensions & Weight: Physical Height (with base) Characteristics Width Depth 1600 x 900@60Hz VESA DDC2B/CI VGA,DVI Analog: 0.7Vp-p(standard), 75 OHM, Positive,DVI...
..., DVI Separate Sync. Display Color Dot Clock H/V TTL 16.7M Colors 140 MHz Horizontal scan range 30 kHz - 83 kHz Horizontal scan Size(Maximum) 442.8 mm Vertical scan range 55 Hz - 75 Hz Vertical scan Size(Maximum) 249.075 mm Optimal preset resolution Resolution Plug & Play Input Connector Input Video Signal Power Source Power Consumption Off timer Connector Type Signal Cable Type Dimensions & Weight: Physical Height (with base) Characteristics Width Depth 1600 x 900@60Hz VESA DDC2B/CI VGA,DVI Analog: 0.7Vp-p(standard), 75 OHM, Positive,DVI...
User's Manual_i2267Fw
Page 63
... purchase to be free from defects in its option, either repair the defective product with new or rebuilt parts, or replace it (or assume the risk of the countries within this product to the EPI Authorized Service Center. warrants this warranty statements. During this period, EPI ( EPI is not responsible for CRT Tube or LCD Panel after the...
... purchase to be free from defects in its option, either repair the defective product with new or rebuilt parts, or replace it (or assume the risk of the countries within this product to the EPI Authorized Service Center. warrants this warranty statements. During this period, EPI ( EPI is not responsible for CRT Tube or LCD Panel after the...
Spec Sheet_i2367F
Page 1
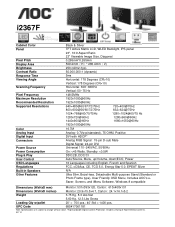
...Cabinet Color Panel Pixel Pitch Display Area Brightness Contrast Ratio Response Time Viewing Angle Scanning Frequency Pixel Frequency Maximum Resolution Recommended Resolution Supported Resolutions Color Analog Input Digital Input Connectors Power Source Power Consumption Plug & Play User Control OSD Languages Regulations Built-in Speakers Other Features Black & Silver TFT Active Matrix LCD, WLED Backlight, IPS panel 23", 16:9 Aspect Ratio 23" Viewable Image Size, Diagonal 0.265mm*0.265mm 509.2mm(H)* 286.4mm(V) 250 cd/m2 (typ) 50,000,000:1 (dynamic) 5ms Horizontal...
...Cabinet Color Panel Pixel Pitch Display Area Brightness Contrast Ratio Response Time Viewing Angle Scanning Frequency Pixel Frequency Maximum Resolution Recommended Resolution Supported Resolutions Color Analog Input Digital Input Connectors Power Source Power Consumption Plug & Play User Control OSD Languages Regulations Built-in Speakers Other Features Black & Silver TFT Active Matrix LCD, WLED Backlight, IPS panel 23", 16:9 Aspect Ratio 23" Viewable Image Size, Diagonal 0.265mm*0.265mm 509.2mm(H)* 286.4mm(V) 250 cd/m2 (typ) 50,000,000:1 (dynamic) 5ms Horizontal...


