Spec Sheet_i2353Ph
Page 1
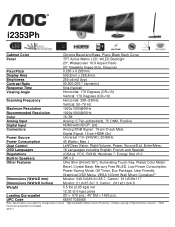
..., Positive Digital Input HDMI with HDCP* (2x) Connectors Analog RGB Signal: 15-pin D-sub Male Digital Signal: 18-pin HDMI (2x) Power Source Universal 110~240VAC, 50/60Hz Power Consumption 45 Watts ( Max. ) User Control Left/Clear Vision, Right/Volume, Power, Source/Exit, Enter/Menu OSD Languages 16 Languages including English, French and Spanish Regulations cCSAus, FCC, ROHS, Windows 7, Energy Star v5.0 Built-in Speakers 2W x 2 Other Features Ultra Slim (9mm/0.35"), Illuminating Touch Key, Plated Color Metal...
..., Positive Digital Input HDMI with HDCP* (2x) Connectors Analog RGB Signal: 15-pin D-sub Male Digital Signal: 18-pin HDMI (2x) Power Source Universal 110~240VAC, 50/60Hz Power Consumption 45 Watts ( Max. ) User Control Left/Clear Vision, Right/Volume, Power, Source/Exit, Enter/Menu OSD Languages 16 Languages including English, French and Spanish Regulations cCSAus, FCC, ROHS, Windows 7, Energy Star v5.0 Built-in Speakers 2W x 2 Other Features Ultra Slim (9mm/0.35"), Illuminating Touch Key, Plated Color Metal...

User's Manual_i2353Ph
Page 2
... Setup ...9 Contents in Box ...9 Setup Stand & Base...10 Adjusting Viewing Angle...11 Connecting the Monitor...12 Wall Mounting ...13 Adjusting ...14 Setting Optimal Resolution ...14 Windows Vista ...14 Windows XP ...16 Windows ME/2000...17 Hotkeys ...18 OSD Setting...20 Luminance ...21 Image Setup ...23 Color Setup...25 Picture Boost ...27 OSD Setup ...29 Extra ...31 Exit ...33 LED Indicator ...33 Driver ...34 Monitor Driver ...34 Windows 7 ...34 Windows Vista ...38 Windows XP ...40 Windows 2000 ...43 Windows ME...43 i-Menu ...44 e-saver ...45 Screen+ ...46 Troubleshoot ...47 Specification...
... Setup ...9 Contents in Box ...9 Setup Stand & Base...10 Adjusting Viewing Angle...11 Connecting the Monitor...12 Wall Mounting ...13 Adjusting ...14 Setting Optimal Resolution ...14 Windows Vista ...14 Windows XP ...16 Windows ME/2000...17 Hotkeys ...18 OSD Setting...20 Luminance ...21 Image Setup ...23 Color Setup...25 Picture Boost ...27 OSD Setup ...29 Extra ...31 Exit ...33 LED Indicator ...33 Driver ...34 Monitor Driver ...34 Windows 7 ...34 Windows Vista ...38 Windows XP ...40 Windows 2000 ...43 Windows ME...43 i-Menu ...44 e-saver ...45 Screen+ ...46 Troubleshoot ...47 Specification...
User's Manual_i2353Ph
Page 5
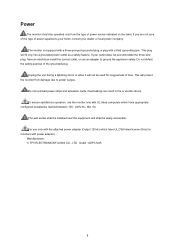
... purpose of power source indicated on the label. The monitor is equipped with a three-pronged grounded plug, a plug with UL listed computers which have UL,CSA listed license (Only for long periods of power supplied to your home, consult your outlet does not accommodate the three-wire plug, have an electrician install the correct outlet, or use an adapter to power surges...
... purpose of power source indicated on the label. The monitor is equipped with a three-pronged grounded plug, a plug with UL listed computers which have UL,CSA listed license (Only for long periods of power supplied to your home, consult your outlet does not accommodate the three-wire plug, have an electrician install the correct outlet, or use an adapter to power surges...
User's Manual_i2353Ph
Page 10
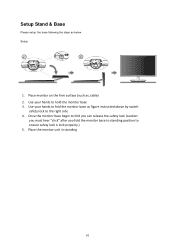
Use your hands to hold the monitor base 3. Place monitor on the firm surface (such as below. Place the monitor unit in standing 10 Setup: 1. Once the monitor base begin to fold you can release the safety lock (caution: you must hear "click" after you fold the monitor base to standing position to the right side 4. Use your hands to fold the monitor base as figure instructed above by switch safety lock to ensure safety lock is lock properly.) 5. Setup Stand & Base Please setup the base following the steps as , table) 2.
Use your hands to hold the monitor base 3. Place monitor on the firm surface (such as below. Place the monitor unit in standing 10 Setup: 1. Once the monitor base begin to fold you can release the safety lock (caution: you must hear "click" after you fold the monitor base to standing position to the right side 4. Use your hands to fold the monitor base as figure instructed above by switch safety lock to ensure safety lock is lock properly.) 5. Setup Stand & Base Please setup the base following the steps as , table) 2.
User's Manual_i2353Ph
Page 12
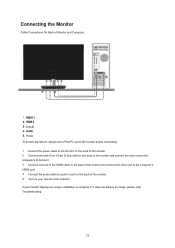
... not display an image, please refer Troubleshooting. 12 Connecting the Monitor Cable Connections On Back of the monitor. 5 Turn on your monitor displays an image, installation is complete. If your monitor and computer. Audio 5. HDMI 1 2. Power To protect equipment, always turn off the PC and LCD monitor before connecting. 1 Connect the power cable to the AC port on the back of the monitor. 2 Connect one end of the 15-pin D-Sub cable to the back of the monitor and connect...
... not display an image, please refer Troubleshooting. 12 Connecting the Monitor Cable Connections On Back of the monitor. 5 Turn on your monitor displays an image, installation is complete. If your monitor and computer. Audio 5. HDMI 1 2. Power To protect equipment, always turn off the PC and LCD monitor before connecting. 1 Connect the power cable to the AC port on the back of the monitor. 2 Connect one end of the 15-pin D-Sub cable to the back of the monitor and connect...
User's Manual_i2353Ph
Page 13
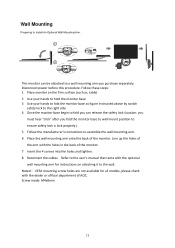
... the cables. Screw mode: M4x8mm 13 Refer to the user's manual that came with the optional wall mounting arm for all models, please check with the holes in the back of AOC. Disconnect power before this procedure. Follow these steps: 1 Place monitor on attaching it to a wall mounting arm you fold the monitor base to wall mount position to ensure safety lock is lock properly.) 5 Follow the manufacturer's instructions to assemble the wall mounting arm...
... the cables. Screw mode: M4x8mm 13 Refer to the user's manual that came with the optional wall mounting arm for all models, please check with the holes in the back of AOC. Disconnect power before this procedure. Follow these steps: 1 Place monitor on attaching it to a wall mounting arm you fold the monitor base to wall mount position to ensure safety lock is lock properly.) 5 Follow the manufacturer's instructions to assemble the wall mounting arm...
User's Manual_i2353Ph
Page 18
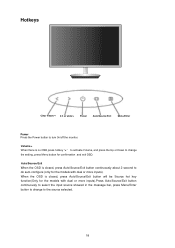
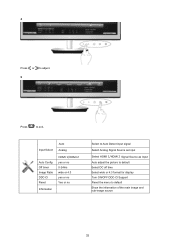
... change to turn 0n/off the monitor. Hotkeys > Clear Vision/ 4:3 or wide /> Power Auto/Source/Exit Menu/Enter Power Press the Power button to the source selected. 18 Volume > When there is closed , press Auto/Source/Exit button will be Source hot key function(Only for the models with dual or more inputs).Press Auto/Source/Exit button continuously to select the input source showed in the message bar, press Menu/Enter button to change the setting, press Menu button...
... change to turn 0n/off the monitor. Hotkeys > Clear Vision/ 4:3 or wide /> Power Auto/Source/Exit Menu/Enter Power Press the Power button to the source selected. 18 Volume > When there is closed , press Auto/Source/Exit button will be Source hot key function(Only for the models with dual or more inputs).Press Auto/Source/Exit button continuously to select the input source showed in the message bar, press Menu/Enter button to change the setting, press Menu button...
User's Manual_i2353Ph
Page 20
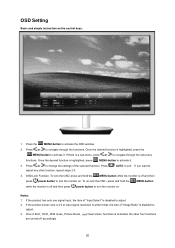
... product has only one signal input, the item of ECO, DCR, DCB mode , Picture Boost , and Clear Vision functions is disabled to turn the monitor on. One of "Input Select" is off and then press power button to adjust. 3. AUTO to turn the monitor on the control keys. 1. press and hold the MENU-button while the monitor is disabled to navigate through the sub-menu functions. OSD Setting Basic and simple instruction on .
... product has only one signal input, the item of ECO, DCR, DCB mode , Picture Boost , and Clear Vision functions is disabled to turn the monitor on. One of "Input Select" is off and then press power button to adjust. 3. AUTO to turn the monitor on the control keys. 1. press and hold the MENU-button while the monitor is disabled to navigate through the sub-menu functions. OSD Setting Basic and simple instruction on .
User's Manual_i2353Ph
Page 32
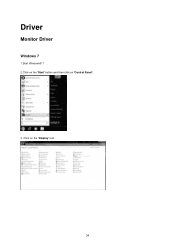
4 Press or to adjust. 5 Press to default Show the information of the main image and sub-image source 32 Input Select Auto Analog Auto Config Off timer Image Ratio DDC-CI Reset Information HDMI 1/HDMI 2 yes or no 0-24hrs wide or 4:3 yes or no Yes or no Select to Auto Detect input signal Select Analog Signal Source as Input Select HDMI 1/HDMI 2 Signal Source as Input Auto adjust the picture to default Select DC off time Select wide or 4:3 format for display Turn ON/OFF DDC-CI Support Reset the menu to exit.
4 Press or to adjust. 5 Press to default Show the information of the main image and sub-image source 32 Input Select Auto Analog Auto Config Off timer Image Ratio DDC-CI Reset Information HDMI 1/HDMI 2 yes or no 0-24hrs wide or 4:3 yes or no Yes or no Select to Auto Detect input signal Select Analog Signal Source as Input Select HDMI 1/HDMI 2 Signal Source as Input Auto adjust the picture to default Select DC off time Select wide or 4:3 format for display Turn ON/OFF DDC-CI Support Reset the menu to exit.
User's Manual_i2353Ph
Page 34
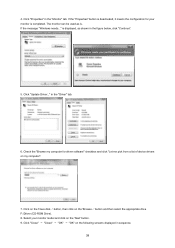
Click on 'Control Panel'. 3. Driver Monitor Driver Windows 7 1.Start Windows® 7 2.Click on the 'Start' button and then click on the 'Display' icon. 34
Click on 'Control Panel'. 3. Driver Monitor Driver Windows 7 1.Start Windows® 7 2.Click on the 'Start' button and then click on the 'Display' icon. 34
User's Manual_i2353Ph
Page 39
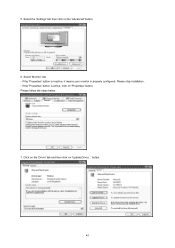
... used as shown in sequence. 39 Click "Update Driver..." Click "Close" → "Close" → "OK" → "OK" on my computer". 7. If the message "Windows needs..." in the "Monitor" tab. button and then select the appropriate drive F:\Driver (CD-ROM Drive). 8. Check the "Browse my computer for your monitor model and click on the 'Have disk...' button, then click on the 'Browse...' is displayed...
... used as shown in sequence. 39 Click "Update Driver..." Click "Close" → "Close" → "OK" → "OK" on my computer". 7. If the message "Windows needs..." in the "Monitor" tab. button and then select the appropriate drive F:\Driver (CD-ROM Drive). 8. Check the "Browse my computer for your monitor model and click on the 'Have disk...' button, then click on the 'Browse...' is displayed...
User's Manual_i2353Ph
Page 41
Select 'Monitor' tab - If the 'Properties' button is properly configured. Click on the 'Driver' tab and then click on 'Properties' button. Select the 'Settings' tab then click on the 'Advanced' button. 6. If the 'Properties' button is inactive, it means your monitor is active, click on 'Update Driver...' Please follow the steps below. 7. Please stop installation. - button. 41 5.
Select 'Monitor' tab - If the 'Properties' button is properly configured. Click on the 'Driver' tab and then click on 'Properties' button. Select the 'Settings' tab then click on the 'Advanced' button. 6. If the 'Properties' button is inactive, it means your monitor is active, click on 'Update Driver...' Please follow the steps below. 7. Please stop installation. - button. 41 5.

User's Manual_i2353Ph
Page 43
... a specific driver', then click on 'Next' and then click on the 'Browse...' Click on the 'Next' button. 7. Click on the 'Start' button, point to 'Settings', and then click on 'Update Driver...' Select the 'Settings' tab then click on 'Control Panel'. 3. If the 'Properties' button is inactive, it means your monitor model and click on the 'Next' button. 7. Please follow the steps given below. 6. Click on 'Change...
... a specific driver', then click on 'Next' and then click on the 'Browse...' Click on the 'Next' button. 7. Click on the 'Start' button, point to 'Settings', and then click on 'Update Driver...' Select the 'Settings' tab then click on 'Control Panel'. 3. If the 'Properties' button is inactive, it means your monitor model and click on the 'Next' button. 7. Please follow the steps given below. 6. Click on 'Change...
User's Manual_i2353Ph
Page 45
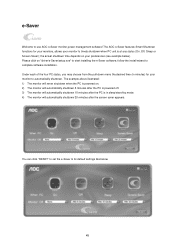
... time (in sleep/stand-by mode. 4) The monitor will never shutdown when the PC is powered on your monitor to its default settings like below ). You can click "RESET" to set the e-Saver to automatically shutdown. The example above illustrated: 1) The monitor will automatically shutdown 20 minutes after the PC is in minutes) for your monitors, allows your monitor to use AOC e-Saver monitor power management software! e-Saver...
... time (in sleep/stand-by mode. 4) The monitor will never shutdown when the PC is powered on your monitor to its default settings like below ). You can click "RESET" to set the e-Saver to automatically shutdown. The example above illustrated: 1) The monitor will automatically shutdown 20 minutes after the PC is in minutes) for your monitors, allows your monitor to use AOC e-Saver monitor power management software! e-Saver...
User's Manual_i2353Ph
Page 47
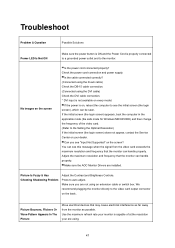
... Contrast and Brightness Controls. Press to the video card output connector on the screen Is the power cord connected properly? You can see "Input Not Supported" on the screen? Is the cable connected correctly? (Connected using the D-sub cable) Check the DB-15 cable connection. (Connected using . 47 We recommend plugging the monitor directly to auto adjust. Troubleshoot Problem & Question Possible Solutions Power LED Is Not ON Make sure the power button is ON and the Power Cord is not available on every model. Can you are installed. Picture...
... Contrast and Brightness Controls. Press to the video card output connector on the screen Is the power cord connected properly? You can see "Input Not Supported" on the screen? Is the cable connected correctly? (Connected using the D-sub cable) Check the DB-15 cable connection. (Connected using . 47 We recommend plugging the monitor directly to auto adjust. Troubleshoot Problem & Question Possible Solutions Power LED Is Not ON Make sure the power button is ON and the Power Cord is not available on every model. Can you are installed. Picture...
User's Manual_i2353Ph
Page 48
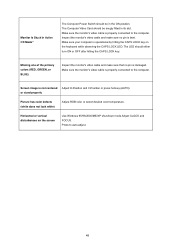
... properly connected to auto-adjust. 48 or sized properly Picture has color defects (white does not look white) Adjust RGB color or select desired color temperature. Make sure the monitor's video cable is operational by hitting the CAPS LOCK key on the screen Use Windows 95/98/2000/ME/XP shut-down mode Adjust CLOCK and FOCUS. Monitor Is Stuck In Active Off-Mode" The Computer Power Switch should be snugly fitted in the ON position. Horizontal or vertical...
... properly connected to auto-adjust. 48 or sized properly Picture has color defects (white does not look white) Adjust RGB color or select desired color temperature. Make sure the monitor's video cable is operational by hitting the CAPS LOCK key on the screen Use Windows 95/98/2000/ME/XP shut-down mode Adjust CLOCK and FOCUS. Monitor Is Stuck In Active Off-Mode" The Computer Power Switch should be snugly fitted in the ON position. Horizontal or vertical...
User's Manual_i2353Ph
Page 49
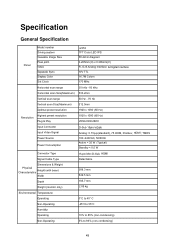
Specification General Specification Panel Model number Driving system Viewable Image Size Pixel pitch Video Separate Sync. HDMI ; Display Color Dot Clock i2353 TFT Color LED IPS 58.42cm diagoanl 0.265mm(H) x 0.265mm(V) R, G, B Analog lnterface & Digital Interface H/V TTL 16.7M Colors 170 MHz Horizontal scan range 30 kHz - 83 kHz Horizontal scan Size(Maximum) 533.2mm Vertical scan range 50 Hz - 76 Hz Vertical scan Size(Maximum) 312.0mm Optimal preset resolution 1920 x 1080 (60 Hz) Highest preset resolution Resolution Plug & Play 1920 x 1080 (60...
Specification General Specification Panel Model number Driving system Viewable Image Size Pixel pitch Video Separate Sync. HDMI ; Display Color Dot Clock i2353 TFT Color LED IPS 58.42cm diagoanl 0.265mm(H) x 0.265mm(V) R, G, B Analog lnterface & Digital Interface H/V TTL 16.7M Colors 170 MHz Horizontal scan range 30 kHz - 83 kHz Horizontal scan Size(Maximum) 533.2mm Vertical scan range 50 Hz - 76 Hz Vertical scan Size(Maximum) 312.0mm Optimal preset resolution 1920 x 1080 (60 Hz) Highest preset resolution Resolution Plug & Play 1920 x 1080 (60...
User's Manual_i2353Ph
Page 53
... comply with the limits for a Class B digital device, pursuant to radio communications. Connect the equipment into an outlet on , the user is connected. The manufacturer is no guarantee that to which can radiate radio frequency energy, and if not installed and used in accordance with the instructions, may cause harmful interference to Part 15 of the following measures: Reorient...
... comply with the limits for a Class B digital device, pursuant to radio communications. Connect the equipment into an outlet on , the user is connected. The manufacturer is no guarantee that to which can radiate radio frequency energy, and if not installed and used in accordance with the instructions, may cause harmful interference to Part 15 of the following measures: Reorient...
User's Manual_i2353Ph
Page 55
... or industrial application Adjustment by non-authorized source Repair, modification, or installation of options or parts by anyone other than an AOC Authorized Service Center Improper environment Excessive or inadequate heating or air conditioning or electrical powers failures, surges, or other irregularities This limited warranty does not cover any of the product firmware or hardware that are replaced become the property...
... or industrial application Adjustment by non-authorized source Repair, modification, or installation of options or parts by anyone other than an AOC Authorized Service Center Improper environment Excessive or inadequate heating or air conditioning or electrical powers failures, surges, or other irregularities This limited warranty does not cover any of the product firmware or hardware that are replaced become the property...

User's Manual_i2353Ph
Page 57
... industrial application Adjustment by non-authorized source Repair, modification, or installation of options or parts by anyone other than an EPI Authorized Service Center Improper environment Excessive or inadequate heating or air conditioning or electrical power failures, surges, or other irregularities This three-year limited warranty does not cover any of the product's firmware or hardware that are replaced become...
... industrial application Adjustment by non-authorized source Repair, modification, or installation of options or parts by anyone other than an EPI Authorized Service Center Improper environment Excessive or inadequate heating or air conditioning or electrical power failures, surges, or other irregularities This three-year limited warranty does not cover any of the product's firmware or hardware that are replaced become...


