

Data Sheet_e2752She
Page 1
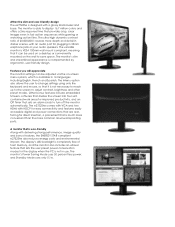
AOC Monitors LCD monitor with ultraslim design and HDMI ports 52 Series 27", 1920 x 1080 E2752She 27-inch class slim 2ms LED monitor with two HDMI ports The e2752She is a 27" widescreen LED-backlit monitor that delivers stunningly crisp and impressive image quality, as well as solid performance with VGA and 2 HDMI ports • VESA 100mm Wall Mount compliant feature Key Features • 27" viewable image and 16:9 aspect ratio • Screen+ software to split display into four...
AOC Monitors LCD monitor with ultraslim design and HDMI ports 52 Series 27", 1920 x 1080 E2752She 27-inch class slim 2ms LED monitor with two HDMI ports The e2752She is a 27" widescreen LED-backlit monitor that delivers stunningly crisp and impressive image quality, as well as solid performance with VGA and 2 HDMI ports • VESA 100mm Wall Mount compliant feature Key Features • 27" viewable image and 16:9 aspect ratio • Screen+ software to split display into four...
Data Sheet_e2752She
Page 2
... to adjust contrast, brightness and other preset modes. A monitor that sets an alarm clock to save space. Attractive slim and user-friendly design The e2752She is available in 14 languages including English, French and Spanish. The versatile monitor is VESA 100mm wall mount compliant, meaning that divides the screen into four selfcontained work areas for plugging in 35mm earphone jack or your audio speakers. Other bonus features include embedded Screen+ software that...
... to adjust contrast, brightness and other preset modes. A monitor that sets an alarm clock to save space. Attractive slim and user-friendly design The e2752She is available in 14 languages including English, French and Spanish. The versatile monitor is VESA 100mm wall mount compliant, meaning that divides the screen into four selfcontained work areas for plugging in 35mm earphone jack or your audio speakers. Other bonus features include embedded Screen+ software that...
Data Sheet_e2752She
Page 3
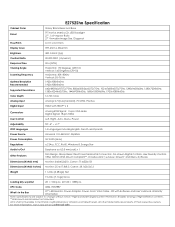
... subject to change without notice. *High-bandwidth Digital Content Protection: Enables viewing of their respective owners. AOC shall not be liable for technical or editorial errors or omissions contained herein. UPC Code 685417057887 What's in the Box 27" LED Monitor, Power Adapter, Power Cord, VGA Cable, CD with HDCP* x 2 Connectors Analog RGB Signal: 15-pin VGA Male Digital Signal: 18-pin HDMI User Control Left, Right, Auto, Menu, Power Adjustability Tilt: -4° ~ +17° OSD Languages 14 Languages including English, French and Spanish Power Source Universal 110...
... subject to change without notice. *High-bandwidth Digital Content Protection: Enables viewing of their respective owners. AOC shall not be liable for technical or editorial errors or omissions contained herein. UPC Code 685417057887 What's in the Box 27" LED Monitor, Power Adapter, Power Cord, VGA Cable, CD with HDCP* x 2 Connectors Analog RGB Signal: 15-pin VGA Male Digital Signal: 18-pin HDMI User Control Left, Right, Auto, Menu, Power Adjustability Tilt: -4° ~ +17° OSD Languages 14 Languages including English, French and Spanish Power Source Universal 110...
User's Manual_e2752She
Page 2
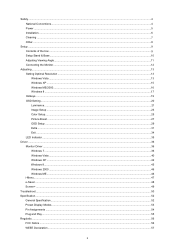
...Setup Stand & Base...10 Adjusting Viewing Angle...11 Connecting the Monitor...12 Adjusting ...13 Setting Optimal Resolution ...13 Windows Vista ...13 Windows XP ...15 Windows ME/2000...16 Windows 8 ...17 Hotkeys...19 OSD Setting...20 Luminance ...21 Image Setup ...23 Color Setup...25 Picture Boost ...27 OSD Setup ...29 Extra ...31 Exit ...34 LED Indicator ...35 Driver ...36 Monitor Driver ...36 Windows 7 ...36 Windows Vista ...40 Windows XP ...42 Windows 8...45 Windows 2000 ...46 Windows ME...46 i-Menu...47 e-Saver ...48 Screen+ ...49 Troubleshoot ...50 Specification...52 General Specification...
...Setup Stand & Base...10 Adjusting Viewing Angle...11 Connecting the Monitor...12 Adjusting ...13 Setting Optimal Resolution ...13 Windows Vista ...13 Windows XP ...15 Windows ME/2000...16 Windows 8 ...17 Hotkeys...19 OSD Setting...20 Luminance ...21 Image Setup ...23 Color Setup...25 Picture Boost ...27 OSD Setup ...29 Extra ...31 Exit ...34 LED Indicator ...35 Driver ...36 Monitor Driver ...36 Windows 7 ...36 Windows Vista ...40 Windows XP ...42 Windows 8...45 Windows 2000 ...46 Windows ME...46 i-Menu...47 e-Saver ...48 Screen+ ...49 Troubleshoot ...50 Specification...52 General Specification...
User's Manual_e2752She
Page 5
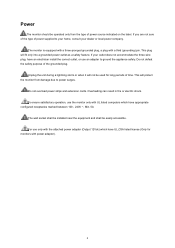
... - 240V ~, Min. 5A The wall socket shall be installed near the equipment and shall be operated only from damage due to your home, consult your outlet does not accommodate the three-wire plug, have an electrician install the correct outlet, or use only with power adapter). 5 Do not overload power strips and extension cords. If you are not sure...
... - 240V ~, Min. 5A The wall socket shall be installed near the equipment and shall be operated only from damage due to your home, consult your outlet does not accommodate the three-wire plug, have an electrician install the correct outlet, or use only with power adapter). 5 Do not overload power strips and extension cords. If you are not sure...
User's Manual_e2752She
Page 12
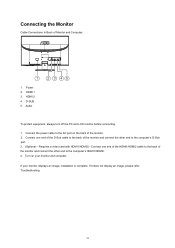
... turn off the PC and LCD monitor before connecting. 1. Turn on the back of the monitor and connect the other end to the computer's HDMI1/HDMI2. 4. HDMI 2 4. HDMI 1 3. Connect the power cable to the AC port on your monitor displays an image, installation is complete. Connect one end of the D-Sub cable to the back of the monitor. 2. Requires a video card with HDMI1/HDMI2) - If it does not display an image, please refer Troubleshooting. 12 Connect...
... turn off the PC and LCD monitor before connecting. 1. Turn on the back of the monitor and connect the other end to the computer's HDMI1/HDMI2. 4. HDMI 2 4. HDMI 1 3. Connect the power cable to the AC port on your monitor displays an image, installation is complete. Connect one end of the D-Sub cable to the back of the monitor. 2. Requires a video card with HDMI1/HDMI2) - If it does not display an image, please refer Troubleshooting. 12 Connect...
User's Manual_e2752She
Page 19
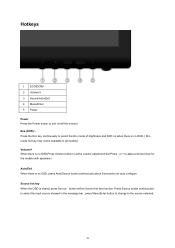
... monitor. Volume/+ When there is no OSD. ( Eco mode hot key may not be available in the message bar , press Menu/Enter button to change to turn on when there is no OSD, press Auto/Source button continuously about 3 second to do auto configure. Hotkeys 1 ECO(DCR)/2 Volume/+ 3 Source/Auto/Exit 4 Menu/Enter 5 Power Power Press the Power button to the source selected. 19 Press Source button continuously to select the input source showed in all models...
... monitor. Volume/+ When there is no OSD. ( Eco mode hot key may not be available in the message bar , press Menu/Enter button to change to turn on when there is no OSD, press Auto/Source button continuously about 3 second to do auto configure. Hotkeys 1 ECO(DCR)/2 Volume/+ 3 Source/Auto/Exit 4 Menu/Enter 5 Power Power Press the Power button to the source selected. 19 Press Source button continuously to select the input source showed in all models...

User's Manual_e2752She
Page 20
... + to turn the monitor on . Notes: 1) If the product has only one signal input, the item of "Input Select" is disable to adjust. 2) If the product screen size is 4:3 or input signal resolution is wide format, the item of "Image Ratio" is highlighted, press the MENU-button to adjust. 3) One of the selected function. Once the desired function is disable to activate it . 3) Press - Press AUTO to activate the OSD window...
... + to turn the monitor on . Notes: 1) If the product has only one signal input, the item of "Input Select" is disable to adjust. 2) If the product screen size is 4:3 or input signal resolution is wide format, the item of "Image Ratio" is highlighted, press the MENU-button to adjust. 3) One of the selected function. Once the desired function is disable to activate it . 3) Press - Press AUTO to activate the OSD window...

User's Manual_e2752She
Page 33
Input Select Auto Config Off timer Image Ratio DDC-CI Reset Information Auto /Analog/HDMI1/HDMI2 yes or no 0-24hrs wide or 4:3 yes or no Yes or no Select Input Signal Source Auto adjust the picture to default Select DC off time Select wide or 4:3 format for display Turn ON/OFF DDC-CI Support Reset the menu to default Show the information of the main image and sub-image source 33
Input Select Auto Config Off timer Image Ratio DDC-CI Reset Information Auto /Analog/HDMI1/HDMI2 yes or no 0-24hrs wide or 4:3 yes or no Yes or no Select Input Signal Source Auto adjust the picture to default Select DC off time Select wide or 4:3 format for display Turn ON/OFF DDC-CI Support Reset the menu to default Show the information of the main image and sub-image source 33

User's Manual_e2752She
Page 36
Click on 'Control Panel'. 3. Driver Monitor Driver Windows 7 1.Start Windows® 7 2.Click on the 'Start' button and then click on the 'Display' icon. 36
Click on 'Control Panel'. 3. Driver Monitor Driver Windows 7 1.Start Windows® 7 2.Click on the 'Start' button and then click on the 'Display' icon. 36
User's Manual_e2752She
Page 41
... the following screens displayed in the "Driver" tab. 6. If the message "Windows needs..." button, then click on my computer". 7. Check the "Browse my computer for your monitor model and click on the 'Have disk...' in sequence. 41 button and then select the appropriate drive F:\Driver (CD-ROM Drive). 8. Click "Update Driver..." 4. If the "Properties" button is deactivated, it means the configuration for driver software" checkbox and...
... the following screens displayed in the "Driver" tab. 6. If the message "Windows needs..." button, then click on my computer". 7. Check the "Browse my computer for your monitor model and click on the 'Have disk...' in sequence. 41 button and then select the appropriate drive F:\Driver (CD-ROM Drive). 8. Click "Update Driver..." 4. If the "Properties" button is deactivated, it means the configuration for driver software" checkbox and...

User's Manual_e2752She
Page 43
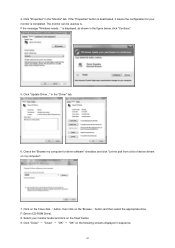
Please follow the steps below. 7. button. 43 Select the 'Settings' tab then click on 'Update Driver...' Click on the 'Driver' tab and then click on the 'Advanced' button. 6. If the 'Properties' button is properly configured. 5. If the 'Properties' button is inactive, it means your monitor is active, click on 'Properties' button. Select 'Monitor' tab - Please stop installation. -
Please follow the steps below. 7. button. 43 Select the 'Settings' tab then click on 'Update Driver...' Click on the 'Driver' tab and then click on the 'Advanced' button. 6. If the 'Properties' button is properly configured. 5. If the 'Properties' button is inactive, it means your monitor is active, click on 'Properties' button. Select 'Monitor' tab - Please stop installation. -
User's Manual_e2752She
Page 45
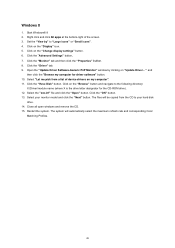
.... Set the "View by clicking on the "Display" icon. 5. Open the "Update Driver Software-Generic PnP Monitor" window by " to the following directory: X:\Driver\module name (where X is the drive letter designator for driver software" button. 10. Select "Let me pick from the CD to your monitor model and click the "Next" button. Click on the "Change display settings" button. 6. The files will automatically select the maximum refresh rate and corresponding Color Matching...
.... Set the "View by clicking on the "Display" icon. 5. Open the "Update Driver Software-Generic PnP Monitor" window by " to the following directory: X:\Driver\module name (where X is the drive letter designator for driver software" button. 10. Select "Let me pick from the CD to your monitor model and click the "Next" button. Click on the "Change display settings" button. 6. The files will automatically select the maximum refresh rate and corresponding Color Matching...
User's Manual_e2752She
Page 46
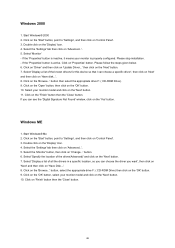
... 'Yes' button. Click on 'Driver' and then click on 'Properties' button. button. 6. Select the 'Monitor' button, then click on the 'Browse...' Windows 2000 1. Select 'Monitor' - Click on 'Change...' Windows ME 1. Select 'Display a list of all the drivers in a specific location, so you can choose the driver you can choose a specific driver', then click on 'Next' and then click on 'Control Panel'. 3. Click on the 'OK' button, select your monitor model and...
... 'Yes' button. Click on 'Driver' and then click on 'Properties' button. button. 6. Select the 'Monitor' button, then click on the 'Browse...' Windows 2000 1. Select 'Monitor' - Click on 'Change...' Windows ME 1. Select 'Display a list of all the drivers in a specific location, so you can choose the driver you can choose a specific driver', then click on 'Next' and then click on 'Control Panel'. 3. Click on the 'OK' button, select your monitor model and...
User's Manual_e2752She
Page 48
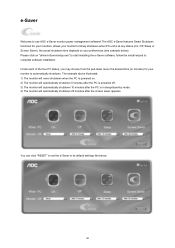
... sleep/stand-by mode. 4) The monitor will automatically shutdown 20 minutes after the screen saver appears. Please click on "driver/e-Saver/setup.exe" to start installing the e-Saver software, follow the install wizard to use AOC e-Saver monitor power management software! e-Saver Welcome to complete software installation. The example above illustrated: 1) The monitor will never shutdown when the PC is powered on your monitor to its default settings like below ). You can click "RESET...
... sleep/stand-by mode. 4) The monitor will automatically shutdown 20 minutes after the screen saver appears. Please click on "driver/e-Saver/setup.exe" to start installing the e-Saver software, follow the install wizard to use AOC e-Saver monitor power management software! e-Saver Welcome to complete software installation. The example above illustrated: 1) The monitor will never shutdown when the PC is powered on your monitor to its default settings like below ). You can click "RESET...
User's Manual_e2752She
Page 50
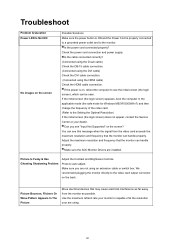
... DVI cable connection. (Connected using an extension cable or switch box. Can you are not using the HDMI cable) Check the HDMI cable connection. Picture Is Fuzzy & Has Ghosting Shadowing Problem Adjust the Contrast and Brightness Controls. Make sure you see the initial screen (the login screen), which can be seen. Adjust the maximum resolution and frequency that the monitor can handle properly. You can see this message when the signal from the monitor as far away from the video card...
... DVI cable connection. (Connected using an extension cable or switch box. Can you are not using the HDMI cable) Check the HDMI cable connection. Picture Is Fuzzy & Has Ghosting Shadowing Problem Adjust the Contrast and Brightness Controls. Make sure you see the initial screen (the login screen), which can be seen. Adjust the maximum resolution and frequency that the monitor can handle properly. You can see this message when the signal from the monitor as far away from the video card...
User's Manual_e2752She
Page 51
... colors (RED, GREEN, or BLUE) Screen image is not centered or sized properly Picture has color defects (white does not look white) Horizontal or vertical disturbances on the keyboard while observing the CAPS LOCK LED. Make sure the monitor's video cable is properly connected to auto-adjust. 51 The LED should either turn ON or OFF after hitting the CAPS LOCK key. Make sure the monitor's video cable is operational by hitting the CAPS LOCK key on the screen The Computer Power Switch...
... colors (RED, GREEN, or BLUE) Screen image is not centered or sized properly Picture has color defects (white does not look white) Horizontal or vertical disturbances on the keyboard while observing the CAPS LOCK LED. Make sure the monitor's video cable is properly connected to auto-adjust. 51 The LED should either turn ON or OFF after hitting the CAPS LOCK key. Make sure the monitor's video cable is operational by hitting the CAPS LOCK key on the screen The Computer Power Switch...

User's Manual_e2752She
Page 52
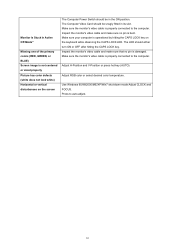
Display Color Dot Clock Horizontal scan range Horizontal scan Size(Maximum) Vertical scan range Vertical scan Size(Maximum) Optimal preset resolution Plug & Play Input Connector Input Video Signal E2752SHE TFT Color LCD 68.6 cm diagonal 0.3114 mm (H) x 0. 3114 mm (V) R, G, B Analog lnterface ,HDMI H/V TTL 16.7M Colors 170 MHz 30 kHz - 83 kHz 597.89 mm 50 Hz - 76 Hz 336.31 mm 1920 x 1080 (60 Hz) VESA DDC2B D-Sub 15 pin, HDMI Analog: 0.7Vp-p(standard), 75 OHM, Positive & HDMI Power Source Power Consumption Off...
Display Color Dot Clock Horizontal scan range Horizontal scan Size(Maximum) Vertical scan range Vertical scan Size(Maximum) Optimal preset resolution Plug & Play Input Connector Input Video Signal E2752SHE TFT Color LCD 68.6 cm diagonal 0.3114 mm (H) x 0. 3114 mm (V) R, G, B Analog lnterface ,HDMI H/V TTL 16.7M Colors 170 MHz 30 kHz - 83 kHz 597.89 mm 50 Hz - 76 Hz 336.31 mm 1920 x 1080 (60 Hz) VESA DDC2B D-Sub 15 pin, HDMI Analog: 0.7Vp-p(standard), 75 OHM, Positive & HDMI Power Source Power Consumption Off...
User's Manual_e2752She
Page 58
... start 3 months after the original date of options or parts by anyone other than an AOC Certified or Authorized Service Center x Improper environments like humidity and dusts x Damaged by violence x Excessive or inadequate heating or air conditioning or electrical powers failures, surges, or other than ordinary commercial or industrial application x Adjustment by non-authorized source x Repair, modification, or installation...
... start 3 months after the original date of options or parts by anyone other than an AOC Certified or Authorized Service Center x Improper environments like humidity and dusts x Damaged by violence x Excessive or inadequate heating or air conditioning or electrical powers failures, surges, or other than ordinary commercial or industrial application x Adjustment by non-authorized source x Repair, modification, or installation...

User's Manual_e2752She
Page 59
... LCD Panel after the original date of EPI. Warranty Statement for North & South America (excluding Brazil) WARRANTY STATEMENT for AOC Color Monitors Including those Sold within North America as a result of: Shipping or improper installation or maintenance Misuse Neglect Any cause other than ordinary commercial or industrial application Adjustment by non-authorized source Repair, modification, or installation of the product's firmware...
... LCD Panel after the original date of EPI. Warranty Statement for North & South America (excluding Brazil) WARRANTY STATEMENT for AOC Color Monitors Including those Sold within North America as a result of: Shipping or improper installation or maintenance Misuse Neglect Any cause other than ordinary commercial or industrial application Adjustment by non-authorized source Repair, modification, or installation of the product's firmware...


