Spec Sheet_e2260Swdn
Page 1
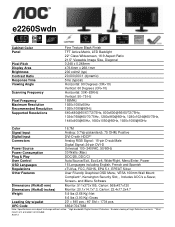
... Color 16.7M Signal Input Analog: 0.7Vp-p(standard), 75 OHM, Positive Digital Input DVI-D with HDCP* Connectors Power Source Power Consumption Analog RGB Signal: 15-pin D-sub Male Digital Signal: 24-pin DVI-D Universal 100~240VAC, 50/60Hz 30 Watts (Max) Plug & Play DDC/2B, DDC/CI User Control Auto/Source/Exit, Eco/Left, Wide/Right, Menu/Enter, Power OSD Languages 16 Languages including English, French and Spanish Regulations cTUVus, FCC, ROHS, EPA 5.1, EPEAT Silver Other Features User Friendly Graphical OSD Menu, VESA 100mm Wall Mount...
... Color 16.7M Signal Input Analog: 0.7Vp-p(standard), 75 OHM, Positive Digital Input DVI-D with HDCP* Connectors Power Source Power Consumption Analog RGB Signal: 15-pin D-sub Male Digital Signal: 24-pin DVI-D Universal 100~240VAC, 50/60Hz 30 Watts (Max) Plug & Play DDC/2B, DDC/CI User Control Auto/Source/Exit, Eco/Left, Wide/Right, Menu/Enter, Power OSD Languages 16 Languages including English, French and Spanish Regulations cTUVus, FCC, ROHS, EPA 5.1, EPEAT Silver Other Features User Friendly Graphical OSD Menu, VESA 100mm Wall Mount...

User's Manual_e2260Swdn
Page 2
... ...9 Setup Stand & Base...10 Adjusting Viewing Angle...11 Connecting the Monitor...12 Wall Mounting ...13 Adjusting ...14 Setting Optimal Resolution ...14 Windows Vista ...14 Windows XP ...16 Windows ME/2000 ...17 Hotkeys ...18 OSD Setting ...19 Luminance ...20 Image Setup ...22 Color Setup...24 Picture Boost ...26 OSD Setup ...28 Extra ...30 Exit ...33 LED Indicator ...34 Driver ...35 Monitor Driver ...35 Windows 7 ...35 Windows Vista ...39 Windows XP ...41 Windows 2000 ...44 Windows ME...44 i-Menu ...45 e-Saver ...46 Screen+ ...47 Troubleshoot ...48 Specification ...50 General Specification...
... ...9 Setup Stand & Base...10 Adjusting Viewing Angle...11 Connecting the Monitor...12 Wall Mounting ...13 Adjusting ...14 Setting Optimal Resolution ...14 Windows Vista ...14 Windows XP ...16 Windows ME/2000 ...17 Hotkeys ...18 OSD Setting ...19 Luminance ...20 Image Setup ...22 Color Setup...24 Picture Boost ...26 OSD Setup ...28 Extra ...30 Exit ...33 LED Indicator ...34 Driver ...35 Monitor Driver ...35 Windows 7 ...35 Windows Vista ...39 Windows XP ...41 Windows 2000 ...44 Windows ME...44 i-Menu ...45 e-Saver ...46 Screen+ ...47 Troubleshoot ...48 Specification ...50 General Specification...

User's Manual_e2260Swdn
Page 5
.... To ensure satisfactory operation, use an adapter to power surges. Power The monitor should be used for long periods of time. The wall socket shall be installed near the equipment and shall be easily accessible. 5 Do not defeat the safety purpose of power supplied to your home, consult your outlet does not accommodate the three-wire plug, have appropriate configured receptacles...
.... To ensure satisfactory operation, use an adapter to power surges. Power The monitor should be used for long periods of time. The wall socket shall be installed near the equipment and shall be easily accessible. 5 Do not defeat the safety purpose of power supplied to your home, consult your outlet does not accommodate the three-wire plug, have appropriate configured receptacles...

User's Manual_e2260Swdn
Page 9
Setup Contents in Box Not all countries and regions. Please check with the local dealer or AOC branch office for all signal cables (Audio,Analog, DVI ) will be provided for confirmation. 9
Setup Contents in Box Not all countries and regions. Please check with the local dealer or AOC branch office for all signal cables (Audio,Analog, DVI ) will be provided for confirmation. 9

User's Manual_e2260Swdn
Page 12
... monitor and connect the other end to the computer's D-Sub port. 3 Connect one end of the DVI cable to the AC port on your monitor displays an image, installation is complete. If your monitor and computer. DVI To protect equipment, always turn off the PC and LCD monitor before connecting. 1 Connect the power cable to the back of Monitor and Computer: 1. If it does not display an image, please refer Troubleshooting. 12 Analog (DB-15 VGA cable) 3. Power...
... monitor and connect the other end to the computer's D-Sub port. 3 Connect one end of the DVI cable to the AC port on your monitor displays an image, installation is complete. If your monitor and computer. DVI To protect equipment, always turn off the PC and LCD monitor before connecting. 1 Connect the power cable to the back of Monitor and Computer: 1. If it does not display an image, please refer Troubleshooting. 12 Analog (DB-15 VGA cable) 3. Power...

User's Manual_e2260Swdn
Page 13
... the user's manual that came with the optional wall mounting arm for all models, please check with the holes in the back of AOC. 13 Line up the holes of the arm with the dealer or official department of the monitor. 4 Insert the 4 screws into the holes and tighten. 5 Reconnect the cables. Follow these steps: 1 Remove the base. 2 Follow the manufacturer's instructions to Install...
... the user's manual that came with the optional wall mounting arm for all models, please check with the holes in the back of AOC. 13 Line up the holes of the arm with the dealer or official department of the monitor. 4 Insert the 4 screws into the holes and tighten. 5 Reconnect the cables. Follow these steps: 1 Remove the base. 2 Follow the manufacturer's instructions to Install...

User's Manual_e2260Swdn
Page 18
... message bar , press Menu/Enter button to change to the source selected 18 Eco (DCR)/ < Press the Eco key to do auto configure . Volume (4 : 3 or wide) / > When there is no OSD,Press Volume button to active volume adjustment bar,Press < or > to adjust volume(Only for the models with speakers) Auto / Exit When there is no OSD, press Auto/Source button continuously to select the Eco mode of brightness and DCR on /off...
... message bar , press Menu/Enter button to change to the source selected 18 Eco (DCR)/ < Press the Eco key to do auto configure . Volume (4 : 3 or wide) / > When there is no OSD,Press Volume button to active volume adjustment bar,Press < or > to adjust volume(Only for the models with speakers) Auto / Exit When there is no OSD, press Auto/Source button continuously to select the Eco mode of brightness and DCR on /off...
User's Manual_e2260Swdn
Page 19
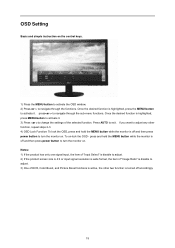
...-menu functions. Press AUTO to adjust. 3) One of the selected function. Notes: 1) If the product has only one signal input, the item of "Input Select" is disable to adjust. 2) If the product screen size is 4:3 or input signal resolution is wide format, the item of "Image Ratio" is off and then press power button to turn the monitor on the control keys. 1) Press the MENU-button to activate the OSD window. 2) Press to turn the monitor...
...-menu functions. Press AUTO to adjust. 3) One of the selected function. Notes: 1) If the product has only one signal input, the item of "Input Select" is disable to adjust. 2) If the product screen size is 4:3 or input signal resolution is wide format, the item of "Image Ratio" is off and then press power button to turn the monitor on the control keys. 1) Press the MENU-button to activate the OSD window. 2) Press to turn the monitor...

User's Manual_e2260Swdn
Page 32
Input Select Auto Config Off timer Image Ratio DDC-CI Reset Auto /Analog yes or no 0-24hrs wide or 4:3 yes or no Yes or no Information Select Input Signal Source Auto adjust the picture to default Select DC off time Select wide or 4:3 format for display Turn ON/OFF DDC-CI Support Reset the menu to default Show t he infor mation of the main image and sub-image source 32
Input Select Auto Config Off timer Image Ratio DDC-CI Reset Auto /Analog yes or no 0-24hrs wide or 4:3 yes or no Yes or no Information Select Input Signal Source Auto adjust the picture to default Select DC off time Select wide or 4:3 format for display Turn ON/OFF DDC-CI Support Reset the menu to default Show t he infor mation of the main image and sub-image source 32

User's Manual_e2260Swdn
Page 35
Driver Monitor Driver Windows 7 1.Start Windows® 7 2.Click on the 'Start' button and then click on the 'Display' icon. 35 Click on 'Control Panel'. 3.
Driver Monitor Driver Windows 7 1.Start Windows® 7 2.Click on the 'Start' button and then click on the 'Display' icon. 35 Click on 'Control Panel'. 3.

User's Manual_e2260Swdn
Page 40
... of device drivers on the following screens displayed in the figure below, click "Continue". 5. The monitor can be used as shown in sequence. 40 Click "Update Driver..." in the "Monitor" tab. button and then select the appropriate drive F:\Driver (CD-ROM Drive). 8. Select your monitor is . button, then click on the 'Next' button. 9. If the message "Windows needs..." 4. Check the "Browse my computer for your monitor model and...
... of device drivers on the following screens displayed in the figure below, click "Continue". 5. The monitor can be used as shown in sequence. 40 Click "Update Driver..." in the "Monitor" tab. button and then select the appropriate drive F:\Driver (CD-ROM Drive). 8. Select your monitor is . button, then click on the 'Next' button. 9. If the message "Windows needs..." 4. Check the "Browse my computer for your monitor model and...

User's Manual_e2260Swdn
Page 42
Please follow the steps below. 7. button. 42 Please stop installation. - Click on the 'Driver' tab and then click on 'Properties' button. Select 'Monitor' tab - If the 'Properties' button is properly configured. 5. If the 'Properties' button is inactive, it means your monitor is active, click on 'Update Driver...' Select the 'Settings' tab then click on the 'Advanced' button. 6.
Please follow the steps below. 7. button. 42 Please stop installation. - Click on the 'Driver' tab and then click on 'Properties' button. Select 'Monitor' tab - If the 'Properties' button is properly configured. 5. If the 'Properties' button is inactive, it means your monitor is active, click on 'Update Driver...' Select the 'Settings' tab then click on the 'Advanced' button. 6.

User's Manual_e2260Swdn
Page 44
...). 9. Start Windows® Me 2. Select the 'Settings' tab then click on the 'Browse...' Click on 'Advanced...'. 5. Click on the 'Start' button, point to 'Settings', and then click on the 'Display' Icon. 4. Click on 'Control Panel'. 3. Please stop installation. - Start Windows® 2000 2. If the 'Properties' button is properly configured. Please follow the steps given below. 6. Click on the 'Open' button, then click on 'Change...' Select the 'Monitor' button...
...). 9. Start Windows® Me 2. Select the 'Settings' tab then click on the 'Browse...' Click on 'Advanced...'. 5. Click on the 'Start' button, point to 'Settings', and then click on the 'Display' Icon. 4. Click on 'Control Panel'. 3. Please stop installation. - Start Windows® 2000 2. If the 'Properties' button is properly configured. Please follow the steps given below. 6. Click on the 'Open' button, then click on 'Change...' Select the 'Monitor' button...

User's Manual_e2260Swdn
Page 46
Please click on "driver/e-Saver/setup.exe" to start installing the e-Saver software, follow the install wizard to its default settings like below ). You can click "RESET" to set the e-Saver to complete software installation. the actual shutdown time depends on . 2) The monitor will automatically shutdown 5 minutes after the PC is powered off. 3) The monitor will automatically shutdown 10 minutes after the screen saver appears. The example...
Please click on "driver/e-Saver/setup.exe" to start installing the e-Saver software, follow the install wizard to its default settings like below ). You can click "RESET" to set the e-Saver to complete software installation. the actual shutdown time depends on . 2) The monitor will automatically shutdown 5 minutes after the PC is powered off. 3) The monitor will automatically shutdown 10 minutes after the screen saver appears. The example...

User's Manual_e2260Swdn
Page 48
... cable) Check the DB-15 cable connection. (Connected using the DVI cable) Check the DVI cable connection. * DVI input is properly connected to a grounded power outlet and to the Setting the Optimal Resolution) If the initial screen (the login screen) does not appear, contact the Service Center or your are installed. Check the power cord connection and power supply. Make sure the AOC Monitor Drivers are using an extension cable or switch box. Press to the video card output connector on the screen Is the power cord connected properly? We recommend plugging the monitor directly...
... cable) Check the DB-15 cable connection. (Connected using the DVI cable) Check the DVI cable connection. * DVI input is properly connected to a grounded power outlet and to the Setting the Optimal Resolution) If the initial screen (the login screen) does not appear, contact the Service Center or your are installed. Check the power cord connection and power supply. Make sure the AOC Monitor Drivers are using an extension cable or switch box. Press to the video card output connector on the screen Is the power cord connected properly? We recommend plugging the monitor directly...

User's Manual_e2260Swdn
Page 49
... Picture has color defects (white does not look white) Adjust RGB color or select desired color temperature. Press to auto-adjust. 49 The Computer Video Card should either turn ON or OFF after hitting the CAPS LOCK key. Missing one of the primary colors (RED, GREEN, or BLUE) Inspect the monitor's video cable and make sure no pin is bent. Make sure your computer is not centered Adjust H-Position and V-Position or press hot-key (AUTO). Horizontal or vertical...
... Picture has color defects (white does not look white) Adjust RGB color or select desired color temperature. Press to auto-adjust. 49 The Computer Video Card should either turn ON or OFF after hitting the CAPS LOCK key. Missing one of the primary colors (RED, GREEN, or BLUE) Inspect the monitor's video cable and make sure no pin is bent. Make sure your computer is not centered Adjust H-Position and V-Position or press hot-key (AUTO). Horizontal or vertical...

User's Manual_e2260Swdn
Page 50
... Specification Panel Model name Driving system Viewable Image Size Pixel pitch Video Separate Sync. Display Color Dot Clock Horizontal scan range Horizontal scan Size(Maximum) Vertical scan range Vertical scan Size(Maximum) Optimal preset resolution Plug & Play Resolution Input Connector Input Video Signal Power Source Power Consumption Off timer Speakers Connector Type Signal Cable Type Dimensions & Weight: Physical Height (with base) Characteristics Width Depth Weight (monitor only) Temperature: Operating Non-Operating Environmental Humidity: Operating Non-Operating E2260SWDN TFT...
... Specification Panel Model name Driving system Viewable Image Size Pixel pitch Video Separate Sync. Display Color Dot Clock Horizontal scan range Horizontal scan Size(Maximum) Vertical scan range Vertical scan Size(Maximum) Optimal preset resolution Plug & Play Resolution Input Connector Input Video Signal Power Source Power Consumption Off timer Speakers Connector Type Signal Cable Type Dimensions & Weight: Physical Height (with base) Characteristics Width Depth Weight (monitor only) Temperature: Operating Non-Operating Environmental Humidity: Operating Non-Operating E2260SWDN TFT...

User's Manual_e2260Swdn
Page 53
... and receiver. Regulation FCC Notice FCC Class B Radio Frequency Interference Statement WARNING: (FOR FCC CERTIFIED MODELS) NOTE: This equipment has been tested and found to comply with the emission limits. This equipment generates, uses and can be used in a particular installation. However, there is not responsible for help. The manufacturer is no guarantee that to which...
... and receiver. Regulation FCC Notice FCC Class B Radio Frequency Interference Statement WARNING: (FOR FCC CERTIFIED MODELS) NOTE: This equipment has been tested and found to comply with the emission limits. This equipment generates, uses and can be used in a particular installation. However, there is not responsible for help. The manufacturer is no guarantee that to which...

User's Manual_e2260Swdn
Page 57
... application • Adjustment by non-authorized source • Repair, modification, or installation of options or parts by anyone other than an AOC Certified or Authorized ServiceCenter • Improper environments like humidity and dusts • Damaged by violence • Excessive or inadequate heating or air conditioning or electrical powers failures, surges, or other irregularities All AOC LCD Monitors are produced according...
... application • Adjustment by non-authorized source • Repair, modification, or installation of options or parts by anyone other than an AOC Certified or Authorized ServiceCenter • Improper environments like humidity and dusts • Damaged by violence • Excessive or inadequate heating or air conditioning or electrical powers failures, surges, or other irregularities All AOC LCD Monitors are produced according...

User's Manual_e2260Swdn
Page 58
... commercial or industrial application Adjustment by non-authorized source Repair, modification, or installation of options or parts by anyone other than an EPI Authorized Service Center Improper environment Excessive or inadequate heating or air conditioning or electrical power failures, surges, or other irregularities This three-year limited warranty does not cover any of the product's firmware or hardware that...
... commercial or industrial application Adjustment by non-authorized source Repair, modification, or installation of options or parts by anyone other than an EPI Authorized Service Center Improper environment Excessive or inadequate heating or air conditioning or electrical power failures, surges, or other irregularities This three-year limited warranty does not cover any of the product's firmware or hardware that...


