
Data Sheet_e2070Swn
Page 1
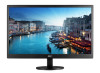
Slim in the front and matte back cover VGA connectivity VESA 100mm wall mount compliant The 20-inch class monitor is also VESA 100mm Wall Mount compliant. AOC Monitors LED monitor 70 Series 20" Class, 1600 x 900 E2070Swn Slim Design with AOC's eSaver software to set low-power configuration and iMenu software to access the user-friendly On Screen Display. Key Features 19.5" viewable image with 16:9 aspect ratio Extra narrow bezel and...
Slim in the front and matte back cover VGA connectivity VESA 100mm wall mount compliant The 20-inch class monitor is also VESA 100mm Wall Mount compliant. AOC Monitors LED monitor 70 Series 20" Class, 1600 x 900 E2070Swn Slim Design with AOC's eSaver software to set low-power configuration and iMenu software to access the user-friendly On Screen Display. Key Features 19.5" viewable image with 16:9 aspect ratio Extra narrow bezel and...
Data Sheet_e2070Swn
Page 2
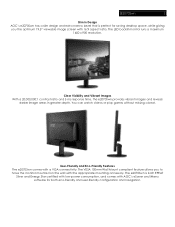
... Star certified with low-power consumption, and comes with AOC's eSaver and iMenu software for saving desktop space, while giving you to have the monitor mounted on the wall with a VGA connectivity. User-Friendly and Eco-Friendly Features The e2070Swn comes with the appropriate mounting accessory. E2070Swn Slim in greater depth. The LED backlit monitor runs a maximum 1600 x 900 resolution. You can watch videos or play games...
... Star certified with low-power consumption, and comes with AOC's eSaver and iMenu software for saving desktop space, while giving you to have the monitor mounted on the wall with a VGA connectivity. User-Friendly and Eco-Friendly Features The e2070Swn comes with the appropriate mounting accessory. E2070Swn Slim in greater depth. The LED backlit monitor runs a maximum 1600 x 900 resolution. You can watch videos or play games...

User's Manual_e2070Swn
Page 2
......3 Power ...4 Installation...5 Cleaning...6 Other ...7 Setup ...8 Contents of Box ...8 Setup Stand ...9 Adjusting Viewing Angle...10 Connecting the Monitor...11 Adjusting ...12 Setting Optimal Resolution ...12 Windows 8 ...12 Windows Vista ...14 Windows XP ...16 Windows ME/2000...17 Hotkeys ...18 LED Indicator ...19 Driver ...20 Monitor Driver ...20 Windows 8 ...20 Windows 2000 ...24 Windows ME...24 Windows XP ...25 Windows Vista ...28 Windows 7 ...30 i-Menu ...35 e-Saver ...36 Screen+ ...37 Troubleshoot ...38 Specification...39 General Specification...39 Preset Display Modes ...40...
......3 Power ...4 Installation...5 Cleaning...6 Other ...7 Setup ...8 Contents of Box ...8 Setup Stand ...9 Adjusting Viewing Angle...10 Connecting the Monitor...11 Adjusting ...12 Setting Optimal Resolution ...12 Windows 8 ...12 Windows Vista ...14 Windows XP ...16 Windows ME/2000...17 Hotkeys ...18 LED Indicator ...19 Driver ...20 Monitor Driver ...20 Windows 8 ...20 Windows 2000 ...24 Windows ME...24 Windows XP ...25 Windows Vista ...28 Windows 7 ...30 i-Menu ...35 e-Saver ...36 Screen+ ...37 Troubleshoot ...38 Specification...39 General Specification...39 Preset Display Modes ...40...
User's Manual_e2070Swn
Page 4
... purpose of power supplied to your home, consult your outlet does not accommodate the three-wire plug, have an electrician install the correct outlet, or use an adapter to power surges. The wall socket shall be installed near the equipment and shall be used for long periods of power source indicated on the label. Do not overload power strips and extension cords. Power The monitor should...
... purpose of power supplied to your home, consult your outlet does not accommodate the three-wire plug, have an electrician install the correct outlet, or use an adapter to power surges. The wall socket shall be installed near the equipment and shall be used for long periods of power source indicated on the label. Do not overload power strips and extension cords. Power The monitor should...
User's Manual_e2070Swn
Page 7
Do not knock or drop the monitor during operation. For display with glossy bezel the user should consider the placement of the display as the bezel may cause disturbing reflections from surrounding light and bright surfaces. 7 Do not engage the LCD monitor in severe vibration or high impact conditions during operation or transportation. Other If the product is emitting a strange smell, sound or smoke, disconnect the power plug IMMEDIATELY and contact a Service Center. Make sure that the ventilating openings are not blocked by a table or curtain.
Do not knock or drop the monitor during operation. For display with glossy bezel the user should consider the placement of the display as the bezel may cause disturbing reflections from surrounding light and bright surfaces. 7 Do not engage the LCD monitor in severe vibration or high impact conditions during operation or transportation. Other If the product is emitting a strange smell, sound or smoke, disconnect the power plug IMMEDIATELY and contact a Service Center. Make sure that the ventilating openings are not blocked by a table or curtain.

User's Manual_e2070Swn
Page 8
Setup Contents of Box Monitor CD Manual Stand MoMniotonritBorasBease Power Cable Analog Cable 8
Setup Contents of Box Monitor CD Manual Stand MoMniotonritBorasBease Power Cable Analog Cable 8
User's Manual_e2070Swn
Page 11
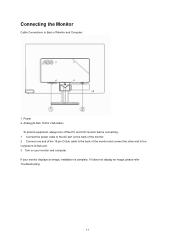
If your monitor and computer. If it does not display an image, please refer Troubleshooting. 11 Analog (D-Sub 15-Pin VGA cable) To protect equipment, always turn off the PC and LCD monitor before connecting. 1 Connect the power cable to the back of Monitor and Computer: 1. Power 2. Connecting the Monitor Cable Connections In Back of the monitor and connect the other end to the computer's D-Sub port. 3 Turn on the back of the monitor. 2 Connect one end of the 15-pin D-Sub cable to the AC port on your monitor displays an image, installation is complete.
If your monitor and computer. If it does not display an image, please refer Troubleshooting. 11 Analog (D-Sub 15-Pin VGA cable) To protect equipment, always turn off the PC and LCD monitor before connecting. 1 Connect the power cable to the back of Monitor and Computer: 1. Power 2. Connecting the Monitor Cable Connections In Back of the monitor and connect the other end to the computer's D-Sub port. 3 Turn on the back of the monitor. 2 Connect one end of the 15-pin D-Sub cable to the AC port on your monitor displays an image, installation is complete.
User's Manual_e2070Swn
Page 12
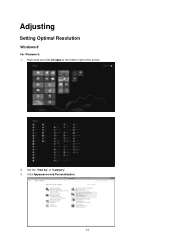
Click Appearance and Personalization. 12 Set the "View by" to "Category". 3. Adjusting Setting Optimal Resolution Windows 8 For Windows 8: 1. Right click and click All apps at the bottom-right of the screen. 2.
Click Appearance and Personalization. 12 Set the "View by" to "Category". 3. Adjusting Setting Optimal Resolution Windows 8 For Windows 8: 1. Right click and click All apps at the bottom-right of the screen. 2.
User's Manual_e2070Swn
Page 17
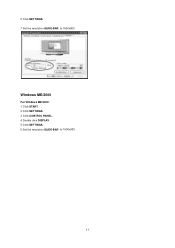
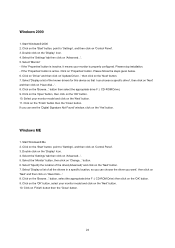
6 Click SETTINGS. 7 Set the resolution SLIDE-BAR to 1600x900. 17 Windows ME/2000 For Windows ME/2000: 1 Click START. 2 Click SETTINGS. 3 Click CONTROL PANEL. 4 Double click DISPLAY. 5 Click SETTINGS. 6 Set the resolution SLIDE-BAR to 1600x900.
6 Click SETTINGS. 7 Set the resolution SLIDE-BAR to 1600x900. 17 Windows ME/2000 For Windows ME/2000: 1 Click START. 2 Click SETTINGS. 3 Click CONTROL PANEL. 4 Double click DISPLAY. 5 Click SETTINGS. 6 Set the resolution SLIDE-BAR to 1600x900.
User's Manual_e2070Swn
Page 20
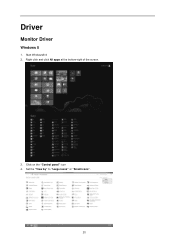
Driver Monitor Driver Windows 8 1. Set the "View by" to "Large icons" or "Small icons". 20 Click on the "Control panel" icon 4. Right click and click All apps at the bottom-right of the screen. 3. Start Windows® 8 2.
Driver Monitor Driver Windows 8 1. Set the "View by" to "Large icons" or "Small icons". 20 Click on the "Control panel" icon 4. Right click and click All apps at the bottom-right of the screen. 3. Start Windows® 8 2.
User's Manual_e2070Swn
Page 24
... 'Driver' and then click on the 'OK' button. 10. Click on the 'Open' button, then click on 'Update Driver...' Click on the 'Start' button, point to 'Settings', and then click on the 'Next' button. 11. Start Windows® 2000 2. Click on the 'Start' button, point to 'Settings', and then click on the 'Next' button. 10. Click on the 'OK' button, select your monitor model and click on 'Control Panel'. 3. Windows 2000 1. Select 'Monitor...
... 'Driver' and then click on the 'OK' button. 10. Click on the 'Open' button, then click on 'Update Driver...' Click on the 'Start' button, point to 'Settings', and then click on the 'Next' button. 11. Start Windows® 2000 2. Click on the 'Start' button, point to 'Settings', and then click on the 'Next' button. 10. Click on the 'OK' button, select your monitor model and click on 'Control Panel'. 3. Windows 2000 1. Select 'Monitor...
User's Manual_e2070Swn
Page 26
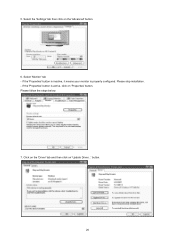
Select the 'Settings' tab then click on 'Update Driver...' button. 26 Select 'Monitor' tab - If the 'Properties' button is properly configured. Please stop installation. - Please follow the steps below. 7. If the 'Properties' button is inactive, it means your monitor is active, click on 'Properties' button. Click on the 'Driver' tab and then click on the 'Advanced' button. 6. 5.
Select the 'Settings' tab then click on 'Update Driver...' button. 26 Select 'Monitor' tab - If the 'Properties' button is properly configured. Please stop installation. - Please follow the steps below. 7. If the 'Properties' button is inactive, it means your monitor is active, click on 'Properties' button. Click on the 'Driver' tab and then click on the 'Advanced' button. 6. 5.
User's Manual_e2070Swn
Page 27
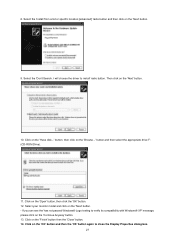
... 'OK' button again to install' radio button. Select the 'Don't Search. Select your monitor model and click on the 'Finish' button then the 'Close' button. 14. Click on the 'Next' button. - Click on the 'Next' button. 9. 8. Select the 'Install from a list or specific location [advanced]' radio button and then click on the 'Have disk...' I will choose the driver to close the Display Properties dialog...
... 'OK' button again to install' radio button. Select the 'Don't Search. Select your monitor model and click on the 'Finish' button then the 'Close' button. 14. Click on the 'Next' button. - Click on the 'Next' button. 9. 8. Select the 'Install from a list or specific location [advanced]' radio button and then click on the 'Have disk...' I will choose the driver to close the Display Properties dialog...
User's Manual_e2070Swn
Page 29
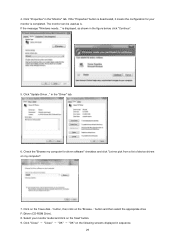
... the "Driver" tab. 6. If the message "Windows needs..." Check the "Browse my computer for your monitor model and click on the 'Have disk...' Select your monitor is . Click on the 'Next' button. 9. in the figure below, click "Continue". 5. button and then select the appropriate drive F:\Driver (CD-ROM Drive). 8. If the "Properties" button is deactivated, it means the configuration for driver software" checkbox...
... the "Driver" tab. 6. If the message "Windows needs..." Check the "Browse my computer for your monitor model and click on the 'Have disk...' Select your monitor is . Click on the 'Next' button. 9. in the figure below, click "Continue". 5. button and then select the appropriate drive F:\Driver (CD-ROM Drive). 8. If the "Properties" button is deactivated, it means the configuration for driver software" checkbox...

User's Manual_e2070Swn
Page 35
... is powered on your monitor to complete software installation. Under each of the four PC status, you may choose from the pull-down menu the desired time (in sleep/stand-by mode. 4) The monitor will never shutdown when the PC is at any status (On, Off, Sleep or Screen Saver); Please click on "driver/e-Saver/setup.exe" to start installing the e-Saver software, follow the install wizard...
... is powered on your monitor to complete software installation. Under each of the four PC status, you may choose from the pull-down menu the desired time (in sleep/stand-by mode. 4) The monitor will never shutdown when the PC is at any status (On, Off, Sleep or Screen Saver); Please click on "driver/e-Saver/setup.exe" to start installing the e-Saver software, follow the install wizard...
User's Manual_e2070Swn
Page 37
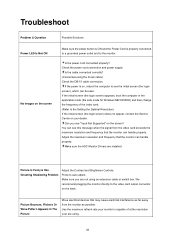
... cable) Check the DB-15 cable connection. You can see this message when the signal from the monitor as far away from the video card exceeds the maximum resolution and frequency that the monitor can handle properly. We recommend plugging the monitor directly to auto adjust. Can you are using. 38 Troubleshoot Problem & Question Power LED Is Not ON No images on the screen Possible Solutions Make sure the power button is ON and the Power Cord...
... cable) Check the DB-15 cable connection. You can see this message when the signal from the monitor as far away from the video card exceeds the maximum resolution and frequency that the monitor can handle properly. We recommend plugging the monitor directly to auto adjust. Can you are using. 38 Troubleshoot Problem & Question Power LED Is Not ON No images on the screen Possible Solutions Make sure the power button is ON and the Power Cord...

User's Manual_e2070Swn
Page 38
.... Make sure the monitor's video cable is properly connected to the computer. The Computer Video Card should either turn ON or OFF after hitting the CAPS LOCK key. Horizontal or vertical disturbances on the keyboard while observing the CAPS LOCK LED. The LED should be in its slot. Make sure the monitor's video cable is properly connected to auto-adjust. 39 Missing one of the primary colors (RED, GREEN, or BLUE) Inspect the monitor's video cable and make sure...
.... Make sure the monitor's video cable is properly connected to the computer. The Computer Video Card should either turn ON or OFF after hitting the CAPS LOCK key. Horizontal or vertical disturbances on the keyboard while observing the CAPS LOCK LED. The LED should be in its slot. Make sure the monitor's video cable is properly connected to auto-adjust. 39 Missing one of the primary colors (RED, GREEN, or BLUE) Inspect the monitor's video cable and make sure...
User's Manual_e2070Swn
Page 43
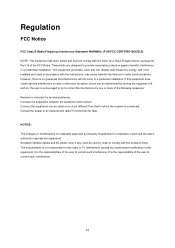
... technician for compliance could void the user's authority to operate the equipment. Shielded interface cables and AC power cord, if any radio or TV interference caused by the party responsible for help. If this equipment. The manufacturer is connected. Regulation FCC Notice FCC Class B Radio Frequency Interference Statement WARNING: (FOR FCC CERTIFIED MODELS) NOTE: This equipment has been...
... technician for compliance could void the user's authority to operate the equipment. Shielded interface cables and AC power cord, if any radio or TV interference caused by the party responsible for help. If this equipment. The manufacturer is connected. Regulation FCC Notice FCC Class B Radio Frequency Interference Statement WARNING: (FOR FCC CERTIFIED MODELS) NOTE: This equipment has been...
User's Manual_e2070Swn
Page 47
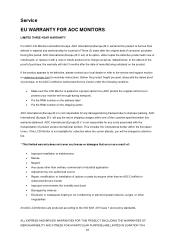
... or industrial application Adjustment by non-authorized source Repair, modification, or installation of purchase, to the AOC Certified or Authorized Service Center under the following condition: Make sure the LCD Monitor is not responsible for any costs associated with the dated proof of options or parts by anyone other than an AOC Certified or Authorized Service Center Improper...
... or industrial application Adjustment by non-authorized source Repair, modification, or installation of purchase, to the AOC Certified or Authorized Service Center under the following condition: Make sure the LCD Monitor is not responsible for any costs associated with the dated proof of options or parts by anyone other than an AOC Certified or Authorized Service Center Improper...
User's Manual_e2070Swn
Page 49
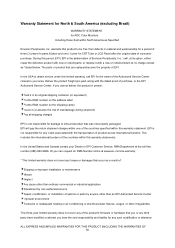
you bear the sole responsibility and liability for AOC Color Monitors Including those Sold within one (1) year for the name of Envision Peripherals, Inc. ) will pay the return shipment ...source Repair, modification, or installation of options or parts by anyone other than an EPI Authorized Service Center Improper environment Excessive or inadequate heating or air conditioning or electrical power failures, surges, or other irregularities This three-year limited warranty does not cover any of consumer purchase. During this limited warranty, call EPI for CRT Tube or LCD Panel...
you bear the sole responsibility and liability for AOC Color Monitors Including those Sold within one (1) year for the name of Envision Peripherals, Inc. ) will pay the return shipment ...source Repair, modification, or installation of options or parts by anyone other than an EPI Authorized Service Center Improper environment Excessive or inadequate heating or air conditioning or electrical power failures, surges, or other irregularities This three-year limited warranty does not cover any of consumer purchase. During this limited warranty, call EPI for CRT Tube or LCD Panel...


