
User's Manual 2036Sa
Page 2
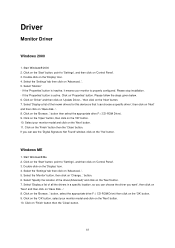
......5 Installation ...6 Cleaning...8 Other ...9 Setup ...10 Contents in Box ...10 Setup Stand & Base...11 Adjusting Viewing Angle...12 Connecting the Monitor...13 Wall Mounting ...14 Adjusting ...15 Setting Optimal Resolution ...15 Windows Vista ...15 Windows XP ...17 Windows ME/2000...18 Hotkeys ...Boost...23 Luminance ...25 Image Setup ...27 Color Temperature ...29 Picture Boost ...31 Extra Setting ...33 Exit...35 LED Indicator ...36 Driver ...37 Monitor Driver ...37 Windows 2000 ...37 Windows ME...37 Windows XP ...38 Windows Vista ...41 i-Menu ...43 Troubleshoot ...44 Specification...46 General...
......5 Installation ...6 Cleaning...8 Other ...9 Setup ...10 Contents in Box ...10 Setup Stand & Base...11 Adjusting Viewing Angle...12 Connecting the Monitor...13 Wall Mounting ...14 Adjusting ...15 Setting Optimal Resolution ...15 Windows Vista ...15 Windows XP ...17 Windows ME/2000...18 Hotkeys ...Boost...23 Luminance ...25 Image Setup ...27 Color Temperature ...29 Picture Boost ...31 Extra Setting ...33 Exit...35 LED Indicator ...36 Driver ...37 Monitor Driver ...37 Windows 2000 ...37 Windows ME...37 Windows XP ...38 Windows Vista ...41 i-Menu ...43 Troubleshoot ...44 Specification...46 General...
User's Manual 2036Sa
Page 37
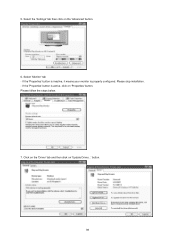
...Panel'. 3. Start Windows® 2000 2. Click on the 'Browse...' Select 'Monitor' - Click on 'Finish' button then the 'Close' button. 37 Select your monitor is properly configured. Windows ME 1. button. 6. Click on 'Driver' and then click on the 'Next' button. 11. Click on the '...I can see the 'Digital Signature Not Found' window, click on 'Have Disk...'. 8. Select 'Display a list of the driver(Advanced)' and click on 'Have disk...'. 8. Driver Monitor Driver Windows 2000 1. then click on the 'OK' button. 9. If the 'Properties' button is active. button, select the ...
...Panel'. 3. Start Windows® 2000 2. Click on the 'Browse...' Select 'Monitor' - Click on 'Finish' button then the 'Close' button. 37 Select your monitor is properly configured. Windows ME 1. button. 6. Click on 'Driver' and then click on the 'Next' button. 11. Click on the '...I can see the 'Digital Signature Not Found' window, click on 'Have Disk...'. 8. Select 'Display a list of the driver(Advanced)' and click on 'Have disk...'. 8. Driver Monitor Driver Windows 2000 1. then click on the 'OK' button. 9. If the 'Properties' button is active. button, select the ...
User's Manual 2036Sa
Page 39
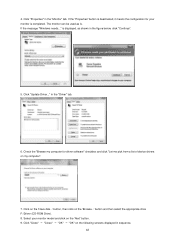
Select 'Monitor' tab - button. 39 Please stop installation. - 5. Select the 'Settings' tab then click on 'Update Driver...' If the 'Properties' button is inactive, it means your monitor is active, click on 'Properties' button. Click on the 'Driver' tab and then click on the 'Advanced' button. 6. If the 'Properties' button is properly configured. Please follow the steps below. 7.
Select 'Monitor' tab - button. 39 Please stop installation. - 5. Select the 'Settings' tab then click on 'Update Driver...' If the 'Properties' button is inactive, it means your monitor is active, click on 'Properties' button. Click on the 'Driver' tab and then click on the 'Advanced' button. 6. If the 'Properties' button is properly configured. Please follow the steps below. 7.

User's Manual 2036Sa
Page 40
.... button and then select the appropriate drive F: (CD-ROM Drive). 11. Click on the 'Browse...' Click on the 'Next' button. - Select your monitor model and click on the 'Have disk...' If you can see the 'has not passed Windows® Logo testing to close the Display Properties dialog...' button. 9. Then click on the 'Finish' button then the 'Close' button. 14. Click on the 'Next' button. 10. 8. I will choose the driver to install' radio button. Select the 'Install from a list or specific location [advanced]' radio button and then click on the 'Continue Anyway' button. 13.
.... button and then select the appropriate drive F: (CD-ROM Drive). 11. Click on the 'Browse...' Click on the 'Next' button. - Select your monitor model and click on the 'Have disk...' If you can see the 'has not passed Windows® Logo testing to close the Display Properties dialog...' button. 9. Then click on the 'Finish' button then the 'Close' button. 14. Click on the 'Next' button. 10. 8. I will choose the driver to install' radio button. Select the 'Install from a list or specific location [advanced]' radio button and then click on the 'Continue Anyway' button. 13.
User's Manual 2036Sa
Page 42
... me pick from a list of device drivers on the 'Browse...' button, then click on my computer". 7. button and then select the appropriate drive F:\Driver (CD-ROM Drive). 8. The monitor can be used as shown in the "Monitor" tab. Select your monitor is . Click on the 'Next' ...button. 9. in sequence. 42 Click "Update Driver..." is displayed, as is completed. Click "Properties" ...
... me pick from a list of device drivers on the 'Browse...' button, then click on my computer". 7. button and then select the appropriate drive F:\Driver (CD-ROM Drive). 8. The monitor can be used as shown in the "Monitor" tab. Select your monitor is . Click on the 'Next' ...button. 9. in sequence. 42 Click "Update Driver..." is displayed, as is completed. Click "Properties" ...
User's Manual 2036Sa
Page 44
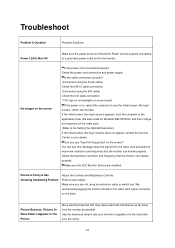
.... * DVI input is not available on every model. Make sure the AOC Monitor Drivers are installed. Picture Bounces, Flickers Or Wave Pattern Appears In The Picture Move electrical devices that the monitor can handle properly. Adjust the maximum resolution and frequency that may cause electrical... interference as far away from the video card exceeds the maximum resolution and frequency that the monitor can handle properly. We recommend plugging the monitor directly to the video card output connector on , reboot the computer to auto adjust. Troubleshoot Problem &...
.... * DVI input is not available on every model. Make sure the AOC Monitor Drivers are installed. Picture Bounces, Flickers Or Wave Pattern Appears In The Picture Move electrical devices that the monitor can handle properly. Adjust the maximum resolution and frequency that may cause electrical... interference as far away from the video card exceeds the maximum resolution and frequency that the monitor can handle properly. We recommend plugging the monitor directly to the video card output connector on , reboot the computer to auto adjust. Troubleshoot Problem &...


