2036Sa Specifications
Page 1
...) Scanning Frequency Vertical: 160 Degrees (CR>10) Horizontal: 30K~80KHz Pixel Frequency Maximum Resolution Recommended Resolution Vertical: 55~75 Hz 145MHz 1600x900x60Hz 1600x900@60Hz Supported Resolutions 640x480@60/67/72/75Hz, 800x600@56/60/72/75Hz, 1024x768@60/70/75Hz, 1280x1024@60/75Hz, 1440x900@60Hz, Color Signal Input Connectors Power Source Power Consumption Plug & Play EPA ENERGY STAR® User Control OSD Languages Regulations 1600x900@60Hz 16.7M Analog: 0.7Vp-p(standard), 75 OHM, Positive Analog RGB Signal...
...) Scanning Frequency Vertical: 160 Degrees (CR>10) Horizontal: 30K~80KHz Pixel Frequency Maximum Resolution Recommended Resolution Vertical: 55~75 Hz 145MHz 1600x900x60Hz 1600x900@60Hz Supported Resolutions 640x480@60/67/72/75Hz, 800x600@56/60/72/75Hz, 1024x768@60/70/75Hz, 1280x1024@60/75Hz, 1440x900@60Hz, Color Signal Input Connectors Power Source Power Consumption Plug & Play EPA ENERGY STAR® User Control OSD Languages Regulations 1600x900@60Hz 16.7M Analog: 0.7Vp-p(standard), 75 OHM, Positive Analog RGB Signal...

User's Manual 2036Sa
Page 2
... ...10 Setup Stand & Base...11 Adjusting Viewing Angle...12 Connecting the Monitor...13 Wall Mounting ...14 Adjusting ...15 Setting Optimal Resolution ...15 Windows Vista ...15 Windows XP ...17 Windows ME/2000...18 Hotkeys ...19 OSD Setting...20 Eco mode ...21 Color Boost...23 Luminance ...25 Image Setup ...27 Color Temperature ...29 Picture Boost ...31 Extra Setting ...33 Exit...35 LED Indicator ...36 Driver ...37 Monitor Driver ...37 Windows 2000 ...37 Windows ME...37 Windows XP ...38 Windows Vista ...41 i-Menu ...43 Troubleshoot ...44 Specification...46 General Specification...
... ...10 Setup Stand & Base...11 Adjusting Viewing Angle...12 Connecting the Monitor...13 Wall Mounting ...14 Adjusting ...15 Setting Optimal Resolution ...15 Windows Vista ...15 Windows XP ...17 Windows ME/2000...18 Hotkeys ...19 OSD Setting...20 Eco mode ...21 Color Boost...23 Luminance ...25 Image Setup ...27 Color Temperature ...29 Picture Boost ...31 Extra Setting ...33 Exit...35 LED Indicator ...36 Driver ...37 Monitor Driver ...37 Windows 2000 ...37 Windows ME...37 Windows XP ...38 Windows Vista ...41 i-Menu ...43 Troubleshoot ...44 Specification...46 General Specification...
User's Manual 2036Sa
Page 5
... license (Only for long periods of power supplied to ground the appliance safely. This plug will not be used for monitors with power adapter). 5 If you are not sure of the type of time. Do not defeat the safety purpose of power source indicated on the label. Do not overload power strips and extension cords. Unplug the unit during a lightning storm...
... license (Only for long periods of power supplied to ground the appliance safely. This plug will not be used for monitors with power adapter). 5 If you are not sure of the type of time. Do not defeat the safety purpose of power source indicated on the label. Do not overload power strips and extension cords. Unplug the unit during a lightning storm...
User's Manual 2036Sa
Page 13
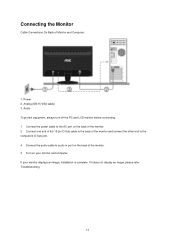
... the 15-pin D-Sub cable to the back of the monitor and connect the other end to the computer's D-Sub port. 4 Connect the audio cable to audio in port on the back of Monitor and Computer: 1. If your monitor and computer. Connecting the Monitor Cable Connections On Back of the monitor. 3 Turn on your monitor displays an image, installation is complete. Power 2. If it does not display an image, please refer Troubleshooting. 13 Analog (DB-15 VGA cable) 3.
... the 15-pin D-Sub cable to the back of the monitor and connect the other end to the computer's D-Sub port. 4 Connect the audio cable to audio in port on the back of Monitor and Computer: 1. If your monitor and computer. Connecting the Monitor Cable Connections On Back of the monitor. 3 Turn on your monitor displays an image, installation is complete. Power 2. If it does not display an image, please refer Troubleshooting. 13 Analog (DB-15 VGA cable) 3.
User's Manual 2036Sa
Page 14
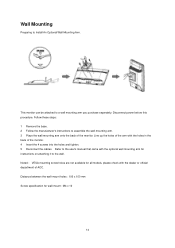
... wall. Noted : VESA mounting screw holes are not available for wall-mount : M4 x 10 14 Follow these steps: 1 Remove the base. 2 Follow the manufacturer's instructions to Install An Optional Wall Mounting Arm. Distance between the wall-mount holes : 100 x 100 mm Screw specification for all models, please check with the holes in the back of the monitor. 4 Insert the 4 screws into the holes and tighten. 5 Reconnect the cables. Wall Mounting Preparing to assemble the wall mounting...
... wall. Noted : VESA mounting screw holes are not available for wall-mount : M4 x 10 14 Follow these steps: 1 Remove the base. 2 Follow the manufacturer's instructions to Install An Optional Wall Mounting Arm. Distance between the wall-mount holes : 100 x 100 mm Screw specification for all models, please check with the holes in the back of the monitor. 4 Insert the 4 screws into the holes and tighten. 5 Reconnect the cables. Wall Mounting Preparing to assemble the wall mounting...
User's Manual 2036Sa
Page 19
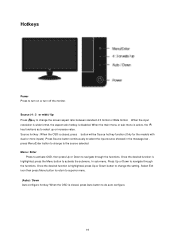
... Up or Down to the source selected. Source hot key : When the OSD is closed , press button will be Source hot key function (Only for the models with dual or more inputs) .Press Source button continuously to select the input source showed in the message bar , press Menu/Enter button to turn on or turn off the monitor. Hotkeys Power Press to change the screen aspect ratio between standard...
... Up or Down to the source selected. Source hot key : When the OSD is closed , press button will be Source hot key function (Only for the models with dual or more inputs) .Press Source button continuously to select the input source showed in the message bar , press Menu/Enter button to turn on or turn off the monitor. Hotkeys Power Press to change the screen aspect ratio between standard...
User's Manual 2036Sa
Page 20
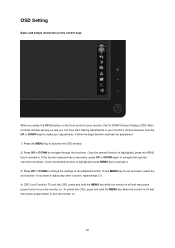
... the desired function is highlighted, press MENU key to navigate through the functions. To unlock the OSD, press and hold the MENU key while the monitor is off and then press power button to make your monitor's various features. Use the UP or DOWN keys to turn the monitor on the control keys. If you press the MENU button on . OSD Setting Basic and simple instruction on . 20
... the desired function is highlighted, press MENU key to navigate through the functions. To unlock the OSD, press and hold the MENU key while the monitor is off and then press power button to make your monitor's various features. Use the UP or DOWN keys to turn the monitor on the control keys. If you press the MENU button on . OSD Setting Basic and simple instruction on . 20
User's Manual 2036Sa
Page 28
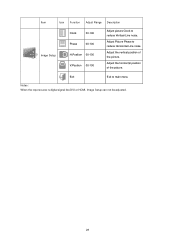
Adjust Picture Phase to main menu Notes : When the input source is digital signal like DVI or HDMI, Image Setup can not be adjusted. 28 Adjust the horizontal position of the picture. Exit Exit to reduce Horizontal-Line noise Adjust the vertical position of the picture. Item Icon Function Adjust Range Description Image Setup Clock 00-100 Phase 00-100 H.Position 00-100 V.Position 00-100 Adjust picture Clock to reduce Vertical-Line noise.
Adjust Picture Phase to main menu Notes : When the input source is digital signal like DVI or HDMI, Image Setup can not be adjusted. 28 Adjust the horizontal position of the picture. Exit Exit to reduce Horizontal-Line noise Adjust the vertical position of the picture. Item Icon Function Adjust Range Description Image Setup Clock 00-100 Phase 00-100 H.Position 00-100 V.Position 00-100 Adjust picture Clock to reduce Vertical-Line noise.
User's Manual 2036Sa
Page 32
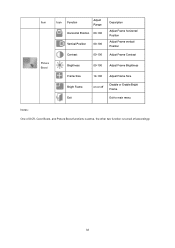
Item Picture Boost Icon Function Adjust Range Horizontal Position 00-100 Vertical Position 00-100 Contrast 00-100 Description Adjust Frame horizontal Position Adjust Frame vertical Position Adjust Frame Contrast Brightness 00-100 Adjust Frame Brightness Frame Size Bright Frame Exit 14-100 Adjust Frame Size on or off Disable or Enable Bright Frame Exit to main menu Notes : One of DCR, Color Boost, and Picture Boost functions is active, the other two function is turned off accordingly. 32
Item Picture Boost Icon Function Adjust Range Horizontal Position 00-100 Vertical Position 00-100 Contrast 00-100 Description Adjust Frame horizontal Position Adjust Frame vertical Position Adjust Frame Contrast Brightness 00-100 Adjust Frame Brightness Frame Size Bright Frame Exit 14-100 Adjust Frame Size on or off Disable or Enable Bright Frame Exit to main menu Notes : One of DCR, Color Boost, and Picture Boost functions is active, the other two function is turned off accordingly. 32

User's Manual 2036Sa
Page 34
Position 00-100 Off Timer 00-24 Adjust the OSD Timeout Adjust the transparence of OSD Adjust the vertical position of OSD Adjust the horizontal position of OSD Adjust the DC off time Exit Exit to default DDC-CI yes or no Turn ON/OFF DDC-CI Support Extra Setting Timeout 05-120 Transparence 00-100 H. Item Icon Function Adjust Range Description Language Select the OSD language Reset yes or no Reset the menu to main menu 34 Position 00-100 V.
Position 00-100 Off Timer 00-24 Adjust the OSD Timeout Adjust the transparence of OSD Adjust the vertical position of OSD Adjust the horizontal position of OSD Adjust the DC off time Exit Exit to default DDC-CI yes or no Turn ON/OFF DDC-CI Support Extra Setting Timeout 05-120 Transparence 00-100 H. Item Icon Function Adjust Range Description Language Select the OSD language Reset yes or no Reset the menu to main menu 34 Position 00-100 V.
User's Manual 2036Sa
Page 37
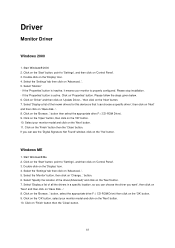
... the 'Display' Icon. 4. Select 'Monitor' - Double click on 'Advanced...'. 5. Please stop installation. - Click on 'Control Panel'. 3. Windows ME 1. Start Windows® Me 2. Select 'Specify the location of all the drivers in a specific location, so you can choose the driver you can choose a specific driver', then click on 'Next' and then click on the 'Next' button. 7. If the 'Properties' button is inactive, it means your monitor model and...
... the 'Display' Icon. 4. Select 'Monitor' - Double click on 'Advanced...'. 5. Please stop installation. - Click on 'Control Panel'. 3. Windows ME 1. Start Windows® Me 2. Select 'Specify the location of all the drivers in a specific location, so you can choose the driver you can choose a specific driver', then click on 'Next' and then click on the 'Next' button. 7. If the 'Properties' button is inactive, it means your monitor model and...
User's Manual 2036Sa
Page 39
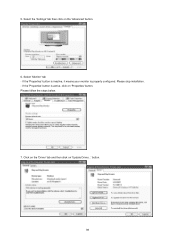
Select the 'Settings' tab then click on 'Update Driver...' Please stop installation. - Click on the 'Driver' tab and then click on the 'Advanced' button. 6. If the 'Properties' button is inactive, it means your monitor is active, click on 'Properties' button. If the 'Properties' button is properly configured. Select 'Monitor' tab - 5. button. 39 Please follow the steps below. 7.
Select the 'Settings' tab then click on 'Update Driver...' Please stop installation. - Click on the 'Driver' tab and then click on the 'Advanced' button. 6. If the 'Properties' button is inactive, it means your monitor is active, click on 'Properties' button. If the 'Properties' button is properly configured. Select 'Monitor' tab - 5. button. 39 Please follow the steps below. 7.
User's Manual 2036Sa
Page 42
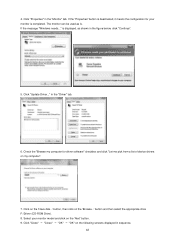
... for your monitor model and click on the following screens displayed in the figure below, click "Continue". 5. button, then click on the 'Have disk...' in the "Monitor" tab. Click on the 'Browse...' Click "Update Driver..." is displayed, as is. button and then select the appropriate drive F:\Driver (CD-ROM Drive). 8. Select your monitor is deactivated, it means the configuration for driver software" checkbox and...
... for your monitor model and click on the following screens displayed in the figure below, click "Continue". 5. button, then click on the 'Have disk...' in the "Monitor" tab. Click on the 'Browse...' Click "Update Driver..." is displayed, as is. button and then select the appropriate drive F:\Driver (CD-ROM Drive). 8. Select your monitor is deactivated, it means the configuration for driver software" checkbox and...
User's Manual 2036Sa
Page 44
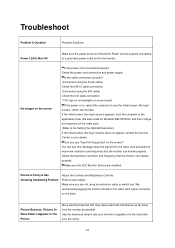
... Problem Adjust the Contrast and Brightness Controls. Use the maximum refresh rate your monitor is capable of the video card. (Refer to the monitor. Check the power cord connection and power supply. Is the cable connected correctly? (Connected using the D-sub cable) Check the DB-15 cable connection. (Connected using the DVI cable) Check the DVI cable connection. * DVI input is not available on the back . If the initial screen (the login screen) appears, boot the computer in the applicable mode (the safe mode for Windows ME/XP/2000) and then change...
... Problem Adjust the Contrast and Brightness Controls. Use the maximum refresh rate your monitor is capable of the video card. (Refer to the monitor. Check the power cord connection and power supply. Is the cable connected correctly? (Connected using the D-sub cable) Check the DB-15 cable connection. (Connected using the DVI cable) Check the DVI cable connection. * DVI input is not available on the back . If the initial screen (the login screen) appears, boot the computer in the applicable mode (the safe mode for Windows ME/XP/2000) and then change...
User's Manual 2036Sa
Page 45
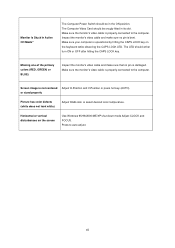
... of the primary colors (RED, GREEN, or BLUE) Inspect the monitor's video cable and make sure no pin is bent. Horizontal or vertical disturbances on the keyboard while observing the CAPS LOCK LED. Make sure the monitor's video cable is properly connected to the computer. Make sure the monitor's video cable is properly connected to auto-adjust. 45 Press to the computer. Screen image is operational by hitting the CAPS LOCK key on the screen Use Windows 95/98/2000...
... of the primary colors (RED, GREEN, or BLUE) Inspect the monitor's video cable and make sure no pin is bent. Horizontal or vertical disturbances on the keyboard while observing the CAPS LOCK LED. Make sure the monitor's video cable is properly connected to the computer. Make sure the monitor's video cable is properly connected to auto-adjust. 45 Press to the computer. Screen image is operational by hitting the CAPS LOCK key on the screen Use Windows 95/98/2000...
User's Manual 2036Sa
Page 46
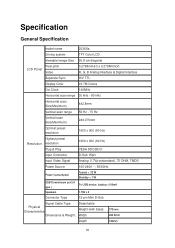
Specification General Specification model name 2036Sa Driving system TFT Color LCD Viewable Image Size 50.8 cm diagonal Pixel pitch LCD Panel Video 0.2768mm(H) x 0.2768mm(V) R, G, B Analog lnterface & Digital Interface Separate Sync. H/V TTL Display Color 16.7M Colors Dot Clock 140MHz Horizontal scan range 30 kHz - 80 kHz Horizontal scan Size(Maximum) 442.8mm Vertical scan range 55 Hz - 75 Hz Vertical scan Size(Maximum) 249.075mm Optimal preset resolution 1600 x 900 (60 Hz) Highest preset Resolution resolution 1600 x 900 (60 Hz) Plug & Play VESA DDC2B...
Specification General Specification model name 2036Sa Driving system TFT Color LCD Viewable Image Size 50.8 cm diagonal Pixel pitch LCD Panel Video 0.2768mm(H) x 0.2768mm(V) R, G, B Analog lnterface & Digital Interface Separate Sync. H/V TTL Display Color 16.7M Colors Dot Clock 140MHz Horizontal scan range 30 kHz - 80 kHz Horizontal scan Size(Maximum) 442.8mm Vertical scan range 55 Hz - 75 Hz Vertical scan Size(Maximum) 249.075mm Optimal preset resolution 1600 x 900 (60 Hz) Highest preset Resolution resolution 1600 x 900 (60 Hz) Plug & Play VESA DDC2B...
User's Manual 2036Sa
Page 47
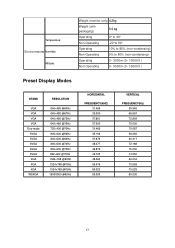
...monitor only) 4.2kg Weight (with packaging) 5.5 kg Operating 0°to 40° Non-Operating -20°to 60° Operating 10% to 85% (non-condensing) Non-Operating 5% to 80% (non-condensing) Operating 0~ 3000m (0~ 10000 ft ) Non-Operating 0~ 5000m (0~ 15000 ft ) Preset Display Modes STAND VGA VGA VGA VGA Dos-mode SVGA SVGA SVGA SVGA SVGA XGA XGA XGA WSXGA RESOLUTION...70Hz 1024×768 @75Hz 1600X900 @60Hz HORIZONTAL FREQUENCY(kHZ) 31.469 35.000 37.861 37.500 31.469 35.156 37.879 48.077 46.875 49.725 48.363 56.476 60.023 60.000 VERTICAL FREQUENCY(Hz) 59.940 66.667 72.809 75...
...monitor only) 4.2kg Weight (with packaging) 5.5 kg Operating 0°to 40° Non-Operating -20°to 60° Operating 10% to 85% (non-condensing) Non-Operating 5% to 80% (non-condensing) Operating 0~ 3000m (0~ 10000 ft ) Non-Operating 0~ 5000m (0~ 15000 ft ) Preset Display Modes STAND VGA VGA VGA VGA Dos-mode SVGA SVGA SVGA SVGA SVGA XGA XGA XGA WSXGA RESOLUTION...70Hz 1024×768 @75Hz 1600X900 @60Hz HORIZONTAL FREQUENCY(kHZ) 31.469 35.000 37.861 37.500 31.469 35.156 37.879 48.077 46.875 49.725 48.363 56.476 60.023 60.000 VERTICAL FREQUENCY(Hz) 59.940 66.667 72.809 75...
User's Manual 2036Sa
Page 50
...to which can radiate radio frequency energy, and if not installed and used in accordance with the emission limits. Shielded interface cables and AC power cord, if any radio or TV interference caused by the party responsible for compliance could void the user's authority to operate the... radio/TV technician for help. This equipment generates, uses and can be used in order to comply with the instructions, may cause harmful interference to radio communications. However, there is connected. If this equipment. It is the responsibility of the user to correct such interference....
...to which can radiate radio frequency energy, and if not installed and used in accordance with the emission limits. Shielded interface cables and AC power cord, if any radio or TV interference caused by the party responsible for compliance could void the user's authority to operate the... radio/TV technician for help. This equipment generates, uses and can be used in order to comply with the instructions, may cause harmful interference to radio communications. However, there is connected. If this equipment. It is the responsibility of the user to correct such interference....
User's Manual 2036Sa
Page 53
... industrial application Adjustment by non-authorized source Repair, modification, or installation of options or parts by anyone other than an AOC Authorized Service Center Improper environment Excessive or inadequate heating or air conditioning or electrical powers failures, surges, or other irregularities This limited warranty does not cover any third party have 53 If the product appears to be free from...
... industrial application Adjustment by non-authorized source Repair, modification, or installation of options or parts by anyone other than an AOC Authorized Service Center Improper environment Excessive or inadequate heating or air conditioning or electrical powers failures, surges, or other irregularities This limited warranty does not cover any third party have 53 If the product appears to be free from...
User's Manual 2036Sa
Page 55
... commercial or industrial application Adjustment by non-authorized source Repair, modification, or installation of options or parts by anyone other than an EPI Authorized Service Center Improper environment Excessive or inadequate heating or air conditioning or electrical power failures, surges, or other irregularities This three-year limited warranty does not cover any of the product's firmware or hardware that...
... commercial or industrial application Adjustment by non-authorized source Repair, modification, or installation of options or parts by anyone other than an EPI Authorized Service Center Improper environment Excessive or inadequate heating or air conditioning or electrical power failures, surges, or other irregularities This three-year limited warranty does not cover any of the product's firmware or hardware that...


