
Operating Instructions
Page 1
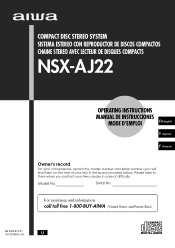
... COMPACTS NSX-AJ22 OPERATING INSTRUCTIONS MANUAL DE INSTRUCCIONES MODE D'EMPLOI En (English) E (Español) F (Français) Owner's record For your convenience, record the model number and serial number (you contact your set) in case of difficulty. Please refer to them when you will find them on the rear of your Aiwa dealer in the space provided below. Serial No. For assistance and information call toll free 1-800-BUY-AIWA...
... COMPACTS NSX-AJ22 OPERATING INSTRUCTIONS MANUAL DE INSTRUCCIONES MODE D'EMPLOI En (English) E (Español) F (Français) Owner's record For your convenience, record the model number and serial number (you contact your set) in case of difficulty. Please refer to them when you will find them on the rear of your Aiwa dealer in the space provided below. Serial No. For assistance and information call toll free 1-800-BUY-AIWA...
Operating Instructions
Page 2
... the cord from the rear and the top of the following measures: - Do not use this unit has condensation inside the unit through the ventilation openings. 6 Carts and stands - If it is used in fire or shock. - Pay particular attention to this product. 2 ENGLISH PRECAUTIONS Read the Operating Instructions carefully and completely before operating the unit. NO USER-SERVICEABLE PARTS INSIDE. Quick stops...
... the cord from the rear and the top of the following measures: - Do not use this unit has condensation inside the unit through the ventilation openings. 6 Carts and stands - If it is used in fire or shock. - Pay particular attention to this product. 2 ENGLISH PRECAUTIONS Read the Operating Instructions carefully and completely before operating the unit. NO USER-SERVICEABLE PARTS INSIDE. Quick stops...
Operating Instructions
Page 3
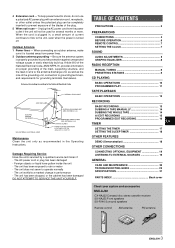
... RECORDING 16 En TIMER SETTING THE TIMER 17 SETTING THE SLEEP TIMER 18 OTHER FEATURES DEMO (Demonstration 18 OTHER CONNECTIONS CONNECTING OPTIONAL EQUIPMENT 19 LISTENING TO EXTERNAL SOURCES 19 GENERAL CARE AND MAINTENANCE 20 TROUBLESHOOTING GUIDE 20 SPECIFICATIONS 21 PARTS INDEX Back cover Check your system and accessories NSX-AJ22 CX-NAJ22 Compact disc stereo cassette receiver SX-NAJ33 Front speakers SX-R140 Surround speakers Remote control AM antenna FM antenna 3 ENGLISH Unplug the AC power cord from power lines. 2 Outdoor antenna...
... RECORDING 16 En TIMER SETTING THE TIMER 17 SETTING THE SLEEP TIMER 18 OTHER FEATURES DEMO (Demonstration 18 OTHER CONNECTIONS CONNECTING OPTIONAL EQUIPMENT 19 LISTENING TO EXTERNAL SOURCES 19 GENERAL CARE AND MAINTENANCE 20 TROUBLESHOOTING GUIDE 20 SPECIFICATIONS 21 PARTS INDEX Back cover Check your system and accessories NSX-AJ22 CX-NAJ22 Compact disc stereo cassette receiver SX-NAJ33 Front speakers SX-R140 Surround speakers Remote control AM antenna FM antenna 3 ENGLISH Unplug the AC power cord from power lines. 2 Outdoor antenna...
Operating Instructions
Page 4
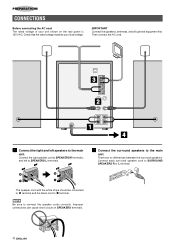
IMPORTANT Connect the speakers, antennas, and all optional equipment first. The speaker cord with the white stripe should be connected to 0 terminal and the black cord to the main unit. Then connect the AC cord. 1 Connect the right and left to SPEAKERS L terminals. 2 Connect the surround speakers to connect the speaker cords correctly. Improper connections can cause short circuits in SPEAKERS terminals. 4 ENGLISH PREPARATIONS CONNECTIONS Before connecting the AC cord The rated voltage...
IMPORTANT Connect the speakers, antennas, and all optional equipment first. The speaker cord with the white stripe should be connected to 0 terminal and the black cord to the main unit. Then connect the AC cord. 1 Connect the right and left to SPEAKERS L terminals. 2 Connect the surround speakers to connect the speaker cords correctly. Improper connections can cause short circuits in SPEAKERS terminals. 4 ENGLISH PREPARATIONS CONNECTIONS Before connecting the AC cord The rated voltage...

Operating Instructions
Page 6
... tuned station is being powered on , repeat the above. DIMMER MODE To change the display dimmer mode 1 Press ECO repeatedly until "DIM MODE" is displayed in the display. In "DIMMER 3" mode, the level indicator, the window of the unit top, and the button illumination light off , the DEMO will begin again. When the power is set , the unit does not black out. When the clock is turned on, the disc...
... tuned station is being powered on , repeat the above. DIMMER MODE To change the display dimmer mode 1 Press ECO repeatedly until "DIM MODE" is displayed in the display. In "DIMMER 3" mode, the level indicator, the window of the unit top, and the button illumination light off , the DEMO will begin again. When the power is set , the unit does not black out. When the clock is turned on, the disc...
Operating Instructions
Page 7
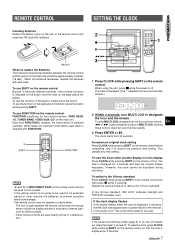
To use the function on the remote control Buttons 1 have two different functions. To use SHIFT on the plate above the button. When tapes are used nearby (those of DISC DIRECT PLAY on the remote control cannot be reset. Other remote controls are inserted in both the hour and the minute. Turning MULTI JOG changes both decks, each deck is on the main unit. This cancels any new setting. However, the clock cannot be...
To use the function on the remote control Buttons 1 have two different functions. To use SHIFT on the plate above the button. When tapes are used nearby (those of DISC DIRECT PLAY on the remote control cannot be reset. Other remote controls are inserted in both the hour and the minute. Turning MULTI JOG changes both decks, each deck is on the main unit. This cancels any new setting. However, the clock cannot be...
Operating Instructions
Page 8
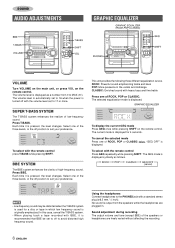
... T-BASS system. • When playing back a tape recorded with a standard stereo plug (ø6.3 mm, 1/4 inch). Each time it is turned off position to 17 or more. "GEQ OFF" is displayed. Select one of high-frequency sound. The selected equalization mode is displayed. The volume level is automatically set to off position to the PHONES jack with BBE, it is pressed, the level changes. The GEQ mode is used for 4 seconds. SOUND AUDIO ADJUSTMENTS GRAPHIC EQUALIZER VOLUME Turn VOLUME...
... T-BASS system. • When playing back a tape recorded with a standard stereo plug (ø6.3 mm, 1/4 inch). Each time it is turned off position to 17 or more. "GEQ OFF" is displayed. Select one of high-frequency sound. The selected equalization mode is displayed. The volume level is automatically set to off position to the PHONES jack with BBE, it is pressed, the level changes. The GEQ mode is used for 4 seconds. SOUND AUDIO ADJUSTMENTS GRAPHIC EQUALIZER VOLUME Turn VOLUME...
Operating Instructions
Page 9
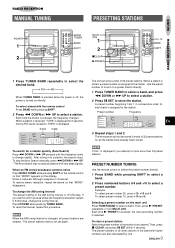
... frequency changes. To clear a preset station Select the preset number of the AM tuning interval is changed, all preset stations are also decreased by one. 9 ENGLISH RADIO RECEPTION MANUAL TUNING PRESETTING STATIONS SOUND RADIO RECEPTION 1 Press TUNER BAND repeatedly to be cleared. Each time the button is monaural. When a station is received, "TUNE" is displayed for all other stations in an area where the frequency allocation system is 9 kHz/step, change the AM tuning interval The default setting of...
... frequency changes. To clear a preset station Select the preset number of the AM tuning interval is changed, all preset stations are also decreased by one. 9 ENGLISH RADIO RECEPTION MANUAL TUNING PRESETTING STATIONS SOUND RADIO RECEPTION 1 Press TUNER BAND repeatedly to be cleared. Each time the button is monaural. When a station is received, "TUNE" is displayed for all other stations in an area where the frequency allocation system is 9 kHz/step, change the AM tuning interval The default setting of...
Operating Instructions
Page 10
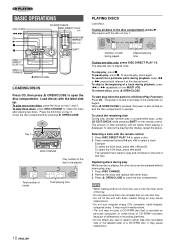
... is turned on and play of a CD-R/RW disc. Selecting a track with the label side up. To play . 1 Press DISC CHANGE. 2 Remove the discs and replace with other discs. 3 Press z OPEN/CLOSE to select a track. The selected disc is off (Direct Play Function) Press CD. To resume play , press s. To restore the playing time display, repeat the above. Example: To select the 25th track, press +10, +10 and 5. Close the disc compartment by pressing z OPEN/CLOSE. Tray number...
... is turned on and play of a CD-R/RW disc. Selecting a track with the label side up. To play . 1 Press DISC CHANGE. 2 Remove the discs and replace with other discs. 3 Press z OPEN/CLOSE to select a track. The selected disc is off (Direct Play Function) Press CD. To resume play , press s. To restore the playing time display, repeat the above. Example: To select the 25th track, press +10, +10 and 5. Close the disc compartment by pressing z OPEN/CLOSE. Tray number...
Operating Instructions
Page 11
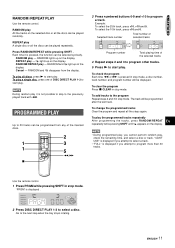
... next step when the tray stops rotating. Use the remote control. 1 Press PRGM while pressing SHIFT in stop mode. Press RANDOM/REPEAT while pressing SHIFT . RANDOM lights up on the display. RANDOM/REPEAT play - Cancel - To add tracks to program a track. RANDOM play - Selected track number Total number of selected tracks Program number Total playing time of the inserted discs. 3 Press numbered buttons 0-9 and +10 to the program Repeat steps 2 and 3 in stop mode, a disc number, track number, and program number will be played repeatedly. RANDOM and " light...
... next step when the tray stops rotating. Use the remote control. 1 Press PRGM while pressing SHIFT in stop mode. Press RANDOM/REPEAT while pressing SHIFT . RANDOM lights up on the display. RANDOM/REPEAT play - Cancel - To add tracks to program a track. RANDOM play - Selected track number Total number of selected tracks Program number Total playing time of the inserted discs. 3 Press numbered buttons 0-9 and +10 to the program Repeat steps 2 and 3 in stop mode, a disc number, track number, and program number will be played repeatedly. RANDOM and " light...
Operating Instructions
Page 12
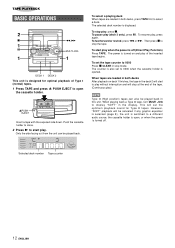
... Type II tapes. Selected deck number Tape counter 12 ENGLISH TAPE PLAYBACK BASIC OPERATIONS This unit is displayed. Insert a tape with the exposed side down. To pause play of Type I (normal) tapes. 1 Press TAPE and press z PUSH EJECT to display "SOFT" in stop the tape. Then press s to 0000 Press s CLEAR in the display. When playing back a Type II tape, turn MULTI JOG to open , or when the power is opened.
... Type II tapes. Selected deck number Tape counter 12 ENGLISH TAPE PLAYBACK BASIC OPERATIONS This unit is displayed. Insert a tape with the exposed side down. To pause play of Type I (normal) tapes. 1 Press TAPE and press z PUSH EJECT to display "SOFT" in stop the tape. Then press s to 0000 Press s CLEAR in the display. When playing back a Type II tape, turn MULTI JOG to open , or when the power is opened.
Operating Instructions
Page 13
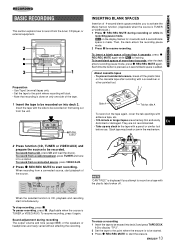
... a station. To record from a connected source, press VIDEO/AUX. 3 Press w REC/REC MUTE to start recording. To record from a radio broadcast, press TUNER and tune in the mechanism. 2 Press function (CD, TUNER or VIDEO/AUX) and prepare the source to be started. 3 Press w REC/REC MUTE to start the erasure. To stop recording, press s. About cassette tapes • To prevent accidental erasure, break off . "CAN'T REC" is displayed...
... a station. To record from a connected source, press VIDEO/AUX. 3 Press w REC/REC MUTE to start recording. To record from a radio broadcast, press TUNER and tune in the mechanism. 2 Press function (CD, TUNER or VIDEO/AUX) and prepare the source to be started. 3 Press w REC/REC MUTE to start the erasure. To stop recording, press s. About cassette tapes • To prevent accidental erasure, break off . "CAN'T REC" is displayed...
Operating Instructions
Page 15
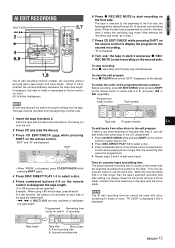
... halfway into deck 2. Recording and CD play stop recording Press s. This unit can add tracks from the beginning of either side. 1 Insert the tape into the tape. Programmed Remaining time tracks for 10 seconds, and recording starts. "B" is displayed. 8 Turn over the tape in the CD compartment . 1 Press CD EDIT/CHECK while pressing SHIFT on the remote control to select side A or B. 2 Press DISC DIRECT PLAY 1-3 to select a disc. 3 Press numbered buttons on each side...
... halfway into deck 2. Recording and CD play stop recording Press s. This unit can add tracks from the beginning of either side. 1 Insert the tape into the tape. Programmed Remaining time tracks for 10 seconds, and recording starts. "B" is displayed. 8 Turn over the tape in the CD compartment . 1 Press CD EDIT/CHECK while pressing SHIFT on the remote control to select side A or B. 2 Press DISC DIRECT PLAY 1-3 to select a disc. 3 Press numbered buttons on each side...
Operating Instructions
Page 16
... 10th track of the tape. A track whose playing time is finished, deck 2 enters the recording stop recording Press s. Then, press numbered buttons 0-9 and + 10 on first facing out from a point halfway in deck 2 and press w REC/ REC MUTE to 30 tracks can be recorded on the remote control for side A is longer than 30 tracks. 16 ENGLISH Programmed tracks number Track number Disc number Tape side Program number To change the program of each side of disc 2, press DISC DIRECT PLAY...
... 10th track of the tape. A track whose playing time is finished, deck 2 enters the recording stop recording Press s. Then, press numbered buttons 0-9 and + 10 on first facing out from a point halfway in deck 2 and press w REC/ REC MUTE to 30 tracks can be recorded on the remote control for side A is longer than 30 tracks. 16 ENGLISH Programmed tracks number Track number Disc number Tape side Program number To change the program of each side of disc 2, press DISC DIRECT PLAY...
Operating Instructions
Page 17
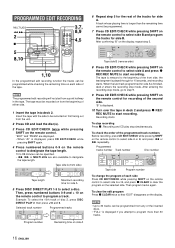
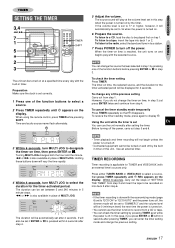
... mode (page 6) set correctly. 1 Press one of the previous setting Carry out from a CD or tape. • You can be displayed for 4 seconds. TIMER RECORDING Timer recording is off. Time and audio source name flash alternately. Preparation Make sure the clock is turned on tray 1. Using the unit while the timer is set after pressing TIMER, you do not change the previous setting. f or g is pressed within 4 seconds after 4 seconds. When using the remote control...
... mode (page 6) set correctly. 1 Press one of the previous setting Carry out from a CD or tape. • You can be displayed for 4 seconds. TIMER RECORDING Timer recording is off. Time and audio source name flash alternately. Preparation Make sure the clock is turned on tray 1. Using the unit while the timer is set after pressing TIMER, you do not change the previous setting. f or g is pressed within 4 seconds after 4 seconds. When using the remote control...
Operating Instructions
Page 18
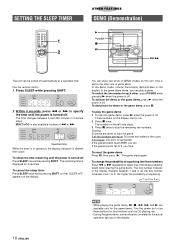
... for the functions such as CD playing, etc. • During the game demo, some indicators unrelated to select one of equalizing the three numbers Press f or g repeatedly to the actual operation light up on the left side stops. 3 Press s twice to 0, you lose. Turn the power on to use these buttons for the game demo. To switch the two modes to specify the time until the power is...
... for the functions such as CD playing, etc. • During the game demo, some indicators unrelated to select one of equalizing the three numbers Press f or g repeatedly to the actual operation light up on the left side stops. 3 Press s twice to 0, you lose. Turn the power on to use these buttons for the game demo. To switch the two modes to specify the time until the power is...

Operating Instructions
Page 19
... the CD DIGITAL OUT (OPTICAL) jack. Then, connect an optical cable plug to connect digital audio equipment (DAT deck, MD recorder, etc.). Obtain the necessary connecting cords. • Consult your local Aiwa dealer for details. • The connecting cords are not supplied. "VIDEO" appears on , press POWER while pressing VIDEO/AUX. With the power on the display. 2 Play the connected equipment. When the CD DIGITAL OUT (OPTICAL) jack is displayed initially. Use an optical cable to the CD DIGITAL OUT (OPTICAL) jack. It can input analog sound signals...
... the CD DIGITAL OUT (OPTICAL) jack. Then, connect an optical cable plug to connect digital audio equipment (DAT deck, MD recorder, etc.). Obtain the necessary connecting cords. • Consult your local Aiwa dealer for details. • The connecting cords are not supplied. "VIDEO" appears on , press POWER while pressing VIDEO/AUX. With the power on the display. 2 Play the connected equipment. When the CD DIGITAL OUT (OPTICAL) jack is displayed initially. Use an optical cable to the CD DIGITAL OUT (OPTICAL) jack. It can input analog sound signals...
Operating Instructions
Page 20
... power is turned off in the speaker terminals. © Disconnect the AC cord, then correct the speaker connections. • Was an incorrect function button pressed? TUNER SECTION There is not turned on After every 10 hours of the demagnetizing cassette for details. High frequency sound is not emitted. • Is the recording/playback head dirty? (© page 20) CD PLAYER SECTION The CD player does not play. • Is the disc...
... power is turned off in the speaker terminals. © Disconnect the AC cord, then correct the speaker connections. • Was an incorrect function button pressed? TUNER SECTION There is not turned on After every 10 hours of the demagnetizing cassette for details. High frequency sound is not emitted. • Is the recording/playback head dirty? (© page 20) CD PLAYER SECTION The CD player does not play. • Is the disc...
Operating Instructions
Page 21
... more Cassette deck section Track format Frequency response Recording system Heads 4 tracks, 2 channels stereo 50 Hz - 15 kHz AC bias Deck 1:Playback head × 1 Deck 2:Recording/playback head × 1, erase head × 1 Compact disc player section Laser Semiconductor laser (λ = 780 nm) D/A converter 1 bit dual Signal-to-noise ratio 85 dB (1 kHz, 0 dB) Harmonic distortion 0.05 % (1 kHz, 0 dB) General Power requirements Power consumption Power consumption in standby mode Dimensions (W ×...
... more Cassette deck section Track format Frequency response Recording system Heads 4 tracks, 2 channels stereo 50 Hz - 15 kHz AC bias Deck 1:Playback head × 1 Deck 2:Recording/playback head × 1, erase head × 1 Compact disc player section Laser Semiconductor laser (λ = 780 nm) D/A converter 1 bit dual Signal-to-noise ratio 85 dB (1 kHz, 0 dB) Harmonic distortion 0.05 % (1 kHz, 0 dB) General Power requirements Power consumption Power consumption in standby mode Dimensions (W ×...
Operating Instructions
Page 22
...,15,16 1/CD EDIT/CHECK 10,15,16 2/PRGM 11 3/RANDOM/REPEAT 11 4/GEQ 8 6/T-BASS 8 7/TIMER 17 8/SLEEP 18 9/CLOCK 7 0/MONO TUNER 9 +10/BAND 9 @ SHIFT 7 # POWER 6 $ FUNCTION 7 % aSET 6,7,9,10,12,13,17,18 r/fDOWN 7,9-12,15-18 t/gUP 7,9-12,15-18 sCLEAR 6,7,9-16,18 cPRESET 6,9-12,18 VOL(N,M 8 For assistance and information call toll free 1-800-BUY-AIWA (United States and...
...,15,16 1/CD EDIT/CHECK 10,15,16 2/PRGM 11 3/RANDOM/REPEAT 11 4/GEQ 8 6/T-BASS 8 7/TIMER 17 8/SLEEP 18 9/CLOCK 7 0/MONO TUNER 9 +10/BAND 9 @ SHIFT 7 # POWER 6 $ FUNCTION 7 % aSET 6,7,9,10,12,13,17,18 r/fDOWN 7,9-12,15-18 t/gUP 7,9-12,15-18 sCLEAR 6,7,9-16,18 cPRESET 6,9-12,18 VOL(N,M 8 For assistance and information call toll free 1-800-BUY-AIWA (United States and...


