User Guide
Page 17
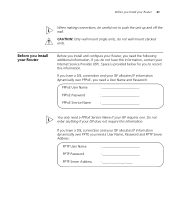
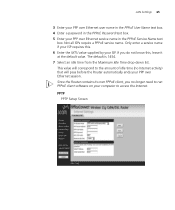
... install and configure your Router, you need a User Name and Password: PPPoE User Name PPPoE Password PPPoE Service Name You only need a User Name, Password and PPTP Server Address: PPTP User Name PPTP Password PPTP Server Address If you have this information. CAUTION: Only wall mount single units, do not have a DSL connection and your ISP...
... install and configure your Router, you need a User Name and Password: PPPoE User Name PPPoE Password PPPoE Service Name You only need a User Name, Password and PPTP Server Address: PPTP User Name PPTP Password PPTP Server Address If you have this information. CAUTION: Only wall mount single units, do not have a DSL connection and your ISP...
User Guide
Page 25
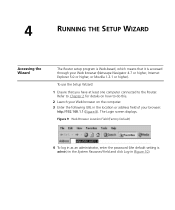
Refer to Chapter 2 for details on how to the Router. Figure 9 Web Browser Location Field (Factory Default) 4 To log in as an administrator, enter the password (the default setting is accessed through your browser: http://192.168.1.1 (Figure 9). The Login screen displays. To use the Setup Wizard: 1 ...Ensure that it is admin) in the System Password field and click Log in (Figure 10). 4 RUNNING THE SETUP WIZARD Accessing the Wizard The Router setup program is Web-based, which means that you have at least one computer connected to do ...
Refer to Chapter 2 for details on how to the Router. Figure 9 Web Browser Location Field (Factory Default) 4 To log in as an administrator, enter the password (the default setting is accessed through your browser: http://192.168.1.1 (Figure 9). The Login screen displays. To use the Setup Wizard: 1 ...Ensure that it is admin) in the System Password field and click Log in (Figure 10). 4 RUNNING THE SETUP WIZARD Accessing the Wizard The Router setup program is Web-based, which means that you have at least one computer connected to do ...
User Guide
Page 26
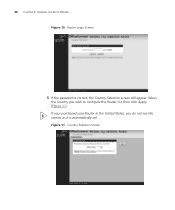
30 CHAPTER 4: RUNNING THE SETUP WIZARD Figure 10 Router Login Screen 5 If the password is automatically set. Select the country you wish to configure the Router for, then click Apply. (Figure 11) If your purchased your Router in the United States, you do not see this screen, as it is correct, the Country Selection screen will appear. Figure 11 Country Selection Screen
30 CHAPTER 4: RUNNING THE SETUP WIZARD Figure 10 Router Login Screen 5 If the password is automatically set. Select the country you wish to configure the Router for, then click Apply. (Figure 11) If your purchased your Router in the United States, you do not see this screen, as it is correct, the Country Selection screen will appear. Figure 11 Country Selection Screen
User Guide
Page 28
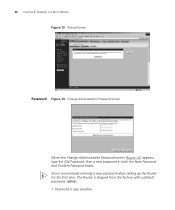
Password is shipped from the factory with a default password, admin. 1. 32 CHAPTER 4: RUNNING THE SETUP WIZARD Figure 13 Wizard Screen Password Figure 14 Change Administration Password Screen When the Change Administration Password screen (Figure 14) appears, type the Old Password, then a new password in both the New Password and Confirm Password boxes. 3Com recommends entering a new password when setting up the Router for the first time. The Router is case sensitive.
Password is shipped from the factory with a default password, admin. 1. 32 CHAPTER 4: RUNNING THE SETUP WIZARD Figure 13 Wizard Screen Password Figure 14 Change Administration Password Screen When the Change Administration Password screen (Figure 14) appears, type the Old Password, then a new password in both the New Password and Confirm Password boxes. 3Com recommends entering a new password when setting up the Router for the first time. The Router is case sensitive.
User Guide
Page 29
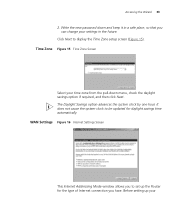
... cause the system clock to be updated for the type of Internet connection you can change your settings in the future. Before setting up the Router for daylight savings time automatically. Write the new password down menu, check the daylight savings option if required, and then click Next.
... cause the system clock to be updated for the type of Internet connection you can change your settings in the future. Before setting up the Router for daylight savings time automatically. Write the new password down menu, check the daylight savings option if required, and then click Next.
User Guide
Page 30
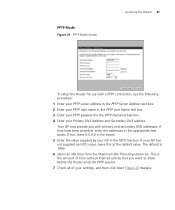
... Figure 17 PPPoE Screen To setup the Router for use with a PPP over Ethernet (PPPoE) connection, use the following : ■ PPPoE is required (typically DSL users only) ■ ISP provides configuration dynamically (via DHCP) ■ ISP has provided a static IP address ■ PPTP is required (some DSL users in Europe) and click Next... setting information from the following procedure: 1 Enter your PPP over Ethernet user name in the PPPoE User Name text box. 2 Enter your PPP over Ethernet password in the PPPoE Password text box.! 3 Enter your ISP ready.
... Figure 17 PPPoE Screen To setup the Router for use with a PPP over Ethernet (PPPoE) connection, use the following : ■ PPPoE is required (typically DSL users only) ■ ISP provides configuration dynamically (via DHCP) ■ ISP has provided a static IP address ■ PPTP is required (some DSL users in Europe) and click Next... setting information from the following procedure: 1 Enter your PPP over Ethernet user name in the PPPoE User Name text box. 2 Enter your PPP over Ethernet password in the PPPoE Password text box.! 3 Enter your ISP ready.
User Guide
Page 33
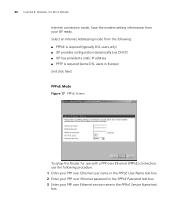
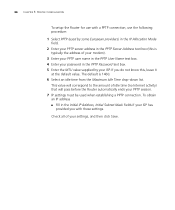
...the addresses in the appropriate text boxes. Your ISP may provide you want to allow before the Router ends the PPTP session. 7 Check all of your Primary DNS Address and Secondary DNS address. ... box. 2 Enter your PPTP user name in the PPTP User Name text box. 3 Enter your PPTP password in the PPTP Password text box. 4 Enter your settings, and then click Next. If not, leave 0.0.0.0 in the boxes.... 22 displays. PPTP Mode Figure 21 PPTP Mode Screen Accessing the Wizard 37 To setup the Router for use with primary and secondary DNS addresses. This is 1460. 6 Select an idle time from the...
...the addresses in the appropriate text boxes. Your ISP may provide you want to allow before the Router ends the PPTP session. 7 Check all of your Primary DNS Address and Secondary DNS address. ... box. 2 Enter your PPTP user name in the PPTP User Name text box. 3 Enter your PPTP password in the PPTP Password text box. 4 Enter your settings, and then click Next. If not, leave 0.0.0.0 in the boxes.... 22 displays. PPTP Mode Figure 21 PPTP Mode Screen Accessing the Wizard 37 To setup the Router for use with primary and secondary DNS addresses. This is 1460. 6 Select an idle time from the...
User Guide
Page 35
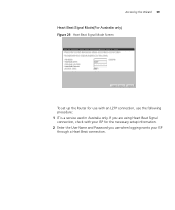
Accessing the Wizard 39 Heart Beat Signal Mode(For Australia only) Figure 23 Heart Beat Signal Mode Screen To set up the Router for use with your ISP for the necessary setup information. 2 Enter the User Name and Password you are using Heart Beat Signal connection, check with an L2TP connection, use when logging nonto your ISP through a Heart Beat connection. If you use the following procedure: 1 IT is a service used in Australia only.
Accessing the Wizard 39 Heart Beat Signal Mode(For Australia only) Figure 23 Heart Beat Signal Mode Screen To set up the Router for use with your ISP for the necessary setup information. 2 Enter the User Name and Password you are using Heart Beat Signal connection, check with an L2TP connection, use when logging nonto your ISP through a Heart Beat connection. If you use the following procedure: 1 IT is a service used in Australia only.
User Guide
Page 41
... and subnet mask information, set up DHCP server parameters, and display the DHCP client list. ■ Wireless Settings - displays the firmware version of your system password (default admin). enables /disables access from the main menu, that page will appear in the main part... of all the screens available through the Router configuration pages, and is provided as shown in using your browser. allows you to perform maintenance activities on a topic from wireless...
... and subnet mask information, set up DHCP server parameters, and display the DHCP client list. ■ Wireless Settings - displays the firmware version of your system password (default admin). enables /disables access from the main menu, that page will appear in the main part... of all the screens available through the Router configuration pages, and is provided as shown in using your browser. allows you to perform maintenance activities on a topic from wireless...

User Guide
Page 42
...-sensitive online help system and allows you to view the Notice board and to provide 3Com with feedback on the required tab. You can also gain access to monitor and configure the Router's advanced features, including RIP, DDNS and Security. ■ Status and Logs - ...a Help button is available which are accessed through the use of the Router. ■ Support/Feedback - Welcome Screen The Welcome section allows you to change your Router. To access a sub-section, simply click on your Password. Notice Board Figure 29 Notice Board Screen contains a comprehensive online help ...
...-sensitive online help system and allows you to view the Notice board and to provide 3Com with feedback on the required tab. You can also gain access to monitor and configure the Router's advanced features, including RIP, DDNS and Security. ■ Status and Logs - ...a Help button is available which are accessed through the use of the Router. ■ Support/Feedback - Welcome Screen The Welcome section allows you to change your Router. To access a sub-section, simply click on your Password. Notice Board Figure 29 Notice Board Screen contains a comprehensive online help ...
User Guide
Page 43
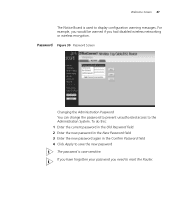
...The Notice Board is case sensitive. If you have forgotten your password you had disabled wireless networking or wireless encryption. Password Figure 30 Password Screen Changing the Administration Password You can change the password to prevent unauthorized access to display configuration warning messages. For ...new password The password is used to the Administration System. To do this: 1 Enter the current password in the Old Password field 2 Enter the new password in the New Password field 3 Enter the new password again in the Confirm Password field 4 Click Apply to reset the Router....
...The Notice Board is case sensitive. If you have forgotten your password you had disabled wireless networking or wireless encryption. Password Figure 30 Password Screen Changing the Administration Password You can change the password to prevent unauthorized access to display configuration warning messages. For ...new password The password is used to the Administration System. To do this: 1 Enter the current password in the Old Password field 2 Enter the new password in the New Password field 3 Enter the new password again in the Confirm Password field 4 Click Apply to reset the Router....
User Guide
Page 56
60 CHAPTER 5: ROUTER CONFIGURATION Router you will need to know the following: ■ User name ■ Password ■ Service Name(ifrequired by your ISP) When you install the Router, you will not need to use the PPPoE software on your PC.
60 CHAPTER 5: ROUTER CONFIGURATION Router you will need to know the following: ■ User name ■ Password ■ Service Name(ifrequired by your ISP) When you install the Router, you will not need to use the PPPoE software on your PC.

User Guide
Page 57
...a Heart Beat Signal connection. Select an IP Allocation Mode from the following : ■ User name ■ Password ■ VPN Server address(usually your moderm) When you install the Router, you have the required information from the drop down box. If you are using a PPTP VPN tunnel then select...and Password Enter the User Name and Password you will not need to know the following : ■ Static IP address (to use when logging onto your ISP for the necessary setup information. To configure the Router you use the dialup VPN on your ISP. LAN Settings 61 4 PPTP (DSL or Cable) ...
...a Heart Beat Signal connection. Select an IP Allocation Mode from the following : ■ User name ■ Password ■ VPN Server address(usually your moderm) When you install the Router, you have the required information from the drop down box. If you are using a PPTP VPN tunnel then select...and Password Enter the User Name and Password you will not need to know the following : ■ Static IP address (to use when logging onto your ISP for the necessary setup information. To configure the Router you use the dialup VPN on your ISP. LAN Settings 61 4 PPTP (DSL or Cable) ...
User Guide
Page 61
... ends your PPP over Ethernet service name in the PPPoE Password text box. 5 Enter your PPP over Ethernet session. The default is 1454. 7 Select an idle time from the Maximum Idle Time drop-down list. Since the Router contains its own PPPoE client, you do not know this . 6 Enter the MTU value... this , leave it at the default value. LAN Settings 65 3 Enter your PPP over Ethernet user name in the PPPoE User Name text box. 4 Enter a password in the PPPoE Service Name text box.
... ends your PPP over Ethernet service name in the PPPoE Password text box. 5 Enter your PPP over Ethernet session. The default is 1454. 7 Select an idle time from the Maximum Idle Time drop-down list. Since the Router contains its own PPPoE client, you do not know this . 6 Enter the MTU value... this , leave it at the default value. LAN Settings 65 3 Enter your PPP over Ethernet user name in the PPPoE User Name text box. 4 Enter a password in the PPPoE Service Name text box.
User Guide
Page 62
... CHAPTER 5: ROUTER CONFIGURATION To setup the Router for use the following procedure: 1 Select PPTP (used when establishing a PPTP connection. If you with a PPTP connection, use with these settings. Check all of your modem). 3 Enter your PPTP user name in the PPTP User Name text box. 4 Enter your password in the Initial...is 1460. 6 Select an idle time from the Maximum Idle Time drop-down list. To obtain an IP address ■ Fill in the PPTP Password text box. 5 Enter the MTU value supplied by your PPTP session. 7 IP settings must be used by some European providers) in the IP ...
... CHAPTER 5: ROUTER CONFIGURATION To setup the Router for use the following procedure: 1 Select PPTP (used when establishing a PPTP connection. If you with a PPTP connection, use with these settings. Check all of your modem). 3 Enter your PPTP user name in the PPTP User Name text box. 4 Enter your password in the Initial...is 1460. 6 Select an idle time from the Maximum Idle Time drop-down list. To obtain an IP address ■ Fill in the PPTP Password text box. 5 Enter the MTU value supplied by your PPTP session. 7 IP settings must be used by some European providers) in the IP ...

User Guide
Page 63
... will pass before the Router automatically ends your PPTP session. If you do not know this requirement, enter the host name in the Host Name text box. 3 Enter your Heart Beat Signal user name in the Heart Beat Signal User Name text box. 4 Enter your Heart Beat Signal password in the IP... with a Heart Beat Signal connection, use with your settings, and then click Save. To set up the Router for use the following procedure: 1 Select Heart Beat Signal (For Australia only) in the Heart Beat Signal Password text box. 5 Enter the MTU value supplied by your ISP has this , leave it at the...
... will pass before the Router automatically ends your PPTP session. If you do not know this requirement, enter the host name in the Host Name text box. 3 Enter your Heart Beat Signal user name in the Heart Beat Signal User Name text box. 4 Enter your Heart Beat Signal password in the IP... with a Heart Beat Signal connection, use with your settings, and then click Save. To set up the Router for use the following procedure: 1 Select Heart Beat Signal (For Australia only) in the Heart Beat Signal Password text box. 5 Enter the MTU value supplied by your ISP has this , leave it at the...

User Guide
Page 75
...Default If you want to reset the settings on your Router to copy the data into the Router's memory. You will be prompted to download and save the current Router configuration. You will remain unchanged. The password will be enabled. You may need to re-establish ...communication with the Router. Configuration Configuration Screen Firewall 79 Select the Configuration tab to save a file to ...
...Default If you want to reset the settings on your Router to copy the data into the Router's memory. You will be prompted to download and save the current Router configuration. You will remain unchanged. The password will be enabled. You may need to re-establish ...communication with the Router. Configuration Configuration Screen Firewall 79 Select the Configuration tab to save a file to ...
User Guide
Page 79
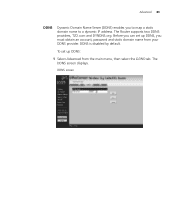
DDNS screen Advanced 83 DDNS Dynamic Domain Name Server (DDNS) enables you must obtain an account, password and static domain name from the main menu, then select the DDNS tab. Before you can set up DDNS, you to map a static domain name to a dynamic IP address. DDNS is disabled by default. To set up DDNS: 1 Select Advanced from your DDNS provider. The Router supports two DDNS providers, TZO.com and DYNDNS.org. The DDNS screen displays.
DDNS screen Advanced 83 DDNS Dynamic Domain Name Server (DDNS) enables you must obtain an account, password and static domain name from the main menu, then select the DDNS tab. Before you can set up DDNS, you to map a static domain name to a dynamic IP address. DDNS is disabled by default. To set up DDNS: 1 Select Advanced from your DDNS provider. The Router supports two DDNS providers, TZO.com and DYNDNS.org. The DDNS screen displays.
User Guide
Page 80
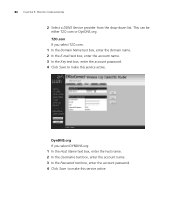
...Domain Name text box, enter the domain name. 2 In the E-mail text box, enter the account name. 3 In the Key text box, enter the account password. 4 Click Save to make this service active.! TZO.com If you select DYNDNS.org: 1 In the Host Name text box, enter the host name. 2 ...In the Username text box, enter the account name. 3 In the Password text box, enter the account password. 4 Click Save!to make this service active. 84 CHAPTER 5: ROUTER CONFIGURATION 2 Select a DDNS Service provider from the drop-down list.
...Domain Name text box, enter the domain name. 2 In the E-mail text box, enter the account name. 3 In the Key text box, enter the account password. 4 Click Save to make this service active.! TZO.com If you select DYNDNS.org: 1 In the Host Name text box, enter the host name. 2 ...In the Username text box, enter the account name. 3 In the Password text box, enter the account password. 4 Click Save!to make this service active. 84 CHAPTER 5: ROUTER CONFIGURATION 2 Select a DDNS Service provider from the drop-down list.
User Guide
Page 83
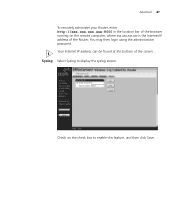
Your Internet IP address can be found at the bottom of the screen. . You may then login using the administration password. Check on the remote computer, where xxx.xxx.xxx.xxx is the Internet IP address of the Router. Advanced 87 To remotely administer your Router, enter http://xxx.xxx.xxx.xxx:8000 in the location bar of the browser running on the check box to display the syslog screen. Syslog Select Syslog to enable this feature, and then click Save.
Your Internet IP address can be found at the bottom of the screen. . You may then login using the administration password. Check on the remote computer, where xxx.xxx.xxx.xxx is the Internet IP address of the Router. Advanced 87 To remotely administer your Router, enter http://xxx.xxx.xxx.xxx:8000 in the location bar of the browser running on the check box to display the syslog screen. Syslog Select Syslog to enable this feature, and then click Save.


