User Guide
Page 3
... Wide Web site: http://www.3com.com Naming Convention Throughout this guide. Most user guides and release notes are referred to as Twisted Pair Cables throughout this guide, the OfficeConnect Wireless 54Mbps/108Mbps! 11g Cable/DSL Router is referred to install and configure the OfficeConnect Wireless 54Mbps/108Mbps 11g cable/DSL Router(3CRWER100-75 and 3CRWER200-75). Category 3 and Category 5 Twisted Pair Cables are available in the release note...
... Wide Web site: http://www.3com.com Naming Convention Throughout this guide. Most user guides and release notes are referred to as Twisted Pair Cables throughout this guide, the OfficeConnect Wireless 54Mbps/108Mbps! 11g Cable/DSL Router is referred to install and configure the OfficeConnect Wireless 54Mbps/108Mbps 11g cable/DSL Router(3CRWER100-75 and 3CRWER200-75). Category 3 and Category 5 Twisted Pair Cables are available in the release note...
User Guide
Page 5
Conventions 9 Example: ■ OfficeConnect Wireless 54Mbps/108Mbps 11g cable/DSL Router User Guide ■ Part Number DUA0554-TAAA02 ■ Page 24 Do not use this guide, each Router document set includes one Documentation Installation Guide. This guide contains the instructions you need to the Support and Safety Information sheet. Related In addition to this e-mail address for technical support questions. For information about contacting Technical Support, please refer to install and configure your Router.
Conventions 9 Example: ■ OfficeConnect Wireless 54Mbps/108Mbps 11g cable/DSL Router User Guide ■ Part Number DUA0554-TAAA02 ■ Page 24 Do not use this guide, each Router document set includes one Documentation Installation Guide. This guide contains the instructions you need to the Support and Safety Information sheet. Related In addition to this e-mail address for technical support questions. For information about contacting Technical Support, please refer to install and configure your Router.
User Guide
Page 9
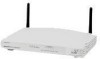
... Package Contents The Router kit includes the following items: ■ One OfficeConnect Wireless 54Mbps/108Mbps 11g cable/DSL Router ■ One power adapter for compatibility with the Router ■ Four rubber feet ■ One Ethernet cable ■ One ...CD-ROM containing the Quick Installation Guide!and this User Guide ■ Installation Guide ■ One Support and Safety Information Sheet ■ One Warranty Flyer If any of all network address settings (DHCP) ■ Acts as a Virtual server to enable remote access to -use, Web-based setup and configuration...
... Package Contents The Router kit includes the following items: ■ One OfficeConnect Wireless 54Mbps/108Mbps 11g cable/DSL Router ■ One power adapter for compatibility with the Router ■ Four rubber feet ■ One Ethernet cable ■ One ...CD-ROM containing the Quick Installation Guide!and this User Guide ■ Installation Guide ■ One Support and Safety Information Sheet ■ One Warranty Flyer If any of all network address settings (DHCP) ■ Acts as a Virtual server to enable remote access to -use, Web-based setup and configuration...
User Guide
Page 10
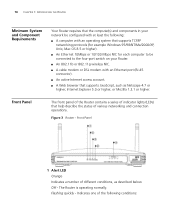
Off - 14 CHAPTER 1: INTRODUCING THE ROUTER Minimum System and Component Requirements Your Router requires that the computer(s) and components in your Router. ■ An 802.11b or 802.11g wireless NIC. ■ A cable modem or DSL modem with an Ethernet port (RJ-45 connector). ■ An active Internet access account. ■ A Web ... Windows 95/98/NT/Me/2000/XP, Unix, Mac OS 8.5 or higher). ■ An Ethernet 10Mbps or 10/100 Mbps NIC for each computer to be connected to the four-port switch on your network be configured with at least the following conditions: Figure 3 Router -
Off - 14 CHAPTER 1: INTRODUCING THE ROUTER Minimum System and Component Requirements Your Router requires that the computer(s) and components in your Router. ■ An 802.11b or 802.11g wireless NIC. ■ A cable modem or DSL modem with an Ethernet port (RJ-45 connector). ■ An active Internet access account. ■ A Web ... Windows 95/98/NT/Me/2000/XP, Unix, Mac OS 8.5 or higher). ■ An Ethernet 10Mbps or 10/100 Mbps NIC for each computer to be connected to the four-port switch on your network be configured with at least the following conditions: Figure 3 Router -
User Guide
Page 17
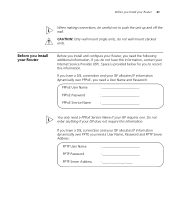
... PPTP Server Address: PPTP User Name PPTP Password PPTP Server Address Before you Install your Router Before you install and configure your Router, you do not wall mount stacked units. CAUTION: Only wall mount single units, do not have a DSL connection and your ISP allocates IP information dynamically over PPPoE, you to push the...
... PPTP Server Address: PPTP User Name PPTP Password PPTP Server Address Before you Install your Router Before you install and configure your Router, you do not wall mount stacked units. CAUTION: Only wall mount single units, do not have a DSL connection and your ISP allocates IP information dynamically over PPPoE, you to push the...
User Guide
Page 18
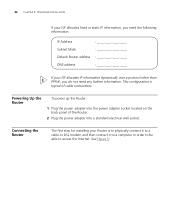
Powering Up the Router To power up the Router: 1 Plug the power adapter into the power adapter socket located on the back panel of cable connections. This configuration is to physically connect it to a cable or DSL modem and then connect it to a computer in order to be able to access the Internet. 22 CHAPTER 2: HARDWARE INSTALLATION...
Powering Up the Router To power up the Router: 1 Plug the power adapter into the power adapter socket located on the back panel of cable connections. This configuration is to physically connect it to a cable or DSL modem and then connect it to a computer in order to be able to access the Internet. 22 CHAPTER 2: HARDWARE INSTALLATION...
User Guide
Page 19
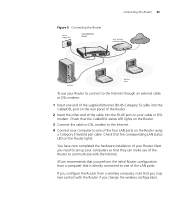
.... Connecting the Router 23 Figure 5 Connecting the Router Power Supply Unit 11g Cable/DSL Router Your existing Cable/DSL Modem Internet 12VDC 1.25A MAX POWER OK Cable/DSL 4 3 2 1 LAN Your PC Wireless Users To use of the Router to communicate with the Router if you perform the initial Router configuration from a wireless computer, note that the Cable/DSL status LED lights on the Router. 3 Connect the cable or DSL modem to...
.... Connecting the Router 23 Figure 5 Connecting the Router Power Supply Unit 11g Cable/DSL Router Your existing Cable/DSL Modem Internet 12VDC 1.25A MAX POWER OK Cable/DSL 4 3 2 1 LAN Your PC Wireless Users To use of the Router to communicate with the Router if you perform the initial Router configuration from a wireless computer, note that the Cable/DSL status LED lights on the Router. 3 Connect the cable or DSL modem to...
User Guide
Page 21
...Refer to the section below which relates to your computers need to be displayed. If your Router. Refer to Appendix A for information on the Router CD-ROM to detect and configure your computers are using a Windows 2000-based computer, use the Discovery program on using DHCP...in this , then you should be configured correctly for details on Properties. 5 A screen similar to Figure 6 should use the following procedure to change the configuration of your network, using the Discovery program. 3 SETTING UP YOUR COMPUTERS The Router has the ability to dynamically allocate network ...
...Refer to the section below which relates to your computers need to be displayed. If your Router. Refer to Appendix A for information on the Router CD-ROM to detect and configure your computers are using a Windows 2000-based computer, use the Discovery program on using DHCP...in this , then you should be configured correctly for details on Properties. 5 A screen similar to Figure 6 should use the following procedure to change the configuration of your network, using the Discovery program. 3 SETTING UP YOUR COMPUTERS The Router has the ability to dynamically allocate network ...
User Guide
Page 23
... Apple Menu, Control Panels, and TCP/IP. 2 In the TCP/IP control panel, set Connect Via: to "Ethernet". 3 In the TCP/IP control panel, set Configure: to "Using DHCP Server." 4 Close the TCP/IP dialog box, and save your changes. 5 Restart your computer. Click OK. 7 Restart your computer. Select the TCP...
... Apple Menu, Control Panels, and TCP/IP. 2 In the TCP/IP control panel, set Connect Via: to "Ethernet". 3 In the TCP/IP control panel, set Configure: to "Using DHCP Server." 4 Close the TCP/IP dialog box, and save your changes. 5 Restart your computer. Click OK. 7 Restart your computer. Select the TCP...
User Guide
Page 26
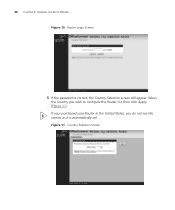
Figure 11 Country Selection Screen 30 CHAPTER 4: RUNNING THE SETUP WIZARD Figure 10 Router Login Screen 5 If the password is automatically set. Select the country you wish to configure the Router for, then click Apply. (Figure 11) If your purchased your Router in the United States, you do not see this screen, as it is correct, the Country Selection screen will appear.
Figure 11 Country Selection Screen 30 CHAPTER 4: RUNNING THE SETUP WIZARD Figure 10 Router Login Screen 5 If the password is automatically set. Select the country you wish to configure the Router for, then click Apply. (Figure 11) If your purchased your Router in the United States, you do not see this screen, as it is correct, the Country Selection screen will appear.
User Guide
Page 27
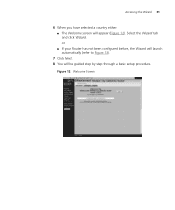
Accessing the Wizard 31 6 When you have selected a country either: ■ The Welcome screen will be guided step by step through a basic setup procedure. Select the Wizard tab and click Wizard. Figure 12 Welcome Screen or ■ If your Router has not been configured before, the Wizard will launch automatically (refer to Figure 13). 7 Click Next. 8 You will appear (Figure 12).
Accessing the Wizard 31 6 When you have selected a country either: ■ The Welcome screen will be guided step by step through a basic setup procedure. Select the Wizard tab and click Wizard. Figure 12 Welcome Screen or ■ If your Router has not been configured before, the Wizard will launch automatically (refer to Figure 13). 7 Click Next. 8 You will appear (Figure 12).
User Guide
Page 30
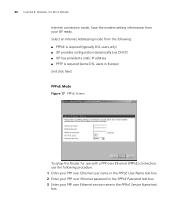
PPPoE Mode Figure 17 PPPoE Screen To setup the Router for use the following : ■ PPPoE is required (typically DSL users only) ■ ISP provides configuration dynamically (via DHCP) ■ ISP has provided a static IP address ■ PPTP is required (some DSL users in the PPPoE Service Name text box. Select an Internet Addressing mode...
PPPoE Mode Figure 17 PPPoE Screen To setup the Router for use the following : ■ PPPoE is required (typically DSL users only) ■ ISP provides configuration dynamically (via DHCP) ■ ISP has provided a static IP address ■ PPTP is required (some DSL users in the PPPoE Service Name text box. Select an Internet Addressing mode...
User Guide
Page 31
Dynamic IP Address Mode To setup the Router for use with a dynamic IP address connection: 1 Select the ISP provides configuration dynamically (via DHCP) and then click Next. Figure 19 Clone MAC Address Screen Figure 18 Hostname Screen 2 Some ISPs require a host name. If your settings, ... the host name in the MTU text box. The default is the amount of time without Internet activity that you want to allow before the Router ends the PPPoE session. 6 Check all of your ISP has this at the default value. If your ISP in the Host Name text box (Figure...
Dynamic IP Address Mode To setup the Router for use with a dynamic IP address connection: 1 Select the ISP provides configuration dynamically (via DHCP) and then click Next. Figure 19 Clone MAC Address Screen Figure 18 Hostname Screen 2 Some ISPs require a host name. If your settings, ... the host name in the MTU text box. The default is the amount of time without Internet activity that you want to allow before the Router ends the PPPoE session. 6 Check all of your ISP has this at the default value. If your ISP in the Host Name text box (Figure...
User Guide
Page 36
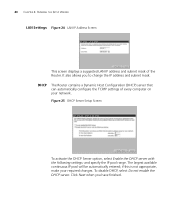
... to change the IP address and subnet mask. if this is not appropriate, make your network. DHCP The Router contains a Dynamic Host Configuration (DHCP) server that can automatically configure the TCP/IP settings of the Router. To disable DHCP, select Do not enable the DHCP server. 40 CHAPTER 4: RUNNING THE SETUP WIZARD LAN Settings...
... to change the IP address and subnet mask. if this is not appropriate, make your network. DHCP The Router contains a Dynamic Host Configuration (DHCP) server that can automatically configure the TCP/IP settings of the Router. To disable DHCP, select Do not enable the DHCP server. 40 CHAPTER 4: RUNNING THE SETUP WIZARD LAN Settings...
User Guide
Page 37
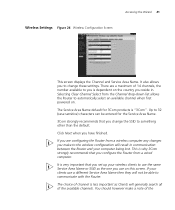
Selecting Clear Channel Select from the Channel drop-down list allows the Router to you is why 3Com strongly recommends that you change these settings. The Service Area Name default for the Service Area Name. 3Com strongly recommends that you configure the Router from a wireless computer any changes you make a note of 14 channels, the number available...
Selecting Clear Channel Select from the Channel drop-down list allows the Router to you is why 3Com strongly recommends that you change these settings. The Service Area Name default for the Service Area Name. 3Com strongly recommends that you configure the Router from a wireless computer any changes you make a note of 14 channels, the number available...
User Guide
Page 38
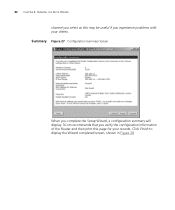
42 CHAPTER 4: RUNNING THE SETUP WIZARD channel you experience problems with your records. Summary Figure 27 Configuration Summary Screen When you complete the Setup Wizard, a configuration summary will display. 3Com recommends that you verify the configuration information of the Router and then print this may be useful if you select as this page for your clients. Click Finish to display the Wizard completed screen, shown in Figure 28
42 CHAPTER 4: RUNNING THE SETUP WIZARD channel you experience problems with your records. Summary Figure 27 Configuration Summary Screen When you complete the Setup Wizard, a configuration summary will display. 3Com recommends that you verify the configuration information of the Router and then print this may be useful if you select as this page for your clients. Click Finish to display the Wizard completed screen, shown in Figure 28
User Guide
Page 39
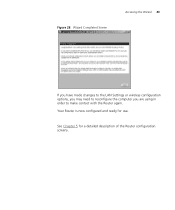
Figure 28 Wizard Completed Screen Accessing the Wizard 43 If you have made changes to the LAN Settings or wireless configuration options, you may need to reconfigure the computer you are using in order to make contact with the Router again. See Chapter 5 for use. Your Router is now configured and ready for a detailed description of the Router configuration screens.
Figure 28 Wizard Completed Screen Accessing the Wizard 43 If you have made changes to the LAN Settings or wireless configuration options, you may need to reconfigure the computer you are using in order to make contact with the Router again. See Chapter 5 for use. Your Router is now configured and ready for a detailed description of the Router configuration screens.
User Guide
Page 41
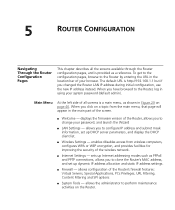
... password, and launch the Wizard ■ LAN Settings - 5 ROUTER CONFIGURATION Navigating Through the Router Configuration Pages This chapter describes all screens is a main menu, as shown in Figure 29 on a topic from wireless computers, configures WPA or WEP encryption, and provides facilities for improving the security of the wireless network. ■ Internet Settings - allows the administrator to...
... password, and launch the Wizard ■ LAN Settings - 5 ROUTER CONFIGURATION Navigating Through the Router Configuration Pages This chapter describes all screens is a main menu, as shown in Figure 29 on a topic from wireless computers, configures WPA or WEP encryption, and provides facilities for improving the security of the wireless network. ■ Internet Settings - allows the administrator to...

User Guide
Page 42
...; Support/Feedback - Notice Board Figure 29 Notice Board Screen Welcome Screen The Welcome section allows you to monitor and configure the Router's advanced features, including RIP, DDNS and Security. ■ Status and Logs - Option Tabs Each corresponding menu page may also provide sub...can also gain access to the current screen. allows you to view the Notice board and to provide 3Com with feedback on the required tab. Click Help for example). 46 CHAPTER 5: ROUTER CONFIGURATION ■ Advanced - displays the current status and activity logs of tabs (see Figure 29 for further...
...; Support/Feedback - Notice Board Figure 29 Notice Board Screen Welcome Screen The Welcome section allows you to monitor and configure the Router's advanced features, including RIP, DDNS and Security. ■ Status and Logs - Option Tabs Each corresponding menu page may also provide sub...can also gain access to the current screen. allows you to view the Notice board and to provide 3Com with feedback on the required tab. Click Help for example). 46 CHAPTER 5: ROUTER CONFIGURATION ■ Advanced - displays the current status and activity logs of tabs (see Figure 29 for further...
User Guide
Page 43
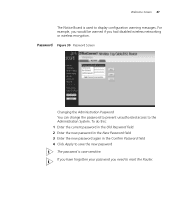
... had disabled wireless networking or wireless encryption. To do this: 1 Enter the current password in the Old Password field 2 Enter the new password in the New Password field 3 Enter the new password again in the Confirm Password field 4 Click Apply to save the new password The password is used to display configuration warning...
... had disabled wireless networking or wireless encryption. To do this: 1 Enter the current password in the Old Password field 2 Enter the new password in the New Password field 3 Enter the new password again in the Confirm Password field 4 Click Apply to save the new password The password is used to display configuration warning...

