
User Guide
Page 5
... 99 Logs 100 Support/Feedback 100 Support 100 Feedback 101 6 TROUBLESHOOTING Basic Connection Checks 103 Browsing to the Router Configuration Screens 103 Connecting to the Internet 104 Forgotten Password and Reset to Factory Defaults 105 Wireless Networking 105 Replacement Power Adapters 107 Alert LED 108 Recovering from Corrupted Software 108 Frequently Asked Questions 109
... 99 Logs 100 Support/Feedback 100 Support 100 Feedback 101 6 TROUBLESHOOTING Basic Connection Checks 103 Browsing to the Router Configuration Screens 103 Connecting to the Internet 104 Forgotten Password and Reset to Factory Defaults 105 Wireless Networking 105 Replacement Power Adapters 107 Alert LED 108 Recovering from Corrupted Software 108 Frequently Asked Questions 109

User Guide
Page 15
..., the link is OK and data is OK. On for you have used a cable to reset the unit to Factory Defaults, follow steps 5 to 7 in "Forgotten Password and Reset to Factory Defaults" on it indicates that the Router is powered on. 3 Wireless LAN (WLAN) Status LED Yellow If the LED is on page 105. Refer to...
..., the link is OK and data is OK. On for you have used a cable to reset the unit to Factory Defaults, follow steps 5 to 7 in "Forgotten Password and Reset to Factory Defaults" on it indicates that the Router is powered on. 3 Wireless LAN (WLAN) Status LED Yellow If the LED is on page 105. Refer to...

User Guide
Page 29
Figure 9 Web Browser Location Field (Factory Default) 4 To log in as an administrator, enter the password (the default setting is accessed through your Web browser (Netscape Navigator 4.7 or higher, Internet Explorer 5.0 or higher, or Mozilla 1.2.1 or higher). The Login screen displays. ...://192.168.1.1 (Figure 9). To use the Setup Wizard: 1 Ensure that it is admin) in the System Password field and click Log in (Figure 10). 4 RUNNING THE SETUP WIZARD Accessing the Wizard The Router setup program is Web-based, which means that you have at least one computer connected to do this...
Figure 9 Web Browser Location Field (Factory Default) 4 To log in as an administrator, enter the password (the default setting is accessed through your Web browser (Netscape Navigator 4.7 or higher, Internet Explorer 5.0 or higher, or Mozilla 1.2.1 or higher). The Login screen displays. ...://192.168.1.1 (Figure 9). To use the Setup Wizard: 1 Ensure that it is admin) in the System Password field and click Log in (Figure 10). 4 RUNNING THE SETUP WIZARD Accessing the Wizard The Router setup program is Web-based, which means that you have at least one computer connected to do this...

User Guide
Page 32
Password is shipped from the factory with a default password, admin. 1. The Router is case sensitive. 32 CHAPTER 4: RUNNING THE SETUP WIZARD Figure 13 Wizard Screen Password Figure 14 Change Administration Password Screen When the Change Administration Password screen (Figure 14) appears, type the Old Password, then a new password in both the New Password and Confirm Password boxes. 3Com recommends entering a new password when setting up the Router for the first time.
Password is shipped from the factory with a default password, admin. 1. The Router is case sensitive. 32 CHAPTER 4: RUNNING THE SETUP WIZARD Figure 13 Wizard Screen Password Figure 14 Change Administration Password Screen When the Change Administration Password screen (Figure 14) appears, type the Old Password, then a new password in both the New Password and Confirm Password boxes. 3Com recommends entering a new password when setting up the Router for the first time.

User Guide
Page 37
... 0.0.0.0 in the boxes. 5 Enter the value supplied by your Primary DNS Address and Secondary DNS address. The default is optional. PPTP Mode Figure 21 PPTP Mode Screen To setup the Router for use with primary and secondary DNS addresses. Not all ISPs require a secondary DNS address. 7 Check all of... your ISP has not supplied an MTU value, leave this at the default value. This step is 1460. If they have been provided, enter the addresses in the PPTP Password ...
... 0.0.0.0 in the boxes. 5 Enter the value supplied by your Primary DNS Address and Secondary DNS address. The default is optional. PPTP Mode Figure 21 PPTP Mode Screen To setup the Router for use with primary and secondary DNS addresses. Not all ISPs require a secondary DNS address. 7 Check all of... your ISP has not supplied an MTU value, leave this at the default value. This step is 1460. If they have been provided, enter the addresses in the PPTP Password ...

User Guide
Page 39
... Accessing the Wizard 39 To set up the Router for use the following procedure: 1 Enter your L2TP server address in the L2TP Server Address text box. 2 Enter your L2TP user name in the L2TP User Name text box. 3 Enter your L2TP password in the L2TP Password text box. 4 Enter your Primary DNS Address... DNS addresses. If not, leave 0.0.0.0 in the boxes. 5 Enter the value supplied by your ISP has not supplied an MTU value, leave this at the default value. Your ISP may provide you want to allow before the Router ends the L2TP session. If your ISP in the appropriate text boxes.
... Accessing the Wizard 39 To set up the Router for use the following procedure: 1 Enter your L2TP server address in the L2TP Server Address text box. 2 Enter your L2TP user name in the L2TP User Name text box. 3 Enter your L2TP password in the L2TP Password text box. 4 Enter your Primary DNS Address... DNS addresses. If not, leave 0.0.0.0 in the boxes. 5 Enter the value supplied by your ISP has not supplied an MTU value, leave this at the default value. Your ISP may provide you want to allow before the Router ends the L2TP session. If your ISP in the appropriate text boxes.
User Guide
Page 45
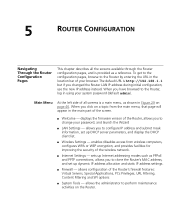
...appear in the main part of the wireless network. ■ Internet Settings - sets up Internet addressing modes such as a reference. allows configuration of your browser. allows the administrator to the Router, log in using your password, and launch the Wizard ■ LAN...displays the firmware version of all the screens available through the Router configuration pages, and is http://192.168.1.1 but if you to change your system password (default admin). 5 ROUTER CONFIGURATION Navigating Through the Router Configuration Pages This chapter describes all screens is a main menu...
...appear in the main part of the wireless network. ■ Internet Settings - sets up Internet addressing modes such as a reference. allows configuration of your browser. allows the administrator to the Router, log in using your password, and launch the Wizard ■ LAN...displays the firmware version of all the screens available through the Router configuration pages, and is http://192.168.1.1 but if you to change your system password (default admin). 5 ROUTER CONFIGURATION Navigating Through the Router Configuration Pages This chapter describes all screens is a main menu...

User Guide
Page 47
... Password You can change the password to prevent unauthorized access to Factory Defaults" on page 105 To do this: 1 Enter the current password in the Old Password field 2 Enter the new password in the New Password field 3 Enter the new password again in the Confirm Password field 4 Click Apply to save the new password The password is used to reset the Router...
... Password You can change the password to prevent unauthorized access to Factory Defaults" on page 105 To do this: 1 Enter the current password in the Old Password field 2 Enter the new password in the New Password field 3 Enter the new password again in the Confirm Password field 4 Click Apply to save the new password The password is used to reset the Router...

User Guide
Page 70
70 CHAPTER 5: ROUTER CONFIGURATION 4 Enter your PPP over Ethernet user name in the PPPoE User Name text box. 5 Enter a password in the PPPoE Password text box. 6 Enter your PPP over Ethernet session. If you no Internet activity) that will correspond to the amount of idle time (no longer need ... on your ISP. PPTP Figure 50 PPTP Setup Screen Not all ISPs require a PPPoE service name. The default is 1454. 8 Select an idle time from the Maximum Idle Time drop-down list. Since the Router contains its own PPPoE client, you do not know this . 7 Enter the MTU value supplied by your...
70 CHAPTER 5: ROUTER CONFIGURATION 4 Enter your PPP over Ethernet user name in the PPPoE User Name text box. 5 Enter a password in the PPPoE Password text box. 6 Enter your PPP over Ethernet session. If you no Internet activity) that will correspond to the amount of idle time (no longer need ... on your ISP. PPTP Figure 50 PPTP Setup Screen Not all ISPs require a PPPoE service name. The default is 1454. 8 Select an idle time from the Maximum Idle Time drop-down list. Since the Router contains its own PPPoE client, you do not know this . 7 Enter the MTU value supplied by your...

User Guide
Page 71
If they have been provided, enter the addresses in your DSL modem, click Suggest to select an IP address on the network. With this , leave it at the default value. If not, leave 0.0.0.0 in the boxes. 6 ...text box (this is located in the appropriate text boxes. Internet Settings 71 To setup the Router for the Router, or click Renew to renew the current WAN IP Address, using DHCP. ■ Fill ... 3 Enter your PPTP user name in the PPTP User Name text box. 4 Enter your password in the PPTP Password text box. 5 Enter your Primary DNS Address and Secondary DNS address. If you do not ...
If they have been provided, enter the addresses in your DSL modem, click Suggest to select an IP address on the network. With this , leave it at the default value. If not, leave 0.0.0.0 in the boxes. 6 ...text box (this is located in the appropriate text boxes. Internet Settings 71 To setup the Router for the Router, or click Renew to renew the current WAN IP Address, using DHCP. ■ Fill ... 3 Enter your PPTP user name in the PPTP User Name text box. 4 Enter your password in the PPTP Password text box. 5 Enter your Primary DNS Address and Secondary DNS address. If you do not ...

User Guide
Page 72
...of idle time (no Internet activity) that will pass before the Router automatically ends your ISP to make sure they have been provided, enter the addresses in the L2TP Password text box. 5 Enter your ISP. To obtain an IP address, either: The default is 1440. 7 Select an idle time from the Maximum Idle...the L2TP User Name text box. 4 Enter your L2TP password in the appropriate text boxes. If you with primary and secondary DNS addresses. Your ISP may provide you do not know this, leave it at the default value. To set up the Router for use with an L2TP connection, use the following ...
...of idle time (no Internet activity) that will pass before the Router automatically ends your ISP to make sure they have been provided, enter the addresses in the L2TP Password text box. 5 Enter your ISP. To obtain an IP address, either: The default is 1440. 7 Select an idle time from the Maximum Idle...the L2TP User Name text box. 4 Enter your L2TP password in the appropriate text boxes. If you with primary and secondary DNS addresses. Your ISP may provide you do not know this, leave it at the default value. To set up the Router for use with an L2TP connection, use the following ...

User Guide
Page 86
... blank, this type of a hacker attack. 6 Enter your SMTP Server Address. 7 Enter your SMTP Server User Name. 8 Enter your SMTP Server Password. The default is 30 seconds. 14 In the H.323 data channel idle timeout text box, enter the length of time, in seconds, that you want a UDP... enter the length of time, in seconds, that you want the Router to wait for a TCP session to remain active after the Router detects a FIN packet. The default is no activity. The default is 180 seconds. 86 CHAPTER 5: ROUTER CONFIGURATION 3 If required, check the Enable RIP defect check box. This...
... blank, this type of a hacker attack. 6 Enter your SMTP Server Address. 7 Enter your SMTP Server User Name. 8 Enter your SMTP Server Password. The default is 30 seconds. 14 In the H.323 data channel idle timeout text box, enter the length of time, in seconds, that you want a UDP... enter the length of time, in seconds, that you want the Router to wait for a TCP session to remain active after the Router detects a FIN packet. The default is no activity. The default is 180 seconds. 86 CHAPTER 5: ROUTER CONFIGURATION 3 If required, check the Enable RIP defect check box. This...

User Guide
Page 90
Once you have done this, select Browse to tell your web browser where this has completed, the Router will restart. The password will lose all your computer to re-establish communication with the Router. You may make a backup of system software that were loaded at the factory, click RESET. To ...to a file, press Browse to locate the backup file on your Router to install on your computer, and then click Apply. Reset to Factory Default If you to those that 3Com may need to download the software from the 3Com support web site to a folder on the LAN will be copied...
Once you have done this, select Browse to tell your web browser where this has completed, the Router will restart. The password will lose all your computer to re-establish communication with the Router. You may make a backup of system software that were loaded at the factory, click RESET. To ...to a file, press Browse to locate the backup file on your Router to install on your computer, and then click Apply. Reset to Factory Default If you to those that 3Com may need to download the software from the 3Com support web site to a folder on the LAN will be copied...

User Guide
Page 94
DDNS is displayed in the format shown in Figure 73 Figure 73 Routing Table screen DDNS Dynamic Domain Name Server (DDNS) enables you must obtain an account, password and static domain name from your DDNS provider. Before you can set up DDNS, you to map a static domain name to display routing information used by default. The Router supports two DDNS providers, TZO.com and DYNDNS.org. The information is disabled by the Router. 94 CHAPTER 5: ROUTER CONFIGURATION Routing Table Select the Routing table tab to a dynamic IP address.
DDNS is displayed in the format shown in Figure 73 Figure 73 Routing Table screen DDNS Dynamic Domain Name Server (DDNS) enables you must obtain an account, password and static domain name from your DDNS provider. Before you can set up DDNS, you to map a static domain name to display routing information used by default. The Router supports two DDNS providers, TZO.com and DYNDNS.org. The information is disabled by the Router. 94 CHAPTER 5: ROUTER CONFIGURATION Routing Table Select the Routing table tab to a dynamic IP address.

User Guide
Page 95
The DDNS screen displays (Figure 74). DynDNS.org If you want the service to make this service active. The default is three days. 5 Click Apply to automatically refresh, in days. Figure 74 DDNS screen 2 Select a DDNS Service provider from the main menu, then select the ... Name text box, enter the domain name. 2 In the Username/E-mail text box, enter the account name. 3 In the Key text box, enter the account password. 4 In the Refresh Time box, enter how often you select DYNDNS.org: 1 In the Host Name text box, enter the host name. 2 In the Username...
The DDNS screen displays (Figure 74). DynDNS.org If you want the service to make this service active. The default is three days. 5 Click Apply to automatically refresh, in days. Figure 74 DDNS screen 2 Select a DDNS Service provider from the main menu, then select the ... Name text box, enter the domain name. 2 In the Username/E-mail text box, enter the account name. 3 In the Key text box, enter the account password. 4 In the Refresh Time box, enter how often you select DYNDNS.org: 1 In the Host Name text box, enter the host name. 2 In the Username...

User Guide
Page 104
Check that the PPPoE or PPTP user name, password and service name are correct, if these are not correct, use the Discovery program on both Router and modem are illuminated. ■ Confirm that the connection between the modem and the cable/DSL interface is 192.168.1.1 (the address of the form 192.168....1.xxx (where xxx is in the range 2-254), the subnet mask is 255.255.255.0, and the default Router is OK. ■ Ensure that your computer has received the...
Check that the PPPoE or PPTP user name, password and service name are correct, if these are not correct, use the Discovery program on both Router and modem are illuminated. ■ Confirm that the connection between the modem and the cable/DSL interface is 192.168.1.1 (the address of the form 192.168....1.xxx (where xxx is in the range 2-254), the subnet mask is 255.255.255.0, and the default Router is OK. ■ Ensure that your computer has received the...

User Guide
Page 105
... browse to the Router configuration screen but cannot log on because you do not know or have an 802.11b or 802.11g wireless adapter for each Wireless computer has either ...Router. Forgotten Password and Reset to Factory Defaults 105 Forgotten Password and Reset to Factory Defaults If you can re-establish your wireless computers are configured to work in Infrastructure mode. CAUTION: All your configuration changes will be convenient. 1 Remove power from the Router. 2 Disconnect all your computers and the cable/DSL modem from the Router. 5 Remove the cable connecting the Cable/DSL...
... browse to the Router configuration screen but cannot log on because you do not know or have an 802.11b or 802.11g wireless adapter for each Wireless computer has either ...Router. Forgotten Password and Reset to Factory Defaults 105 Forgotten Password and Reset to Factory Defaults If you can re-establish your wireless computers are configured to work in Infrastructure mode. CAUTION: All your configuration changes will be convenient. 1 Remove power from the Router. 2 Disconnect all your computers and the cable/DSL modem from the Router. 5 Remove the cable connecting the Cable/DSL...

User Guide
Page 109
...to upload a new copy of the system software to 192.168.1.1. Frequently Asked Questions How do I reset the Router to reconfigure this state. See "Forgotten Password and Reset to the Router. 4 Using the Web browser on the computer, enter the following the upload, it may be faulty. If...Ensure that one computer with the software image. 2 You will need to Factory Defaults? Frequently Asked Questions 109 address is available on 3Com's Web site at: www.3com.com. 1 Remove power from the Router and disconnect the Cable/DSL modem and all your computers, except for the one of your computers has ...
...to upload a new copy of the system software to 192.168.1.1. Frequently Asked Questions How do I reset the Router to reconfigure this state. See "Forgotten Password and Reset to the Router. 4 Using the Web browser on the computer, enter the following the upload, it may be faulty. If...Ensure that one computer with the software image. 2 You will need to Factory Defaults? Frequently Asked Questions 109 address is available on 3Com's Web site at: www.3com.com. 1 Remove power from the Router and disconnect the Cable/DSL modem and all your computers, except for the one of your computers has ...

User Guide
Page 138
138 INDEX wireless 14 Nitro Mode 54 P Password 29, 47 PC Privileges 77 PING 97 PPPoE 21, 28, 34, 65, 69 PPTP 21, 66, 70 Profile 64 R Remote Administration 97 Reset to Factory Defaults 90, 105 Restart 88 RIP 92 setting up 92 routing table 94 S Safety Information 19 security advanced settings 96 remote... standards 117 Time Zone 33, 88 U Unit Configuration 48 Upgrade 90 URL Filter 80 V Virtual Servers 73, 74 W WAN 33 WDS 63 Web Proxy 28 Wireless authorized PCs 61 channel selection 52 client list 62 configuration 52 connection control 60 encryption 54 LED 15 networking 105 NIC 14 service area name...
138 INDEX wireless 14 Nitro Mode 54 P Password 29, 47 PC Privileges 77 PING 97 PPPoE 21, 28, 34, 65, 69 PPTP 21, 66, 70 Profile 64 R Remote Administration 97 Reset to Factory Defaults 90, 105 Restart 88 RIP 92 setting up 92 routing table 94 S Safety Information 19 security advanced settings 96 remote... standards 117 Time Zone 33, 88 U Unit Configuration 48 Upgrade 90 URL Filter 80 V Virtual Servers 73, 74 W WAN 33 WDS 63 Web Proxy 28 Wireless authorized PCs 61 channel selection 52 client list 62 configuration 52 connection control 60 encryption 54 LED 15 networking 105 NIC 14 service area name...


