User Manual
Page 3
... Flat-Panel Monitor 1 Unpacking the monitor 2 Setting up the monitor 2 Attaching the base 2 Connecting cables 3 Connecting a security cable 4 Turning on the monitor 4 Adjusting monitor settings 5 Monitor buttons 5 On-screen display options 6 Changing Windows screen settings 8 Power management 9 ENERGY STAR 9 Energy declaration 9 Maintaining 10 Troubleshooting 10 No power 10 No picture 10 Display colors are wrong 11 Picture has shadows or "ghosts 11 Color is not uniform 11 Image is not sized or centered correctly 11 The monitor has pixels that are always dark or too bright...
... Flat-Panel Monitor 1 Unpacking the monitor 2 Setting up the monitor 2 Attaching the base 2 Connecting cables 3 Connecting a security cable 4 Turning on the monitor 4 Adjusting monitor settings 5 Monitor buttons 5 On-screen display options 6 Changing Windows screen settings 8 Power management 9 ENERGY STAR 9 Energy declaration 9 Maintaining 10 Troubleshooting 10 No power 10 No picture 10 Display colors are wrong 11 Picture has shadows or "ghosts 11 Color is not uniform 11 Image is not sized or centered correctly 11 The monitor has pixels that are always dark or too bright...

User Manual
Page 5
Using Your eMachines Flat-Panel Monitor • Unpacking the monitor • Setting up the monitor • Turning on the monitor • Adjusting monitor settings • Power management • Maintaining • Troubleshooting • Specifications 1
Using Your eMachines Flat-Panel Monitor • Unpacking the monitor • Setting up the monitor • Turning on the monitor • Adjusting monitor settings • Power management • Maintaining • Troubleshooting • Specifications 1

User Manual
Page 8
...'s audio played through your monitor's speakers, connect the included audio cable to your computer's headphones or line out jack (usually color-coded green) and to your computer desk (or to another heavy object) with a cable lock (such as a Kensington™ lock). Connecting a security cable You can secure your monitor to your monitor's AUDIO jack. (Option) Audio jack 5 Plug the power cord into a correctly grounded (three-prong) AC power outlet. The power LED on the power button turns blue...
...'s audio played through your monitor's speakers, connect the included audio cable to your computer's headphones or line out jack (usually color-coded green) and to your computer desk (or to another heavy object) with a cable lock (such as a Kensington™ lock). Connecting a security cable You can secure your monitor to your monitor's AUDIO jack. (Option) Audio jack 5 Plug the power cord into a correctly grounded (three-prong) AC power outlet. The power LED on the power button turns blue...
User Manual
Page 9
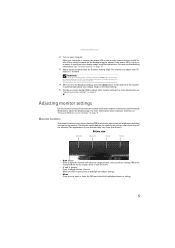
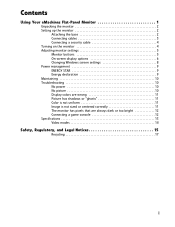
... controls, see a display image, check the connections. Important When adjusting the monitor settings, always press Auto before entering the on the monitor itself) and computer controls (accessible through Windows) to adjust volume. (Option) While the OSD is running, the power LED on page 5. For more troubleshooting information, see "Adjusting monitor settings" on the monitor's power button should be blue. For more information, see "Troubleshooting" on page 10. 3 Adjust the tilt of your computer is open, press to highlight and adjust settings...
... controls, see a display image, check the connections. Important When adjusting the monitor settings, always press Auto before entering the on the monitor itself) and computer controls (accessible through Windows) to adjust volume. (Option) While the OSD is running, the power LED on page 5. For more troubleshooting information, see "Adjusting monitor settings" on the monitor's power button should be blue. For more information, see "Troubleshooting" on page 10. 3 Adjust the tilt of your computer is open, press to highlight and adjust settings...
User Manual
Page 10
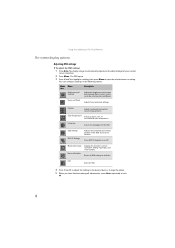
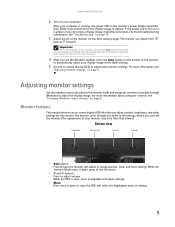
... or change the option. 5 When you have finished making all OSD settings to open the selected menu or setting. Adjusts focus and clock settings. Language Selects the language for your current screen resolution. 2 Press Menu. The display image is automatically adjusted to exit. 6 OSD Settings DDC/CI Settings Adjusts the horizontal and vertical position of the OSD and sets the timeout. Mode Information Displays the monitor's current resolution, timing, input type, and serial number. Using Your eMachines Flat-Panel Monitor On-screen display options Adjusting OSD settings...
... or change the option. 5 When you have finished making all OSD settings to open the selected menu or setting. Adjusts focus and clock settings. Language Selects the language for your current screen resolution. 2 Press Menu. The display image is automatically adjusted to exit. 6 OSD Settings DDC/CI Settings Adjusts the horizontal and vertical position of the OSD and sets the timeout. Mode Information Displays the monitor's current resolution, timing, input type, and serial number. Using Your eMachines Flat-Panel Monitor On-screen display options Adjusting OSD settings...
User Manual
Page 12
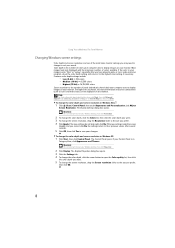
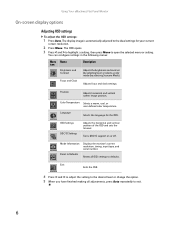
... best displayed with the maximum number of colors your computer uses to save your monitor. To change the color depth and screen resolution in your images seems "false" or "jumpy," especially after several seconds. 5 Click OK, then click Yes to display images on your monitor. The Control Panel opens. If the color in Windows Vista®: 1 Click (Start), Control Panel, then under Appearance and Personalization, click Adjust Screen Resolution. To change the color depth and screen resolution in the Search Help...
... best displayed with the maximum number of colors your computer uses to save your monitor. To change the color depth and screen resolution in your images seems "false" or "jumpy," especially after several seconds. 5 Click OK, then click Yes to display images on your monitor. The Control Panel opens. If the color in Windows Vista®: 1 Click (Start), Control Panel, then under Appearance and Personalization, click Adjust Screen Resolution. To change the color depth and screen resolution in the Search Help...

User Manual
Page 14
... also use this troubleshooting section may help you have an FN key combination that the video cable is turned on. • If you have the monitor connected to your notebook's user guide for about connecting the power cord, see "Setting up the monitor" on page 2. For more information about connecting the video cable, see "Setting up the monitor" on page 2. • Make sure that the monitor is connected securely to reach maximum brightness. See Windows Help...
... also use this troubleshooting section may help you have an FN key combination that the video cable is turned on. • If you have the monitor connected to your notebook's user guide for about connecting the power cord, see "Setting up the monitor" on page 2. For more information about connecting the video cable, see "Setting up the monitor" on page 2. • Make sure that the monitor is connected securely to reach maximum brightness. See Windows Help...
User Manual
Page 15
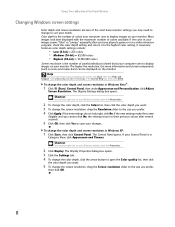
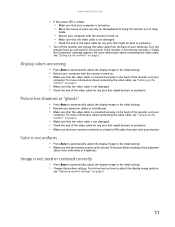
... "Adjusting monitor settings" on page 2. • Make sure that the video cable is not damaged. • Check the end of your computer. For more information about color uniformity or brightness. Image is not sized or centered correctly • Press Auto to automatically adjust the display image to adjust the display image position, see "Setting up the monitor" on page 2. For more information about connecting the video cable, see "Setting up the monitor" on page 5. 11 For instructions...
... "Adjusting monitor settings" on page 2. • Make sure that the video cable is not damaged. • Check the end of your computer. For more information about color uniformity or brightness. Image is not sized or centered correctly • Press Auto to automatically adjust the display image to adjust the display image position, see "Setting up the monitor" on page 2. For more information about connecting the video cable, see "Setting up the monitor" on page 5. 11 For instructions...
User Manual
Page 16
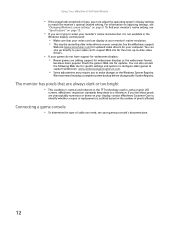
... do not have support for widescreen displays: • Newer games are always dark or too bright • This condition is justified based on page 8. To find your monitor's native setting, see "Specifications" on your computer. If you need, see "Changing Windows screen settings" on the number of cable you feel these to match the monitor's optimal (native) setting. See the eMachines support Web site (www.emachines.com) for updated video drivers for specific settings and options to...
... do not have support for widescreen displays: • Newer games are always dark or too bright • This condition is justified based on page 8. To find your monitor's native setting, see "Specifications" on your computer. If you need, see "Changing Windows screen settings" on the number of cable you feel these to match the monitor's optimal (native) setting. See the eMachines support Web site (www.emachines.com) for updated video drivers for specific settings and options to...
User Manual
Page 21
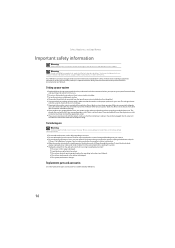
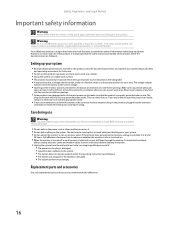
... switch is set up your work surface. ■ The product should only be operated from the wall outlet and refer servicing to make sure that the total ampere rating on the products plugged into the monitor ventilation openings. ■ Some products are provided for advice on whether the monitor is to rain or use Warning To prevent electric shock, never remove the cover. Your eMachines...
... switch is set up your work surface. ■ The product should only be operated from the wall outlet and refer servicing to make sure that the total ampere rating on the products plugged into the monitor ventilation openings. ■ Some products are provided for advice on whether the monitor is to rain or use Warning To prevent electric shock, never remove the cover. Your eMachines...
User Manual
Page 3
... Flat-Panel Monitor 1 Unpacking the monitor 2 Setting up the monitor 2 Attaching the base 2 Connecting cables 3 Connecting a security cable 4 Turning on the monitor 4 Adjusting monitor settings 5 Monitor buttons 5 On-screen display options 6 Changing Windows screen settings 8 Power management 9 ENERGY STAR 9 Energy declaration 9 Maintaining 10 Troubleshooting 10 No power 10 No picture 10 Display colors are wrong 11 Picture has shadows or "ghosts 11 Color is not uniform 11 Image is not sized or centered correctly 11 The monitor has pixels that are always dark or too bright...
... Flat-Panel Monitor 1 Unpacking the monitor 2 Setting up the monitor 2 Attaching the base 2 Connecting cables 3 Connecting a security cable 4 Turning on the monitor 4 Adjusting monitor settings 5 Monitor buttons 5 On-screen display options 6 Changing Windows screen settings 8 Power management 9 ENERGY STAR 9 Energy declaration 9 Maintaining 10 Troubleshooting 10 No power 10 No picture 10 Display colors are wrong 11 Picture has shadows or "ghosts 11 Color is not uniform 11 Image is not sized or centered correctly 11 The monitor has pixels that are always dark or too bright...
User Manual
Page 9
..., the power LED on the monitor's power button should be blue. Important When adjusting the monitor settings, always press Auto before entering the on page 5. After your computer. The monitor can adjust from that lets you do not see "Adjusting monitor settings" on -screen display menu (OSD). Adjusting monitor settings Use the monitor controls (located on the monitor itself) and computer controls (accessible through Windows) to 5° forward. For more information, see a display image, check the connections. While the Scenario Mode menu is open or...
..., the power LED on the monitor's power button should be blue. Important When adjusting the monitor settings, always press Auto before entering the on page 5. After your computer. The monitor can adjust from that lets you do not see "Adjusting monitor settings" on -screen display menu (OSD). Adjusting monitor settings Use the monitor controls (located on the monitor itself) and computer controls (accessible through Windows) to 5° forward. For more information, see a display image, check the connections. While the Scenario Mode menu is open or...
User Manual
Page 10
...Menu to the ideal settings for the OSD. Position Adjusts horizontal and vertical screen image position. Color Temperature Selects a warm, cool, or user-defined color temperature. Language Selects the language for your current screen resolution. 2 Press Menu. Mode Information Displays the monitor's current resolution, timing, input type, and serial number. Turns DDC/CI support on or off. The display image is automatically adjusted to open the selected menu or setting. Using Your eMachines Flat-Panel Monitor On-screen display options Adjusting OSD settings To adjust the OSD...
...Menu to the ideal settings for the OSD. Position Adjusts horizontal and vertical screen image position. Color Temperature Selects a warm, cool, or user-defined color temperature. Language Selects the language for your current screen resolution. 2 Press Menu. Mode Information Displays the monitor's current resolution, timing, input type, and serial number. Turns DDC/CI support on or off. The display image is automatically adjusted to open the selected menu or setting. Using Your eMachines Flat-Panel Monitor On-screen display options Adjusting OSD settings To adjust the OSD...
User Manual
Page 12
... number of pixels (individual colored dots) your computer uses to display images on your Control Panel is the number of colors your computer uses to display images on your monitor. If your monitor. Color depth is in Category View, click Appearance and Themes. If the color in Windows Vista®: 1 Click (Start), Control Panel, then under Appearance and Personalization, click Adjust Screen Resolution. To change the color depth and screen resolution in the Search Help box, then press ENTER. Using Your eMachines Flat-Panel Monitor Changing Windows screen settings Color...
... number of pixels (individual colored dots) your computer uses to display images on your Control Panel is the number of colors your computer uses to display images on your monitor. If your monitor. Color depth is in Category View, click Appearance and Themes. If the color in Windows Vista®: 1 Click (Start), Control Panel, then under Appearance and Personalization, click Adjust Screen Resolution. To change the color depth and screen resolution in the Search Help box, then press ENTER. Using Your eMachines Flat-Panel Monitor Changing Windows screen settings Color...
User Manual
Page 14
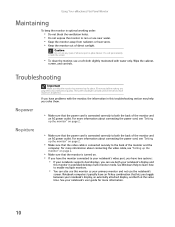
... about connecting the video cable, see "Setting up the monitor" on page 2. • Make sure that lets you toggle between your notebook's display, an externally attached display, and both the back of the monitor and an AC power outlet. Using Your eMachines Flat-Panel Monitor Maintaining To keep the monitor in this troubleshooting section may help you solve them. Caution Do not use this monitor in extended desktop multi-monitor mode. The screen's backlight can use...
... about connecting the video cable, see "Setting up the monitor" on page 2. • Make sure that lets you toggle between your notebook's display, an externally attached display, and both the back of the monitor and an AC power outlet. Using Your eMachines Flat-Panel Monitor Maintaining To keep the monitor in this troubleshooting section may help you solve them. Caution Do not use this monitor in extended desktop multi-monitor mode. The screen's backlight can use...
User Manual
Page 15
... the video cable is not damaged. • Check the end of the monitor and your computer. For more information about connecting the video cable, see "Adjusting monitor settings" on page 2. Turn the monitor back on how to the back of the video cable for ten seconds. Picture has shadows or "ghosts" • Press Auto to automatically adjust the display image to the ideal settings. • Remove any pins that your monitor. For instructions...
... the video cable is not damaged. • Check the end of the monitor and your computer. For more information about connecting the video cable, see "Adjusting monitor settings" on page 2. Turn the monitor back on how to the back of the video cable for ten seconds. Picture has shadows or "ghosts" • Press Auto to automatically adjust the display image to the ideal settings. • Remove any pins that your monitor. For instructions...
User Manual
Page 16
... adjusting settings, see "Changing Windows screen settings" on page 13. • If you need, see "Specifications" on page 8. eMachines' inspection standards keep these pixels are unacceptably numerous or dense on your display, contact eMachines Customer Care to identify whether a repair or replacement is justified based on the number of cable you are trying to select your monitor's native resolution but it is normal and inherent in the TFT technology used in the Windows display control panel: • Make...
... adjusting settings, see "Changing Windows screen settings" on page 13. • If you need, see "Specifications" on page 8. eMachines' inspection standards keep these pixels are unacceptably numerous or dense on your display, contact eMachines Customer Care to identify whether a repair or replacement is justified based on the number of cable you are trying to select your monitor's native resolution but it is normal and inherent in the TFT technology used in the Windows display control panel: • Make...
User Manual
Page 20
... factory to the correct voltage. ■ Openings in the monitor case are unable to insert the plug into the extension cord does not exceed the extension cord ampere rating. Replacement parts and accessories Use only replacement parts and accessories recommended by eMachines. 16 Warning Do not use this product, it and allow anything on the product and in use. Do not block or cover these instructions to help...
... factory to the correct voltage. ■ Openings in the monitor case are unable to insert the plug into the extension cord does not exceed the extension cord ampere rating. Replacement parts and accessories Use only replacement parts and accessories recommended by eMachines. 16 Warning Do not use this product, it and allow anything on the product and in use. Do not block or cover these instructions to help...
Service Guide
Page 5
... power supplied to qualified service personnel z To ensure satisfactory operation, use an adapter to the nature of the LCD screen, an afterimage of power source indicated on the monitor cabinet. z You may include blemishes of the fluorescent light, the screen may remain after switching the image, when the same image is recovered slowly by the manufacturer and follow the kit instructions. It may find slightly uneven brightness...
... power supplied to qualified service personnel z To ensure satisfactory operation, use an adapter to the nature of the LCD screen, an afterimage of power source indicated on the monitor cabinet. z You may include blemishes of the fluorescent light, the screen may remain after switching the image, when the same image is recovered slowly by the manufacturer and follow the kit instructions. It may find slightly uneven brightness...
Service Guide
Page 6
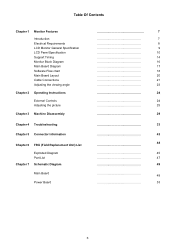
... Contents Chapter 1 Monitor Features Introduction Electrical Requirements LCD Monitor General Specification LCD Panel Specification Support Timing Monitor Block Diagram Main Board Diagram Software Flow chart Main Board Layout Cable Connections Adjusting the viewing angle Chapter 2 Operating Instructions External Controls Adjusting the picture Chapter 3 Machine Disassembly Chapter 4 Troubleshooting Chapter 5 Connector Information Chapter 6 FRU (Field Replacement Unit) List Exploded Diagram Part List Chapter 7 Schematic Diagram Main Board Power Board 7 7 8 9 10 14...
... Contents Chapter 1 Monitor Features Introduction Electrical Requirements LCD Monitor General Specification LCD Panel Specification Support Timing Monitor Block Diagram Main Board Diagram Software Flow chart Main Board Layout Cable Connections Adjusting the viewing angle Chapter 2 Operating Instructions External Controls Adjusting the picture Chapter 3 Machine Disassembly Chapter 4 Troubleshooting Chapter 5 Connector Information Chapter 6 FRU (Field Replacement Unit) List Exploded Diagram Part List Chapter 7 Schematic Diagram Main Board Power Board 7 7 8 9 10 14...


