User Manual
Page 10
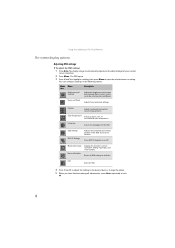
Using Your eMachines Flat-Panel Monitor On-screen display options Adjusting OSD settings To adjust the OSD settings: 1 Press Auto. Adjusts focus and clock settings. Mode Information Displays ... or change the option. 5 When you have finished making all OSD settings to exit. 6 Language Selects the language for your current screen resolution. 2 Press Menu. Reset to Defaults Resets all adjustments, press Auto repeatedly to defaults.
Using Your eMachines Flat-Panel Monitor On-screen display options Adjusting OSD settings To adjust the OSD settings: 1 Press Auto. Adjusts focus and clock settings. Mode Information Displays ... or change the option. 5 When you have finished making all OSD settings to exit. 6 Language Selects the language for your current screen resolution. 2 Press Menu. Reset to Defaults Resets all adjustments, press Auto repeatedly to defaults.
User Manual
Page 10
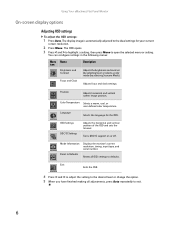
... number. The OSD opens. 3 Press < and > to highlight a setting, then press Menu to the ideal settings for the OSD. Reset to Defaults Resets all adjustments, press Auto repeatedly to defaults. You can configure settings in the following menus: Menu Name icon Brightness and Contrast Focus and Clock... the option. 5 When you have finished making all OSD settings to exit. 6 Turns DDC/CI support on or off. Using Your eMachines Flat-Panel Monitor On-screen display options Adjusting OSD settings To adjust the OSD settings: 1 Press Auto. Language Selects the language for your...
... number. The OSD opens. 3 Press < and > to highlight a setting, then press Menu to the ideal settings for the OSD. Reset to Defaults Resets all adjustments, press Auto repeatedly to defaults. You can configure settings in the following menus: Menu Name icon Brightness and Contrast Focus and Clock... the option. 5 When you have finished making all OSD settings to exit. 6 Turns DDC/CI support on or off. Using Your eMachines Flat-Panel Monitor On-screen display options Adjusting OSD settings To adjust the OSD settings: 1 Press Auto. Language Selects the language for your...
Service Guide
Page 34
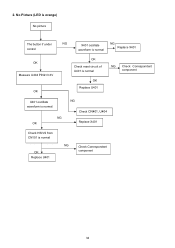
No Picture (LED is orange) No picture The button if under NG X401 oscillate NG control waveform is normal Replace X401 OK Measure U404 PIN2=3.3V OK OK Check reset circuit of U401 is normal OK Replace U401 NG Check Correspondent component X401 oscillate waveform is normal NG OK NG Check CN401, U404 Replace X401 Check HS/VS from CN101 is normal OK Replace U401 NG Check Correspondent component 34 2.
No Picture (LED is orange) No picture The button if under NG X401 oscillate NG control waveform is normal Replace X401 OK Measure U404 PIN2=3.3V OK OK Check reset circuit of U401 is normal OK Replace U401 NG Check Correspondent component X401 oscillate waveform is normal NG OK NG Check CN401, U404 Replace X401 Check HS/VS from CN101 is normal OK Replace U401 NG Check Correspondent component 34 2.
Service Guide
Page 35
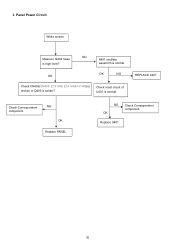
waveform is normal OK NG OK Check CN403(CN405: E191HQ/ E181H&E161HQ) is broken or Q405 is normal REPLACE X401 Check Correspondent component. Check reset circuit of U401 is solder? OK Replace U401 35 Panel Power Circuit White screen NG Measure Q404 base X401 oscillate is high level? 3. NG OK Replace PANEL NG Check Correspondent component.
waveform is normal OK NG OK Check CN403(CN405: E191HQ/ E181H&E161HQ) is broken or Q405 is normal REPLACE X401 Check Correspondent component. Check reset circuit of U401 is solder? OK Replace U401 35 Panel Power Circuit White screen NG Measure Q404 base X401 oscillate is high level? 3. NG OK Replace PANEL NG Check Correspondent component.

