User Manual
Page 3
Contents Using Your eMachines Flat-Panel Monitor 1 Unpacking the monitor 2 Setting up the monitor 2 Attaching the base 2 Connecting cables 3 Connecting a security cable 4 Turning on the monitor 4 Adjusting monitor settings 5 Monitor buttons 5 On-screen display options 6 Changing Windows screen settings 8 Power management 9 ENERGY STAR 9 Energy ...Picture has shadows or "ghosts 11 Color is not uniform 11 Image is not sized or centered correctly 11 The monitor has pixels that are always dark or too bright 12 Connecting a game console 12 Specifications 13 Video modes 14 ...
Contents Using Your eMachines Flat-Panel Monitor 1 Unpacking the monitor 2 Setting up the monitor 2 Attaching the base 2 Connecting cables 3 Connecting a security cable 4 Turning on the monitor 4 Adjusting monitor settings 5 Monitor buttons 5 On-screen display options 6 Changing Windows screen settings 8 Power management 9 ENERGY STAR 9 Energy ...Picture has shadows or "ghosts 11 Color is not uniform 11 Image is not sized or centered correctly 11 The monitor has pixels that are always dark or too bright 12 Connecting a game console 12 Specifications 13 Video modes 14 ...

User Manual
Page 5
Using Your eMachines Flat-Panel Monitor • Unpacking the monitor • Setting up the monitor • Turning on the monitor • Adjusting monitor settings • Power management • Maintaining • Troubleshooting • Specifications 1
Using Your eMachines Flat-Panel Monitor • Unpacking the monitor • Setting up the monitor • Turning on the monitor • Adjusting monitor settings • Power management • Maintaining • Troubleshooting • Specifications 1
User Manual
Page 6
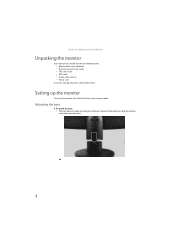
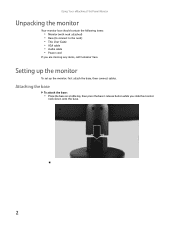
Setting up the monitor To set up the monitor, first attach the base, then connect cables. Attaching the base To attach the base: • Place the base on a table top, then press the base's release button while you are missing any items, call Customer Care. Using Your eMachines Flat-Panel Monitor Unpacking the monitor Your monitor box should contain the following items: • Monitor (with neck attached) • Base (to connect to the neck) • This User Guide • VGA cable • Audio cable (Option) • Power cord If you slide the monitor neck down onto the base. 2
Setting up the monitor To set up the monitor, first attach the base, then connect cables. Attaching the base To attach the base: • Place the base on a table top, then press the base's release button while you are missing any items, call Customer Care. Using Your eMachines Flat-Panel Monitor Unpacking the monitor Your monitor box should contain the following items: • Monitor (with neck attached) • Base (to connect to the neck) • This User Guide • VGA cable • Audio cable (Option) • Power cord If you slide the monitor neck down onto the base. 2

User Manual
Page 7
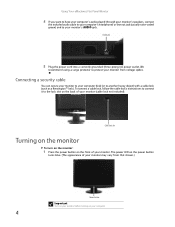
www.emachines.com Connecting cables To connect video and power cables: 1 Position your computer and the monitor so you can reach the back of each, then connect the blue VGA video cable to the blue VGA video connector under the back of the monitor. 2 Make sure that your computer is turned off, then connect the other end of the video cable to the matching video port on the back of your computer. 3 Connect the power cord to the power connector under the back of the monitor. 3
www.emachines.com Connecting cables To connect video and power cables: 1 Position your computer and the monitor so you can reach the back of each, then connect the blue VGA video cable to the blue VGA video connector under the back of the monitor. 2 Make sure that your computer is turned off, then connect the other end of the video cable to the matching video port on the back of your computer. 3 Connect the power cord to the power connector under the back of the monitor. 3

User Manual
Page 8
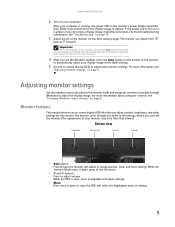
Cable lock slot Turning on the monitor To turn on the monitor: 1 Press the power button on the front of your monitor may vary from voltage spikes. Using Your eMachines Flat-Panel Monitor 4 If you want to have your computer's audio played through your monitor's speakers, connect the included audio cable to your computer's ... recommend using a surge protector to the lock slot on the power button turns blue. (The appearance of your monitor's AUDIO jack. (Option) Audio jack 5 Plug the power cord into a correctly grounded (three-prong) AC power outlet. To connect a cable lock, follow the ...
Cable lock slot Turning on the monitor To turn on the monitor: 1 Press the power button on the front of your monitor may vary from voltage spikes. Using Your eMachines Flat-Panel Monitor 4 If you want to have your computer's audio played through your monitor's speakers, connect the included audio cable to your computer's ... recommend using a surge protector to the lock slot on the power button turns blue. (The appearance of your monitor's AUDIO jack. (Option) Audio jack 5 Plug the power cord into a correctly grounded (three-prong) AC power outlet. To connect a cable lock, follow the ...
User Manual
Page 9
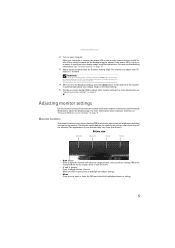
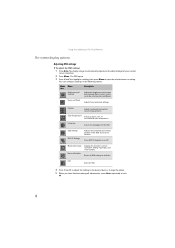
...or is amber, or you do not see "Changing Windows screen settings" on page 5. Monitor buttons This monitor features an on your display image to adjust other settings for the monitor. www.emachines.com 2 Turn on -screen display (OSD) that shown.) Bottom view Auto button Menu button.... For more information about computer controls, see a display image, check the connections. Adjusting monitor settings Use the monitor controls (located on the monitor's power button should be blue. The monitor saves changes you make to the settings, even if you see "Troubleshooting" on -screen ...
...or is amber, or you do not see "Changing Windows screen settings" on page 5. Monitor buttons This monitor features an on your display image to adjust other settings for the monitor. www.emachines.com 2 Turn on -screen display (OSD) that shown.) Bottom view Auto button Menu button.... For more information about computer controls, see a display image, check the connections. Adjusting monitor settings Use the monitor controls (located on the monitor's power button should be blue. The monitor saves changes you make to the settings, even if you see "Troubleshooting" on -screen ...
User Manual
Page 10
... adjusted to open the selected menu or setting. Turns DDC/CI support on or off. Mode Information Displays the monitor's current resolution, timing, input type, and serial number. Using Your eMachines Flat-Panel Monitor On-screen display options Adjusting OSD settings To adjust the OSD settings: 1 Press Auto. Color Temperature Selects a warm, cool...
... adjusted to open the selected menu or setting. Turns DDC/CI support on or off. Mode Information Displays the monitor's current resolution, timing, input type, and serial number. Using Your eMachines Flat-Panel Monitor On-screen display options Adjusting OSD settings To adjust the OSD settings: 1 Press Auto. Color Temperature Selects a warm, cool...
User Manual
Page 12
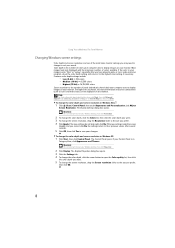
... components (such as icons and menu bars) can also right-click on the monitor. Type adjusting monitor settings in Category View, click Appearance and Themes. Shortcut You can also right-click on your monitor. The Display Settings dialog box opens. If your Control Panel is in the ... to the size you prefer. 4 Click Apply. To change to suit your monitor. Using Your eMachines Flat-Panel Monitor Changing Windows screen settings Color depth and screen resolution are two of the most basic monitor settings you may need to change the color depth and screen resolution in Windows XP...
... components (such as icons and menu bars) can also right-click on the monitor. Type adjusting monitor settings in Category View, click Appearance and Themes. Shortcut You can also right-click on your monitor. The Display Settings dialog box opens. If your Control Panel is in the ... to the size you prefer. 4 Click Apply. To change to suit your monitor. Using Your eMachines Flat-Panel Monitor Changing Windows screen settings Color depth and screen resolution are two of the most basic monitor settings you may need to change the color depth and screen resolution in Windows XP...
User Manual
Page 13
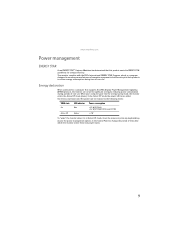
... As an ENERGY STAR® Partner, eMachines has determined that supports the VESA Display Power Management Signaling (DPMS) protocol, the monitor can be reduced to the following levels: VESA state LED indicator Power consumption On Active Off Blue Amber < 25 W (E161HQ) < 36 W (E191HQ/E181H and E191W) This monitor complies with the EPA's International ENERGY...
... As an ENERGY STAR® Partner, eMachines has determined that supports the VESA Display Power Management Signaling (DPMS) protocol, the monitor can be reduced to the following levels: VESA state LED indicator Power consumption On Active Off Blue Amber < 25 W (E161HQ) < 36 W (E191HQ/E181H and E191W) This monitor complies with the EPA's International ENERGY...

User Manual
Page 14
...sunlight. Caution Do not use near water. • Keep the monitor away from radiators or heat vents. • Keep the monitor out of the monitor and an AC power outlet. Using Your eMachines Flat-Panel Monitor Maintaining To keep the monitor in optimal working order: • Do not block the ventilation... holes. • Do not expose the monitor to rain or use any judgments ...
...sunlight. Caution Do not use near water. • Keep the monitor away from radiators or heat vents. • Keep the monitor out of the monitor and an AC power outlet. Using Your eMachines Flat-Panel Monitor Maintaining To keep the monitor in optimal working order: • Do not block the ventilation... holes. • Do not expose the monitor to rain or use any judgments ...
User Manual
Page 15
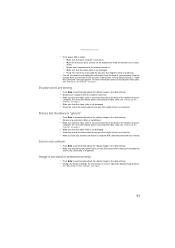
...settings. • Change the position settings. For more information about connecting the video cable, see "Adjusting monitor settings" on page 5. 11 Image is functioning correctly, a "Cable Not Connected" message appears. www.emachines.com • If the power LED is amber: • Make sure that your computer is turned ...on. • Move the mouse or press any key on the keyboard to bring the monitor out of sleep mode. • Restart your computer...
...settings. • Change the position settings. For more information about connecting the video cable, see "Adjusting monitor settings" on page 5. 11 Image is functioning correctly, a "Cable Not Connected" message appears. www.emachines.com • If the power LED is amber: • Make sure that your computer is turned ...on. • Move the mouse or press any key on the keyboard to bring the monitor out of sleep mode. • Restart your computer...
User Manual
Page 16
... require you feel these to select your monitor's native resolution but it is normal and inherent in the TFT technology used in the Windows display control panel: • Make sure that your video card can display at your computer. eMachines' inspection standards keep these pixels are trying... to a minimum. If you to make changes to match the monitor's optimal (native) setting. You can also consult the following Web site for widescreen...
... require you feel these to select your monitor's native resolution but it is normal and inherent in the TFT technology used in the Windows display control panel: • Make sure that your video card can display at your computer. eMachines' inspection standards keep these pixels are trying... to a minimum. If you to make changes to match the monitor's optimal (native) setting. You can also consult the following Web site for widescreen...
User Manual
Page 21
... personnel. ■ Do not walk on the power cord or allow it to dry for advice on whether the monitor is safe to turn back on the system. Call eMachines Customer Care for 24 hours. Replacement parts and accessories Use only replacement parts and accessories recommended by... eMachines. 16 If the monitor does get exposed to moisture, unplug it and allow anything on . ■ When the monitor is designed and tested to install the appropriate outlet. ■ If you operate your...
... personnel. ■ Do not walk on the power cord or allow it to dry for advice on whether the monitor is safe to turn back on the system. Call eMachines Customer Care for 24 hours. Replacement parts and accessories Use only replacement parts and accessories recommended by... eMachines. 16 If the monitor does get exposed to moisture, unplug it and allow anything on . ■ When the monitor is designed and tested to install the appropriate outlet. ■ If you operate your...
User Manual
Page 24
...USA All Rights Reserved This publication is protected by conformity with the following harmonized standards: - Trademark acknowledgments Gateway and eMachines are incorporated in Electrical and Electronic Equipment Year to assure that production units of the same product will Gateway be ... 886-2-8691-3089 Fax: 886-2-8691-3120 E-mail: [email protected] Hereby declare that: Product: LCD Monitor Trade Name: emachine Model Number: E161HQ, E191HQ, E181H, E191W Is compliant with the essential requirements and other countries. EN61000-3-2:2006, Class D - However, changes are...
...USA All Rights Reserved This publication is protected by conformity with the following harmonized standards: - Trademark acknowledgments Gateway and eMachines are incorporated in Electrical and Electronic Equipment Year to assure that production units of the same product will Gateway be ... 886-2-8691-3089 Fax: 886-2-8691-3120 E-mail: [email protected] Hereby declare that: Product: LCD Monitor Trade Name: emachine Model Number: E161HQ, E191HQ, E181H, E191W Is compliant with the essential requirements and other countries. EN61000-3-2:2006, Class D - However, changes are...
User Manual
Page 3
Contents Using Your eMachines Flat-Panel Monitor 1 Unpacking the monitor 2 Setting up the monitor 2 Attaching the base 2 Connecting cables 3 Connecting a security cable 4 Turning on the monitor 4 Adjusting monitor settings 5 Monitor buttons 5 On-screen display options 6 Changing Windows screen settings 8 Power management 9 ENERGY STAR 9 Energy ...Picture has shadows or "ghosts 11 Color is not uniform 11 Image is not sized or centered correctly 11 The monitor has pixels that are always dark or too bright 12 Connecting a game console 12 Specifications 13 Video modes 14 ...
Contents Using Your eMachines Flat-Panel Monitor 1 Unpacking the monitor 2 Setting up the monitor 2 Attaching the base 2 Connecting cables 3 Connecting a security cable 4 Turning on the monitor 4 Adjusting monitor settings 5 Monitor buttons 5 On-screen display options 6 Changing Windows screen settings 8 Power management 9 ENERGY STAR 9 Energy ...Picture has shadows or "ghosts 11 Color is not uniform 11 Image is not sized or centered correctly 11 The monitor has pixels that are always dark or too bright 12 Connecting a game console 12 Specifications 13 Video modes 14 ...

User Manual
Page 5
Using Your eMachines Flat-Panel Monitor • Unpacking the monitor • Setting up the monitor • Turning on the monitor • Adjusting monitor settings • Power management • Maintaining • Troubleshooting • Specifications 1
Using Your eMachines Flat-Panel Monitor • Unpacking the monitor • Setting up the monitor • Turning on the monitor • Adjusting monitor settings • Power management • Maintaining • Troubleshooting • Specifications 1
User Manual
Page 6
Setting up the monitor To set up the monitor, first attach the base, then connect cables. Attaching the base To attach the base: • Place the base on a table top, then press the base's release button while you are missing any items, call Customer Care. Using Your eMachines Flat-Panel Monitor Unpacking the monitor Your monitor box should contain the following items: • Monitor (with neck attached) • Base (to connect to the neck) • This User Guide • VGA cable • Audio cable • Power cord If you slide the monitor neck down onto the base. 2
Setting up the monitor To set up the monitor, first attach the base, then connect cables. Attaching the base To attach the base: • Place the base on a table top, then press the base's release button while you are missing any items, call Customer Care. Using Your eMachines Flat-Panel Monitor Unpacking the monitor Your monitor box should contain the following items: • Monitor (with neck attached) • Base (to connect to the neck) • This User Guide • VGA cable • Audio cable • Power cord If you slide the monitor neck down onto the base. 2

User Manual
Page 7
www.emachines.com Connecting cables To connect video and power cables: 1 Position your computer and the monitor so you can reach the back of each, then connect the blue VGA video cable to the blue VGA video connector under the back of the monitor. 2 Make sure that your computer is turned off, then connect the other end of the video cable to the matching video port on the back of your computer. 3 Connect the power cord to the power connector under the back of the monitor. 3
www.emachines.com Connecting cables To connect video and power cables: 1 Position your computer and the monitor so you can reach the back of each, then connect the blue VGA video cable to the blue VGA video connector under the back of the monitor. 2 Make sure that your computer is turned off, then connect the other end of the video cable to the matching video port on the back of your computer. 3 Connect the power cord to the power connector under the back of the monitor. 3
User Manual
Page 8
... turns blue. (The appearance of your monitor's AUDIO jack. We recommend using a surge protector to protect your computer desk (or to another heavy object) with a cable lock (such as a Kensington™ lock). Using Your eMachines Flat-Panel Monitor 4 If you want to have your computer...'s audio played through your monitor's speakers, connect the included audio cable to your computer's headphones or line out jack (usually color...
... turns blue. (The appearance of your monitor's AUDIO jack. We recommend using a surge protector to protect your computer desk (or to another heavy object) with a cable lock (such as a Kensington™ lock). Using Your eMachines Flat-Panel Monitor 4 If you want to have your computer...'s audio played through your monitor's speakers, connect the included audio cable to your computer's headphones or line out jack (usually color...
User Manual
Page 9
... settings, even if you make to adjust the display image. The monitor saves changes you turn off the monitor. (The appearance of the monitor for the monitor. www.emachines.com 2 Turn on page 5. After your monitor may vary from 15° back to have the monitor self-adjust its image position, clock, and focus settings. Important When...
... settings, even if you make to adjust the display image. The monitor saves changes you turn off the monitor. (The appearance of the monitor for the monitor. www.emachines.com 2 Turn on page 5. After your monitor may vary from 15° back to have the monitor self-adjust its image position, clock, and focus settings. Important When...


