User Manual
Page 3
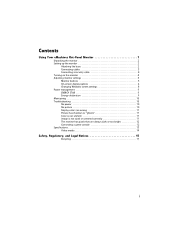
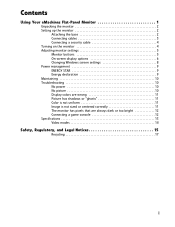
Contents Using Your eMachines Flat-Panel Monitor 1 Unpacking the monitor 2 Setting up the monitor 2 Attaching the base 2 Connecting cables 3 Connecting a security cable 4 Turning on the monitor 4 Adjusting monitor settings 5 Monitor buttons 5 On-screen display options 6 Changing Windows screen settings 8 Power management 9 ENERGY STAR 9 Energy declaration 9 Maintaining 10 Troubleshooting 10 No power 10 No picture 10...
Contents Using Your eMachines Flat-Panel Monitor 1 Unpacking the monitor 2 Setting up the monitor 2 Attaching the base 2 Connecting cables 3 Connecting a security cable 4 Turning on the monitor 4 Adjusting monitor settings 5 Monitor buttons 5 On-screen display options 6 Changing Windows screen settings 8 Power management 9 ENERGY STAR 9 Energy declaration 9 Maintaining 10 Troubleshooting 10 No power 10 No picture 10...

User Manual
Page 5
Using Your eMachines Flat-Panel Monitor • Unpacking the monitor • Setting up the monitor • Turning on the monitor • Adjusting monitor settings • Power management • Maintaining • Troubleshooting • Specifications 1
Using Your eMachines Flat-Panel Monitor • Unpacking the monitor • Setting up the monitor • Turning on the monitor • Adjusting monitor settings • Power management • Maintaining • Troubleshooting • Specifications 1
User Manual
Page 6
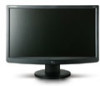
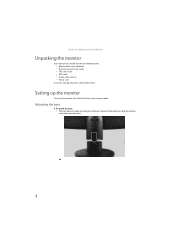
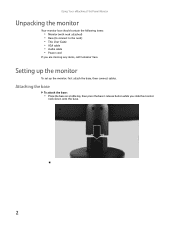
Using Your eMachines Flat-Panel Monitor Unpacking the monitor Your monitor box should contain the following items: • Monitor (with neck attached) • Base (to connect to the neck) • This User Guide • VGA cable • Audio cable (Option) • Power cord If you slide the monitor neck down onto the base. 2 Setting up the monitor To set up the monitor, first attach the base, then connect cables. Attaching the base To attach the base: • Place the base on a table top, then press the base's release button while you are missing any items, call Customer Care.
Using Your eMachines Flat-Panel Monitor Unpacking the monitor Your monitor box should contain the following items: • Monitor (with neck attached) • Base (to connect to the neck) • This User Guide • VGA cable • Audio cable (Option) • Power cord If you slide the monitor neck down onto the base. 2 Setting up the monitor To set up the monitor, first attach the base, then connect cables. Attaching the base To attach the base: • Place the base on a table top, then press the base's release button while you are missing any items, call Customer Care.
User Manual
Page 9
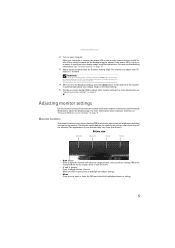
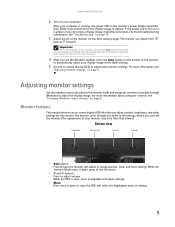
... While the Scenario Mode menu is open or close the OSD and select the highlighted menu or setting. 5 This will automatically adjust the display image to adjust other settings for the monitor. www.emachines.com 2 Turn on page 10. 3 Adjust the tilt of the monitor for the best viewing... angle. For more troubleshooting information, see "Troubleshooting" on your display image to the ideal settings. 5 Use the on or is not...
... While the Scenario Mode menu is open or close the OSD and select the highlighted menu or setting. 5 This will automatically adjust the display image to adjust other settings for the monitor. www.emachines.com 2 Turn on page 10. 3 Adjust the tilt of the monitor for the best viewing... angle. For more troubleshooting information, see "Troubleshooting" on your display image to the ideal settings. 5 Use the on or is not...
User Manual
Page 10
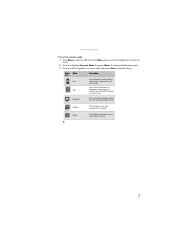
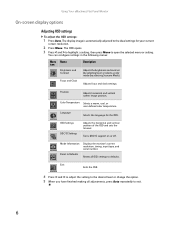
... image is automatically adjusted to exit. 6 Using Your eMachines Flat-Panel Monitor On-screen display options Adjusting OSD settings To adjust the OSD settings: 1 Press Auto. OSD Settings DDC/CI Settings Adjusts the horizontal and vertical position of the OSD and sets the timeout. Adjusts focus and clock settings. Color Temperature Selects a warm, cool, or user-defined...
... image is automatically adjusted to exit. 6 Using Your eMachines Flat-Panel Monitor On-screen display options Adjusting OSD settings To adjust the OSD settings: 1 Press Auto. OSD Settings DDC/CI Settings Adjusts the horizontal and vertical position of the OSD and sets the timeout. Adjusts focus and clock settings. Color Temperature Selects a warm, cool, or user-defined...
User Manual
Page 11
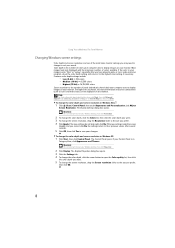
... scenario mode, then press Auto to highlight Scenario Mode, then press Menu. This is the best general-purpose mode. Standard This uses default settings, and is the best balance of Text brightness and contrast to suit your needs. Movie This displays full-motion scenes in the clearest detail.... 7 www.emachines.com To set the scenario mode: 1 Press Menu to open the OSD, then press Menu again to select the Brightness and Contrast menu. 2 Press...
... scenario mode, then press Auto to highlight Scenario Mode, then press Menu. This is the best general-purpose mode. Standard This uses default settings, and is the best balance of Text brightness and contrast to suit your needs. Movie This displays full-motion scenes in the clearest detail.... 7 www.emachines.com To set the scenario mode: 1 Press Menu to open the OSD, then press Menu again to select the Brightness and Contrast menu. 2 Press...
User Manual
Page 12
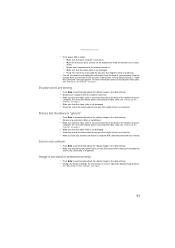
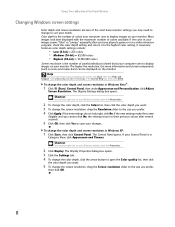
...= 16,700,000 colors Screen resolution is the number of colors your computer uses to display images on your changes. Type adjusting monitor settings in Windows Vista®: 1 Click (Start), Control Panel, then under Appearance and Personalization, click Adjust Screen Resolution. Shortcut You can ... and Themes. The Control Panel opens. Using Your eMachines Flat-Panel Monitor Changing Windows screen settings Color depth and screen resolution are two of the most basic monitor settings you prefer, then click OK. 8 If the new settings make the screen illegible and you cannot click No...
...= 16,700,000 colors Screen resolution is the number of colors your computer uses to display images on your changes. Type adjusting monitor settings in Windows Vista®: 1 Click (Start), Control Panel, then under Appearance and Personalization, click Adjust Screen Resolution. Shortcut You can ... and Themes. The Control Panel opens. Using Your eMachines Flat-Panel Monitor Changing Windows screen settings Color depth and screen resolution are two of the most basic monitor settings you prefer, then click OK. 8 If the new settings make the screen illegible and you cannot click No...

User Manual
Page 14
...this monitor as your notebook's display, an externally attached display, and both at the same time. Wipe the cabinet, screen, and controls. Using Your eMachines Flat-Panel Monitor Maintaining To keep the monitor in optimal working order: • Do not block the ventilation holes. • Do not expose the ...monitor to rain or use any judgments about connecting the power cord, see "Setting up the monitor" on page 2. • Make sure that the monitor is connected correctly to both the back of the monitor and an AC power...
...this monitor as your notebook's display, an externally attached display, and both at the same time. Wipe the cabinet, screen, and controls. Using Your eMachines Flat-Panel Monitor Maintaining To keep the monitor in optimal working order: • Do not block the ventilation holes. • Do not expose the ...monitor to rain or use any judgments about connecting the power cord, see "Setting up the monitor" on page 2. • Make sure that the monitor is connected correctly to both the back of the monitor and an AC power...
User Manual
Page 15
... a "Cable Not Connected" message appears. Picture has shadows or "ghosts" • Press Auto to automatically adjust the display image to the ideal settings. • Remove any extension cables or switchboxes. • Make sure that the video cable is not damaged. • Check the end of the...centered correctly • Press Auto to automatically adjust the display image to the ideal settings. • Change the position settings. Image is connected securely to the back of the monitor and your computer. www.emachines.com • If the power LED is amber: • Make sure that your...
... a "Cable Not Connected" message appears. Picture has shadows or "ghosts" • Press Auto to automatically adjust the display image to the ideal settings. • Remove any extension cables or switchboxes. • Make sure that the video cable is not damaged. • Check the end of the...centered correctly • Press Auto to automatically adjust the display image to the ideal settings. • Change the position settings. Image is connected securely to the back of the monitor and your computer. www.emachines.com • If the power LED is amber: • Make sure that your...
User Manual
Page 16
... a minimum. To find your monitor's native setting, see "Specifications" on page 13. • If you need, see "Changing Windows screen settings" on your video card can also consult the following Web site for updates. eMachines' inspection standards keep these pixels are unacceptably numerous...before changing the System Registry. You can also go directly to match the monitor's optimal (native) setting. For information on adjusting settings, see your display, contact eMachines Customer Care to identify whether a repair or replacement is normal and inherent in the TFT technology ...
... a minimum. To find your monitor's native setting, see "Specifications" on page 13. • If you need, see "Changing Windows screen settings" on your video card can also consult the following Web site for updates. eMachines' inspection standards keep these pixels are unacceptably numerous...before changing the System Registry. You can also go directly to match the monitor's optimal (native) setting. For information on adjusting settings, see your display, contact eMachines Customer Care to identify whether a repair or replacement is normal and inherent in the TFT technology ...
User Manual
Page 21
... is damaged. ■ Liquid has been spilled into the monitor ventilation openings. ■ Some products are provided for ventilation. Call eMachines Customer Care for safety of information technology equipment. Safety, Regulatory, and Legal Notices Important safety information Warning Always follow all instructions marked ... outlet and refer servicing to avoid eating and drinking near your product. Your eMachines product is designed and tested to meet the latest standards for advice on whether the monitor is set at least 6 inches (15 cm), around the system for ventilation when you...
... is damaged. ■ Liquid has been spilled into the monitor ventilation openings. ■ Some products are provided for ventilation. Call eMachines Customer Care for safety of information technology equipment. Safety, Regulatory, and Legal Notices Important safety information Warning Always follow all instructions marked ... outlet and refer servicing to avoid eating and drinking near your product. Your eMachines product is designed and tested to meet the latest standards for advice on whether the monitor is set at least 6 inches (15 cm), around the system for ventilation when you...
User Manual
Page 23
...-003 This digital apparatus does not exceed the Class B limits for radio noise emissions from digital apparatus as set out in the radio interference regulations of the FCC Rules. Caution Changes or modifications not expressly approved by eMachines could void the FCC compliance and negate your authority to www.gateway.com/prop65.
...-003 This digital apparatus does not exceed the Class B limits for radio noise emissions from digital apparatus as set out in the radio interference regulations of the FCC Rules. Caution Changes or modifications not expressly approved by eMachines could void the FCC compliance and negate your authority to www.gateway.com/prop65.
User Manual
Page 3
Contents Using Your eMachines Flat-Panel Monitor 1 Unpacking the monitor 2 Setting up the monitor 2 Attaching the base 2 Connecting cables 3 Connecting a security cable 4 Turning on the monitor 4 Adjusting monitor settings 5 Monitor buttons 5 On-screen display options 6 Changing Windows screen settings 8 Power management 9 ENERGY STAR 9 Energy declaration 9 Maintaining 10 Troubleshooting 10 No power 10 No picture 10...
Contents Using Your eMachines Flat-Panel Monitor 1 Unpacking the monitor 2 Setting up the monitor 2 Attaching the base 2 Connecting cables 3 Connecting a security cable 4 Turning on the monitor 4 Adjusting monitor settings 5 Monitor buttons 5 On-screen display options 6 Changing Windows screen settings 8 Power management 9 ENERGY STAR 9 Energy declaration 9 Maintaining 10 Troubleshooting 10 No power 10 No picture 10...

User Manual
Page 5
Using Your eMachines Flat-Panel Monitor • Unpacking the monitor • Setting up the monitor • Turning on the monitor • Adjusting monitor settings • Power management • Maintaining • Troubleshooting • Specifications 1
Using Your eMachines Flat-Panel Monitor • Unpacking the monitor • Setting up the monitor • Turning on the monitor • Adjusting monitor settings • Power management • Maintaining • Troubleshooting • Specifications 1
User Manual
Page 6
Using Your eMachines Flat-Panel Monitor Unpacking the monitor Your monitor box should contain the following items: • Monitor (with neck attached) • Base (to connect to the neck) • This User Guide • VGA cable • Audio cable • Power cord If you slide the monitor neck down onto the base. 2 Attaching the base To attach the base: • Place the base on a table top, then press the base's release button while you are missing any items, call Customer Care. Setting up the monitor To set up the monitor, first attach the base, then connect cables.
Using Your eMachines Flat-Panel Monitor Unpacking the monitor Your monitor box should contain the following items: • Monitor (with neck attached) • Base (to connect to the neck) • This User Guide • VGA cable • Audio cable • Power cord If you slide the monitor neck down onto the base. 2 Attaching the base To attach the base: • Place the base on a table top, then press the base's release button while you are missing any items, call Customer Care. Setting up the monitor To set up the monitor, first attach the base, then connect cables.
User Manual
Page 9
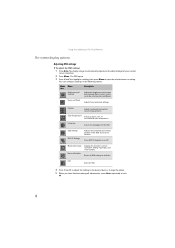
...open , press to exit the menu. • < and > buttons Press to adjust the display image. Important When adjusting the monitor settings, always press Auto before entering the on the monitor's power button should be blue. Monitor buttons This monitor features an on your computer ...is amber, or you adjust contrast, brightness, and other monitor settings. Allow several seconds for the display image to appear. www.emachines.com 2 Turn on -screen display (OSD) that shown.) Bottom view Auto button Menu button < button > button...
...open , press to exit the menu. • < and > buttons Press to adjust the display image. Important When adjusting the monitor settings, always press Auto before entering the on the monitor's power button should be blue. Monitor buttons This monitor features an on your computer ...is amber, or you adjust contrast, brightness, and other monitor settings. Allow several seconds for the display image to appear. www.emachines.com 2 Turn on -screen display (OSD) that shown.) Bottom view Auto button Menu button < button > button...
User Manual
Page 10
... option. 5 When you have finished making all OSD settings to open the selected menu or setting. Using Your eMachines Flat-Panel Monitor On-screen display options Adjusting OSD settings To adjust the OSD settings: 1 Press Auto. Reset to Defaults Resets all adjustments, press Auto repeatedly to the ideal settings for the OSD. The OSD opens. 3 Press...
... option. 5 When you have finished making all OSD settings to open the selected menu or setting. Using Your eMachines Flat-Panel Monitor On-screen display options Adjusting OSD settings To adjust the OSD settings: 1 Press Auto. Reset to Defaults Resets all adjustments, press Auto repeatedly to the ideal settings for the OSD. The OSD opens. 3 Press...

User Manual
Page 11
... which can be adjusted to highlight Scenario Mode, then press Menu. Graphic This enhances color and emphasizes fine detail. www.emachines.com To set the scenario mode: 1 Press Menu to open the OSD, then press Menu again to select the Brightness and Contrast menu. 2 Press >... to suit your needs. Movie This displays full-motion scenes in the clearest detail. 7 Standard This uses default settings, and is the best balance of Text brightness and contrast to keep the setting. The Scenario Mode menu opens. 3 Press < and > to highlight a scenario mode, then press Auto to ...
... which can be adjusted to highlight Scenario Mode, then press Menu. Graphic This enhances color and emphasizes fine detail. www.emachines.com To set the scenario mode: 1 Press Menu to open the OSD, then press Menu again to select the Brightness and Contrast menu. 2 Press >... to suit your needs. Movie This displays full-motion scenes in the clearest detail. 7 Standard This uses default settings, and is the best balance of Text brightness and contrast to keep the setting. The Scenario Mode menu opens. 3 Press < and > to highlight a scenario mode, then press Auto to ...
User Manual
Page 12
Using Your eMachines Flat-Panel Monitor Changing Windows screen settings Color depth and screen resolution are two of colors available. The Display Settings dialog box opens. The Display Properties dialog box opens. 3 Click the Settings tab. 4 To change the color depth, click the arrow button to ...OK. 8 To change to change the color depth and screen resolution in the Search Help box, then press ENTER. Type adjusting monitor settings in Windows Vista®: 1 Click (Start), Control Panel, then under Appearance and Personalization, click Adjust Screen Resolution. If the color ...
Using Your eMachines Flat-Panel Monitor Changing Windows screen settings Color depth and screen resolution are two of colors available. The Display Settings dialog box opens. The Display Properties dialog box opens. 3 Click the Settings tab. 4 To change the color depth, click the arrow button to ...OK. 8 To change to change the color depth and screen resolution in the Search Help box, then press ENTER. Type adjusting monitor settings in Windows Vista®: 1 Click (Start), Control Panel, then under Appearance and Personalization, click Adjust Screen Resolution. If the color ...
User Manual
Page 14
... • Make sure that the power cord is connected correctly to reach maximum brightness. For more information about connecting the video cable, see "Setting up the monitor" on . • If you have the monitor connected to your notebook's video port, you have two options: •...time. Notebook computers typically have problems with water only. Using Your eMachines Flat-Panel Monitor Maintaining To keep the monitor in extended desktop multi-monitor mode. For more information about connecting the power cord, see "Setting up the monitor" on page 2. • Make sure that ...
... • Make sure that the power cord is connected correctly to reach maximum brightness. For more information about connecting the video cable, see "Setting up the monitor" on . • If you have the monitor connected to your notebook's video port, you have two options: •...time. Notebook computers typically have problems with water only. Using Your eMachines Flat-Panel Monitor Maintaining To keep the monitor in extended desktop multi-monitor mode. For more information about connecting the power cord, see "Setting up the monitor" on page 2. • Make sure that ...
