User Guide
Page 27
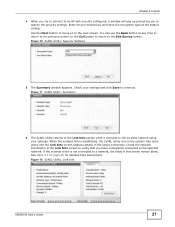
... security settings. See Table 4.3 on to the next screen. If the wireless client is established, the ZyXEL utility icon in this screen remain blank. Figure 10 ZyXEL Utility: Security Settings 5 The Summary window appears. Check your settings. You can use the Back button at the default setting. Enter the pre...the Exit button to return to continue. Use the Next button to move on page 45 for detailed field descriptions. Figure 12 ZyXEL Utility: Link Info NWD2105 User's Guide 27 When the wireless link is not connected to a network, the fields in the system tray turns green and ...
... security settings. See Table 4.3 on to the next screen. If the wireless client is established, the ZyXEL utility icon in this screen remain blank. Figure 10 ZyXEL Utility: Security Settings 5 The Summary window appears. Check your settings. You can use the Back button at the default setting. Enter the pre...the Exit button to return to continue. Use the Next button to move on page 45 for detailed field descriptions. Figure 12 ZyXEL Utility: Link Info NWD2105 User's Guide 27 When the wireless link is not connected to a network, the fields in the system tray turns green and ...
User Guide
Page 50
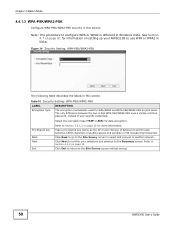
... the encryption type (TKIP or AES) for more information. Pre-Shared Key Back Next Exit Refer to Section 3.3.1.3 on page 53. Table 10 Security Setting: WPA-PSK/WPA2-PSK LABEL DESCRIPTION Encryption Type The encryption mechanisms used for information on page 61 for WPA/WPA2 and WPA-PSK...WPA2 is that WPA-PSK/WPA2-PSK uses a simple common password, instead of between the two is different in Windows Vista. Note: The procedure to the Site Survey screen without saving. 50 NWD2105 User's Guide Type a pre-shared key (same as the AP or peer device) of user-specific credentials. ...
... the encryption type (TKIP or AES) for more information. Pre-Shared Key Back Next Exit Refer to Section 3.3.1.3 on page 53. Table 10 Security Setting: WPA-PSK/WPA2-PSK LABEL DESCRIPTION Encryption Type The encryption mechanisms used for information on page 61 for WPA/WPA2 and WPA-PSK...WPA2 is that WPA-PSK/WPA2-PSK uses a simple common password, instead of between the two is different in Windows Vista. Note: The procedure to the Site Survey screen without saving. 50 NWD2105 User's Guide Type a pre-shared key (same as the AP or peer device) of user-specific credentials. ...
User Guide
Page 70
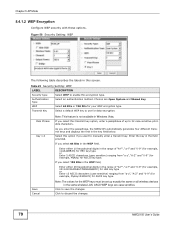
..."a-z", "A-Z" and "0-9" (for example, MyKey) for data encryption. Click to discard the changes. 70 NWD2105 User's Guide Pass Phrase Key 1-4 Save Cancel Note: This feature is not available in the field ... Type Select an authentication method. If you select 128 Bits in the WEP field, Enter either 10 hexadecimal digits in the range of up exactly the same on all wireless devices in this encryption ... Select a default WEP key to manually enter a transmit key. Enter the key in Windows Vista. If you select 64 Bits in the key field below. WEP Select 64 Bits...
..."a-z", "A-Z" and "0-9" (for example, MyKey) for data encryption. Click to discard the changes. 70 NWD2105 User's Guide Pass Phrase Key 1-4 Save Cancel Note: This feature is not available in the field ... Type Select an authentication method. If you select 128 Bits in the WEP field, Enter either 10 hexadecimal digits in the range of up exactly the same on all wireless devices in this encryption ... Select a default WEP key to manually enter a transmit key. Enter the key in Windows Vista. If you select 64 Bits in the key field below. WEP Select 64 Bits...
User Guide
Page 85
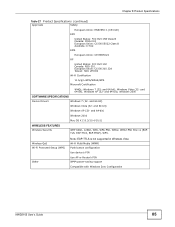
... AP or Router's PIN WMM power-saving support Compatible with Windows Zero Configuration NWD2105 User's Guide 85 and 64-bit) Windows XP (32- and 64-bit), Windows XP (32- and 64-bit), Windows 2000 SOFTWARE SPECIFICATIONS Device Drivers Windows 7 (32- and 64-bit) Windows 2000 Mac OS X (10.3/10.4/10.5) WIRELESS FEATURES Wireless Security WEP 64bit, 128bit, WPA, WPA-PSK...
... AP or Router's PIN WMM power-saving support Compatible with Windows Zero Configuration NWD2105 User's Guide 85 and 64-bit) Windows XP (32- and 64-bit), Windows XP (32- and 64-bit), Windows 2000 SOFTWARE SPECIFICATIONS Device Drivers Windows 7 (32- and 64-bit) Windows 2000 Mac OS X (10.3/10.4/10.5) WIRELESS FEATURES Wireless Security WEP 64bit, 128bit, WPA, WPA-PSK...
User Guide
Page 89
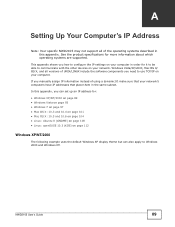
... the product specifications for more information about which operating systems are supported. This appendix shows you need to use TCP/IP on your computer. NWD2105 User's Guide 89 Windows Vista/XP/2000, Mac OS 9/ OS X, and all of the operating systems described in this appendix, you can set up an IP ...address for: • Windows XP/NT/2000 on page 89 • Windows Vista on page 93 • Windows 7 on page 97 • Mac OS X: 10.3 and 10.4 on page 101 • Mac OS X: 10.5 and 10.6 on page 104 • Linux: Ubuntu 8 (GNOME) on page 108 &#...
... the product specifications for more information about which operating systems are supported. This appendix shows you need to use TCP/IP on your computer. NWD2105 User's Guide 89 Windows Vista/XP/2000, Mac OS 9/ OS X, and all of the operating systems described in this appendix, you can set up an IP ...address for: • Windows XP/NT/2000 on page 89 • Windows Vista on page 93 • Windows 7 on page 97 • Mac OS X: 10.3 and 10.4 on page 101 • Mac OS X: 10.5 and 10.6 on page 104 • Linux: Ubuntu 8 (GNOME) on page 108 &#...
User Guide
Page 96
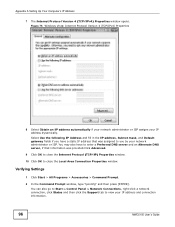
...static IP address that information was provided.Click Advanced. 9 Click OK to close the Internet Protocol (TCP/IP) Properties window. 10 Click OK to view your IP address dynamically. Appendix A Setting Up Your Computer's IP Address 7 The Internet Protocol Version 4 (TCP/IPv4... "ipconfig" and then press [ENTER]. Figure 75 Windows Vista: Internet Protocol Version 4 (TCP/IPv4) Properties 8 Select Obtain an IP address automatically if your network administrator or ISP assigns your IP address and connection information. 96 NWD2105 User's Guide You can also go to Start > Control ...
...static IP address that information was provided.Click Advanced. 9 Click OK to close the Internet Protocol (TCP/IP) Properties window. 10 Click OK to view your IP address dynamically. Appendix A Setting Up Your Computer's IP Address 7 The Internet Protocol Version 4 (TCP/IPv4... "ipconfig" and then press [ENTER]. Figure 75 Windows Vista: Internet Protocol Version 4 (TCP/IPv4) Properties 8 Select Obtain an IP address automatically if your network administrator or ISP assigns your IP address and connection information. 96 NWD2105 User's Guide You can also go to Start > Control ...

User Guide
Page 101
Figure 83 Mac OS X 10.4: Apple Menu NWD2105 User's Guide 101 Figure 82 Windows 7: Internet Protocol Version 4 (TCP/IPv4) Properties Mac OS X: 10.3 and 10.4 The screens in this section are displayed as follows. Appendix A Setting Up Your Computer's IP Address 3 The IP settings are from Mac OS X 10.4 but can also apply to 10.3. 1 Click Apple > System Preferences.
Figure 83 Mac OS X 10.4: Apple Menu NWD2105 User's Guide 101 Figure 82 Windows 7: Internet Protocol Version 4 (TCP/IPv4) Properties Mac OS X: 10.3 and 10.4 The screens in this section are displayed as follows. Appendix A Setting Up Your Computer's IP Address 3 The IP settings are from Mac OS X 10.4 but can also apply to 10.3. 1 Click Apple > System Preferences.

User Guide
Page 102
Figure 85 Mac OS X 10.4: Network Preferences 102 NWD2105 User's Guide Appendix A Setting Up Your Computer's IP Address 2 In the System Preferences window, click the Network icon. Figure 84 Mac OS X 10.4: System Preferences 3 When the Network preferences pane opens, select Built-in Ethernet from the network connection type list, and then click Configure.
Figure 85 Mac OS X 10.4: Network Preferences 102 NWD2105 User's Guide Appendix A Setting Up Your Computer's IP Address 2 In the System Preferences window, click the Network icon. Figure 84 Mac OS X 10.4: System Preferences 3 When the Network preferences pane opens, select Built-in Ethernet from the network connection type list, and then click Configure.

User Guide
Page 104
Figure 88 Mac OS X 10.4: Network Utility Mac OS X: 10.5 and 10.6 The screens in this section are from the Info tab. Appendix A Setting Up Your Computer's IP Address • In the Router field, type the IP address of your TCP/IP properties by clicking Applications > Utilities > Network Utilities, and then selecting the appropriate Network Interface from Mac OS X 10.5 but can also apply to 10.6. 104 NWD2105 User's Guide Figure 87 Mac OS X 10.4: Network Preferences > Ethernet 6 Click Apply Now and close the window. Verifying Settings Check your device.
Figure 88 Mac OS X 10.4: Network Utility Mac OS X: 10.5 and 10.6 The screens in this section are from the Info tab. Appendix A Setting Up Your Computer's IP Address • In the Router field, type the IP address of your TCP/IP properties by clicking Applications > Utilities > Network Utilities, and then selecting the appropriate Network Interface from Mac OS X 10.5 but can also apply to 10.6. 104 NWD2105 User's Guide Figure 87 Mac OS X 10.4: Network Preferences > Ethernet 6 Click Apply Now and close the window. Verifying Settings Check your device.

User Guide
Page 107
NWD2105 User's Guide 107 Appendix A Setting Up Your Computer's IP Address • In the Router field, enter the IP address of your NWD2105. Figure 92 Mac OS X 10.5: Network Preferences > Ethernet 6 Click Apply and close the window.
NWD2105 User's Guide 107 Appendix A Setting Up Your Computer's IP Address • In the Router field, enter the IP address of your NWD2105. Figure 92 Mac OS X 10.5: Network Preferences > Ethernet 6 Click Apply and close the window.

User Guide
Page 114
Figure 104 openSUSE 10.3: Network Settings 114 NWD2105 User's Guide Figure 103 openSUSE 10.3: YaST Control Center 4 When the Network Settings window opens, click the Overview tab, select the appropriate connection Name from the list, and then click the Configure button. Appendix A Setting Up Your Computer's IP Address 3 When the YaST Control Center window opens, select Network Devices and then click the Network Card icon.
Figure 104 openSUSE 10.3: Network Settings 114 NWD2105 User's Guide Figure 103 openSUSE 10.3: YaST Control Center 4 When the Network Settings window opens, click the Overview tab, select the appropriate connection Name from the list, and then click the Configure button. Appendix A Setting Up Your Computer's IP Address 3 When the YaST Control Center window opens, select Network Devices and then click the Network Card icon.
User Guide
Page 115
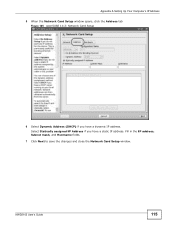
NWD2105 User's Guide 115 Appendix A Setting Up Your Computer's IP Address 5 When the Network Card Setup window opens, click the Address tab Figure 105 openSUSE 10.3: Network Card Setup 6 Select Dynamic Address (DHCP) if you have a dynamic IP address. Select Statically assigned IP Address if you have a static IP address. Fill in the IP address, Subnet mask, and Hostname fields. 7 Click Next to save the changes and close the Network Card Setup window.
NWD2105 User's Guide 115 Appendix A Setting Up Your Computer's IP Address 5 When the Network Card Setup window opens, click the Address tab Figure 105 openSUSE 10.3: Network Card Setup 6 Select Dynamic Address (DHCP) if you have a dynamic IP address. Select Statically assigned IP Address if you have a static IP address. Fill in the IP address, Subnet mask, and Hostname fields. 7 Click Next to save the changes and close the Network Card Setup window.

User Guide
Page 116
Figure 106 openSUSE 10.3: Network Settings 9 Click Finish to check your TCP/IP properties. From the Options sub-menu, select Show Connection Information. Figure 107 openSUSE 10.3: KNetwork Manager 116 NWD2105 User's Guide Appendix A Setting Up Your Computer's IP Address 8 If you know your settings and close the window. Verifying Settings Click the KNetwork Manager icon on the Task bar to save your DNS server IP address(es), click the Hostname/DNS tab in Network Settings and then enter the DNS server information in the fields provided.
Figure 106 openSUSE 10.3: Network Settings 9 Click Finish to check your TCP/IP properties. From the Options sub-menu, select Show Connection Information. Figure 107 openSUSE 10.3: KNetwork Manager 116 NWD2105 User's Guide Appendix A Setting Up Your Computer's IP Address 8 If you know your settings and close the window. Verifying Settings Click the KNetwork Manager icon on the Task bar to save your DNS server IP address(es), click the Hostname/DNS tab in Network Settings and then enter the DNS server information in the fields provided.
