

Owners Manual
Page 2
... support Audio Return Channel (ARC 25 Connecting playback devices 26 HDMI connection 26 Optical connection 26 Coaxial connection 27 Analog connection 27 Connecting the power cable 28 Connecting the subwoofer 29 Initial settings 30 Displaying the menu screen on the TV 30 Selecting the language for menu display 31 Auto setup for appropriate surround effects (IntelliBeam 32 Installing the IntelliBeam microphone 32 Using AUTO SETUP (IntelliBeam 33 Operating the unit by TV's remote control (HDMI control 37 What is the HDMI control function 37 Setting the HDMI control function 38...
... support Audio Return Channel (ARC 25 Connecting playback devices 26 HDMI connection 26 Optical connection 26 Coaxial connection 27 Analog connection 27 Connecting the power cable 28 Connecting the subwoofer 29 Initial settings 30 Displaying the menu screen on the TV 30 Selecting the language for menu display 31 Auto setup for appropriate surround effects (IntelliBeam 32 Installing the IntelliBeam microphone 32 Using AUTO SETUP (IntelliBeam 33 Operating the unit by TV's remote control (HDMI control 37 What is the HDMI control function 37 Setting the HDMI control function 38...

Owners Manual
Page 3
... menu 63 Option menu list 64 Adjusting tones (TREBLE, BASS 64 Adjusting input level of each jack (VOLUME TRIM 64 Audio delay control (AUDIO DELAY 64 Assigning HDMI audio to a different input jack (AUDIO ASSIGN 64 Advanced setup 65 Setting the advanced setup 65 Advanced setup list 66 TROUBLESHOOTING 67 Troubleshooting 67 General 67 Bluetooth 71 Remote control 72 Messages 72 When surround effect is not enough 73 Installing and adjusting the sound reflection board YRB-100 73 Pairing the center unit and the subwoofer...
... menu 63 Option menu list 64 Adjusting tones (TREBLE, BASS 64 Adjusting input level of each jack (VOLUME TRIM 64 Audio delay control (AUDIO DELAY 64 Assigning HDMI audio to a different input jack (AUDIO ASSIGN 64 Advanced setup 65 Setting the advanced setup 65 Advanced setup list 66 TROUBLESHOOTING 67 Troubleshooting 67 General 67 Bluetooth 71 Remote control 72 Messages 72 When surround effect is not enough 73 Installing and adjusting the sound reflection board YRB-100 73 Pairing the center unit and the subwoofer...

Owners Manual
Page 8
... Glows while the wireless connection to the subwoofer is being established (p. 29). 9 VOL indicator Indicates the current volume level (p. 39). 0 CINEMA DSP indicator Glows when a CINEMA DSP program is performed. • "DIMMER" can adjust the brightness of the front panel display in the setup menu (p. 60). • HD audio signals offer a higher quality sound than do conventional digital audio signals. indicator Glows when multichannel audio signals are input. 3 SUR. Displays settings and information as...
... Glows while the wireless connection to the subwoofer is being established (p. 29). 9 VOL indicator Indicates the current volume level (p. 39). 0 CINEMA DSP indicator Glows when a CINEMA DSP program is performed. • "DIMMER" can adjust the brightness of the front panel display in the setup menu (p. 60). • HD audio signals offer a higher quality sound than do conventional digital audio signals. indicator Glows when multichannel audio signals are input. 3 SUR. Displays settings and information as...

Owners Manual
Page 9
...). N SUBWOOFER PAIRING key Used to target playback mode (p. 44). Remote control Infrared signal transmitter 1 E 2 F 3 G 4 H 5 I CH LEVEL key Adjusts the volume balance during playback (p. 45). G TARGET key Switches to pair the center unit with the subwoofer manually (p. 75). I 6 J 7 8 K 9 0 L A B M C N D 1 ECO key Turns the Eco function on or off (p. 45). PREPARATIONS ➤ Controls and functions En 9 J VOL (+/-) key Adjusts the volume of the subwoofer (p. 39). 7 MUTE ( ) key Mute the sound (p. 39). 8 SETUP ( ) key Displays the setup menu (p. 51...
...). N SUBWOOFER PAIRING key Used to target playback mode (p. 44). Remote control Infrared signal transmitter 1 E 2 F 3 G 4 H 5 I CH LEVEL key Adjusts the volume balance during playback (p. 45). G TARGET key Switches to pair the center unit with the subwoofer manually (p. 75). I 6 J 7 8 K 9 0 L A B M C N D 1 ECO key Turns the Eco function on or off (p. 45). PREPARATIONS ➤ Controls and functions En 9 J VOL (+/-) key Adjusts the volume of the subwoofer (p. 39). 7 MUTE ( ) key Mute the sound (p. 39). 8 SETUP ( ) key Displays the setup menu (p. 51...

Owners Manual
Page 26
... as BD/DVD players, set-top boxes (STBs) and game consoles to prevent degradation of signal quality. • Use an ARC-compatible HDMI cable. Center unit (rear) SYSTEMSUBWOOFER CONNECTOR OUT R L AUX1 AUX2 TV OPTICAL HDMI OUT (ARC) IN1 IN2 IN3 HDMI IN1 IN2 IN3 Video device HDMI IN 1-3 jacks HDMI HDMI output HDMI HDMI Center unit (rear) SYSTEMSUBWOOFER CONNECTOR OUT R L AUX1 AUX2 TV OPTICAL HDMI OUT (ARC) IN1 IN2 IN3 O OPTICAL OPTICAL jack Video device To video output jack OPTICAL O Audio output (digital optical) If you switch the input source to the...
... as BD/DVD players, set-top boxes (STBs) and game consoles to prevent degradation of signal quality. • Use an ARC-compatible HDMI cable. Center unit (rear) SYSTEMSUBWOOFER CONNECTOR OUT R L AUX1 AUX2 TV OPTICAL HDMI OUT (ARC) IN1 IN2 IN3 HDMI IN1 IN2 IN3 Video device HDMI IN 1-3 jacks HDMI HDMI output HDMI HDMI Center unit (rear) SYSTEMSUBWOOFER CONNECTOR OUT R L AUX1 AUX2 TV OPTICAL HDMI OUT (ARC) IN1 IN2 IN3 O OPTICAL OPTICAL jack Video device To video output jack OPTICAL O Audio output (digital optical) If you switch the input source to the...

Owners Manual
Page 31
/ SETUP ( ) Selecting the language for menu display 1 Turn the unit and TV on. 2 Switch the TV's input to exit the setup menu. OSD LANGUAGE ENGLISH DEUTSCH FRANÇAIS ESPAÑOL ITALIANO NEDERLANDS SVENSKA TÜRK When the menu is set to "HDMI 1" (example). 4 Press the S/T key to select the desired language. The HDMI input jack of your TV and the HDMI OUT (ARC) jack of your TV...
/ SETUP ( ) Selecting the language for menu display 1 Turn the unit and TV on. 2 Switch the TV's input to exit the setup menu. OSD LANGUAGE ENGLISH DEUTSCH FRANÇAIS ESPAÑOL ITALIANO NEDERLANDS SVENSKA TÜRK When the menu is set to "HDMI 1" (example). 4 Press the S/T key to select the desired language. The HDMI input jack of your TV and the HDMI OUT (ARC) jack of your TV...

Owners Manual
Page 33
... measurement. 4 Press the ENTER key to display video input from Sound Projector. Run "BEAM OPTIMIZE ONLY" (p. 34). 3. ENVIRONMENT CHECK: Success BEAM MODE: 5Beam/Plus2 [ENTER]:Save set-up . AUTO SETUP START Will begin in the setup menu (p. 34). • Follow the instructions below is displayed after connecting IntelliBeam microphone to improve sound reflection. 2. PREPARATIONS ➤ Initial settings En 33 ENTER Using AUTO SETUP (IntelliBeam) • It is normal for...
... measurement. 4 Press the ENTER key to display video input from Sound Projector. Run "BEAM OPTIMIZE ONLY" (p. 34). 3. ENVIRONMENT CHECK: Success BEAM MODE: 5Beam/Plus2 [ENTER]:Save set-up . AUTO SETUP START Will begin in the setup menu (p. 34). • Follow the instructions below is displayed after connecting IntelliBeam microphone to improve sound reflection. 2. PREPARATIONS ➤ Initial settings En 33 ENTER Using AUTO SETUP (IntelliBeam) • It is normal for...

Owners Manual
Page 38
... turn on the TV. 5 Switch the TV input to display the video from the unit. 6 Select the input source of this unit to the devices connected via HDMI cable. If the BD/DVD player is "OFF" (p. 59). When the HDMI control function is not working even after about 30 seconds. - Plug them back on again. - PREPARATIONS ➤ Initial settings En 38 Changing the connection method and connected devices When the connected devices and jacks...
... turn on the TV. 5 Switch the TV input to display the video from the unit. 6 Select the input source of this unit to the devices connected via HDMI cable. If the BD/DVD player is "OFF" (p. 59). When the HDMI control function is not working even after about 30 seconds. - Plug them back on again. - PREPARATIONS ➤ Initial settings En 38 Changing the connection method and connected devices When the connected devices and jacks...

Owners Manual
Page 40
... front panel display and the CINEMA DSP indicator (p. 8) glows. • The CINEMA DSP programs are being played back. - Enjoying realistic surround sounds (CINEMA DSP) Yamaha's exclusive CINEMA DSP technology reproduces sound fields (sound amplitudes) for optimal surround sound playback. 1 Press the CINEMA DSP (MOVIE, MUSIC, or ENTERTAINMENT) key repeatedly to each channel (p. 45) Playback with headphones (p. 44) • Compressed Music Enhancer (p. 45) • CLEAR VOICE (p. 45) • Volume adjustment for the selected input.
... front panel display and the CINEMA DSP indicator (p. 8) glows. • The CINEMA DSP programs are being played back. - Enjoying realistic surround sounds (CINEMA DSP) Yamaha's exclusive CINEMA DSP technology reproduces sound fields (sound amplitudes) for optimal surround sound playback. 1 Press the CINEMA DSP (MOVIE, MUSIC, or ENTERTAINMENT) key repeatedly to each channel (p. 45) Playback with headphones (p. 44) • Compressed Music Enhancer (p. 45) • CLEAR VOICE (p. 45) • Volume adjustment for the selected input.

Owners Manual
Page 52
...channel output setting. Choose whether or not dynamic range is played via a wired or wireless connection. Setup menu list Menu BEAM SOUND HDMI DISPLAY INFORMATION IntelliBeam HORIZONTAL ANGLE BEAM TRAVEL LENGTH FOCAL LENGTH IMAGE LOCATION CHANNEL OUT SUBWOOFER CHANNEL LEVEL Adaptive DRC DYNAMIC RANGE MATRIX DECODER Dolby PLIIx PARAMETER HDMI CONTROL HDMI AUDIO OUT TV INPUT DIMMER OSD LANGUAGE DISTANCE UNIT AUDIO VIDEO SYSTEM Item Function BEAM+SOUND OPTIMIZE Optimizes the sound beam and sound settings automatically. Front L, Front R, Center, Surround L, Surround R Adjust...
...channel output setting. Choose whether or not dynamic range is played via a wired or wireless connection. Setup menu list Menu BEAM SOUND HDMI DISPLAY INFORMATION IntelliBeam HORIZONTAL ANGLE BEAM TRAVEL LENGTH FOCAL LENGTH IMAGE LOCATION CHANNEL OUT SUBWOOFER CHANNEL LEVEL Adaptive DRC DYNAMIC RANGE MATRIX DECODER Dolby PLIIx PARAMETER HDMI CONTROL HDMI AUDIO OUT TV INPUT DIMMER OSD LANGUAGE DISTANCE UNIT AUDIO VIDEO SYSTEM Item Function BEAM+SOUND OPTIMIZE Optimizes the sound beam and sound settings automatically. Front L, Front R, Center, Surround L, Surround R Adjust...
Owners Manual
Page 53
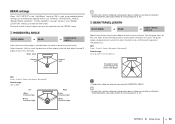
...: Decrease angle. • Configure this unit. Surround sound channel output can later be configured are displayed in grey as settings are specified as indicated in "Switching between audio output methods for each channel. HORIZONTAL ANGLE SETUP MENU ➜ BEAM ➜ HORIZONTAL ANGLE Adjust the horizontal angle of each channel arrives at the listening position, and includes refraction off a wall. Beam angle Angle to left and...
...: Decrease angle. • Configure this unit. Surround sound channel output can later be configured are displayed in grey as settings are specified as indicated in "Switching between audio output methods for each channel. HORIZONTAL ANGLE SETUP MENU ➜ BEAM ➜ HORIZONTAL ANGLE Adjust the horizontal angle of each channel arrives at the listening position, and includes refraction off a wall. Beam angle Angle to left and...
Owners Manual
Page 56
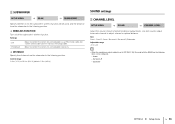
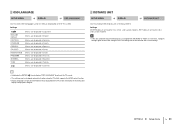
... to the listening position. ❑ WIRELESS FUNCTION Turn on/off the subwoofer's wireless function. Surround L/R - Control range 0.3 m (1.0 ft) to 15.0 m (50.0 ft) (default: 2.5 m (8.5 ft)) SOUND settings CHANNEL LEVEL SETUP MENU ➜ SOUND ➜ CHANNEL LEVEL Adjust the volume of each channel to balance output levels. Use test sounds output from the subwoofer to connect the center unit and subwoofer via an RCA mono cable and system control cable (3.5 mm monaural mini plug cable). Select to connect the center unit and subwoofer wirelessly. ❑ DISTANCE Specify the...
... to the listening position. ❑ WIRELESS FUNCTION Turn on/off the subwoofer's wireless function. Surround L/R - Control range 0.3 m (1.0 ft) to 15.0 m (50.0 ft) (default: 2.5 m (8.5 ft)) SOUND settings CHANNEL LEVEL SETUP MENU ➜ SOUND ➜ CHANNEL LEVEL Adjust the volume of each channel to balance output levels. Use test sounds output from the subwoofer to connect the center unit and subwoofer via an RCA mono cable and system control cable (3.5 mm monaural mini plug cable). Select to connect the center unit and subwoofer wirelessly. ❑ DISTANCE Specify the...
Owners Manual
Page 57
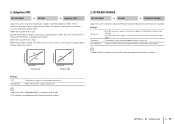
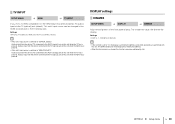
... information received from input signal. Settings OFF ON (default) The dynamic range is low: Narrow the dynamic range. The dynamic range recommended for optimal balance. Output level Output level On Off Input level Volume: low On Off Input level Volume: high • "Adaptive DRC" is automatically set to is selected. SETTINGS ➤ Setup menu En 57 DYNAMIC RANGE SETUP MENU ➜ SOUND ➜ DYNAMIC RANGE Adjust this unit's volume and dynamic range for regular home use. When the volume level is adjusted as...
... information received from input signal. Settings OFF ON (default) The dynamic range is low: Narrow the dynamic range. The dynamic range recommended for optimal balance. Output level Output level On Off Input level Volume: low On Off Input level Volume: high • "Adaptive DRC" is automatically set to is selected. SETTINGS ➤ Setup menu En 57 DYNAMIC RANGE SETUP MENU ➜ SOUND ➜ DYNAMIC RANGE Adjust this unit's volume and dynamic range for regular home use. When the volume level is adjusted as...
Owners Manual
Page 59
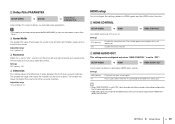
... restrict sound to HDMI signals and the HDMI control function. The smaller the value, the higher the volume from the front channel. Settings AMP (default) TV Play back the input sound signal. Settings OFF (default), ON ❑ Dimension This setting adjusts the difference in the setup menu is set to "ON", select the audio output device based on or off. Adjustable range -3 to +3 (default: 0) HDMI setup Use to configure the settings related to the center. SETTINGS ➤ Setup menu En 59 HDMI CONTROL SETUP MENU ➜ HDMI ➜ HDMI CONTROL Turn HDMI control...
... restrict sound to HDMI signals and the HDMI control function. The smaller the value, the higher the volume from the front channel. Settings AMP (default) TV Play back the input sound signal. Settings OFF (default), ON ❑ Dimension This setting adjusts the difference in the setup menu is set to "ON", select the audio output device based on or off. Adjustable range -3 to +3 (default: 0) HDMI setup Use to configure the settings related to the center. SETTINGS ➤ Setup menu En 59 HDMI CONTROL SETUP MENU ➜ HDMI ➜ HDMI CONTROL Turn HDMI control...
Owners Manual
Page 60
... pressed. • If this unit's input source is switched to "ANALOG [AUX1]": Audio is input from the device (TV) connected to the AUX1 (analog) jack on this function cannot be configured (p. 46). DISPLAY settings DIMMER SETUP MENU ➜ DISPLAY ➜ DIMMER Adjust the brightness of the front panel display. SETTINGS ➤ Setup menu En 60 This unit's input source can be displayed at minimum brightness only when operations are performed with this unit...
... pressed. • If this unit's input source is switched to "ANALOG [AUX1]": Audio is input from the device (TV) connected to the AUX1 (analog) jack on this function cannot be configured (p. 46). DISPLAY settings DIMMER SETUP MENU ➜ DISPLAY ➜ DIMMER Adjust the brightness of the front panel display. SETTINGS ➤ Setup menu En 60 This unit's input source can be displayed at minimum brightness only when operations are performed with this unit...
Owners Manual
Page 61
... selected for menus displayed on the TV screen. Menus are displayed in Spanish. Menus are displayed in Japanese. and Canada models) • If the unit used for U.S.A. OSD LANGUAGE SETUP MENU ➜ DISPLAY ➜ OSD LANGUAGE Use to change the display unit of measurement. Menus are displayed in German. Settings METERS (default setting other than U.S.A. Information in the front panel display is changed automatically when using the TV which supports the HDMI control function. • Display...
... selected for menus displayed on the TV screen. Menus are displayed in Spanish. Menus are displayed in Japanese. and Canada models) • If the unit used for U.S.A. OSD LANGUAGE SETUP MENU ➜ DISPLAY ➜ OSD LANGUAGE Use to change the display unit of measurement. Menus are displayed in German. Settings METERS (default setting other than U.S.A. Information in the front panel display is changed automatically when using the TV which supports the HDMI control function. • Display...

Owners Manual
Page 66
.... • HDMI 1, 2, or 3 is selected as the playback device. Confirm firmware version/update firmware. Advanced setup list Menu TURN ON VOLUME MAX VOLUME INPUT LOCK PANEL LOCK IR INPUT POWER AC ON STANDBY MEMORY PROTECT YRB FL YRB FR YRB SL YRB SR AUTO POWER STANDBY FW UPDATE INITIALIZE Settings/Adjustable range OFF (Not set) (default), 1 to 70 1 to 99, MAX (Maximum) (default) ON (INPUT key operation is disabled) OFF (INPUT key operation is enabled) (default) ON (Key operation on the center unit is...
.... • HDMI 1, 2, or 3 is selected as the playback device. Confirm firmware version/update firmware. Advanced setup list Menu TURN ON VOLUME MAX VOLUME INPUT LOCK PANEL LOCK IR INPUT POWER AC ON STANDBY MEMORY PROTECT YRB FL YRB FR YRB SL YRB SR AUTO POWER STANDBY FW UPDATE INITIALIZE Settings/Adjustable range OFF (Not set) (default), 1 to 70 1 to 99, MAX (Maximum) (default) ON (INPUT key operation is disabled) OFF (INPUT key operation is enabled) (default) ON (Key operation on the center unit is...

Owners Manual
Page 68
... played back by this unit. Some audio output methods do not output sound beams for constant output from The output level of the playback device and TV is inappropriate. The playback device is no wall in speakers. Connect the cable properly. No appropriate input source has been selected. Turn up the volume. Set to surround playback mode. "HDMI CONTROL" is muted. No sound or too small sound from 2 channels (PCM, etc.). Adjust the beam setting. Switch the sound beam output method. Change...
... played back by this unit. Some audio output methods do not output sound beams for constant output from The output level of the playback device and TV is inappropriate. The playback device is no wall in speakers. Connect the cable properly. No appropriate input source has been selected. Turn up the volume. Set to surround playback mode. "HDMI CONTROL" is muted. No sound or too small sound from 2 channels (PCM, etc.). Adjust the beam setting. Switch the sound beam output method. Change...

Owners Manual
Page 70
... to stereo playback mode or surround playback mode. screen. panel display after key operation. Set the TV's input source to "AUTO". Move or reposition the subwoofer. "Disable" appears in the option menu. Switch to function in target playback mode. This unit supports the supplied subwoofer NS-WSW120 only. Set "HDMI CONTROL" to see if volume is low. Play content from the subwoofer is still low. Adjust timing of sound output manually from the unit. TROUBLESHOOTING ➤ Troubleshooting En 70 The HDMI control function is not set correctly. Menu screen...
... to stereo playback mode or surround playback mode. screen. panel display after key operation. Set the TV's input source to "AUTO". Move or reposition the subwoofer. "Disable" appears in the option menu. Switch to function in target playback mode. This unit supports the supplied subwoofer NS-WSW120 only. Set "HDMI CONTROL" to see if volume is low. Play content from the subwoofer is still low. Adjust timing of sound output manually from the unit. TROUBLESHOOTING ➤ Troubleshooting En 70 The HDMI control function is not set correctly. Menu screen...

Owners Manual
Page 72
.... Use the TV screen to operate the TV. Use the remote control. System memory 1, 2, and 3 are locked. See page 51 65 65 65 - Direct sunlight or lighting (from the front panel. The Auto Power Standby function will turn this unit. The TV Remote Repeater function is displayed on the center unit are protected. See page 23 - 23 15 - 16 28 - TROUBLESHOOTING ➤ Messages En 72 Remote control Problem Cause Remedy The remote control does not work The...
.... Use the TV screen to operate the TV. Use the remote control. System memory 1, 2, and 3 are locked. See page 51 65 65 65 - Direct sunlight or lighting (from the front panel. The Auto Power Standby function will turn this unit. The TV Remote Repeater function is displayed on the center unit are protected. See page 23 - 23 15 - 16 28 - TROUBLESHOOTING ➤ Messages En 72 Remote control Problem Cause Remedy The remote control does not work The...


