MCXSP10 Manual
Page 3
... repairs to follow instructions could void your authority, granted by using one of the following the operating instructions. When replacement parts are required, be used replacement parts specified by the manufacturer. 23 Heat - NATIONAL ELECTRICAL CODE ANTENNA LEAD IN WIRE ANTENNA DISCHARGE UNIT (NEC SECTION 810-20) GROUNDING CONDUCTORS (NEC SECTION 810-21) GROUND CLAMPS POWER SERVICE GROUNDING ELECTRODE SYSTEM (NEC ART 250. Upon completion of radio...
... repairs to follow instructions could void your authority, granted by using one of the following the operating instructions. When replacement parts are required, be used replacement parts specified by the manufacturer. 23 Heat - NATIONAL ELECTRICAL CODE ANTENNA LEAD IN WIRE ANTENNA DISCHARGE UNIT (NEC SECTION 810-20) GROUNDING CONDUCTORS (NEC SECTION 810-21) GROUND CLAMPS POWER SERVICE GROUNDING ELECTRODE SYSTEM (NEC ART 250. Upon completion of radio...
MCXSP10 Manual
Page 5
... 4 Remote control 6 Using the remote control 7 Front panel display 8 Rear panel 10 PREPARATION SPEAKER SETUP 11 Speaker placement 11 Speaker connections 12 CONNECTIONS 15 Before connecting components 15 Connecting video components 16 Connecting audio components 19 Connecting the FM and AM antennas 21 Connecting the power supply cord 22 Speaker impedance setting 23 Turning on the power 23 AUTO SETUP 24 Introduction 24 Optimizer microphone setup 24 Starting the setup 25 BASIC OPERATION PLAYBACK 30 Basic operations 30 Selecting sound field programs 32 Selecting input modes...
... 4 Remote control 6 Using the remote control 7 Front panel display 8 Rear panel 10 PREPARATION SPEAKER SETUP 11 Speaker placement 11 Speaker connections 12 CONNECTIONS 15 Before connecting components 15 Connecting video components 16 Connecting audio components 19 Connecting the FM and AM antennas 21 Connecting the power supply cord 22 Speaker impedance setting 23 Turning on the power 23 AUTO SETUP 24 Introduction 24 Optimizer microphone setup 24 Starting the setup 25 BASIC OPERATION PLAYBACK 30 Basic operations 30 Selecting sound field programs 32 Selecting input modes...
MCXSP10 Manual
Page 6
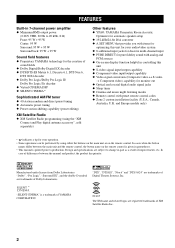
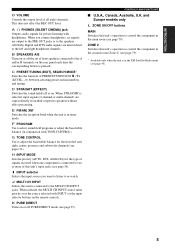
FEATURES FEATURES Built-in 7-channel power amplifier ◆ Minimum RMS output power (0.06% THD, 20 Hz to 20 kHz, 8 Ω) Front: 95 W + 95 W Center: 95 W Surround: 95 W + 95 W Surround back: 95 W + 95 W Sound field features ◆ Proprietary YAMAHA technology for monitor out ◆ Optical and coaxial digital audio signal jacks ◆ Sleep timer ◆ Cinema and music night listening modes ◆ Remote control with preset remote control codes ◆ Zone 2 custom installation facility (U.S.A., Canada, Australia, U.K. and Europe...
FEATURES FEATURES Built-in 7-channel power amplifier ◆ Minimum RMS output power (0.06% THD, 20 Hz to 20 kHz, 8 Ω) Front: 95 W + 95 W Center: 95 W Surround: 95 W + 95 W Surround back: 95 W + 95 W Sound field features ◆ Proprietary YAMAHA technology for monitor out ◆ Optical and coaxial digital audio signal jacks ◆ Sleep timer ◆ Cinema and music night listening modes ◆ Remote control with preset remote control codes ◆ Zone 2 custom installation facility (U.S.A., Canada, Australia, U.K. and Europe...
MCXSP10 Manual
Page 8
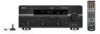
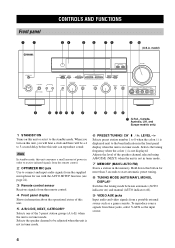
...and input audio signals from the supplied microphone for use with the AUTO SETUP function (see page 24). 3 Remote control sensor Receives signals from these jacks, select V-AUX as a game console. model) ZONE ON/OFF MAIN ZONE 2 VOLUME OPTIMIZER MIC STANDBY /ON PHONES SPEAKERS A B SILENT CINEMA PRESET/TUNING FM/AM EDIT SEARCH MODE XM A/B/C/D/E NEXT CATEGORY l PRESET/TUNING/CH h LEVEL MEMORY TUNING MODE MAN'L/AUTO FM AUTO/MAN'L MONO DISPLAY PROGRAM INPUT STRAIGHT TONE CONTROL INPUT MODE MULTI CH INPUT PURE DIRECT EFFECT S VIDEO VIDEO AUX VIDEO L AUDIO R OPTICAL...
...and input audio signals from the supplied microphone for use with the AUTO SETUP function (see page 24). 3 Remote control sensor Receives signals from these jacks, select V-AUX as a game console. model) ZONE ON/OFF MAIN ZONE 2 VOLUME OPTIMIZER MIC STANDBY /ON PHONES SPEAKERS A B SILENT CINEMA PRESET/TUNING FM/AM EDIT SEARCH MODE XM A/B/C/D/E NEXT CATEGORY l PRESET/TUNING/CH h LEVEL MEMORY TUNING MODE MAN'L/AUTO FM AUTO/MAN'L MONO DISPLAY PROGRAM INPUT STRAIGHT TONE CONTROL INPUT MODE MULTI CH INPUT PURE DIRECT EFFECT S VIDEO VIDEO AUX VIDEO L AUDIO R OPTICAL...
MCXSP10 Manual
Page 9
... or on or off the set of this unit's input jacks (see pages 31). C PRESET/TUNING (EDIT), SEARCH MODE* Switches the function of all audio channels. INTRODUCTION 0 VOLUME Controls the output level of PRESET/TUNING/CH l / h (LEVEL -/+) between selecting preset station numbers and tuning. All Dolby Digital and DTS audio signals are mixed down to adjust the bass/treble balance for the front left and right headphone channels. B SPEAKERS A/B Turns on . D STRAIGHT (EFFECT) Switches the sound fields off PURE DIRECT mode (see page 79). * Available...
... or on or off the set of this unit's input jacks (see pages 31). C PRESET/TUNING (EDIT), SEARCH MODE* Switches the function of all audio channels. INTRODUCTION 0 VOLUME Controls the output level of PRESET/TUNING/CH l / h (LEVEL -/+) between selecting preset station numbers and tuning. All Dolby Digital and DTS audio signals are mixed down to adjust the bass/treble balance for the front left and right headphone channels. B SPEAKERS A/B Turns on . D STRAIGHT (EFFECT) Switches the sound fields off PURE DIRECT mode (see page 79). * Available...
MCXSP10 Manual
Page 10
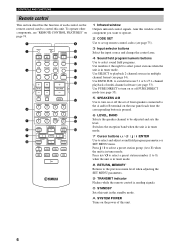
... DISC SKIP A-E/CAT. Use PURE DIRECT to turn on or off PURE DIRECT mode (see page 35). 5 SPEAKERS A/B Use to turn on or off the set up remote control codes (see "REMOTE CONTROL FEATURES" on page 74. 1 2 3 CODE SET TRANSMIT POWER TV POWER AV STANDBY CD MD/CD-R TUNER SYSTEM POWER SLEEP DVD DTV/CBL V-AUX MULTI CH IN VCR 1 DVR/VCR2 AMP TV VOL TV CH VOLUME 9 0 A B C D E 4 5 6 7 8 TV MUTE TV INPUT MUTE STEREO 1 MUSIC 2 ENTERTAIN 3 MOVIE 4 STANDARD SELECT EXTD SUR. CONTROLS AND FUNCTIONS Remote control...
... DISC SKIP A-E/CAT. Use PURE DIRECT to turn on or off PURE DIRECT mode (see page 35). 5 SPEAKERS A/B Use to turn on or off the set up remote control codes (see "REMOTE CONTROL FEATURES" on page 74. 1 2 3 CODE SET TRANSMIT POWER TV POWER AV STANDBY CD MD/CD-R TUNER SYSTEM POWER SLEEP DVD DTV/CBL V-AUX MULTI CH IN VCR 1 DVR/VCR2 AMP TV VOL TV CH VOLUME 9 0 A B C D E 4 5 6 7 8 TV MUTE TV INPUT MUTE STEREO 1 MUSIC 2 ENTERTAIN 3 MOVIE 4 STANDARD SELECT EXTD SUR. CONTROLS AND FUNCTIONS Remote control...

MCXSP10 Manual
Page 35
... select a sound field program. TONE CONTROL PROGRAM y Speaker and headphone adjustments are set to enjoy multi-channel music or movie sound, including Dolby Digital and DTS surround, through ordinary headphones. y You can adjust the tonal quality of the sound field program buttons) to the right or left and right, center, and subwoofer speakers or headphones (when connected). Press TONE CONTROL on the remote control. The MUTE indicator flashes in STRAIGHT mode. See page 55 for details about sound field programs. PROGRAM Front panel AMP or STEREO 1 MUSIC...
... select a sound field program. TONE CONTROL PROGRAM y Speaker and headphone adjustments are set to enjoy multi-channel music or movie sound, including Dolby Digital and DTS surround, through ordinary headphones. y You can adjust the tonal quality of the sound field program buttons) to the right or left and right, center, and subwoofer speakers or headphones (when connected). Press TONE CONTROL on the remote control. The MUTE indicator flashes in STRAIGHT mode. See page 55 for details about sound field programs. PROGRAM Front panel AMP or STEREO 1 MUSIC...

MCXSP10 Manual
Page 36
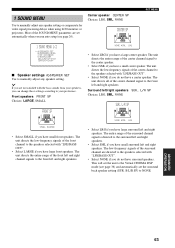
... the front panel display, no other source can be played. MULTI CH INPUT MULTI CH IN or Front panel Remote control Selecting sound field programs ■ Front panel operation VOLUME OPTIMIZER MIC STANDBY /ON PHONES SPEAKERS A B SILENT CINEMA PRESET/TUNING FM/AM EDIT SEARCH MODE XIM A/B/C/D/E NEXT CATEGORY l PRESET/TUNING/CH h LEVEL MEMORY TUNING MODE MAN'L/AUTO FM AUTO/MAN'L MONO DISPLAY PROGRAM INPUT STRAIGHT TONE CONTROL INPUT MODE MULTI CH INPUT PURE DIRECT EFFECT S VIDEO VIDEO AUX VIDEO L AUDIO R OPTICAL MULTI CH INPUT Note When "MULTI CH INPUT" is shown...
... the front panel display, no other source can be played. MULTI CH INPUT MULTI CH IN or Front panel Remote control Selecting sound field programs ■ Front panel operation VOLUME OPTIMIZER MIC STANDBY /ON PHONES SPEAKERS A B SILENT CINEMA PRESET/TUNING FM/AM EDIT SEARCH MODE XIM A/B/C/D/E NEXT CATEGORY l PRESET/TUNING/CH h LEVEL MEMORY TUNING MODE MAN'L/AUTO FM AUTO/MAN'L MONO DISPLAY PROGRAM INPUT STRAIGHT TONE CONTROL INPUT MODE MULTI CH INPUT PURE DIRECT EFFECT S VIDEO VIDEO AUX VIDEO L AUDIO R OPTICAL MULTI CH INPUT Note When "MULTI CH INPUT" is shown...

MCXSP10 Manual
Page 43
... the preset station number. VOLUME OPTIMIZER MIC STANDBY /ON PHONES SPEAKERS A B SILENT CINEMA PRESET/TUNING FM/AM EDIT SEARCH MODE XIM A/B/C/D/E NEXT CATEGORY l PRESET/TUNING/CH h LEVEL MEMORY TUNING MODE MAN'L/AUTO FM AUTO/MAN'L MONO DISPLAY PROGRAM INPUT STRAIGHT TONE CONTROL INPUT MODE MULTI CH INPUT PURE DIRECT EFFECT S VIDEO VIDEO AUX VIDEO L AUDIO R OPTICAL If a colon (:) appears in the front panel display, tuning is not possible. Hold down the button to select the FM band. You can use the automatic preset tuning feature to store FM stations. model...
... the preset station number. VOLUME OPTIMIZER MIC STANDBY /ON PHONES SPEAKERS A B SILENT CINEMA PRESET/TUNING FM/AM EDIT SEARCH MODE XIM A/B/C/D/E NEXT CATEGORY l PRESET/TUNING/CH h LEVEL MEMORY TUNING MODE MAN'L/AUTO FM AUTO/MAN'L MONO DISPLAY PROGRAM INPUT STRAIGHT TONE CONTROL INPUT MODE MULTI CH INPUT PURE DIRECT EFFECT S VIDEO VIDEO AUX VIDEO L AUDIO R OPTICAL If a colon (:) appears in the front panel display, tuning is not possible. Hold down the button to select the FM band. You can use the automatic preset tuning feature to store FM stations. model...

MCXSP10 Manual
Page 58
...records, CDs, radio, etc. For DVDs and CDs encoded with DTS, when your country to the DIGITAL OUTPUT jack. If you cannot record between other operations are not output to record from the recording components. VOLUME OPTIMIZER MIC STANDBY /ON PHONES SPEAKERS A B SILENT CINEMA PRESET/TUNING FM/AM EDIT SEARCH MODE XIM A/B/C/D/E NEXT CATEGORY l PRESET/TUNING/CH h LEVEL MEMORY TUNING MODE MAN'L/AUTO FM AUTO/MAN'L MONO DISPLAY PROGRAM INPUT STRAIGHT TONE CONTROL INPUT MODE MULTI CH INPUT PURE DIRECT EFFECT S VIDEO VIDEO AUX VIDEO L AUDIO R OPTICAL (U.S.A.
...records, CDs, radio, etc. For DVDs and CDs encoded with DTS, when your country to the DIGITAL OUTPUT jack. If you cannot record between other operations are not output to record from the recording components. VOLUME OPTIMIZER MIC STANDBY /ON PHONES SPEAKERS A B SILENT CINEMA PRESET/TUNING FM/AM EDIT SEARCH MODE XIM A/B/C/D/E NEXT CATEGORY l PRESET/TUNING/CH h LEVEL MEMORY TUNING MODE MAN'L/AUTO FM AUTO/MAN'L MONO DISPLAY PROGRAM INPUT STRAIGHT TONE CONTROL INPUT MODE MULTI CH INPUT PURE DIRECT EFFECT S VIDEO VIDEO AUX VIDEO L AUDIO R OPTICAL (U.S.A.
MCXSP10 Manual
Page 64
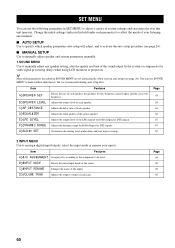
... for Dolby Digital or DTS signals. 67 G)AUDIO SET Customizes the muting level, audio delay and tone bypass settings. 67 2 INPUT MENU Use to reassign digital input/outputs, select the input mode or rename your listening environment. ■ AUTO SETUP Use to specify which speaker parameters auto setup will adjust, and to activate the auto setup procedure (see page 24). You can use SOUND MENU to make further adjustments, but we recommend running auto setup first. D)VOLUME TRIM Adjusts the output volume of the inputs. C)INPUT RENAME Changes the name of each jack. B)INPUT MODE...
... for Dolby Digital or DTS signals. 67 G)AUDIO SET Customizes the muting level, audio delay and tone bypass settings. 67 2 INPUT MENU Use to reassign digital input/outputs, select the input mode or rename your listening environment. ■ AUTO SETUP Use to specify which speaker parameters auto setup will adjust, and to activate the auto setup procedure (see page 24). You can use SOUND MENU to make further adjustments, but we recommend running auto setup first. D)VOLUME TRIM Adjusts the output volume of the inputs. C)INPUT RENAME Changes the name of each jack. B)INPUT MODE...
MCXSP10 Manual
Page 67
... channel to manually adjust any speaker setting or compensate for video signal processing delays when using LCD monitors or projectors. Center speaker CENTER SP Choices: LRG, SML, NONE CENTER SP SET MENU p 1 SOUND MENU 1/2 . The unit directs the low-frequency signals of the center channel signal to the front left and right speakers. The unit directs all of the center channel to the surround left and right speakers. • Select SML if you have a center speaker. The unit directs the entire range of the center channel signal...
... channel to manually adjust any speaker setting or compensate for video signal processing delays when using LCD monitors or projectors. Center speaker CENTER SP Choices: LRG, SML, NONE CENTER SP SET MENU p 1 SOUND MENU 1/2 . The unit directs the low-frequency signals of the center channel signal to the front left and right speakers. The unit directs all of the center channel to the surround left and right speakers. • Select SML if you have a center speaker. The unit directs the entire range of the center channel signal...

MCXSP10 Manual
Page 70
... center speaker matches that all sound will be displayed if you selected only one surround back speaker in most home situations. Speaker distances Choices: 0.3 to 24.00 m (1 to 80 ft) • FRONT L adjusts the distance of the front left speaker. Initial setting: 2.10 m (7.0 ft) • SB R* adjusts the distance of the subwoofer. Choices: AUTO PEQ, CNTR GEQ, EQ OFF • Select AUTO PEQ to use this feature to output a test tone...
... center speaker matches that all sound will be displayed if you selected only one surround back speaker in most home situations. Speaker distances Choices: 0.3 to 24.00 m (1 to 80 ft) • FRONT L adjusts the distance of the front left speaker. Initial setting: 2.10 m (7.0 ft) • SB R* adjusts the distance of the subwoofer. Choices: AUTO PEQ, CNTR GEQ, EQ OFF • Select AUTO PEQ to use this feature to output a test tone...

MCXSP10 Manual
Page 71
... Dolby Digital and DTS signals. Audio delay AUDIO DELAY Use to adjust the speaker LFE level. Choices: AUTO, OFF • Select AUTO if you want signals to bypass tone control circuitry. G)AUDIO SET . SPEAKER;;;;;;0dB HEADPHONE;;;;0dB [ ]/[ ]:Up/Down []:Adjust Speaker SPEAKER Select to delay the sound output and synchronize it with the video image. Note Depending on the settings of "LFE LEVEL", some signals may be applied to 0 dB (see page 31). Choices: 0 to 160 ms Tone bypass TONE BYPASS Use to select whether audio output...
... Dolby Digital and DTS signals. Audio delay AUDIO DELAY Use to adjust the speaker LFE level. Choices: AUTO, OFF • Select AUTO if you want signals to bypass tone control circuitry. G)AUDIO SET . SPEAKER;;;;;;0dB HEADPHONE;;;;0dB [ ]/[ ]:Up/Down []:Adjust Speaker SPEAKER Select to delay the sound output and synchronize it with the video image. Note Depending on the settings of "LFE LEVEL", some signals may be applied to 0 dB (see page 31). Choices: 0 to 160 ms Tone bypass TONE BYPASS Use to select whether audio output...
MCXSP10 Manual
Page 78
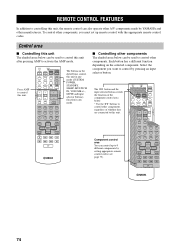
... control other components regardless of the component control area below can control up remote control with the appropriate remote control codes. NIGHT EFFECT 10 SET MENU LEVEL MENU PRESET/CH SRCH MODE STRAIGHT ENT. ENTER DISPLAY ON SCREEN A-E/CAT. CODE SET TRANSMIT POWER TV POWER AV STANDBY CD MD/CD-R TUNER SYSTEM POWER SLEEP DVD DTV/CBL V-AUX MULTI CH IN VCR 1 DVR/VCR2 AMP TV VOL TV CH VOLUME TV MUTE TV INPUT MUTE STEREO 1 MUSIC 2 ENTERTAIN 3 MOVIE 4 STANDARD SELECT EXTD SUR. DISPLAY ON SCREEN AUDIO The buttons...
... control other components regardless of the component control area below can control up remote control with the appropriate remote control codes. NIGHT EFFECT 10 SET MENU LEVEL MENU PRESET/CH SRCH MODE STRAIGHT ENT. ENTER DISPLAY ON SCREEN A-E/CAT. CODE SET TRANSMIT POWER TV POWER AV STANDBY CD MD/CD-R TUNER SYSTEM POWER SLEEP DVD DTV/CBL V-AUX MULTI CH IN VCR 1 DVR/VCR2 AMP TV VOL TV CH VOLUME TV MUTE TV INPUT MUTE STEREO 1 MUSIC 2 ENTERTAIN 3 MOVIE 4 STANDARD SELECT EXTD SUR. DISPLAY ON SCREEN AUDIO The buttons...
MCXSP10 Manual
Page 80
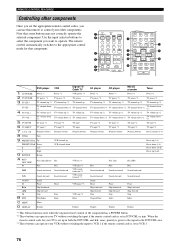
.../CBL area. *3 These buttons can use this remote to VCR 1 if the remote control code is set in DTV/CBL or . Note that component. 1 2 CODE SET TRANSMIT POWER TV POWER AV STANDBY CD MD/CD-R TUNER SYSTEM POWER SLEEP DVD DTV/CBL V-AUX MULTI CH IN 3 VCR 1 DVR/VCR2 AMP 4 TV VOL TV CH VOLUME 5 6 TV MUTE TV INPUT MUTE STEREO 1 MUSIC 2 ENTERTAIN 3 MOVIE 4 7 8 9 0 A STEREO 1 MUSIC 2 ENTERTAIN 3 MOVIE 4 STANDARD SELECT EXTD SUR. EFFECT SET MENU MENU SRCH MODE A-E/CAT. REMOTE CONTROL FEATURES Controlling other components.
.../CBL area. *3 These buttons can use this remote to VCR 1 if the remote control code is set in DTV/CBL or . Note that component. 1 2 CODE SET TRANSMIT POWER TV POWER AV STANDBY CD MD/CD-R TUNER SYSTEM POWER SLEEP DVD DTV/CBL V-AUX MULTI CH IN 3 VCR 1 DVR/VCR2 AMP 4 TV VOL TV CH VOLUME 5 6 TV MUTE TV INPUT MUTE STEREO 1 MUSIC 2 ENTERTAIN 3 MOVIE 4 7 8 9 0 A STEREO 1 MUSIC 2 ENTERTAIN 3 MOVIE 4 STANDARD SELECT EXTD SUR. EFFECT SET MENU MENU SRCH MODE A-E/CAT. REMOTE CONTROL FEATURES Controlling other components.

MCXSP10 Manual
Page 83
... the remote control codes for . 4 You can turn the main unit on, or set it is applied to control Zone 2. CODE SET TRANSMIT POWER TV POWER AV STANDBY CD MD/CD-R TUNER SYSTEM POWER SLEEP DVD DTV/CBL V-AUX MULTI CH IN VCR 1 DVR/VCR2 AMP TV VOL TV CH VOLUME TV MUTE TV INPUT MUTE y If "ZONE2 AMP" in OPTION MENU is set to INT, you can use this unit's internal amplifier To use VOLUME -/+ to adjust sound output from speakers connected...
... the remote control codes for . 4 You can turn the main unit on, or set it is applied to control Zone 2. CODE SET TRANSMIT POWER TV POWER AV STANDBY CD MD/CD-R TUNER SYSTEM POWER SLEEP DVD DTV/CBL V-AUX MULTI CH IN VCR 1 DVR/VCR2 AMP TV VOL TV CH VOLUME TV MUTE TV INPUT MUTE y If "ZONE2 AMP" in OPTION MENU is set to INT, you can use this unit's internal amplifier To use VOLUME -/+ to adjust sound output from speakers connected...
MCXSP10 Manual
Page 92
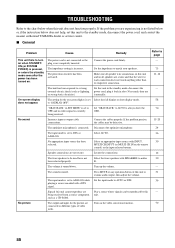
... input mode is set this unit to resume audio output, then adjust the volume. Select the full display or short display mode. If the problem you are not secure. The front speakers to always show the OSD. Incorrect input or output cable connections. Remedy Connect the power cord firmly. Press MUTE or any operation button of video jacks. The setting for the on when STANDBY/ ON (or SYSTEM POWER) is not listed below or if the instruction below...
... input mode is set this unit to resume audio output, then adjust the volume. Select the full display or short display mode. If the problem you are not secure. The front speakers to always show the OSD. Incorrect input or output cable connections. Remedy Connect the power cord firmly. Press MUTE or any operation button of video jacks. The setting for the on when STANDBY/ ON (or SYSTEM POWER) is not listed below or if the instruction below...

MCXSP10 Manual
Page 95
... digital or radio frequency equipment, or this unit further away from the TV. Use the manual tuning method. Refer to eliminate all noise. There is noise when the OSD is disturbed. A TV set is distortion, and clear reception cannot be disturbed when displaying OSD through component video connections. There are buzzing and whining noises. This unit suddenly turns into the standby mode. This will help...
... digital or radio frequency equipment, or this unit further away from the TV. Use the manual tuning method. Refer to eliminate all noise. There is noise when the OSD is disturbed. A TV set is distortion, and clear reception cannot be disturbed when displaying OSD through component video connections. There are buzzing and whining noises. This unit suddenly turns into the standby mode. This will help...
MCXSP10 Manual
Page 96
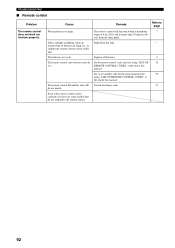
TROUBLESHOOTING ■ Remote control Problem The remote control does not work nor function properly. axis from an Reposition this unit. - Replace all batteries. 3 The remote control code was not correctly Set the remote control code correctly using "LIST OF REMOTE CONTROL CODES" at the end of this manual. Even if the remote control code is striking the remote control sensor of this unit's ID Switch the library code. 77 do not respond to page Wrong distance or angle. Try...
TROUBLESHOOTING ■ Remote control Problem The remote control does not work nor function properly. axis from an Reposition this unit. - Replace all batteries. 3 The remote control code was not correctly Set the remote control code correctly using "LIST OF REMOTE CONTROL CODES" at the end of this manual. Even if the remote control code is striking the remote control sensor of this unit's ID Switch the library code. 77 do not respond to page Wrong distance or angle. Try...


