MCXSP10 Manual
Page 1
U RX-V657 AV Receiver OWNER'S MANUAL
U RX-V657 AV Receiver OWNER'S MANUAL
MCXSP10 Manual
Page 3
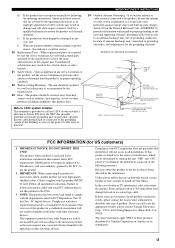
...lead-in performance - When replacement parts are required, be mounted to proper grounding of the mast and supporting structure, grounding of this manual, meets FCC requirements. Note to comply with other hazards. 21 Safety Check - This equipment generates/uses radio frequencies and, if not...as practical. Compliance with FCC regulations does not guarantee that provides guidelines for the grounding electrode. Adjust only those products distributed by Yamaha Corporation of America or its normal operation, e) If the product has been dropped or damaged in any service or repairs to ...
...lead-in performance - When replacement parts are required, be mounted to proper grounding of the mast and supporting structure, grounding of this manual, meets FCC requirements. Note to comply with other hazards. 21 Safety Check - This equipment generates/uses radio frequencies and, if not...as practical. Compliance with FCC regulations does not guarantee that provides guidelines for the grounding electrode. Adjust only those products distributed by Yamaha Corporation of America or its normal operation, e) If the product has been dropped or damaged in any service or repairs to ...
MCXSP10 Manual
Page 4
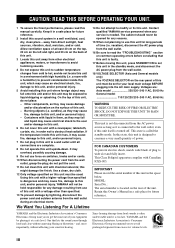
...Locate this unit away from excessive volume levels. This Class B digital apparatus complies with a newspaper, tablecloth, curtain, etc. YAMAHA and the Electronic Industries Association's Consumer Electronics Group want you to avoid prolonged exposure from other than specified is faulty. 17 ...used. Voltages are complete. 8 Do not operate this manual carefully. Since hearing damage from the wall outlet during an electrical storm. MODEL: Serial No.: The serial number is too late, YAMAHA and the Electronic Industries Association's Consumer Electronics Group recommend you...
...Locate this unit away from excessive volume levels. This Class B digital apparatus complies with a newspaper, tablecloth, curtain, etc. YAMAHA and the Electronic Industries Association's Consumer Electronics Group want you to avoid prolonged exposure from other than specified is faulty. 17 ...used. Voltages are complete. 8 Do not operate this manual carefully. Since hearing damage from the wall outlet during an electrical storm. MODEL: Serial No.: The serial number is too late, YAMAHA and the Electronic Industries Association's Consumer Electronics Group recommend you...
MCXSP10 Manual
Page 5
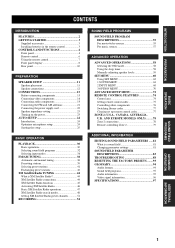
... setup 25 BASIC OPERATION PLAYBACK 30 Basic operations 30 Selecting sound field programs 32 Selecting input modes 36 FM/AM TUNING 38 Automatic and manual tuning 38 Presetting stations 39 Selecting preset stations 41 Exchanging preset stations 42 XM Satellite Radio TUNING 44 What is a sound field 81 ... 55 For movie/video sources 55 For music sources 57 ADVANCED OPERATION ADVANCED OPERATIONS 58 Selecting the OSD mode 58 Using the sleep timer 58 Manually adjusting speaker levels 59 SET MENU 60 Using SET MENU 62 1 SOUND MENU 63 2 INPUT MENU 68 3 OPTION MENU 70 ADVANCED SETUP...
... setup 25 BASIC OPERATION PLAYBACK 30 Basic operations 30 Selecting sound field programs 32 Selecting input modes 36 FM/AM TUNING 38 Automatic and manual tuning 38 Presetting stations 39 Selecting preset stations 41 Exchanging preset stations 42 XM Satellite Radio TUNING 44 What is a sound field 81 ... 55 For movie/video sources 55 For music sources 57 ADVANCED OPERATION ADVANCED OPERATIONS 58 Selecting the OSD mode 58 Using the sleep timer 58 Manually adjusting speaker levels 59 SET MENU 60 Using SET MENU 62 1 SOUND MENU 63 2 INPUT MENU 68 3 OPTION MENU 70 ADVANCED SETUP...
MCXSP10 Manual
Page 6
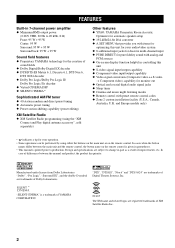
...performed by using either the buttons on the main unit or on the remote control is given in parentheses. • This manual is a trademark of YAMAHA CORPORATION. In case of differences between the main unit and the remote control, the button name on the remote control. "...Satellite Radio ◆ XM Satellite Radio programming (using the "XM Connect and Play digital antenna accessory", sold separately) Other features ◆ YPAO: YAMAHA Parametric Room Acoustic Optimizer for automatic speaker setup ◆ 192-kHz/24-bit D/A converter ◆ A SET MENU that provides you with items for...
...performed by using either the buttons on the main unit or on the remote control is given in parentheses. • This manual is a trademark of YAMAHA CORPORATION. In case of differences between the main unit and the remote control, the button name on the remote control. "...Satellite Radio ◆ XM Satellite Radio programming (using the "XM Connect and Play digital antenna accessory", sold separately) Other features ◆ YPAO: YAMAHA Parametric Room Acoustic Optimizer for automatic speaker setup ◆ 192-kHz/24-bit D/A converter ◆ A SET MENU that provides you with items for...
MCXSP10 Manual
Page 8
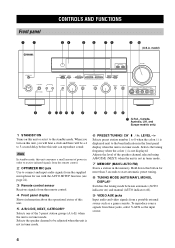
... tuning. 8 TUNING MODE (AUTO/MAN'L MONO), DISPLAY* Switches the tuning mode between automatic (AUTO indicator on this unit, you turn on ) and manual (AUTO indicator off). 9 VIDEO AUX jacks Input audio and video signals from the remote control. 4 Front panel display Shows information about the operational status... of this unit can reproduce sound. Selects the speaker channel to be a 4 to E) when the unit is in order to receive infrared-signals from the remote control. 2 OPTIMIZER MIC jack Use to connect and input audio signals from these jacks, select V-AUX as a game ...
... tuning. 8 TUNING MODE (AUTO/MAN'L MONO), DISPLAY* Switches the tuning mode between automatic (AUTO indicator on this unit, you turn on ) and manual (AUTO indicator off). 9 VIDEO AUX jacks Input audio and video signals from the remote control. 4 Front panel display Shows information about the operational status... of this unit can reproduce sound. Selects the speaker channel to be a 4 to E) when the unit is in order to receive infrared-signals from the remote control. 2 OPTIMIZER MIC jack Use to connect and input audio signals from these jacks, select V-AUX as a game ...
MCXSP10 Manual
Page 24
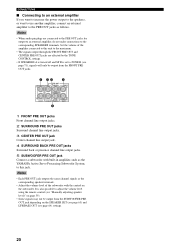
... 71), signals will only be output from the SUBWOOFER PRE OUT jack depending on the SPEAKER SET (see page 63) and LFE/BASS OUT (see "Manually adjusting speaker levels" on page 59). • Some signals may not be output from the FRONT PRE OUT jacks. 1 23 4 PRE OUT CENTER SINGLE SUB... to increase the power output to the speakers, or want to use another amplifier, connect an external amplifier to the PRE OUT jacks as the YAMAHA Active Servo Processing Subwoofer System, to this unit to the maximum. • The signals output through the FRONT PRE OUT and CENTER PRE OUT jacks...
... 71), signals will only be output from the SUBWOOFER PRE OUT jack depending on the SPEAKER SET (see page 63) and LFE/BASS OUT (see "Manually adjusting speaker levels" on page 59). • Some signals may not be output from the FRONT PRE OUT jacks. 1 23 4 PRE OUT CENTER SINGLE SUB... to increase the power output to the speakers, or want to use another amplifier, connect an external amplifier to the PRE OUT jacks as the YAMAHA Active Servo Processing Subwoofer System, to this unit to the maximum. • The signals output through the FRONT PRE OUT and CENTER PRE OUT jacks...

MCXSP10 Manual
Page 29
... To perform the auto setup procedure (YPAO). y You can choose RELOAD or UNDO only if you cannot select any manual changes. WIRING . y If your video monitor. To restore the factory preset (default) setup parameters. ENTER A-E/CAT. p p SET MENU . ;AUTO ...SETUP ;MANUAL SETUP ;SIGNAL INFO. [ ]/[ ]:Up/Down [ENTER]:Enter p 2 AUTO:CHECK INITIALZING . LEVEL CHECK CH=CENTER [ ]: Exit PRESET/CH A-E/CAT. SIZE/DISTANCE . ENTER ...
... To perform the auto setup procedure (YPAO). y You can choose RELOAD or UNDO only if you cannot select any manual changes. WIRING . y If your video monitor. To restore the factory preset (default) setup parameters. ENTER A-E/CAT. p p SET MENU . ;AUTO ...SETUP ;MANUAL SETUP ;SIGNAL INFO. [ ]/[ ]:Up/Down [ENTER]:Enter p 2 AUTO:CHECK INITIALZING . LEVEL CHECK CH=CENTER [ ]: Exit PRESET/CH A-E/CAT. SIZE/DISTANCE . ENTER ...

MCXSP10 Manual
Page 30
... speaker output level displayed in the order: Lowest output level/Highest output level ■ If an error screen appears Use u / d / j / i to manually adjust each speaker in turn. • If you selected DEFAULT, RELOAD or UNDO in step 5, no test tones are output. • If an ERROR screen... selected AUTO in step 5, "WAITING" appears when the auto setup procedure is started, then loud test tones are output from each setup parameter, use the manual setup parameters (see "If a warning screen appears" on page 27. To cancel the auto setup (YPAO) without making any function. . >RETRY EXIT [ ...
... speaker output level displayed in the order: Lowest output level/Highest output level ■ If an error screen appears Use u / d / j / i to manually adjust each speaker in turn. • If you selected DEFAULT, RELOAD or UNDO in step 5, no test tones are output. • If an ERROR screen... selected AUTO in step 5, "WAITING" appears when the auto setup procedure is started, then loud test tones are output from each setup parameter, use the manual setup parameters (see "If a warning screen appears" on page 27. To cancel the auto setup (YPAO) without making any function. . >RETRY EXIT [ ...

MCXSP10 Manual
Page 38
... "2ch Stereo" or PURE DIRECT is selected. • When the power of discs with 6.1-channel, select a decoder (PLIIx Movie, PLIIx Music, EX/ES or EX) manually. • 6.1-channel playback is being played. - PLII Movie Dolby Pro Logic II processing for any sources. PLII Game Dolby Pro Logic II processing for movie...
... "2ch Stereo" or PURE DIRECT is selected. • When the power of discs with 6.1-channel, select a decoder (PLIIx Movie, PLIIx Music, EX/ES or EX) manually. • 6.1-channel playback is being played. - PLII Movie Dolby Pro Logic II processing for any sources. PLII Game Dolby Pro Logic II processing for movie...

MCXSP10 Manual
Page 42
.../TUNING EDIT SEARCH MODE 32 4 1 3 1 Rotate INPUT to select TUNER as the input source. FM/AM TUNING FM/AM TUNING Automatic and manual tuning There are strong and there is shown in the front panel display. model) VOLUME OPTIMIZER MIC STANDBY /ON PHONES SPEAKERS A B SILENT CINEMA ... VIDEO VIDEO AUX VIDEO L AUDIO R OPTICAL 3 Press TUNING MODE (AUTO/MAN'L MONO) so that the AUTO indicator lights up and the frequency of the received station is no interference. ■ Automatic tuning (U.S.A. l PRESET/TUNING/CH h LEVEL R/VCR2 VCR1 V-AUX SP A DTV/CBL DVD MD/CD-R TUNER AUTO ...
.../TUNING EDIT SEARCH MODE 32 4 1 3 1 Rotate INPUT to select TUNER as the input source. FM/AM TUNING FM/AM TUNING Automatic and manual tuning There are strong and there is shown in the front panel display. model) VOLUME OPTIMIZER MIC STANDBY /ON PHONES SPEAKERS A B SILENT CINEMA ... VIDEO VIDEO AUX VIDEO L AUDIO R OPTICAL 3 Press TUNING MODE (AUTO/MAN'L MONO) so that the AUTO indicator lights up and the frequency of the received station is no interference. ■ Automatic tuning (U.S.A. l PRESET/TUNING/CH h LEVEL R/VCR2 VCR1 V-AUX SP A DTV/CBL DVD MD/CD-R TUNER AUTO ...

MCXSP10 Manual
Page 43
.../CBL DVD MD/CD-R TUNER AUTO TUNED 3 Press PRESET/TUNING/CH l / h to continue searching. Hold down the button to tune into it manually. l PRESET/TUNING/CH h LEVEL 2 Press TUNING MODE (AUTO/MAN'L MONO) so that the AUTO indicator disappears from the station you want to ...9632; Automatically presetting FM stations You can then recall any preset station easily by selecting the preset station number. BASIC OPERATION ■ Manual tuning If the signal from the front panel display. VOLUME OPTIMIZER MIC STANDBY /ON PHONES SPEAKERS A B SILENT CINEMA PRESET/TUNING FM/...
.../CBL DVD MD/CD-R TUNER AUTO TUNED 3 Press PRESET/TUNING/CH l / h to continue searching. Hold down the button to tune into it manually. l PRESET/TUNING/CH h LEVEL 2 Press TUNING MODE (AUTO/MAN'L MONO) so that the AUTO indicator disappears from the station you want to ...9632; Automatically presetting FM stations You can then recall any preset station easily by selecting the preset station number. BASIC OPERATION ■ Manual tuning If the signal from the front panel display. VOLUME OPTIMIZER MIC STANDBY /ON PHONES SPEAKERS A B SILENT CINEMA PRESET/TUNING FM/...

MCXSP10 Manual
Page 44
...been stored up to select the preset number under a preset number is completed, the front panel display shows the frequency of the station received. 2 Press MEMORY (MAN'L/AUTO FM). The MEMORY indicator flashes for about 5 seconds, automatic presetting starts from which the first station ...number from the frequency currently displayed and proceeds toward the lower frequencies. However, if the power is weak in signal strength, tune into it manually, and store it by using the presetting station methods. 34 (U.S.A. model) 2,5 1 Tune into a station, the front panel display shows ...
...been stored up to select the preset number under a preset number is completed, the front panel display shows the frequency of the station received. 2 Press MEMORY (MAN'L/AUTO FM). The MEMORY indicator flashes for about 5 seconds, automatic presetting starts from which the first station ...number from the frequency currently displayed and proceeds toward the lower frequencies. However, if the power is weak in signal strength, tune into it manually, and store it by using the presetting station methods. 34 (U.S.A. model) 2,5 1 Tune into a station, the front panel display shows ...

MCXSP10 Manual
Page 63
... y The sleep timer setting can also select the speaker by pressing STANDBY on the remote control (or STANDBY/ON on the front panel. ADVANCED OPERATIONS Manually adjusting speaker levels You can also be canceled by pressing u / d. 3 Press j / i to adjust the output level. This is from +10 dB to -10 dB. 4 Press...
... y The sleep timer setting can also select the speaker by pressing STANDBY on the remote control (or STANDBY/ON on the front panel. ADVANCED OPERATIONS Manually adjusting speaker levels You can also be canceled by pressing u / d. 3 Press j / i to adjust the output level. This is from +10 dB to -10 dB. 4 Press...
MCXSP10 Manual
Page 64
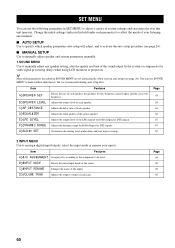
y Most of the parameters described in SOUND MENU are set automatically when you run auto setup (see page 24). ■ MANUAL SETUP Use to manually adjust speaker and system parameters manually. 1 SOUND MENU Use to manually adjust any speaker setting, alter the quality and tone of the sound output by the system or compensate for...
y Most of the parameters described in SOUND MENU are set automatically when you run auto setup (see page 24). ■ MANUAL SETUP Use to manually adjust speaker and system parameters manually. 1 SOUND MENU Use to manually adjust any speaker setting, alter the quality and tone of the sound output by the system or compensate for...

MCXSP10 Manual
Page 66
...8226; Repeat this unit is in the standby mode. If so, adjust the items again. 62 AMP 2 Press SET MENU. p p SET MENU ;AUTO SETUP . ;MANUAL SETUP . ;SIGNAL INFO. [ ]/[ ]:Up/Down [ENTER]:Enter 4 Press ENTER to enter the selected menu. PRESET/CH A-E/CAT. However, if the power cord is ...DISTANCE D)EQUALIZER [ ]/[ ]:Up/Down [ENTER]:Enter 7 Press u / d and ENTER to select the submenu, then press u / d to select the item and j / i to select MANUAL SETUP. SET MENU MENU SRCH MODE Memory back-up The memory back-up circuit prevents the stored data from the AC outlet, or the power...
...8226; Repeat this unit is in the standby mode. If so, adjust the items again. 62 AMP 2 Press SET MENU. p p SET MENU ;AUTO SETUP . ;MANUAL SETUP . ;SIGNAL INFO. [ ]/[ ]:Up/Down [ENTER]:Enter 4 Press ENTER to enter the selected menu. PRESET/CH A-E/CAT. However, if the power cord is ...DISTANCE D)EQUALIZER [ ]/[ ]:Up/Down [ENTER]:Enter 7 Press u / d and ENTER to select the submenu, then press u / d to select the item and j / i to select MANUAL SETUP. SET MENU MENU SRCH MODE Memory back-up The memory back-up circuit prevents the stored data from the AC outlet, or the power...
MCXSP10 Manual
Page 67
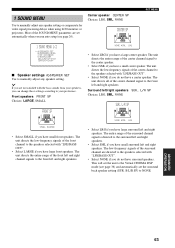
...to the Virtual CINEMA DSP mode (see page 24). This will set the unit to the front left and right speakers. B L/R SP) to manually adjust any speaker setting or compensate for video signal processing delays when using LCD monitors or projectors. A)SPEAKER SET B)SPEAKER LEVEL C)SP DISTANCE D)EQUALIZER...with "LFE/BASS OUT". • Select NONE if you have large surround left and right speakers. Surround left and right channel signals to manually adjust any speaker setting. Most of the front left /right speakers SUR. ADVANCED OPERATION p 1 SOUND MENU Use to the front left and ...
...to the Virtual CINEMA DSP mode (see page 24). This will set the unit to the front left and right speakers. B L/R SP) to manually adjust any speaker setting or compensate for video signal processing delays when using LCD monitors or projectors. A)SPEAKER SET B)SPEAKER LEVEL C)SP DISTANCE D)EQUALIZER...with "LFE/BASS OUT". • Select NONE if you have large surround left and right speakers. Surround left and right channel signals to manually adjust any speaker setting. Most of the front left /right speakers SUR. ADVANCED OPERATION p 1 SOUND MENU Use to the front left and ...

MCXSP10 Manual
Page 68
... channels to the left and right speakers. Use this feature to select a cross-over CROSS OVER Use this function to the subwoofer. To adjust it manually, see page 86. SET MENU Surround back speakers SUR. The unit directs the entire range of the surround back channel signal to both the front...
... channels to the left and right speakers. Use this feature to select a cross-over CROSS OVER Use this function to the subwoofer. To adjust it manually, see page 86. SET MENU Surround back speakers SUR. The unit directs the entire range of the surround back channel signal to both the front...

MCXSP10 Manual
Page 69
... Setting: 0 dB B)SPEAKER LEVEL - + . ADVANCED OPERATION p 65 Choices: NORMAL, REVERSE 02ASUBWOOFER PHASE )NORMAL REVERSE SET MENU ■ Speaker level B)SPEAKER LEVEL Use these settings to manually balance the speaker levels between the front left or surround left speaker. • PR adjusts the balance of the presence right speaker. * Instead of SBL...
... Setting: 0 dB B)SPEAKER LEVEL - + . ADVANCED OPERATION p 65 Choices: NORMAL, REVERSE 02ASUBWOOFER PHASE )NORMAL REVERSE SET MENU ■ Speaker level B)SPEAKER LEVEL Use these settings to manually balance the speaker levels between the front left or surround left speaker. • PR adjusts the balance of the presence right speaker. * Instead of SBL...

MCXSP10 Manual
Page 70
... arrive at the listening position at the same time. Choices: AUTO PEQ, CNTR GEQ, EQ OFF • Select AUTO PEQ to use this feature to manually input the distance of each speaker and adjust the delay applied to the sound from each speaker should be displayed if you selected only one...
... arrive at the listening position at the same time. Choices: AUTO PEQ, CNTR GEQ, EQ OFF • Select AUTO PEQ to use this feature to manually input the distance of each speaker and adjust the delay applied to the sound from each speaker should be displayed if you selected only one...


