MCXSP10 Manual
Page 2
... Use only with the cart, stand, tripod, bracket, or table specified by playing it is required when the apparatus has been damaged in the literature accompanying the appliance. Install in particular, specifies that provides guidelines for replacement of the obsolete outlet. 10 Protect the power cord from being walked on the rear of time. 14 Refer all servicing to...
... Use only with the cart, stand, tripod, bracket, or table specified by playing it is required when the apparatus has been damaged in the literature accompanying the appliance. Install in particular, specifies that provides guidelines for replacement of the obsolete outlet. 10 Protect the power cord from being walked on the rear of time. 14 Refer all servicing to...
MCXSP10 Manual
Page 4
... Do not use this manual carefully. do not place: - This unit is not disconnected from the wall outlet. 16 Install this unit near the AC outlet and where the AC power plug can be exposed to use force on common operating errors before concluding ...rear panel of this unit with a newspaper, tablecloth, curtain, etc. This state is turned off by lightning, keep the power cord and outdoor antennas disconnected from the wall outlet. 19 VOLTAGE SELECTOR (Asia and General models only) The VOLTAGE SELECTOR on the surface of power. Burning objects (i.e. Contact qualified YAMAHA service...
... Do not use this manual carefully. do not place: - This unit is not disconnected from the wall outlet. 16 Install this unit near the AC outlet and where the AC power plug can be exposed to use force on common operating errors before concluding ...rear panel of this unit with a newspaper, tablecloth, curtain, etc. This state is turned off by lightning, keep the power cord and outdoor antennas disconnected from the wall outlet. 19 VOLTAGE SELECTOR (Asia and General models only) The VOLTAGE SELECTOR on the surface of power. Burning objects (i.e. Contact qualified YAMAHA service...
MCXSP10 Manual
Page 5
...FUNCTIONS 3 Front panel 3 Front panel display 5 Rear panel 6 Remote control 7 Installing batteries in the remote control 8 Using the remote control 8 PREPARATION CONNECTIONS 9 Connecting speakers 10 Connecting the AM and FM antennas 11 Connecting the power supply cord 13 Turning on and off this unit 14 OPERATION PLAYING AND RECORDING 15 Playing a source 15 Adjusting the tonal quality 16 Recording a source 17 Using the SLEEP timer 18 Muting the sound output 19 FM/AM TUNING 20 Automatic tuning 20 Manual tuning 21 Automatic preset tuning 21 Manual preset tuning 23 Selecting...
...FUNCTIONS 3 Front panel 3 Front panel display 5 Rear panel 6 Remote control 7 Installing batteries in the remote control 8 Using the remote control 8 PREPARATION CONNECTIONS 9 Connecting speakers 10 Connecting the AM and FM antennas 11 Connecting the power supply cord 13 Turning on and off this unit 14 OPERATION PLAYING AND RECORDING 15 Playing a source 15 Adjusting the tonal quality 16 Recording a source 17 Using the SLEEP timer 18 Muting the sound output 19 FM/AM TUNING 20 Automatic tuning 20 Manual tuning 21 Automatic preset tuning 21 Manual preset tuning 23 Selecting...
MCXSP10 Manual
Page 6
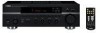
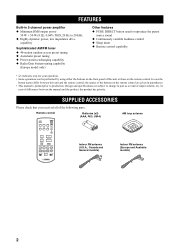
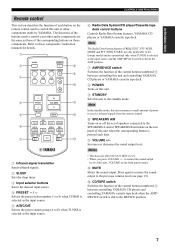
... preset tuning ◆ Preset station exchanging capability ◆ Radio Data System tuning capability (Europe model only) Other features ◆ PURE DIRECT button used to production. Remote control SLEEP POWER CD/DVD PHONO TUNER STANDBY MD TAPE AUX SPEAKERS A B u PRESET d A/B/C/D/E + VOLUME - SUPPLIED ACCESSORIES Please check that you received all of differences between this unit or those on the remote control are subject to change in parentheses. • This manual is printed prior to reproduce the purest source sound...
... preset tuning ◆ Preset station exchanging capability ◆ Radio Data System tuning capability (Europe model only) Other features ◆ PURE DIRECT button used to production. Remote control SLEEP POWER CD/DVD PHONO TUNER STANDBY MD TAPE AUX SPEAKERS A B u PRESET d A/B/C/D/E + VOLUME - SUPPLIED ACCESSORIES Please check that you received all of differences between this unit or those on the remote control are subject to change in parentheses. • This manual is printed prior to reproduce the purest source sound...
MCXSP10 Manual
Page 7
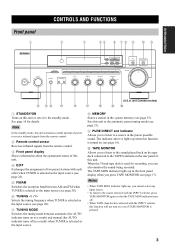
... remote control. 2 Remote control sensor Receives infrared signals from the remote control. 3 Front panel display Shows information about the operational status of this unit. 4 EDIT Exchanges the assignment of two preset stations with each other when TUNER is selected as the input source (see page 21). 9 PURE DIRECT and indicator Allows you can also monitor the sound being recorded. Note In the standby mode, this unit consumes a small amount of power to a source...
... remote control. 2 Remote control sensor Receives infrared signals from the remote control. 3 Front panel display Shows information about the operational status of this unit. 4 EDIT Exchanges the assignment of two preset stations with each other when TUNER is selected as the input source (see page 21). 9 PURE DIRECT and indicator Allows you can also monitor the sound being recorded. Note In the standby mode, this unit consumes a small amount of power to a source...

MCXSP10 Manual
Page 8
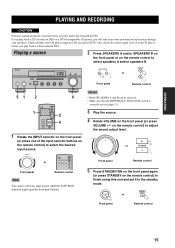
E SPEAKERS A/B Turns on the rear panel each time the corresponding button is selected as the input source (see page 16). J Preset station number buttons (1 to 8) Selects the preset station number (1 to high and low-frequency ranges at a low volume level (see page 24). 4 B INPUT selector Selects the input source you connect your headphones. F BASS Increases or decreases the low frequency response. The 0 position produces a flat response (see page 16). G TREBLE Increases or decreases the high frequency response. H BALANCE Adjusts the sound output balance of...
E SPEAKERS A/B Turns on the rear panel each time the corresponding button is selected as the input source (see page 16). J Preset station number buttons (1 to 8) Selects the preset station number (1 to high and low-frequency ranges at a low volume level (see page 24). 4 B INPUT selector Selects the input source you connect your headphones. F BASS Increases or decreases the low frequency response. The 0 position produces a flat response (see page 16). G TREBLE Increases or decreases the high frequency response. H BALANCE Adjusts the sound output balance of...
MCXSP10 Manual
Page 9
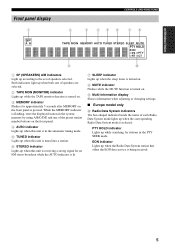
... speakers are selected. 2 TAPE MON (MONITOR) indicator Lights up while the TAPE monitor function is turned on. 3 MEMORY indicator Flashes for an FM stereo broadcast while the AUTO indicator is lit. 7 SLEEP indicator Lights up when this unit is being received. 5 While the MEMORY indicator is flashing, store the displayed station in the system memory by using A/B/C/D/E and one of the preset station number buttons on the front panel. 4 AUTO...
... speakers are selected. 2 TAPE MON (MONITOR) indicator Lights up while the TAPE monitor function is turned on. 3 MEMORY indicator Flashes for an FM stereo broadcast while the AUTO indicator is lit. 7 SLEEP indicator Lights up when this unit is being received. 5 While the MEMORY indicator is flashing, store the displayed station in the system memory by using A/B/C/D/E and one of the preset station number buttons on the front panel. 4 AUTO...
MCXSP10 Manual
Page 10
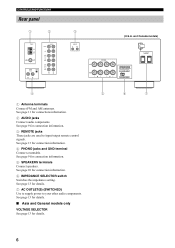
.... /SPEAKER AC OUTLETS SWITCHED 4 5 6 7 1 Antenna terminals Connect FM and AM antennas. See page 9 for details. 6 See page 11 for connection information. 3 REMOTE jacks These jacks are used to your other audio components. See page 9 for connections information. 2 AUDIO jacks Connect audio components. See page 13 for details. 7 AC OUTLET(S) (SWITCHED) Use to supply power to input/output remote control signals. FM ANT AUDIO PHONO GND CD/DVD AUDIO AUX IN (PLAY) MD OUT (REC) IN (PLAY) TAPE OUT (REC) 3 REMOTE IN OUT SPEAKERS CLASS 2 WIRING...
.... /SPEAKER AC OUTLETS SWITCHED 4 5 6 7 1 Antenna terminals Connect FM and AM antennas. See page 9 for details. 6 See page 11 for connection information. 3 REMOTE jacks These jacks are used to your other audio components. See page 9 for connections information. 2 AUDIO jacks Connect audio components. See page 13 for details. 7 AC OUTLET(S) (SWITCHED) Use to supply power to input/output remote control signals. FM ANT AUDIO PHONO GND CD/DVD AUDIO AUX IN (PLAY) MD OUT (REC) IN (PLAY) TAPE OUT (REC) 3 REMOTE IN OUT SPEAKERS CLASS 2 WIRING...
MCXSP10 Manual
Page 11
... remote control. 0 SPEAKERS A/B Turns on or off the set of speakers connected to the SPEAKERS A and/or SPEAKERS B terminals on the remote control used to the standby mode. C CD/TAPE switch Switches the function of the control buttons numbered 6 between controlling this unit and controlling YAMAHA CD players or YAMAHA cassette tape deck. 8 POWER Turns on this unit. 9 STANDBY Sets this unit when the corresponding button is slid to control this unit, VOLUME on those components' instruction manuals for details. 1 SLEEP 2 POWER 8 CD/DVD PHONO TUNER STANDBY 9 3 MD TAPE AUX SPEAKERS...
... remote control. 0 SPEAKERS A/B Turns on or off the set of speakers connected to the SPEAKERS A and/or SPEAKERS B terminals on the remote control used to the standby mode. C CD/TAPE switch Switches the function of the control buttons numbered 6 between controlling this unit and controlling YAMAHA CD players or YAMAHA cassette tape deck. 8 POWER Turns on this unit. 9 STANDBY Sets this unit when the corresponding button is slid to control this unit, VOLUME on those components' instruction manuals for details. 1 SLEEP 2 POWER 8 CD/DVD PHONO TUNER STANDBY 9 3 MD TAPE AUX SPEAKERS...

MCXSP10 Manual
Page 13
... "+" and "-" to the PHONO jacks. • Connect your components. • Use the RCA type pin plug cables for audio components except speakers. However, you have a turntable with an MM or high-output MC cartridge. CD/DVD player, etc. y • The PHONO jacks are designed to the main power until all connections between components are faulty, no sound will be heard from the speakers, and if the polarity of...
... "+" and "-" to the PHONO jacks. • Connect your components. • Use the RCA type pin plug cables for audio components except speakers. However, you have a turntable with an MM or high-output MC cartridge. CD/DVD player, etc. y • The PHONO jacks are designed to the main power until all connections between components are faulty, no sound will be heard from the speakers, and if the polarity of...

MCXSP10 Manual
Page 14
... side of this unit. Red: positive (+) Black: negative (-) 10 CAUTION Before connecting the speakers, make sure that the power of each terminal. Red: positive (+) Black: negative (-) 4 Tighten the knob to connect the left channel (L), right channel (R), "+" (red) and "-" (black) properly. If you use only one speaker set, connect it to prevent short circuits. ■ Connecting the banana plug (U.S.A., Canada, Australia and General models only) First, tighten the...
... side of this unit. Red: positive (+) Black: negative (-) 10 CAUTION Before connecting the speakers, make sure that the power of each terminal. Red: positive (+) Black: negative (-) 4 Tighten the knob to connect the left channel (L), right channel (R), "+" (red) and "-" (black) properly. If you use only one speaker set, connect it to prevent short circuits. ■ Connecting the banana plug (U.S.A., Canada, Australia and General models only) First, tighten the...
MCXSP10 Manual
Page 19
...CD player supports CDs encoded in DTS. STANDBY /ON INPUT FM/AM l TUNING h EDIT MEMORY TUNING MODE MAN'L/AUTO FM AUTO/MAN'L A/B/C/D/E 1 2 3 4 5 6 7 8 PHONES SPEAKERS A B BASS 0 1 1 2 2 3 3 4 -5 4 5+ TREBLE 0 1 1 2 2 3 3 4 -5 4 5+ BALANCE 0 1 1 2 2 3 3 4 L5 4 5R LOUDNESS FLAT 1 2 -30dB 10 3 9 4 8 5 7 6 PURE DIRECT TAPE MONITOR VOLUME 16 20 12 26 8 40 4 60 ∞ -dB 2 0 SPEAKERS A B Front panel SPEAKERS A or B Remote control 51 2 1 SLEEP POWER CD/DVD PHONO TUNER STANDBY MD TAPE AUX SPEAKERS A B u PRESET...
...CD player supports CDs encoded in DTS. STANDBY /ON INPUT FM/AM l TUNING h EDIT MEMORY TUNING MODE MAN'L/AUTO FM AUTO/MAN'L A/B/C/D/E 1 2 3 4 5 6 7 8 PHONES SPEAKERS A B BASS 0 1 1 2 2 3 3 4 -5 4 5+ TREBLE 0 1 1 2 2 3 3 4 -5 4 5+ BALANCE 0 1 1 2 2 3 3 4 L5 4 5R LOUDNESS FLAT 1 2 -30dB 10 3 9 4 8 5 7 6 PURE DIRECT TAPE MONITOR VOLUME 16 20 12 26 8 40 4 60 ∞ -dB 2 0 SPEAKERS A B Front panel SPEAKERS A or B Remote control 51 2 1 SLEEP POWER CD/DVD PHONO TUNER STANDBY MD TAPE AUX SPEAKERS A B u PRESET...
MCXSP10 Manual
Page 20
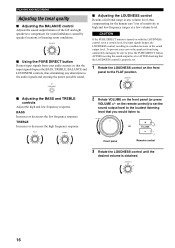
.... BASS Increases or decreases the low frequency response. PLAYING AND RECORDING Adjusting the tonal quality ■ Adjusting the BALANCE control Adjusts the sound output balance of sensitivity to high and low-frequency ranges at a low volume level. PURE DIRECT ■ Adjusting the LOUDNESS control Retains a full tonal range at a certain level, the input signals bypass the LOUDNESS control, resulting in a sudden increase in the sound output level. To prevent your ears or the speakers from your audio sources...
.... BASS Increases or decreases the low frequency response. PLAYING AND RECORDING Adjusting the tonal quality ■ Adjusting the BALANCE control Adjusts the sound output balance of sensitivity to high and low-frequency ranges at a low volume level. PURE DIRECT ■ Adjusting the LOUDNESS control Retains a full tonal range at a certain level, the input signals bypass the LOUDNESS control, resulting in a sudden increase in the sound output level. To prevent your ears or the speakers from your audio sources...
MCXSP10 Manual
Page 24
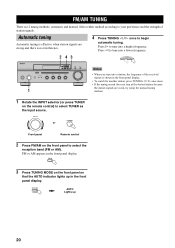
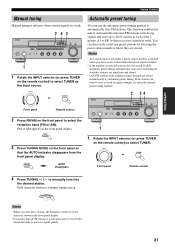
... TUNER on the remote control) to select the reception band (FM or AM). FM/AM 3 Press TUNING MODE on the front panel to select TUNER as the input source. TUNING MODE AUTO/MAN'L AUTO Lights up in the front panel display. Automatic tuning Automatic tuning is effective when station signals are strong and there is shown in the front panel display. Press l to tune into a lower frequency. 2 43 l TUNING h STANDBY /ON INPUT FM/AM l TUNING h EDIT MEMORY TUNING MODE MAN'L/AUTO FM AUTO/MAN'L A/B/C/D/E 1 2 3 4 5 6 7 8 SPEAKERS A B BASS...
... TUNER on the remote control) to select the reception band (FM or AM). FM/AM 3 Press TUNING MODE on the front panel to select TUNER as the input source. TUNING MODE AUTO/MAN'L AUTO Lights up in the front panel display. Automatic tuning Automatic tuning is effective when station signals are strong and there is shown in the front panel display. Press l to tune into a lower frequency. 2 43 l TUNING h STANDBY /ON INPUT FM/AM l TUNING h EDIT MEMORY TUNING MODE MAN'L/AUTO FM AUTO/MAN'L A/B/C/D/E 1 2 3 4 5 6 7 8 SPEAKERS A B BASS...
MCXSP10 Manual
Page 25
... MODE MAN'L/AUTO FM AUTO/MAN'L A/B/C/D/E 1 2 3 4 5 6 7 8 PHONES SPEAKERS A B BASS 0 1 1 2 2 3 3 4 -5 4 5+ TREBLE 0 1 1 2 2 3 3 4 -5 4 5+ BALANCE 0 1 1 2 2 3 3 4 L5 4 5R LOUDNESS FLAT 1 2 -30dB 10 3 9 4 8 5 7 6 PURE DIRECT TAPE MONITOR VOLUME 16 20 12 26 8 40 4 60 ∞ -dB 2 0 1 1 Rotate the INPUT selector (or press TUNER on the remote control) to select TUNER. FM/AM 3 Press TUNING MODE on the front panel so that preset station number. • If the number of the received station is shown in the front panel display...
... MODE MAN'L/AUTO FM AUTO/MAN'L A/B/C/D/E 1 2 3 4 5 6 7 8 PHONES SPEAKERS A B BASS 0 1 1 2 2 3 3 4 -5 4 5+ TREBLE 0 1 1 2 2 3 3 4 -5 4 5+ BALANCE 0 1 1 2 2 3 3 4 L5 4 5R LOUDNESS FLAT 1 2 -30dB 10 3 9 4 8 5 7 6 PURE DIRECT TAPE MONITOR VOLUME 16 20 12 26 8 40 4 60 ∞ -dB 2 0 1 1 Rotate the INPUT selector (or press TUNER on the remote control) to select TUNER. FM/AM 3 Press TUNING MODE on the front panel so that preset station number. • If the number of the received station is shown in the front panel display...
MCXSP10 Manual
Page 29
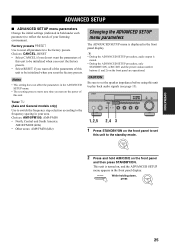
... you reset the factory presets. STANDBY /ON INPUT FM/AM l TUNING h EDIT MEMORY TUNING MODE MAN'L/AUTO FM AUTO/MAN'L A/B/C/D/E 1 2 3 4 5 6 7 8 PHONES SPEAKERS A B BASS 0 1 1 2 2 3 3 4 -5 4 5+ TREBLE 0 1 1 2 2 3 3 4 -5 4 5+ BALANCE 0 1 1 2 2 3 3 4 L5 4 5R LOUDNESS FLAT 1 2 -30dB 10 3 9 4 8 5 7 6 PURE DIRECT TAPE MONITOR VOLUME 16 20 12 26 8 40 4 60 ∞ -dB 2 0 1,2,5 2,4 3 1 Press STANDBY/ON on the front panel and then press STANDBY/ON. y • During the ADVANCED SETUP procedure, audio output is turned on...
... you reset the factory presets. STANDBY /ON INPUT FM/AM l TUNING h EDIT MEMORY TUNING MODE MAN'L/AUTO FM AUTO/MAN'L A/B/C/D/E 1 2 3 4 5 6 7 8 PHONES SPEAKERS A B BASS 0 1 1 2 2 3 3 4 -5 4 5+ TREBLE 0 1 1 2 2 3 3 4 -5 4 5+ BALANCE 0 1 1 2 2 3 3 4 L5 4 5R LOUDNESS FLAT 1 2 -30dB 10 3 9 4 8 5 7 6 PURE DIRECT TAPE MONITOR VOLUME 16 20 12 26 8 40 4 60 ∞ -dB 2 0 1,2,5 2,4 3 1 Press STANDBY/ON on the front panel and then press STANDBY/ON. y • During the ADVANCED SETUP procedure, audio output is turned on...

MCXSP10 Manual
Page 31
... function is not set to either the rear panel is turned Turn off . The protection circuitry has been activated Check that the speaker wires are connected in after 30 seconds, then use it normally. Incorrect cable connections. Connect the cables properly. wires are not touching each other and then turn the power of this unit back on . A "humming" sound Incorrect cable connections. No connection from the turntable to the standby mode, disconnect the power supply cord, plug...
... function is not set to either the rear panel is turned Turn off . The protection circuitry has been activated Check that the speaker wires are connected in after 30 seconds, then use it normally. Incorrect cable connections. Connect the cables properly. wires are not touching each other and then turn the power of this unit back on . A "humming" sound Incorrect cable connections. No connection from the turntable to the standby mode, disconnect the power supply cord, plug...
MCXSP10 Manual
Page 32
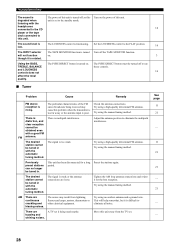
... 14 player or the tape deck connected to the standby mode. Set the LOUDNESS control to eliminate the multipath interference. Preset the stations again. TROUBLESHOOTING The sound is The power of this unit is turned Turn off the TAPE MONITOR function. listening with a good FM FM antenna. The sound level is noisy. and LOUDNESS controls does not 16 affect the tonal quality. ■ Tuner Problem Cause Remedy FM stereo reception is low...
... 14 player or the tape deck connected to the standby mode. Set the LOUDNESS control to eliminate the multipath interference. Preset the stations again. TROUBLESHOOTING The sound is The power of this unit is turned Turn off the TAPE MONITOR function. listening with a good FM FM antenna. The sound level is noisy. and LOUDNESS controls does not 16 affect the tonal quality. ■ Tuner Problem Cause Remedy FM stereo reception is low...
MCXSP10 Manual
Page 36
... them , paying particular attention to service this product through openings as they may result in damage and will often require extensive work by following instructions instead of the polarized plug. 13 Power-Cord Protection - When installing an outside antenna system should be placed in a built-in a wet basement; Never push objects of overhead power lines or other controls may cause hazards. 7 Water...
... them , paying particular attention to service this product through openings as they may result in damage and will often require extensive work by following instructions instead of the polarized plug. 13 Power-Cord Protection - When installing an outside antenna system should be placed in a built-in a wet basement; Never push objects of overhead power lines or other controls may cause hazards. 7 Water...
MCXSP10 Manual
Page 37
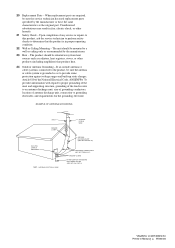
... proper operating condition. 22 Wall or Ceiling Mounting - 20 Replacement Parts - When replacement parts are required, be sure the service technician has used replacement parts specified by the manufacturer. 23 Heat - Unauthorized substitutions may result in Malaysia a WG63450 The product should be mounted to the product, be situated away from heat sources such as the original part. NATIONAL ELECTRICAL CODE ANTENNA LEAD IN WIRE ANTENNA DISCHARGE...
... proper operating condition. 22 Wall or Ceiling Mounting - 20 Replacement Parts - When replacement parts are required, be sure the service technician has used replacement parts specified by the manufacturer. 23 Heat - Unauthorized substitutions may result in Malaysia a WG63450 The product should be mounted to the product, be situated away from heat sources such as the original part. NATIONAL ELECTRICAL CODE ANTENNA LEAD IN WIRE ANTENNA DISCHARGE...


