Data List
Page 9
... 0 114 LaserGun 479 64 0 115 Explosion 480 64 0 116 Firework NOTE • Voice names that begin with recorded MIDI sequence data (such as songs and styles). They are primarily designed for use with "Mega", they are not intended to be played from the keyboard. The Mega Voices are Mega Voices.
... 0 114 LaserGun 479 64 0 115 Explosion 480 64 0 116 Firework NOTE • Voice names that begin with recorded MIDI sequence data (such as songs and styles). They are primarily designed for use with "Mega", they are not intended to be played from the keyboard. The Mega Voices are Mega Voices.

Data List
Page 18
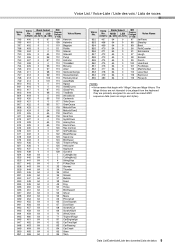
... 38 39 40 41 42 43 44 45 46 47 48 49 50 51 52 53 54 55 56 57 58 59 60 61 Style No. (Category) Style Name Pop&Rock 1 BritRockPop 2 AcousticRock 3 IndieRock 4 00sBoyband 5 Cool8Beat 6 VintageGtrPop 7 60sVintageRock 8 60sPopRock 9 FunkPopRock 10 BritPopSwing 11... 99 100 101 102 103 104 105 106 107 108 109 110 111 112 113 114 115 116 117 118 119 120 121 122 Style No. (Category) Style Name 3 OrchestraSwing2 4 BigBandFast 5 BigBandShuffle 6 MidnightSwing 7 JumpJive 8 OrganGroove 9 JazzClub 10 Five-Four 11 JazzWaltzFast 12 Dixieland 13 Ragtime 14 Charleston R&B 1 BluesRock...
... 38 39 40 41 42 43 44 45 46 47 48 49 50 51 52 53 54 55 56 57 58 59 60 61 Style No. (Category) Style Name Pop&Rock 1 BritRockPop 2 AcousticRock 3 IndieRock 4 00sBoyband 5 Cool8Beat 6 VintageGtrPop 7 60sVintageRock 8 60sPopRock 9 FunkPopRock 10 BritPopSwing 11... 99 100 101 102 103 104 105 106 107 108 109 110 111 112 113 114 115 116 117 118 119 120 121 122 Style No. (Category) Style Name 3 OrchestraSwing2 4 BigBandFast 5 BigBandShuffle 6 MidnightSwing 7 JumpJive 8 OrganGroove 9 JazzClub 10 Five-Four 11 JazzWaltzFast 12 Dixieland 13 Ragtime 14 Charleston R&B 1 BluesRock...
Midi Reference
Page 2
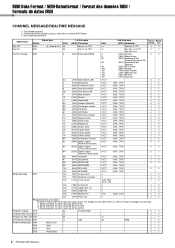
...61646; 123 (7BH) All note off mode messages are always active. FEH Active Sens - - 2 PSR-S650 MIDI Reference FCH Stop - - No change occurs when Omni on, Omni off 0 124 (7CH) OMNI OFF (*1) 0 125 (7DH) OMNI ON 0 ... des données MIDI / Formato de datos MIDI CHANNEL MESSAGE/REALTIME MESSAGE : Transmitted/received. : Transmitted when playing a song or style which contains MIDI Events. : Not transmitted/received.
...61646; 123 (7BH) All note off mode messages are always active. FEH Active Sens - - 2 PSR-S650 MIDI Reference FCH Stop - - No change occurs when Omni on, Omni off 0 124 (7CH) OMNI OFF (*1) 0 125 (7DH) OMNI ON 0 ... des données MIDI / Formato de datos MIDI CHANNEL MESSAGE/REALTIME MESSAGE : Transmitted/received. : Transmitted when playing a song or style which contains MIDI Events. : Not transmitted/received.

Owner's Manual
Page 5
...User Registration form. • Music rest DMI-3 2/2 Owner's Manual 5 Please check with respect to which Yamaha owns copyrights or with your Yamaha dealer. • My Yamaha Product User Registration * The PRODUCT ID on your personal use paint thinners, solvents, cleaning fluids, or ...the instrument to the proper format music data for your particular area. Such copyrighted materials include, without limitation, all computer software, style files, MIDI files, WAVE data, musical scores and sound recordings. Information About copyrights • Copying of the commercially...
...User Registration form. • Music rest DMI-3 2/2 Owner's Manual 5 Please check with respect to which Yamaha owns copyrights or with your Yamaha dealer. • My Yamaha Product User Registration * The PRODUCT ID on your personal use paint thinners, solvents, cleaning fluids, or ...the instrument to the proper format music data for your particular area. Such copyrighted materials include, without limitation, all computer software, style files, MIDI files, WAVE data, musical scores and sound recordings. Information About copyrights • Copying of the commercially...
Owner's Manual
Page 6
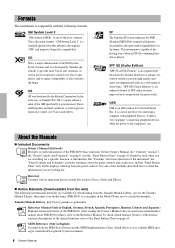
...instrument, the "Panel Controls and Terminals" provides summary about PSR-S650 features, refer to the Reference Manual. Use one of the most common Voice allocation formats. Formats The instrument is an original Style file format by Yamaha which uses a unique conversion system to provide high-quality...controls and connectors, and the "Panel Button Chart" lists all the displays called up from the Yamaha Manual Library. Access the Yamaha Manual Library, then enter your model name (PSR-S650, for connecting a computer with greater functionality and open-ended expandability for . GS GS was ...
...instrument, the "Panel Controls and Terminals" provides summary about PSR-S650 features, refer to the Reference Manual. Use one of the most common Voice allocation formats. Formats The instrument is an original Style file format by Yamaha which uses a unique conversion system to provide high-quality...controls and connectors, and the "Panel Button Chart" lists all the displays called up from the Yamaha Manual Library. Access the Yamaha Manual Library, then enter your model name (PSR-S650, for connecting a computer with greater functionality and open-ended expandability for . GS GS was ...
Owner's Manual
Page 7
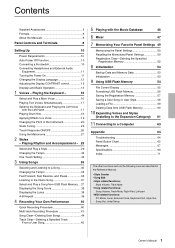
...Using USB Flash Memory 54 File Control Display 55 Formatting USB Flash Memory 56 Saving the Registration Memory 57 Saving a User Song or User Style 58 Loading a File 59 Deleting Data from USB Flash Memory ... 37 Displaying the Song Score 38 Displaying the Lyrics 38 A-B Repeat ...67 Specifications 69 Index 71 The other functions such as the following ones are described in the Reference Manual. • Style Creator • Song Edit • Style related functions: Style Volume, Track Mute • Song related functions: Song Volume, Track Mute, Right-Part, Left-part • MIDI ...
...Using USB Flash Memory 54 File Control Display 55 Formatting USB Flash Memory 56 Saving the Registration Memory 57 Saving a User Song or User Style 58 Loading a File 59 Deleting Data from USB Flash Memory ... 37 Displaying the Song Score 38 Displaying the Lyrics 38 A-B Repeat ...67 Specifications 69 Index 71 The other functions such as the following ones are described in the Reference Manual. • Style Creator • Song Edit • Style related functions: Style Volume, Track Mute • Song related functions: Song Volume, Track Mute, Right-Part, Left-part • MIDI ...

Owner's Manual
Page 8
...or Standby. r [SONG MODE] button page 35 Switches between Song mode and Style mode. u [REC] button page 40 Records your keyboard performance. y [USB] button page 35 Selects a Song or Style file in semitone steps. !2 METRONOME button page 27 Plays the Metronome. !3 ...35 Selects a Song or show music score and lyrics. o STYLE CONTROL buttons........... pages 13-14 8 Owner's Manual i STYLE category selection buttons.....page 29 Selects a Style. e [DEMO] button page 37 Plays the Demo. pages 30-31 Controls Style playback. !0 SONG CONTROL buttons page 36 Controls Song playback....
...or Standby. r [SONG MODE] button page 35 Switches between Song mode and Style mode. u [REC] button page 40 Records your keyboard performance. y [USB] button page 35 Selects a Song or Style file in semitone steps. !2 METRONOME button page 27 Plays the Metronome. !3 ...35 Selects a Song or show music score and lyrics. o STYLE CONTROL buttons........... pages 13-14 8 Owner's Manual i STYLE category selection buttons.....page 29 Selects a Style. e [DEMO] button page 37 Plays the Demo. pages 30-31 Controls Style playback. !0 SONG CONTROL buttons page 36 Controls Song playback....
Owner's Manual
Page 9
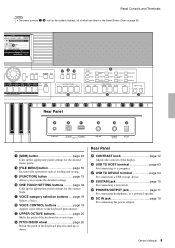
... the keyboard in the Panel Button Chart on page 65. !6 !7 !8 !9 @1 @0 @2 @3 Rear Panel @5 @6 @7 @8 @9 #0 !7 [MDB] button page 46 Calls up the appropriate panel settings for the current Style. @1 VOICE category selection buttons ..... Rear Panel @5 CONTRAST knob page 12 Adjusts the contrast of the display. @6 USB TO HOST terminal page 63 For connecting to...
... the keyboard in the Panel Button Chart on page 65. !6 !7 !8 !9 @1 @0 @2 @3 Rear Panel @5 @6 @7 @8 @9 #0 !7 [MDB] button page 46 Calls up the appropriate panel settings for the current Style. @1 VOICE category selection buttons ..... Rear Panel @5 CONTRAST knob page 12 Adjusts the contrast of the display. @6 USB TO HOST terminal page 63 For connecting to...

Owner's Manual
Page 13
... (page 20) Measure number (page 43) Octave (page 20) Music Database (page 46) Chord Display (page 32) Registration Memory bank status (page 49) Song / Style track status (page 41) USB status Appears when the USB flash memory is turned on, shows all of functions. In such a case, return to which... that show the on for Song playback. (page 39) Harmony (page 19) Touch Response (page 26) Sustain (page 19) Registration Memory / Song or Style track indication Shows currently selected item: REGIST., TR 1-8, TR 9-16 (page 49) Main Voice (page 16) Dual Voice (page 17) Left Voice (page 17...
... (page 20) Measure number (page 43) Octave (page 20) Music Database (page 46) Chord Display (page 32) Registration Memory bank status (page 49) Song / Style track status (page 41) USB status Appears when the USB flash memory is turned on, shows all of functions. In such a case, return to which... that show the on for Song playback. (page 39) Harmony (page 19) Touch Response (page 26) Sustain (page 19) Registration Memory / Song or Style track indication Shows currently selected item: REGIST., TR 1-8, TR 9-16 (page 49) Main Voice (page 16) Dual Voice (page 17) Left Voice (page 17...
Owner's Manual
Page 14
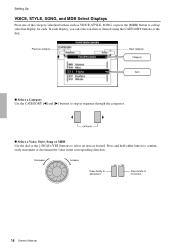
...; Select a Category Use the CATEGORY [] buttons to step in the corresponding direction. In each display, you can select an item as VOICE, STYLE, SONG, or press the [MDB] button to call up selection display for each. Decrease Increase Press briefly to select an item as desired. Press...continuously increment or decrement the value in sequence through the categories. Select a Voice, Style, Song or MDB Use the dial or the [-/NO]/[+/YES] buttons to decrement. Setting Up VOICE, STYLE, SONG, and MDB Select Displays Press one of the category selection buttons such as desired using...
...; Select a Category Use the CATEGORY [] buttons to step in the corresponding direction. In each display, you can select an item as VOICE, STYLE, SONG, or press the [MDB] button to call up selection display for each. Decrease Increase Press briefly to select an item as desired. Press...continuously increment or decrement the value in sequence through the categories. Select a Voice, Style, Song or MDB Use the dial or the [-/NO]/[+/YES] buttons to decrement. Setting Up VOICE, STYLE, SONG, and MDB Select Displays Press one of the category selection buttons such as desired using...

Owner's Manual
Page 19
... effects provided are automatically selected when you want to add sustain to many of footswitch operation. Voices - Playing the Keyboard - Use it when you select a Style or Song.
... effects provided are automatically selected when you want to add sustain to many of footswitch operation. Voices - Playing the Keyboard - Use it when you select a Style or Song.
Owner's Manual
Page 22
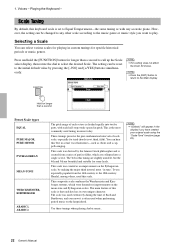
... tuning are slightly unstable, but the 4th and 5th are collapsed into twelve parts, with any other scale according to the music genre or music style you have created your original scale using the "Scale Tune" function (page 23). 22 Owner's Manual However, the setting can select various scales for playing...
... tuning are slightly unstable, but the 4th and 5th are collapsed into twelve parts, with any other scale according to the music genre or music style you have created your original scale using the "Scale Tune" function (page 23). 22 Owner's Manual However, the setting can select various scales for playing...

Owner's Manual
Page 24
... Part and ON/OFF status are shown. 3 Use the dial to the Main display. Select the desired part from Main/Dual Voices, Left Voice, and Style. Part 24 Owner's Manual 1. NOTE • Press the [EXIT] button to return to select the part, then press the [EXECUTE] button. Playing the Keyboard ...the remaining notes. 5 Memorize the settings here to the Registration Memory as necessary to the Left Voice and Style playback. If you want to apply this setting to the Left Voice or Style playback as well as the Main/Dual Voices, follow the instructions below. 1 Press and hold the [FUNCTION]...
... Part and ON/OFF status are shown. 3 Use the dial to the Main display. Select the desired part from Main/Dual Voices, Left Voice, and Style. Part 24 Owner's Manual 1. NOTE • Press the [EXIT] button to return to select the part, then press the [EXECUTE] button. Playing the Keyboard ...the remaining notes. 5 Memorize the settings here to the Registration Memory as necessary to the Left Voice and Style playback. If you want to apply this setting to the Left Voice or Style playback as well as the Main/Dual Voices, follow the instructions below. 1 Press and hold the [FUNCTION]...
Owner's Manual
Page 27
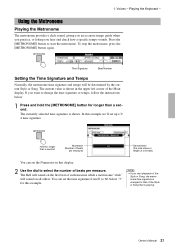
...can set the Numerator in this example we'll set the time signature from 01 to that of the Style or Song that is shown in the upper left corner of one beat) You can set up a 3/... 4 time signature. 1. Press the [METRONOME] button to start playback of the Style or Song, the metronome time signature is changed to 60. If you want to select the number of each ... when you practice, or letting you start the metronome. The Bell will be determined by the current Style or Song. NOTE • If you hear and check how a specific tempo sounds. Voices - Playing the...
...can set the Numerator in this example we'll set the time signature from 01 to that of the Style or Song that is shown in the upper left corner of one beat) You can set up a 3/... 4 time signature. 1. Press the [METRONOME] button to start playback of the Style or Song, the metronome time signature is changed to 60. If you want to select the number of each ... when you practice, or letting you start the metronome. The Bell will be determined by the current Style or Song. NOTE • If you hear and check how a specific tempo sounds. Voices - Playing the...

Owner's Manual
Page 29
... to play left-hand chords. Pressing this button again will be selected and displayed in the separate Data List. Look at the highlighted Style name and rotate the dial. The available Styles will be highlighted. NOTE • The [EXPANSION/USER] button is turned on . Press the [ACMP] button. The current category name...
... to play left-hand chords. Pressing this button again will be selected and displayed in the separate Data List. Look at the highlighted Style name and rotate the dial. The available Styles will be highlighted. NOTE • The [EXPANSION/USER] button is turned on . Press the [ACMP] button. The current category name...

Owner's Manual
Page 30
...[SYNC START] button to turn Synchro Start on. To cancel or disable Sync Start, press the button again. NOTE • You can start the Style by pressing the button just twice. • You can be changed in 4, and three times for specifying the Accompaniment chords. You can change the ...tempo during style playback by simply tapping the [TEMPO/ TAP] button at the required tempo-four times for time signatures in the Function display. When the Auto ...
...[SYNC START] button to turn Synchro Start on. To cancel or disable Sync Start, press the button again. NOTE • You can start the Style by pressing the button just twice. • You can be changed in 4, and three times for specifying the Accompaniment chords. You can change the ...tempo during style playback by simply tapping the [TEMPO/ TAP] button at the required tempo-four times for time signatures in the Function display. When the Auto ...

Owner's Manual
Page 31
...the Ending section. Try playing a C major chord. (See "Playing Auto Accompaniment Chords" on page 32.) Split Point NOTE • The Baroque Air Style in . 10 Press one of the ENDING/rit. [I ]-[III] buttons. Auto Accompaniment range Chord When the playback of the intro is finished, it...start the Intro section. Owner's Manual 31 7 Press one of the MAIN VARIATION [A]-[D] buttons. The Main Variation corresponding to the Reference Manual. Styles - For details, refer to the pressed button plays following an automatic fill-in the MOVIE & SHOW category does not have the Ending gradually ...
...the Ending section. Try playing a C major chord. (See "Playing Auto Accompaniment Chords" on page 32.) Split Point NOTE • The Baroque Air Style in . 10 Press one of the ENDING/rit. [I ]-[III] buttons. Auto Accompaniment range Chord When the playback of the intro is finished, it...start the Intro section. Owner's Manual 31 7 Press one of the MAIN VARIATION [A]-[D] buttons. The Main Variation corresponding to the Reference Manual. Styles - For details, refer to the pressed button plays following an automatic fill-in the MOVIE & SHOW category does not have the Ending gradually ...

Owner's Manual
Page 32
... . To play a minor chord Press the root note together with chords, this instrument are unfamiliar with the nearest black key to the left of it . Styles - Major Minor Seventh Minor Seventh Major Seventh C Cm C7 Cm7 CM7 D Dm D7 Dm7 DM7 E Em E7 Em7 EM7 FC Fm F7 Fm7 FM7 G Gm...
... . To play a minor chord Press the root note together with chords, this instrument are unfamiliar with the nearest black key to the left of it . Styles - Major Minor Seventh Minor Seventh Major Seventh C Cm C7 Cm7 CM7 D Dm D7 Dm7 DM7 E Em E7 Em7 EM7 FC Fm F7 Fm7 FM7 G Gm...

Owner's Manual
Page 33
... USB TO DEVICE terminal can be saved either in the USB flash memory's root directory or a first-level/second-level/third-level folder in the Style mode (page 35) and the name of the keyboard. Synchro Stop When this button is selected from USB Flash Memory... a USB flash memory, be sure to turn off , press the button again. Playing Rhythm and Accompaniment - The Style files must be moved using the [USB TO DEVICE] terminal" on , press the [SYNC STOP] button. Styles - To turn the function on page 54. Press the [USB] button in the root directory. To turn...
... USB TO DEVICE terminal can be saved either in the USB flash memory's root directory or a first-level/second-level/third-level folder in the Style mode (page 35) and the name of the keyboard. Synchro Stop When this button is selected from USB Flash Memory... a USB flash memory, be sure to turn off , press the button again. Playing Rhythm and Accompaniment - The Style files must be moved using the [USB TO DEVICE] terminal" on , press the [SYNC STOP] button. Styles - To turn the function on page 54. Press the [USB] button in the root directory. To turn...
Owner's Manual
Page 34
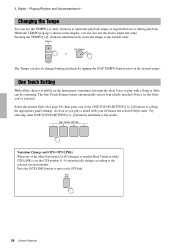
...buttons and listen to turn on the display, you can also use the TEMPO [+] and [-] buttons to play a chord with a Song or Style can also be confusing. While the TEMPO pop-up the appropriate panel settings. Pressing the TEMPO [+]/[-] buttons simultaneously resets the tempo to adjust the... value. or The Tempo can be changed during playback. Styles - As soon as required before or during playback by tapping the [TAP TEMPO] button twice at the desired tempo. One Touch Setting ...
...buttons and listen to turn on the display, you can also use the TEMPO [+] and [-] buttons to play a chord with a Song or Style can also be confusing. While the TEMPO pop-up the appropriate panel settings. Pressing the TEMPO [+]/[-] buttons simultaneously resets the tempo to adjust the... value. or The Tempo can be changed during playback. Styles - As soon as required before or during playback by tapping the [TAP TEMPO] button twice at the desired tempo. One Touch Setting ...


