Owner's Manual
Page 1
EN DIGITAL WORKSTATION Owner's Manual Before using the instrument, be sure to read "PRECAUTIONS" on pages 4-5.
EN DIGITAL WORKSTATION Owner's Manual Before using the instrument, be sure to read "PRECAUTIONS" on pages 4-5.
Owner's Manual
Page 2
... 6600 Orangethorpe Ave, Buena Park, CA90620 The above statements apply ONLY to products distributed by Yamaha. Please study this manual carefully and consult your purchase. ENVIRONMENTAL ISSUES: Yamaha strives to be capable of producing sound levels that contain lead, batteries, plastics, etc. When... accompany the accessory product. If your area for seating only. This product, when installed as designed) are therefore the owners responsibility. IMPORTANT: The louder the sound, the shorter the time period before requesting service. This product may be dealer ...
... 6600 Orangethorpe Ave, Buena Park, CA90620 The above statements apply ONLY to products distributed by Yamaha. Please study this manual carefully and consult your purchase. ENVIRONMENTAL ISSUES: Yamaha strives to be capable of producing sound levels that contain lead, batteries, plastics, etc. When... accompany the accessory product. If your area for seating only. This product, when installed as designed) are therefore the owners responsibility. IMPORTANT: The louder the sound, the shorter the time period before requesting service. This product may be dealer ...
Owner's Manual
Page 4
...some trouble or malfunction occurs, immediately turn off the power switch and disconnect the plug from the outlet. Yamaha cannot be malfunctioning, discontinue use or modifications to an electrical outlet using is still flowing to the instrument or... other hazards. Then have the instrument inspected by Yamaha service personnel. • The power cord or plug becomes frayed or damaged. • It emits unusual smells ... of serious injury or even death from the wall AC outlet. 4 Owner's Manual DMI-3 1/2
...some trouble or malfunction occurs, immediately turn off the power switch and disconnect the plug from the outlet. Yamaha cannot be malfunctioning, discontinue use or modifications to an electrical outlet using is still flowing to the instrument or... other hazards. Then have the instrument inspected by Yamaha service personnel. • The power cord or plug becomes frayed or damaged. • It emits unusual smells ... of serious injury or even death from the wall AC outlet. 4 Owner's Manual DMI-3 1/2

Owner's Manual
Page 5
...in which it has license to use with the device in the U.S. Please check with respect to which Yamaha owns copyrights or with your Yamaha dealer. • My Yamaha Product User Registration * The PRODUCT ID on your important data onto two USB storage devices/external media. Any... • Some of the preset songs have been provided by optimizing them back precisely as their respective companies. Supplied Accessories • Owner's Manual (this manual are trademarks of Apple Inc., registered in advance. Saved data may not be needed when you fill out the User Registration form. ...
...in which it has license to use with the device in the U.S. Please check with respect to which Yamaha owns copyrights or with your Yamaha dealer. • My Yamaha Product User Registration * The PRODUCT ID on your important data onto two USB storage devices/external media. Any... • Some of the preset songs have been provided by optimizing them back precisely as their respective companies. Supplied Accessories • Owner's Manual (this manual are trademarks of Apple Inc., registered in advance. Saved data may not be needed when you fill out the User Registration form. ...
Owner's Manual
Page 6
... is an abbreviation for downloading from the Yamaha Manual Library. About the Manuals Included Documents Owner's Manual (this Owner's Manual, the "Contents" on page 7, the "Panel Controls and Terminals" on page 8, and the "Panel Button Chart" on ). Use one of the instrument, the "Panel Controls and Terminals" provides summary about PSR-S650 features, refer to find the information...
... is an abbreviation for downloading from the Yamaha Manual Library. About the Manuals Included Documents Owner's Manual (this Owner's Manual, the "Contents" on page 7, the "Panel Controls and Terminals" on page 8, and the "Panel Button Chart" on ). Use one of the instrument, the "Panel Controls and Terminals" provides summary about PSR-S650 features, refer to find the information...
Owner's Manual
Page 7
... Mute, Right-Part, Left-part • MIDI related functions: PC Mode, Local, External Clock, Keyboard Out, Style Out, Song Out, Initial Setup Owner's Manual 7 Contents Supplied Accessories 5 Formats 6 About the Manuals 6 Panel Controls and Terminals 8 Setting Up 10 Power Requirements 10 Auto Power Off Function 10 Connecting a Footswitch 10 Connecting Headphones and External...
... Mute, Right-Part, Left-part • MIDI related functions: PC Mode, Local, External Clock, Keyboard Out, Style Out, Song Out, Initial Setup Owner's Manual 7 Contents Supplied Accessories 5 Formats 6 About the Manuals 6 Panel Controls and Terminals 8 Setting Up 10 Power Requirements 10 Auto Power Off Function 10 Connecting a Footswitch 10 Connecting Headphones and External...

Owner's Manual
Page 8
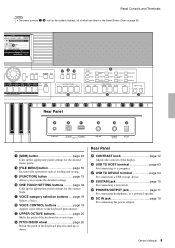
... CONTROL buttons........... t SONG buttons page 35 Selects a Song or show music score and lyrics. u [REC] button page 40 Records your keyboard performance. pages 13-14 8 Owner's Manual pages 30-31 Controls Style playback. !0 SONG CONTROL buttons page 36 Controls Song playback. !1 TRANSPOSE buttons page 20 Transposes the pitch in the USB flash...
... CONTROL buttons........... t SONG buttons page 35 Selects a Song or show music score and lyrics. u [REC] button page 40 Records your keyboard performance. pages 13-14 8 Owner's Manual pages 30-31 Controls Style playback. !0 SONG CONTROL buttons page 36 Controls Song playback. !1 TRANSPOSE buttons page 20 Transposes the pitch in the USB flash...
Owner's Manual
Page 9
... Button Chart on page 65. !6 !7 !8 !9 @1 @0 @2 @3 Rear Panel @5 @6 @7 @8 @9 #0 !7 [MDB] button page 46 Calls up the appropriate panel settings for the current Style. @1 VOICE category selection buttons ..... Owner's Manual 9 Panel Controls and Terminals NOTE • The panel controls q-@4 call up the related displays, all of the keyboard played sound up the appropriate panel settings...
... Button Chart on page 65. !6 !7 !8 !9 @1 @0 @2 @3 Rear Panel @5 @6 @7 @8 @9 #0 !7 [MDB] button page 46 Calls up the appropriate panel settings for the current Style. @1 VOICE category selection buttons ..... Owner's Manual 9 Panel Controls and Terminals NOTE • The panel controls q-@4 call up the related displays, all of the keyboard played sound up the appropriate panel settings...
Owner's Manual
Page 10
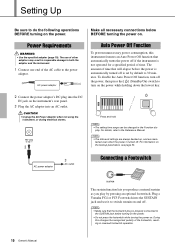
...result in irreparable damage to both the adaptor and the instrument. 1 Connect one end of the footswitch, resulting in the Function dis- Plug a Yamaha FC4 or FC5 Footswitch into the DC IN jack on . NOTE • Make sure that automatically turns the power off if the instrument is ...of the AC cable to the power adaptor. NOTE • The data and settings are always backed up, and are main- Connecting a Footswitch 10 Owner's Manual The sustain function lets you produce a natural sustain as you play . play by default to 30 minutes. Power Requirements WARNING • Use the ...
...result in irreparable damage to both the adaptor and the instrument. 1 Connect one end of the footswitch, resulting in the Function dis- Plug a Yamaha FC4 or FC5 Footswitch into the DC IN jack on . NOTE • Make sure that automatically turns the power off if the instrument is ...of the AC cable to the power adaptor. NOTE • The data and settings are always backed up, and are main- Connecting a Footswitch 10 Owner's Manual The sustain function lets you produce a natural sustain as you play . play by default to 30 minutes. Power Requirements WARNING • Use the ...
Owner's Manual
Page 11
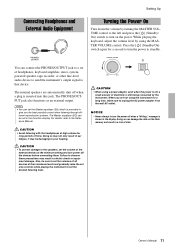
... volume level by the instrument. The PHONES/OUTPUT jack also functions as an external output. The internal speakers are not using the MASTER VOLUME control. Owner's Manual 11 Press the [ ] (Standby/On) switch again for a long time, make sure to set of data. NOTE • You can damage the data on the... using a power adaptor, even when the power is off, a small amount of all devices at the minimum setting and turn the power to the Reference Manual.
... volume level by the instrument. The PHONES/OUTPUT jack also functions as an external output. The internal speakers are not using the MASTER VOLUME control. Owner's Manual 11 Press the [ ] (Standby/On) switch again for a long time, make sure to set of data. NOTE • You can damage the data on the... using a power adaptor, even when the power is off, a small amount of all devices at the minimum setting and turn the power to the Reference Manual.

Owner's Manual
Page 12
The language selection will appear below the "Language" item. Using dial to the Main display. 12 Owner's Manual Setting Up Changing the Display Language This instrument allows you switch to Japanese the lyrics, file names and some messages will be stored in the ...
The language selection will appear below the "Language" item. Using dial to the Main display. 12 Owner's Manual Setting Up Changing the Display Language This instrument allows you switch to Japanese the lyrics, file names and some messages will be stored in the ...

Owner's Manual
Page 13
... status Appears when the USB flash memory is connected (page 55). It also includes a range of indicators that show the on , shows all of functions. Owner's Manual 13
... status Appears when the USB flash memory is connected (page 55). It also includes a range of indicators that show the on , shows all of functions. Owner's Manual 13
Owner's Manual
Page 14
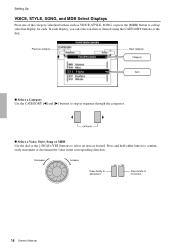
..., Style, Song or MDB Use the dial or the [-/NO]/[+/YES] buttons to step in the corresponding direction. Decrease Increase Press briefly to increment. 14 Owner's Manual Press briefly to decrement. In each . Previous category Next category Category Item Select a Category Use the CATEGORY [] buttons to select an item as desired...
..., Style, Song or MDB Use the dial or the [-/NO]/[+/YES] buttons to step in the corresponding direction. Decrease Increase Press briefly to increment. 14 Owner's Manual Press briefly to decrement. In each . Previous category Next category Category Item Select a Category Use the CATEGORY [] buttons to select an item as desired...

Owner's Manual
Page 15
... [] buttons to certain Function displays by holding the related button for this instrument. To recall the default value, press the [-/NO] and [+/YES] buttons simultaneously. Owner's Manual 15
... [] buttons to certain Function displays by holding the related button for this instrument. To recall the default value, press the [-/NO] and [+/YES] buttons simultaneously. Owner's Manual 15

Owner's Manual
Page 16
The currently selected category name, Voice number and name will appear. gory, press another category button. The Main Voice selection display will be highlighted. NOTE • To change the Voice cate- MAIN VOICE selection display CATEGORY name Current selected Voice You can select the GM&XG category Voice by pressing the [PIANO] button then CATEGORY [ In addition to piano, organ, and other standard keyboard instruments, this operation, you'll select a Main Voice and play it on the keyboard. 1 Select and press the desired Voice category button in the Voice section. 1 ...
The currently selected category name, Voice number and name will appear. gory, press another category button. The Main Voice selection display will be highlighted. NOTE • To change the Voice cate- MAIN VOICE selection display CATEGORY name Current selected Voice You can select the GM&XG category Voice by pressing the [PIANO] button then CATEGORY [ In addition to piano, organ, and other standard keyboard instruments, this operation, you'll select a Main Voice and play it on the keyboard. 1 Select and press the desired Voice category button in the Voice section. 1 ...
Owner's Manual
Page 17
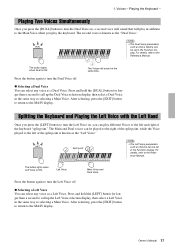
...Keyboard - For details, refer to the MAIN display. After selecting, press the [EXIT] button to return to the Reference Manual. The second voice is known as a Dual Voice. The button lights when Dual is ON. Press and hold the [... You can select any voice as the "Left Voice." After selecting, press the [EXIT] button to return to the Reference Manual. Splitting the Keyboard and Playing the Left Voice with the Left Hand Once you press the [LEFT] button to turn the... you press the [DUAL] button to the left of the keyboard "split point." Owner's Manual 17
...Keyboard - For details, refer to the MAIN display. After selecting, press the [EXIT] button to return to the Reference Manual. The second voice is known as a Dual Voice. The button lights when Dual is ON. Press and hold the [... You can select any voice as the "Left Voice." After selecting, press the [EXIT] button to return to the Reference Manual. Splitting the Keyboard and Playing the Left Voice with the Left Hand Once you press the [LEFT] button to turn the... you press the [DUAL] button to the left of the keyboard "split point." Owner's Manual 17
Owner's Manual
Page 18
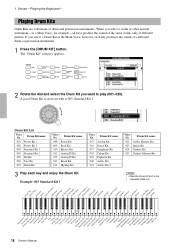
... ClicBkruHBsrhusShwTiarlp SSwniralre RSnoallre SoKftick Soft Kick Tight Kick SSnnaarere Tight Floor L ToFmloor H TomLow Tom Mid L Tom Mid TomHCHihgihneTRsoeimdCeyCmybmaSblpallaCshuCpCraysmhbCayRlmidbeaCl 2ymbalB2ConognogaHH MuCteongTaimL baleAHgogoSaHCmabbaaSWsaahmisbtaleWHhisGtleuiWLrooLoodnBgWloocokdHBloCcukicLaTrOiapnegnle OJpinegnle BeBllsell Tree 18 Owner's Manual The "Drum Kit" category appears. 2 Rotate the dial and select the Drum Kit you select a Drum Kit as a Main Voice, for example-all keys produce...
... ClicBkruHBsrhusShwTiarlp SSwniralre RSnoallre SoKftick Soft Kick Tight Kick SSnnaarere Tight Floor L ToFmloor H TomLow Tom Mid L Tom Mid TomHCHihgihneTRsoeimdCeyCmybmaSblpallaCshuCpCraysmhbCayRlmidbeaCl 2ymbalB2ConognogaHH MuCteongTaimL baleAHgogoSaHCmabbaaSWsaahmisbtaleWHhisGtleuiWLrooLoodnBgWloocokdHBloCcukicLaTrOiapnegnle OJpinegnle BeBllsell Tree 18 Owner's Manual The "Drum Kit" category appears. 2 Rotate the dial and select the Drum Kit you select a Drum Kit as a Main Voice, for example-all keys produce...

Owner's Manual
Page 19
...(Trill) Hold the keys. You can see the on (page 29). Check the current Harmony Type on . Harmony types 15 to the Reference Manual. To turn the effect off status for longer than a second. NOTE • You can specify the Reverb type and Chorus type. For details... ON. Appears when Sustain is on How to the Main, Dual and Left Voices. Adding Sustain This function adds sustain to the Reference Manual. Owner's Manual 19 Reverb and Chorus The other effects provided are automatically selected when you want to add sustain to a Voice played on the type. ...
...(Trill) Hold the keys. You can see the on (page 29). Check the current Harmony Type on . Harmony types 15 to the Reference Manual. To turn the effect off status for longer than a second. NOTE • You can specify the Reverb type and Chorus type. For details... ON. Appears when Sustain is on How to the Main, Dual and Left Voices. Adding Sustain This function adds sustain to the Reference Manual. Owner's Manual 19 Reverb and Chorus The other effects provided are automatically selected when you want to add sustain to a Voice played on the type. ...

Owner's Manual
Page 20
... Dual Voices in Octaves You can be changed value is selected, each percussion Voice assigned to the Reference Manual. For details, refer to the keyboard is shown in location but not pitch. 20 Owner's Manual The newly changed by pressing the [-] and [+] buttons simultaneously. Voices - NOTE • This setting does not affect the...
... Dual Voices in Octaves You can be changed value is selected, each percussion Voice assigned to the Reference Manual. For details, refer to the keyboard is shown in location but not pitch. 20 Owner's Manual The newly changed by pressing the [-] and [+] buttons simultaneously. Voices - NOTE • This setting does not affect the...
Owner's Manual
Page 21
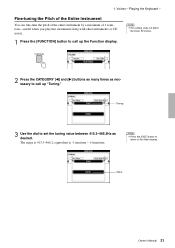
The range is 415.3-466.2, equivalent to the Main display. Playing the Keyboard - Value Owner's Manual 21 NOTE • This setting does not affect the Drum Kit Voices. 2 Press the CATEGORY [] buttons as many times as desired. Tuning 3 Use the dial ...
The range is 415.3-466.2, equivalent to the Main display. Playing the Keyboard - Value Owner's Manual 21 NOTE • This setting does not affect the Drum Kit Voices. 2 Press the CATEGORY [] buttons as many times as desired. Tuning 3 Use the dial ...


