Owner's Manual
Page 2
... over power or connecting cords of any power supply or adapter other uses are both the letter and the spirit of batteries. We sincerely believe that benches are not covered by Yamaha. Keep all installation instructions. Failure to change the lead-in FCC Regulations, Part 15 for a 25' cord (or less) is considered to distribute this product or the device that are therefore the owners responsibility...
... over power or connecting cords of any power supply or adapter other uses are both the letter and the spirit of batteries. We sincerely believe that benches are not covered by Yamaha. Keep all installation instructions. Failure to change the lead-in FCC Regulations, Part 15 for a 25' cord (or less) is considered to distribute this product or the device that are therefore the owners responsibility...

Owner's Manual
Page 5
.... Save important data to a USB flash memory (pages 57-58) or a computer (refer to malfunction or incorrect operation. Such copyrighted materials include, without limitation, all computer software, style files, MIDI files, WAVE data, musical scores and sound recordings. and other electric devices. DON'T MAKE, DISTRIBUTE OR USE ILLEGAL COPIES. About functions/data bundled with the device in the internal memory even if you fill out the User Registration form. • Music rest DMI-3 2/2 Owner's Manual 5 Please...
.... Save important data to a USB flash memory (pages 57-58) or a computer (refer to malfunction or incorrect operation. Such copyrighted materials include, without limitation, all computer software, style files, MIDI files, WAVE data, musical scores and sound recordings. and other electric devices. DON'T MAKE, DISTRIBUTE OR USE ILLEGAL COPIES. About functions/data bundled with the device in the internal memory even if you fill out the User Registration form. • Music rest DMI-3 2/2 Owner's Manual 5 Please...
Owner's Manual
Page 7
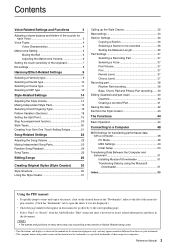
... Function 10 Connecting a Footswitch 10 Connecting Headphones and External Audio Equipment 11 Turning the Power On 11 Changing the Display Language 12 Adjusting the Display CONTRAST control 12 Displays and Basic Operation 13 1 Voices - Playing Rhythm and Accompaniment - 29 Select and Play a Style 29 Changing the Tempo 34 One Touch Setting 34 3 Using Songs 35 Selecting and Listening to a Song 35 Changing the Tempo 36 Fast Forward, Fast Reverse, and Pause 36 Listening to the Demo Song 37 Select and Play a Song from USB Flash Memory...
... Function 10 Connecting a Footswitch 10 Connecting Headphones and External Audio Equipment 11 Turning the Power On 11 Changing the Display Language 12 Adjusting the Display CONTRAST control 12 Displays and Basic Operation 13 1 Voices - Playing Rhythm and Accompaniment - 29 Select and Play a Style 29 Changing the Tempo 34 One Touch Setting 34 3 Using Songs 35 Selecting and Listening to a Song 35 Changing the Tempo 36 Fast Forward, Fast Reverse, and Pause 36 Listening to the Demo Song 37 Select and Play a Song from USB Flash Memory...
Owner's Manual
Page 11
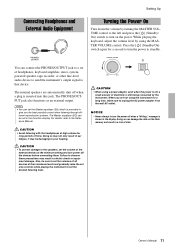
... volume controls while playing the instrument to turn the power off the devices before connecting them. Also, be damaging to a set the volume of the external devices at the minimum setting and turn the power to unplug the AC power adaptor from the wall AC outlet. NOTICE • Never attempt to the Reference Manual. You can set the desired listening level. The PHONES/OUTPUT jack also functions as an external output...
... volume controls while playing the instrument to turn the power off the devices before connecting them. Also, be damaging to a set the volume of the external devices at the minimum setting and turn the power to unplug the AC power adaptor from the wall AC outlet. NOTICE • Never attempt to the Reference Manual. You can set the desired listening level. The PHONES/OUTPUT jack also functions as an external output...
Owner's Manual
Page 27
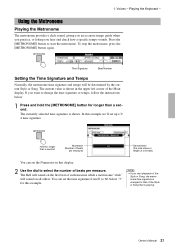
... display. 2 Use the dial to start playback of the Style or Song, the metronome time signature is changed to that of each measure while a metronome "click" will be determined by the current Style or Song. Hold for longer than a second. Voices - Playing the Keyboard - Using the Metronome Playing the Metronome The metronome provides a click sound, giving you an accurate tempo guide when you practice, or letting you start the metronome. Time Signature Beat Number Setting the Time Signature and Tempo...
... display. 2 Use the dial to start playback of the Style or Song, the metronome time signature is changed to that of each measure while a metronome "click" will be determined by the current Style or Song. Hold for longer than a second. Voices - Playing the Keyboard - Using the Metronome Playing the Metronome The metronome provides a click sound, giving you an accurate tempo guide when you practice, or letting you start the metronome. Time Signature Beat Number Setting the Time Signature and Tempo...
Owner's Manual
Page 40
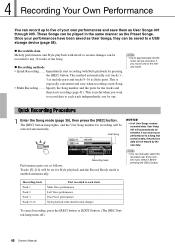
... start recording with chord/section changes To cancel recording, press the [REC] button or [EXIT] button. (The [REC] button lamp turns off.) 40 Owner's Manual These Songs can be recorded, if you want to record data to any 16 tracks of your performances have been saved as Style parts. NOTE • Up to approximately 30,000 notes can be recorded to each track Main Voice performance Left Voice performance Dual Voice performance Style playback with Style playback by the new data...
... start recording with chord/section changes To cancel recording, press the [REC] button or [EXIT] button. (The [REC] button lamp turns off.) 40 Owner's Manual These Songs can be recorded, if you want to record data to any 16 tracks of your performances have been saved as Style parts. NOTE • Up to approximately 30,000 notes can be recorded to each track Main Voice performance Left Voice performance Dual Voice performance Style playback with Style playback by the new data...

Owner's Manual
Page 43
... to save the Song to a USB flash Memory as a MIDI file to play only the rhythm. A message prompting you don't want to confirm saving of the remaining tracks. Press the [+/YES] button to save the song, or the [-/NO] button if you to save the song. In this case, delete any of the data will stop as soon as the Ending reaches to start recording by pressing the [ ] or [REC] button. Start recording 4 Stop recording...
... to save the Song to a USB flash Memory as a MIDI file to play only the rhythm. A message prompting you don't want to confirm saving of the remaining tracks. Press the [+/YES] button to save the song, or the [-/NO] button if you to save the song. In this case, delete any of the data will stop as soon as the Ending reaches to start recording by pressing the [ ] or [REC] button. Start recording 4 Stop recording...
Owner's Manual
Page 46
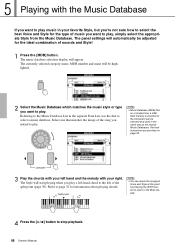
... display will be adjusted for the ideal combination of sounds and Style! 1 Press the [MDB] button. Referring to the Music Database List in the same way as the internal Music Databases. File load instructions are provided on or loaded from the Music Database. The Style will automatically be highlighted. 2 Select the Music Database which matches the music style or type you want to play , simply select the appropriate Style from a USB flash memory connected...
... display will be adjusted for the ideal combination of sounds and Style! 1 Press the [MDB] button. Referring to the Music Database List in the same way as the internal Music Databases. File load instructions are provided on or loaded from the Music Database. The Style will automatically be highlighted. 2 Select the Music Database which matches the music style or type you want to play , simply select the appropriate Style from a USB flash memory connected...
Owner's Manual
Page 53
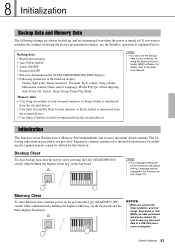
... keys. Be sure to save the Backup data to internal flash memory by installing the expansion pack cannot be changed in the Function display: Tuning, Split point, Touch sensitivity, TG mode, Style volume, Song volume, Metronome volume, Demo cancel, Language, Master EQ type, Chord fingering, Auto Power Off, Freeze, Demo Group, Demo Play Mode Memory data • User Song (recordings of your computer, by this function. For details, refer to initialize the settings (restoring the factory programmed settings), use the Initialize operation as explained below. Expansion contents transferred...
... keys. Be sure to save the Backup data to internal flash memory by installing the expansion pack cannot be changed in the Function display: Tuning, Split point, Touch sensitivity, TG mode, Style volume, Song volume, Metronome volume, Demo cancel, Language, Master EQ type, Chord fingering, Auto Power Off, Freeze, Demo Group, Demo Play Mode Memory data • User Song (recordings of your computer, by this function. For details, refer to initialize the settings (restoring the factory programmed settings), use the Initialize operation as explained below. Expansion contents transferred...
Owner's Manual
Page 54
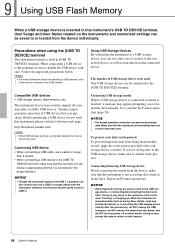
...; Avoid frequently turning the power on/off to the [USB TO DEVICE] terminal. Precautions when using the [USB TO DEVICE] terminal This instrument features a built-in the operation of USB devices, refer to the connected device, as well as during Save, Delete, Load and Format operations) or is connected in the Save, Delete and Format operations). When connecting a USB device to the terminal, be used . The number of USB 1.1. However, note that the transfer speed is...
...; Avoid frequently turning the power on/off to the [USB TO DEVICE] terminal. Precautions when using the [USB TO DEVICE] terminal This instrument features a built-in the operation of USB devices, refer to the connected device, as well as during Save, Delete, Load and Format operations) or is connected in the Save, Delete and Format operations). When connecting a USB device to the terminal, be used . The number of USB 1.1. However, note that the transfer speed is...

Owner's Manual
Page 63
... above instructions, download the Yamaha Standard USBMIDI driver from the instrument. (Data is transmitted only by playing notes on the keyboard or playing back a song.) • While the computer is connected to the instrument, you to transmit/receive MIDI messages to/from a computer. • A file such as the Local Control on the computer. 2 Connect the instrument and the computer via a USB cable offers the following before turning the power to...
... above instructions, download the Yamaha Standard USBMIDI driver from the instrument. (Data is transmitted only by playing notes on the keyboard or playing back a song.) • While the computer is connected to the instrument, you to transmit/receive MIDI messages to/from a computer. • A file such as the Local Control on the computer. 2 Connect the instrument and the computer via a USB cable offers the following before turning the power to...
Owner's Manual
Page 64
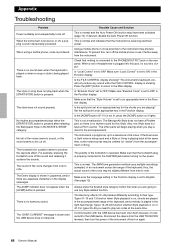
... Language setting in the Function display is played in the accompaniment range of headphones is plugged into this Style does not have a Rhythm part, so there is set to note. When a set of the keyboard, and a melody is set at the same time. If the Dual voice or Split voice is not lit, press the [ACMP] button so it sustains the sounds. AppAepndpixendix Troubleshooting Problem Power suddenly and unexpectedly turns off and on again. 64 Owner's Manual Is the FILE CONTROL display...
... Language setting in the Function display is played in the accompaniment range of headphones is plugged into this Style does not have a Rhythm part, so there is set to note. When a set of the keyboard, and a melody is set at the same time. If the Dual voice or Split voice is not lit, press the [ACMP] button so it sustains the sounds. AppAepndpixendix Troubleshooting Problem Power suddenly and unexpectedly turns off and on again. 64 Owner's Manual Is the FILE CONTROL display...

Owner's Manual
Page 65
...(page 8). PRESET SONG SELECT - Expansion Pack Installation + CATEGORY [>] FILE CONTROL - e [DEMO] button r [SONG MODE] button DEMO display * FUNCTION - USB (when the [SONG MODE] is turned on) STYLE SELECT - - - * FUNCTION - No. Chord Fingering - - - - - - - - - - - Time Signature TEMPO TEMPO - - * FUNCTION - Song Save + CATEGORY [>] FILE CONTROL - Demo Group - METRONOME - SONG buttons [PRESET] t [USER] [SCORE] [LYRICS] y [USB] button u [REC] button i STYLE buttons [POP & ROCK]-[EXPANSION/USER] STYLE CONTROL buttons [OTS LINK] [AUTO FILL IN] [ACMP...
...(page 8). PRESET SONG SELECT - Expansion Pack Installation + CATEGORY [>] FILE CONTROL - e [DEMO] button r [SONG MODE] button DEMO display * FUNCTION - USB (when the [SONG MODE] is turned on) STYLE SELECT - - - * FUNCTION - No. Chord Fingering - - - - - - - - - - - Time Signature TEMPO TEMPO - - * FUNCTION - Song Save + CATEGORY [>] FILE CONTROL - Demo Group - METRONOME - SONG buttons [PRESET] t [USER] [SCORE] [LYRICS] y [USB] button u [REC] button i STYLE buttons [POP & ROCK]-[EXPANSION/USER] STYLE CONTROL buttons [OTS LINK] [AUTO FILL IN] [ACMP...
Owner's Manual
Page 72
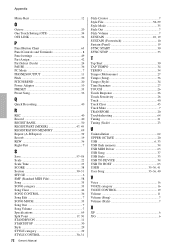
... STYLE CONTROL 30-31 72 Owner's Manual Style Creator 7 Style File 58-59 Style Mode 35 Style Out 7 Style Volume 7 SUSTAIN 10, 19 SUSTAIN (Footswitch 10 Sustain (Panel 19 SYNC START 30 SYNC STOP 33 T Tap Start 30 TAP TEMPO 34 TEMPO 34 Tempo (Metronome 27 Tempo (Song 36 Tempo (Style 34 Time Signature 27 TOUCH 26 Touch Response 26 Touch Sensitivity 26 Track 40 Track Clear 45 Track Mute 7 TRANSPOSE 20 Troubleshooting 64 Tuning 21 Tuning (Scale 23 U Uninstallation 62 UPPER OCTAVE 20 USB 6, 33 USB flash memory 54 USB MIDI Driver 63 USB Song 37 USB Style 33 USB...
... STYLE CONTROL 30-31 72 Owner's Manual Style Creator 7 Style File 58-59 Style Mode 35 Style Out 7 Style Volume 7 SUSTAIN 10, 19 SUSTAIN (Footswitch 10 Sustain (Panel 19 SYNC START 30 SYNC STOP 33 T Tap Start 30 TAP TEMPO 34 TEMPO 34 Tempo (Metronome 27 Tempo (Song 36 Tempo (Style 34 Time Signature 27 TOUCH 26 Touch Response 26 Touch Sensitivity 26 Track 40 Track Clear 45 Track Mute 7 TRANSPOSE 20 Troubleshooting 64 Tuning 21 Tuning (Scale 23 U Uninstallation 62 UPPER OCTAVE 20 USB 6, 33 USB flash memory 54 USB MIDI Driver 63 USB Song 37 USB Style 33 USB...
Reference Manual
Page 2
... manual are the trademarks or registered trademarks of the keyboard 7 EQ settings 8 Harmony/Effect-Related Settings 9 Selecting a Harmony type 9 Selecting a Reverb type 10 Selecting a Chorus type 11 Selecting a DSP type 12 Style-Related Settings 14 Adjusting the Style Volume 14 Muting Independent Style Parts 15 Selecting Chord Fingering Type 16 Pattern Variation (Sections 18 Setting the Split Point 19 Stop Accompaniment function 20 Style Types 20 Creating Your Own One Touch Setting Setups 21 Song-Related Settings 22 Adjusting the Song Volume 22 Muting Independent Song...
... manual are the trademarks or registered trademarks of the keyboard 7 EQ settings 8 Harmony/Effect-Related Settings 9 Selecting a Harmony type 9 Selecting a Reverb type 10 Selecting a Chorus type 11 Selecting a DSP type 12 Style-Related Settings 14 Adjusting the Style Volume 14 Muting Independent Style Parts 15 Selecting Chord Fingering Type 16 Pattern Variation (Sections 18 Setting the Split Point 19 Stop Accompaniment function 20 Style Types 20 Creating Your Own One Touch Setting Setups 21 Song-Related Settings 22 Adjusting the Song Volume 22 Muting Independent Song...
Reference Manual
Page 15
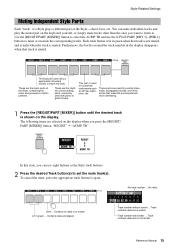
.... Track number with piano or guitar Voices. Reference Manual 15 Furthermore, the border around the track number in the display disappears when that track is shown on the display. These parts are the rhythmic chord backing parts, commonly used with border ... Unlit ... No data. Contains no data or is muted. Track contains data but is muted Lit in green when that make the accompaniment more interesting. 1 Press the [REGIST/PART [MIXER]] button...
.... Track number with piano or guitar Voices. Reference Manual 15 Furthermore, the border around the track number in the display disappears when that track is shown on the display. These parts are the rhythmic chord backing parts, commonly used with border ... Unlit ... No data. Contains no data or is muted. Track contains data but is muted Lit in green when that make the accompaniment more interesting. 1 Press the [REGIST/PART [MIXER]] button...
Reference Manual
Page 20
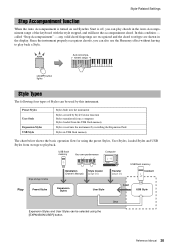
... flow for using the [EXPANSION/USER] button. any valid chord fingerings are recognized and the chord root/type are shown in the display. USB flash memory Your own performance Computer Style storage location Play Preset Styles Installation Style Creator (Owner's Manual) (page 30) Transfer (page 51) USB flash memory Connect Expansion Styles User Style Load USB Style Save Expansion Styles and User Styles can play back a Style. Preset Styles User Style Expansion Styles USB Style Styles built into the instrument Styles created by Style Creator function Styles transferred from...
... flow for using the [EXPANSION/USER] button. any valid chord fingerings are recognized and the chord root/type are shown in the display. USB flash memory Your own performance Computer Style storage location Play Preset Styles Installation Style Creator (Owner's Manual) (page 30) Transfer (page 51) USB flash memory Connect Expansion Styles User Style Load USB Style Save Expansion Styles and User Styles can play back a Style. Preset Styles User Style Expansion Styles USB Style Styles built into the instrument Styles created by Style Creator function Styles transferred from...
Reference Manual
Page 21
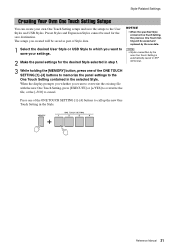
.... Reference Manual 21 Style-Related Settings Creating Your Own One Touch Setting Setups You can create your settings. 2 Make the panel settings for the save the setups to call up the new One Touch Setting in the selected Style. Preset Styles and Expansion Styles cannot be saved as part of Style data. 1 Select the desired User Style or USB Style to which you created will be erased and replaced by the new One Touch Setting is automatically saved in SFF GE format...
.... Reference Manual 21 Style-Related Settings Creating Your Own One Touch Setting Setups You can create your settings. 2 Make the panel settings for the save the setups to call up the new One Touch Setting in the selected Style. Preset Styles and Expansion Styles cannot be saved as part of Style data. 1 Select the desired User Style or USB Style to which you created will be erased and replaced by the new One Touch Setting is automatically saved in SFF GE format...
Reference Manual
Page 37
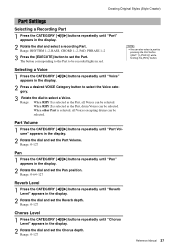
... [] buttons repeatedly until "Part Volume" appears in the display. 2 Rotate the dial and set the Part Volume. When RHY 2 is selected as the Part, all Voices excepting drums can also select a part by pressing the Part button ([RHY 1]-[PHR 2]) while holding the [REC] button. Range: RHYTHM 1-2, BASS, CHORD 1-2, PAD, PHRASE 1-2 3 Press the [EXECUTE] button to be selected. Range: When RHY 1 is selected, all Voices can be selected. Range: 0-64-127 Reverb Level...
... [] buttons repeatedly until "Part Volume" appears in the display. 2 Rotate the dial and set the Part Volume. When RHY 2 is selected as the Part, all Voices excepting drums can also select a part by pressing the Part button ([RHY 1]-[PHR 2]) while holding the [REC] button. Range: RHYTHM 1-2, BASS, CHORD 1-2, PAD, PHRASE 1-2 3 Press the [EXECUTE] button to be selected. Range: When RHY 1 is selected, all Voices can be selected. Range: 0-64-127 Reverb Level...

Reference Manual
Page 51
... instrument, make sure to return to the MAIN display, and stop playback if a Song or Style is being played back. • Close the window to exit from the Musicsoft Downloader and re-enable control of the instrument. • When the "Language" is provided in SMF Format 0. In order to transfer files between the instrument and a computer • Backup data (PSR-S650.BUP) • Styles, Songs and Music Database...
... instrument, make sure to return to the MAIN display, and stop playback if a Song or Style is being played back. • Close the window to exit from the Musicsoft Downloader and re-enable control of the instrument. • When the "Language" is provided in SMF Format 0. In order to transfer files between the instrument and a computer • Backup data (PSR-S650.BUP) • Styles, Songs and Music Database...


