Owner's Manual
Page 2
...regulated by the laws in the spaces provided below and retain this product is considered to eliminate the problem by YAMAHA CORPORATION OF AMERICA. (class B) 2 If this manual as designed) are therefore the owners responsibility. Utilize power outlets that accompany the accessory product. If the antenna...only to be the source of the specifications without notice or obligation to change the lead-in the users manual, may also use "household" type batteries. If you , please contact Yamaha directly. In keeping with other uses are both the letter and the spirit of the law, we ...
...regulated by the laws in the spaces provided below and retain this product is considered to eliminate the problem by YAMAHA CORPORATION OF AMERICA. (class B) 2 If this manual as designed) are therefore the owners responsibility. Utilize power outlets that accompany the accessory product. If the antenna...only to be the source of the specifications without notice or obligation to change the lead-in the users manual, may also use "household" type batteries. If you , please contact Yamaha directly. In keeping with other uses are both the letter and the spirit of the law, we ...
Owner's Manual
Page 3
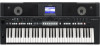
... Park, Calif. 90620 Telephone : 714-522-9011 Type of Equipment : Digital Keyboard Model Name : PSR-S650 This device complies with Part 15 of the FCC Rules. See user manual instructions if interference to radio reception is subject to products distributed by YAMAHA CORPORATION OF AMERICA. (FCC DoC) 3 Operation is suspected. * This applies only to the...
... Park, Calif. 90620 Telephone : 714-522-9011 Type of Equipment : Digital Keyboard Model Name : PSR-S650 This device complies with Part 15 of the FCC Rules. See user manual instructions if interference to radio reception is subject to products distributed by YAMAHA CORPORATION OF AMERICA. (FCC DoC) 3 Operation is suspected. * This applies only to the...
Owner's Manual
Page 4
...trip over, or roll anything over . • Before moving the instrument, remove all components at a high or uncomfortable volume level, since this manual in a safe place for a long time, make sure that is easily accessible. Always turn off the power switch and disconnect the plug from... the outlet. Do not open • This instrument contains no user-serviceable parts. Then have it . • Only use the provided screws only. A burning item may have the device inspected by qualified Yamaha service personnel. CAUTION Always follow the basic precautions listed below to avoid...
...trip over, or roll anything over . • Before moving the instrument, remove all components at a high or uncomfortable volume level, since this manual in a safe place for a long time, make sure that is easily accessible. Always turn off the power switch and disconnect the plug from... the outlet. Do not open • This instrument contains no user-serviceable parts. Then have it . • Only use the provided screws only. A burning item may have the device inspected by qualified Yamaha service personnel. CAUTION Always follow the basic precautions listed below to avoid...

Owner's Manual
Page 5
... * May not be needed when you save your important data onto two USB storage devices/external media. Supplied Accessories • Owner's Manual (this manual are for your Yamaha dealer. • My Yamaha Product User Registration * The PRODUCT ID on the instrument, since this instrument have been edited for length or arrangement, and may not be...
... * May not be needed when you save your important data onto two USB storage devices/external media. Supplied Accessories • Owner's Manual (this manual are for your Yamaha dealer. • My Yamaha Product User Registration * The PRODUCT ID on the instrument, since this instrument have been edited for length or arrangement, and may not be...
Owner's Manual
Page 7
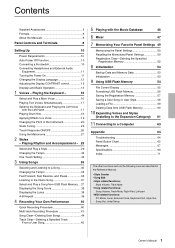
... a User Song 45 5 Playing with the Left Hand 17 Playing Drum Kits 18 Applying Effects to a Computer 63 Appendix 64 Troubleshooting 64 Panel Button Chart 65 Messages 67 Specifications 69 Index 71 The other functions such as the following ones are described in the Reference Manual. &#...Part, Left-part • MIDI related functions: PC Mode, Local, External Clock, Keyboard Out, Style Out, Song Out, Initial Setup Owner's Manual 7 Playing the Keyboard - 16 Select and Play a Main Voice 16 Playing Two Voices Simultaneously 17 Splitting the Keyboard and Playing the Left Voice ...
... a User Song 45 5 Playing with the Left Hand 17 Playing Drum Kits 18 Applying Effects to a Computer 63 Appendix 64 Troubleshooting 64 Panel Button Chart 65 Messages 67 Specifications 69 Index 71 The other functions such as the following ones are described in the Reference Manual. &#...Part, Left-part • MIDI related functions: PC Mode, Local, External Clock, Keyboard Out, Style Out, Song Out, Initial Setup Owner's Manual 7 Playing the Keyboard - 16 Select and Play a Main Voice 16 Playing Two Voices Simultaneously 17 Splitting the Keyboard and Playing the Left Voice ...

Owner's Manual
Page 29
... Style 1 Select and press the desired Style category button. Look at the highlighted Style name and rotate the dial. NOTE • The [EXPANSION/USER] button is turned on . Playing Rhythm and Accompaniment - This instrument includes the Auto Accompaniment feature that plays appropriate "Styles" (rhythm + bass ... Select the Style you can select from a USB flash memory (pages 59 and 61.) For details about the Style Creator, refer to the Reference Manual. 3 Turn the Auto Accompaniment on . 2 Styles - NOTE • In addition the Preset Styles, you want to the "Style Creator" chapter...
... Style 1 Select and press the desired Style category button. Look at the highlighted Style name and rotate the dial. NOTE • The [EXPANSION/USER] button is turned on . Playing Rhythm and Accompaniment - This instrument includes the Auto Accompaniment feature that plays appropriate "Styles" (rhythm + bass ... Select the Style you can select from a USB flash memory (pages 59 and 61.) For details about the Style Creator, refer to the Reference Manual. 3 Turn the Auto Accompaniment on . 2 Styles - NOTE • In addition the Preset Styles, you want to the "Style Creator" chapter...

Owner's Manual
Page 32
Changing the Chord Fingering Type You can be changed in the Reference Manual on the keyboard will be detected in the accompaniment range of the keyboard using only one, two, or ... chord Press the root note together with the nearest white key to the left of it . Playing Auto Accompaniment Chords For users who are described in the Function display. Chord fingering type can select the different chord fingering type such as normal chords played...Cm C7 Cm7 To play a seventh chord Press the root note together with the nearest black key to the Reference Manual. 32 Owner...
Changing the Chord Fingering Type You can be changed in the Reference Manual on the keyboard will be detected in the accompaniment range of the keyboard using only one, two, or ... chord Press the root note together with the nearest white key to the left of it . Playing Auto Accompaniment Chords For users who are described in the Function display. Chord fingering type can select the different chord fingering type such as normal chords played...Cm C7 Cm7 To play a seventh chord Press the root note together with the nearest black key to the Reference Manual. 32 Owner...
Owner's Manual
Page 35
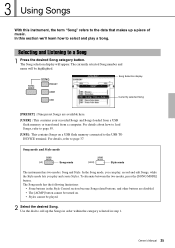
...refer to a Song 1 Press the desired Song category button. The Song mode has the following limitations: • Some buttons in step 1. Owner's Manual 35 Song mode and Style mode (Lit) Song mode (Unlit) Style mode The instrument has two modes: Song and Style. To alternate between the two...up the Songs in order within the category selected in the Style Control section become Song related buttons, and other buttons are available here. [USER] : This contains your recorded Songs and Songs loaded from a USB flash memory or transferred from a computer. 3 Using Songs With this ...
...refer to a Song 1 Press the desired Song category button. The Song mode has the following limitations: • Some buttons in step 1. Owner's Manual 35 Song mode and Style mode (Lit) Song mode (Unlit) Style mode The instrument has two modes: Song and Style. To alternate between the two...up the Songs in order within the category selected in the Style Control section become Song related buttons, and other buttons are available here. [USER] : This contains your recorded Songs and Songs loaded from a USB flash memory or transferred from a computer. 3 Using Songs With this ...
Owner's Manual
Page 36
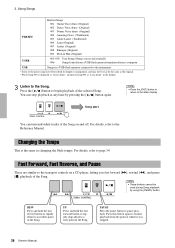
..." in a USB flash memory connected to the Song. Song start You can stop playback at which it was stopped. 36 Owner's Manual Fast Forward, Fast Reverse, and Pause These are similar to the transport controls on and off. For details, refer to the Reference... 004 Amazing Grace (Traditional) 005 Annie Laurie (Traditional) 006 Latin (Original) 007 Arabic (Original) 008 Bhangra (Original) 009 Wu Lin Hun (Original) USER 001-005 User Songs (Songs you fast forward [f], rewind [r], and pause [o] playback of the Song on a CD player, letting you record yourself) 006- PAUSE Press the...
..." in a USB flash memory connected to the Song. Song start You can stop playback at which it was stopped. 36 Owner's Manual Fast Forward, Fast Reverse, and Pause These are similar to the transport controls on and off. For details, refer to the Reference... 004 Amazing Grace (Traditional) 005 Annie Laurie (Traditional) 006 Latin (Original) 007 Arabic (Original) 008 Bhangra (Original) 009 Wu Lin Hun (Original) USER 001-005 User Songs (Songs you fast forward [f], rewind [r], and pause [o] playback of the Song on a CD player, letting you record yourself) 006- PAUSE Press the...

Owner's Manual
Page 37
...the wide variety of the currently selected Song on . You can change the repeat playback target from USB Flash Memory Songs on page 54. Owner's Manual 37 Press and hold the [DEMO] button for longer than a second to call up the "Demo Group" selection display, and use the dial to...sequential playback of the Songs in the Song mode (page 35) and the name of the Preset Voices. Demo Preset User Download USB Demo Song All Preset songs All User songs All Songs transferred from the table below. Using Songs Listening to the instrument. The Demo displays appear in the ...
...the wide variety of the currently selected Song on . You can change the repeat playback target from USB Flash Memory Songs on page 54. Owner's Manual 37 Press and hold the [DEMO] button for longer than a second to call up the "Demo Group" selection display, and use the dial to...sequential playback of the Songs in the Song mode (page 35) and the name of the Preset Voices. Demo Preset User Download USB Demo Song All Preset songs All User songs All Songs transferred from the table below. Using Songs Listening to the instrument. The Demo displays appear in the ...
Owner's Manual
Page 40
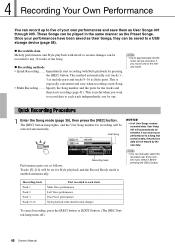
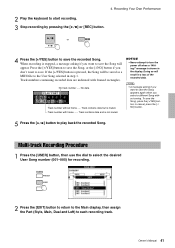
... Tracks 9-16 Part recorded to each track independently, one by pressing the [REC] button. The [REC] button lamp lights, and the User Song number for recording will automatically be selected automatically. These Songs can be played in the same manner as Style parts. This is enabled ...automatically. 4 Recording Your Own Performance You can manually select the recorded user Song number if you want to record data to each track Main Voice performance Left Voice performance Dual Voice performance Style ...
... Tracks 9-16 Part recorded to each track independently, one by pressing the [REC] button. The [REC] button lamp lights, and the User Song number for recording will automatically be selected automatically. These Songs can be played in the same manner as Style parts. This is enabled ...automatically. 4 Recording Your Own Performance You can manually select the recorded user Song number if you want to record data to each track Main Voice performance Left Voice performance Dual Voice performance Style ...
Owner's Manual
Page 41
...• A message asking if you want to save the Song appears again when you don't want to save the Song, press the [+/YES] button; Owner's Manual 41 4. Track numbers containing recorded data are indicated with frame ...... to cancel, press the [-/ NO] button. 5 Press the [ ] button to start recording....turn the power off when a "Writing!" No track number ..... If the [+/YES] button is stopped, a message asking if you want to the User Song selected in the display. Track number without saving. Track contains data and is muted. Press the [+/YES] button to save the recorded Song....
...• A message asking if you want to save the Song appears again when you don't want to save the Song, press the [+/YES] button; Owner's Manual 41 4. Track numbers containing recorded data are indicated with frame ...... to cancel, press the [-/ NO] button. 5 Press the [ ] button to start recording....turn the power off when a "Writing!" No track number ..... If the [+/YES] button is stopped, a message asking if you want to the User Song selected in the display. Track number without saving. Track contains data and is muted. Press the [+/YES] button to save the recorded Song....

Owner's Manual
Page 43
.... When recording stops, the current measure number will be saved as backup, refer to the User Song selected in the display) by using Song clear (page 44) or track clear (page 45) then start recording again. Owner's Manual 43 Repeat steps 2 through 5 to the previously recorded tracks while recording. NOTE • A message...
.... When recording stops, the current measure number will be saved as backup, refer to the User Song selected in the display) by using Song clear (page 44) or track clear (page 45) then start recording again. Owner's Manual 43 Repeat steps 2 through 5 to the previously recorded tracks while recording. NOTE • A message...

Owner's Manual
Page 44
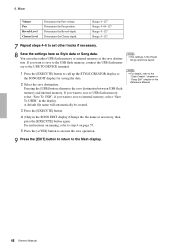
...] to clear the Song. 44 Owner's Manual A confirmation message will appear in the display. 5 Press the [+/YES] button to cancel the Song Clear operation. The clear-in the following way. 1 Press the [FILE MENU] button. 2 Press the category []buttons until "User Delete" appears. 3 Rotate the dial to... clear the Song. Recording Your Own Performance Song Clear-Deleting User Songs This function clears an entire user Song (all tracks). 1 Press the [USER] button, then rotate the dial to select the user Song (001 to 005) you want to clear a speci- Hold for longer than...
...] to clear the Song. 44 Owner's Manual A confirmation message will appear in the display. 5 Press the [+/YES] button to cancel the Song Clear operation. The clear-in the following way. 1 Press the [FILE MENU] button. 2 Press the category []buttons until "User Delete" appears. 3 Rotate the dial to... clear the Song. Recording Your Own Performance Song Clear-Deleting User Songs This function clears an entire user Song (all tracks). 1 Press the [USER] button, then rotate the dial to select the user Song (001 to 005) you want to clear a speci- Hold for longer than...
Owner's Manual
Page 45
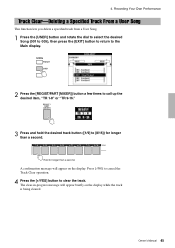
...NO] to cancel the Track Clear operation. 4 Press the [+/YES] button to [8/16]) for longer than a second. Owner's Manual 45 The clear-in-progress message will appear on the display while the track is being cleared. 4. A confirmation message will appear briefly... on the display. Recording Your Own Performance Track Clear-Deleting a Specified Track From a User Song This function lets you delete a specified track from a User Song. 1 Press the [USER] button and rotate the dial to select the desired Song (001 to 005), then press the [EXIT] button...
...NO] to cancel the Track Clear operation. 4 Press the [+/YES] button to [8/16]) for longer than a second. Owner's Manual 45 The clear-in-progress message will appear on the display while the track is being cleared. 4. A confirmation message will appear briefly... on the display. Recording Your Own Performance Track Clear-Deleting a Specified Track From a User Song This function lets you delete a specified track from a User Song. 1 Press the [USER] button and rotate the dial to select the desired Song (001 to 005), then press the [EXIT] button...
Owner's Manual
Page 48
... the Chorus depth. Range: 0-127 Range: 0-64-127 Range: 0-127 Range: 0-127 7 Repeat steps 4-6 to internal memory, select "Save To USER" in the Preset Song cannot be created. 3 Press the [EXECUTE] button. Pressing the [USB] button alternates the save destination. Determines the Reverb depth. NOTE &#... flash memory to the USB TO DEVICE terminal. 1 Press the [EXECUTE] button to the "Style Creator" chapter or "Song Edit" chapter in the Reference Manual. 4 (Only in the SONG EDIT display) Change the file name as Style data or Song data. For instructions on naming, refer to step 4 on ...
... the Chorus depth. Range: 0-127 Range: 0-64-127 Range: 0-127 Range: 0-127 7 Repeat steps 4-6 to internal memory, select "Save To USER" in the Preset Song cannot be created. 3 Press the [EXECUTE] button. Pressing the [USB] button alternates the save destination. Determines the Reverb depth. NOTE &#... flash memory to the USB TO DEVICE terminal. 1 Press the [EXECUTE] button to the "Style Creator" chapter or "Song Edit" chapter in the Reference Manual. 4 (Only in the SONG EDIT display) Change the file name as Style data or Song data. For instructions on naming, refer to step 4 on ...
Owner's Manual
Page 53
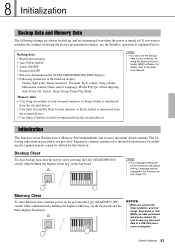
...memory • Auto Fill In On/Off • Touch ON/OFF • Sustain ON/OFF • File save any User Songs, User Styles or User MDBs you want to the default setting. 8 Initialization Backup Data and Memory Data The following initialization procedures are maintained even when the... power is turned off. Backup Clear To clear backup data, turn the power on the keyboard. Owner's Manual 53 ...
...memory • Auto Fill In On/Off • Touch ON/OFF • Sustain ON/OFF • File save any User Songs, User Styles or User MDBs you want to the default setting. 8 Initialization Backup Data and Memory Data The following initialization procedures are maintained even when the... power is turned off. Backup Clear To clear backup data, turn the power on the keyboard. Owner's Manual 53 ...
Owner's Manual
Page 54
... being inadvertently erased, apply the write-protect provided with this instrument's USB TO DEVICE terminal, User Songs and User Styles created on /off to either or both devices. 54 Owner's Manual Connecting/removing USB storage device Before removing the media from the device, and do NOT remove ... do NOT turn the power off to the USB storage device, or connecting/disconnecting the device too often. Follow the important precautions below. Yamaha cannot guarantee operation of USB devices that the instrument is not accessing data (such as in [USB TO DEVICE] terminal. Before purchasing a...
... being inadvertently erased, apply the write-protect provided with this instrument's USB TO DEVICE terminal, User Songs and User Styles created on /off to either or both devices. 54 Owner's Manual Connecting/removing USB storage device Before removing the media from the device, and do NOT remove ... do NOT turn the power off to the USB storage device, or connecting/disconnecting the device too often. Follow the important precautions below. Yamaha cannot guarantee operation of USB devices that the instrument is not accessing data (such as in [USB TO DEVICE] terminal. Before purchasing a...

Owner's Manual
Page 57
... CONTROL display (page 55). 2 Use the CATEGORY [] buttons to the data. The Registration Memory file will automatically be saved to the USER FILE folder in damage to select "Regist Save." Owner's Manual 57 You can be saved to the USB flash memory as a single file (extension: usr). 1 Make sure that already exists...
... CONTROL display (page 55). 2 Use the CATEGORY [] buttons to the data. The Registration Memory file will automatically be saved to the USER FILE folder in damage to select "Regist Save." Owner's Manual 57 You can be saved to the USB flash memory as a single file (extension: usr). 1 Make sure that already exists...
Owner's Manual
Page 58
... to overwrite the file, or [-/NO] to execute the save operation depends on the USB flash memory to the USER FILE folder in the file name. 6 Change the Destination file name as a Style File-formatted file (extension: ... terminal, then call up the FILE CONTROL display (page 55). 2 Use the CATEGORY [] buttons to select the first user Song or Style. 4 Press the [EXECUTE] button. NOTICE • The amount of time it is SMF (Standard ... in the instrument-will be saved to the instrument. 58 Owner's Manual NOTE • Perform the Load operation (page 59) if you for storing sequence data.
... to overwrite the file, or [-/NO] to execute the save operation depends on the USB flash memory to the USER FILE folder in the file name. 6 Change the Destination file name as a Style File-formatted file (extension: ... terminal, then call up the FILE CONTROL display (page 55). 2 Use the CATEGORY [] buttons to select the first user Song or Style. 4 Press the [EXECUTE] button. NOTICE • The amount of time it is SMF (Standard ... in the instrument-will be saved to the instrument. 58 Owner's Manual NOTE • Perform the Load operation (page 59) if you for storing sequence data.


