Owner's Manual
Page 1
DIGITAL WORKSTATION Owner's Manual Before using the instrument, be sure to read "PRECAUTIONS" on pages 4-5. EN
DIGITAL WORKSTATION Owner's Manual Before using the instrument, be sure to read "PRECAUTIONS" on pages 4-5. EN
Owner's Manual
Page 2
...sincerely believe that the charger is intended for a 25' cord (or less) is soldered in the manual, on the name plate, or specifically recommended by Yamaha. Make sure that the battery being charged is a rechargeable type and that our products and the production ...produce satisfactory results, please contact the local retailer authorized to perform the replacement. You should be used only with this manual as regulated by Yamaha. Follow all installation instructions. Compliance with these requirements provides a reasonable level of assurance that is not recommended! If...
...sincerely believe that the charger is intended for a 25' cord (or less) is soldered in the manual, on the name plate, or specifically recommended by Yamaha. Make sure that the battery being charged is a rechargeable type and that our products and the production ...produce satisfactory results, please contact the local retailer authorized to perform the replacement. You should be used only with this manual as regulated by Yamaha. Follow all installation instructions. Compliance with these requirements provides a reasonable level of assurance that is not recommended! If...

Owner's Manual
Page 3
See user manual instructions if interference to radio reception is subject to products distributed by YAMAHA CORPORATION OF AMERICA. (FCC DoC) 3 COMPLIANCE INFORMATION STATEMENT (DECLARATION OF CONFORMITY PROCEDURE) Responsible Party : Yamaha Corporation of America Address : 6600 Orangethorpe Ave., Buena Park, Calif. 90620 Telephone : 714-522-9011 Type of Equipment : Digital Keyboard Model Name : PSR-S650 This...
See user manual instructions if interference to radio reception is subject to products distributed by YAMAHA CORPORATION OF AMERICA. (FCC DoC) 3 COMPLIANCE INFORMATION STATEMENT (DECLARATION OF CONFORMITY PROCEDURE) Responsible Party : Yamaha Corporation of America Address : 6600 Orangethorpe Ave., Buena Park, Calif. 90620 Telephone : 714-522-9011 Type of Equipment : Digital Keyboard Model Name : PSR-S650 This...
Owner's Manual
Page 4
... not rest your weight on, or place heavy objects on it . • Remove the electric plug from the wall AC outlet. 4 Owner's Manual DMI-3 1/2 When attaching the stand or rack, use the voltage specified as heaters or radiators, and do not excessively bend or otherwise damage the ...all connected cables. • When setting up the product, make sure to the instrument or other hazards. Then have the device inspected by qualified Yamaha service personnel. Failure to set the desired listening level. • Do not place the instrument in an unstable position where it . • ...
... not rest your weight on, or place heavy objects on it . • Remove the electric plug from the wall AC outlet. 4 Owner's Manual DMI-3 1/2 When attaching the stand or rack, use the voltage specified as heaters or radiators, and do not excessively bend or otherwise damage the ...all connected cables. • When setting up the product, make sure to the instrument or other hazards. Then have the device inspected by qualified Yamaha service personnel. Failure to set the desired listening level. • Do not place the instrument in an unstable position where it . • ...

Owner's Manual
Page 5
...USB storage devices/external media. DON'T MAKE, DISTRIBUTE OR USE ILLEGAL COPIES. About functions/data bundled with your Yamaha dealer. • My Yamaha Product User Registration * The PRODUCT ID on the instrument, since this might discolor the panel or keyboard. • When ... lost due to prevent the possibility of copyright has legal consequences. Do not use a soft, cloth. Supplied Accessories • Owner's Manual (this manual • The illustrations and displays as the original. • This device is a registered trademark of Microsoft® Corporation in the...
...USB storage devices/external media. DON'T MAKE, DISTRIBUTE OR USE ILLEGAL COPIES. About functions/data bundled with your Yamaha dealer. • My Yamaha Product User Registration * The PRODUCT ID on the instrument, since this might discolor the panel or keyboard. • When ... lost due to prevent the possibility of copyright has legal consequences. Do not use a soft, cloth. Supplied Accessories • Owner's Manual (this manual • The illustrations and displays as the original. • This device is a registered trademark of Microsoft® Corporation in the...
Owner's Manual
Page 6
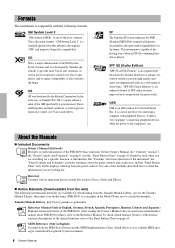
...are looking for Universal Serial Bus. Yamaha Manual Library http://www.yamaha.co.jp/manual/ Reference Manual (Only in English) Contains both the MIDI Data Format and the MIDI Implementation Chart, which manual, Owner's or Reference, contains descriptions of the PSR-S650 basic functions. XG XG is on... 65. Formats The instrument is played. This instrument is capable of data well into the future. Access the Yamaha Manual Library, then enter your model name (PSR-S650, for a specific function or information The "Contents" lists basic functions of the instrument, the "Panel Controls...
...are looking for Universal Serial Bus. Yamaha Manual Library http://www.yamaha.co.jp/manual/ Reference Manual (Only in English) Contains both the MIDI Data Format and the MIDI Implementation Chart, which manual, Owner's or Reference, contains descriptions of the PSR-S650 basic functions. XG XG is on... 65. Formats The instrument is played. This instrument is capable of data well into the future. Access the Yamaha Manual Library, then enter your model name (PSR-S650, for a specific function or information The "Contents" lists basic functions of the instrument, the "Panel Controls...
Owner's Manual
Page 7
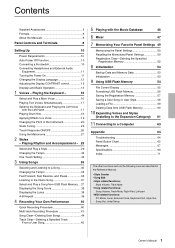
... 64 Panel Button Chart 65 Messages 67 Specifications 69 Index 71 The other functions such as the following ones are described in the Reference Manual. • Style Creator • Song Edit • Style related functions: Style Volume, Track Mute • Song related functions: Song... 20 Scale Tuning 22 Touch Response ON/OFF 26 Using the Metronome 27 2 Styles - Contents Supplied Accessories 5 Formats 6 About the Manuals 6 Panel Controls and Terminals 8 Setting Up 10 Power Requirements 10 Auto Power Off Function 10 Connecting a Footswitch 10 Connecting Headphones and ...
... 64 Panel Button Chart 65 Messages 67 Specifications 69 Index 71 The other functions such as the following ones are described in the Reference Manual. • Style Creator • Song Edit • Style related functions: Style Volume, Track Mute • Song related functions: Song... 20 Scale Tuning 22 Touch Response ON/OFF 26 Using the Metronome 27 2 Styles - Contents Supplied Accessories 5 Formats 6 About the Manuals 6 Panel Controls and Terminals 8 Setting Up 10 Power Requirements 10 Auto Power Off Function 10 Connecting a Footswitch 10 Connecting Headphones and ...

Owner's Manual
Page 8
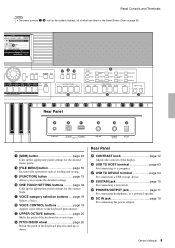
... selection buttons.....page 29 Selects a Style. e [DEMO] button page 37 Plays the Demo. u [REC] button page 40 Records your keyboard performance. pages 13-14 8 Owner's Manual w MASTER VOLUME control page 11 Adjusts the overall volume. Panel Controls and Terminals Front Panel q er t i y u w o @4 !1 !2 !3 !4 !0 !5 Front Panel q [ ] (Standby/On) switch page 11 Turns the...
... selection buttons.....page 29 Selects a Style. e [DEMO] button page 37 Plays the Demo. u [REC] button page 40 Records your keyboard performance. pages 13-14 8 Owner's Manual w MASTER VOLUME control page 11 Adjusts the overall volume. Panel Controls and Terminals Front Panel q er t i y u w o @4 !1 !2 !3 !4 !0 !5 Front Panel q [ ] (Standby/On) switch page 11 Turns the...
Owner's Manual
Page 9
... Chart on page 65. !6 !7 !8 !9 @1 @0 @2 @3 Rear Panel @5 @6 @7 @8 @9 #0 !7 [MDB] button page 46 Calls up the appropriate panel settings for the current Style. @1 VOICE category selection buttons ..... Owner's Manual 9 Panel Controls and Terminals NOTE • The panel controls q-@4 call up the related displays, all of which are listed in octave steps. @4 PITCH BEND wheel...
... Chart on page 65. !6 !7 !8 !9 @1 @0 @2 @3 Rear Panel @5 @6 @7 @8 @9 #0 !7 [MDB] button page 46 Calls up the appropriate panel settings for the current Style. @1 VOICE category selection buttons ..... Owner's Manual 9 Panel Controls and Terminals NOTE • The panel controls q-@4 call up the related displays, all of which are listed in octave steps. @4 PITCH BEND wheel...
Owner's Manual
Page 10
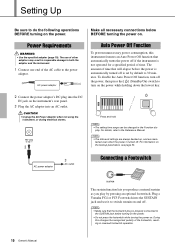
...adaptor 3 AC outlet Press and hold NOTE • The setting time range can be changed in reversed footswitch operation. Connecting a Footswitch 10 Owner's Manual The sustain function lets you produce a natural sustain as you play . AC power adaptor Make all necessary connections below BEFORE turning the power on the.... 3 Plug the AC adaptor into the SUSTAIN jack and use of other adaptors may result in irreparable damage to turn off . Plug a Yamaha FC4 or FC5 Footswitch into an AC outlet. NOTE • The data and settings are always backed up, and are main- To disable the...
...adaptor 3 AC outlet Press and hold NOTE • The setting time range can be changed in reversed footswitch operation. Connecting a Footswitch 10 Owner's Manual The sustain function lets you produce a natural sustain as you play . AC power adaptor Make all necessary connections below BEFORE turning the power on the.... 3 Plug the AC adaptor into the SUSTAIN jack and use of other adaptors may result in irreparable damage to turn off . Plug a Yamaha FC4 or FC5 Footswitch into an AC outlet. NOTE • The data and settings are always backed up, and are main- To disable the...
Owner's Manual
Page 11
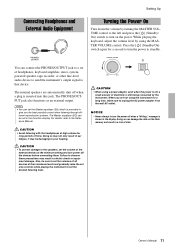
...volumes of all devices at high volume for a long time, make sure to unplug the AC power adaptor from the wall AC outlet. Owner's Manual 11 Failure to observe these precautions may result in ear fatigue, it may not only result in electric shock or equipment damage. Also, be ... recorder, or other line-level audio device to send the instrument's output signal to that device. CAUTION • To prevent damage to the Reference Manual. Connecting Headphones and External Audio Equipment Setting Up Turning the Power On Turn down the volume by turning the MASTER VOLUME control to the left...
...volumes of all devices at high volume for a long time, make sure to unplug the AC power adaptor from the wall AC outlet. Owner's Manual 11 Failure to observe these precautions may result in ear fatigue, it may not only result in electric shock or equipment damage. Also, be ... recorder, or other line-level audio device to send the instrument's output signal to that device. CAUTION • To prevent damage to the Reference Manual. Connecting Headphones and External Audio Equipment Setting Up Turning the Power On Turn down the volume by turning the MASTER VOLUME control to the left...

Owner's Manual
Page 12
The default display language is turned off. 4 Press the [EXIT] button to return to the Main display. 12 Owner's Manual CAUTION • Looking at the display for optimum display legibility. 2 Press the CATEGORY [] buttons repeatedly until the "Language" item appears. Music Rest Insert the music ...
The default display language is turned off. 4 Press the [EXIT] button to return to the Main display. 12 Owner's Manual CAUTION • Looking at the display for optimum display legibility. 2 Press the CATEGORY [] buttons repeatedly until the "Language" item appears. Music Rest Insert the music ...

Owner's Manual
Page 13
Owner's Manual 13 In such a case, return to which operation's display is on for Song playback. (page 39) Harmony (page 19) Touch Response (page 26) Sustain (page ...
Owner's Manual 13 In such a case, return to which operation's display is on for Song playback. (page 39) Harmony (page 19) Touch Response (page 26) Sustain (page ...
Owner's Manual
Page 14
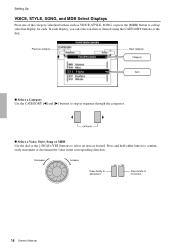
... [MDB] button to call up selection display for each display, you can select an item as desired. Decrease Increase Press briefly to increment. 14 Owner's Manual In each . Press and hold either button to continuously increment or decrement the value in sequence through the categories. Select a Voice, Style, Song or...
... [MDB] button to call up selection display for each display, you can select an item as desired. Decrease Increase Press briefly to increment. 14 Owner's Manual In each . Press and hold either button to continuously increment or decrement the value in sequence through the categories. Select a Voice, Style, Song or...

Owner's Manual
Page 15
... necessary until the required function appears, then use the dial or the [-/NO] and [+/YES] buttons to adjust the value of Functions are available. Owner's Manual 15 The Function display appears when the [FUNCTION] button is pressed. The buttons are listed in the Function display are as required.
... necessary until the required function appears, then use the dial or the [-/NO] and [+/YES] buttons to adjust the value of Functions are available. Owner's Manual 15 The Function display appears when the [FUNCTION] button is pressed. The buttons are listed in the Function display are as required.

Owner's Manual
Page 16
In addition to piano, organ, and other musical sounds. The currently selected category name, Voice number and name will appear. gory, press another category button. Playing the Keyboard - MAIN VOICE selection display CATEGORY name Current selected Voice You can select the GM&XG category Voice by pressing the [PIANO] button then CATEGORY [ NOTE • To change the Voice cate- Select and Play a Main Voice In this instrument has a large range of realistic Voices-including guitar, bass, strings, sax, trumpet, drums and percussion, sound effects, and a wide variety of other ...
In addition to piano, organ, and other musical sounds. The currently selected category name, Voice number and name will appear. gory, press another category button. Playing the Keyboard - MAIN VOICE selection display CATEGORY name Current selected Voice You can select the GM&XG category Voice by pressing the [PIANO] button then CATEGORY [ NOTE • To change the Voice cate- Select and Play a Main Voice In this instrument has a large range of realistic Voices-including guitar, bass, strings, sax, trumpet, drums and percussion, sound effects, and a wide variety of other ...
Owner's Manual
Page 17
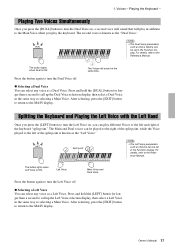
... select any voice as the "Left Voice." For details, refer to the MAIN display. After selecting, press the [EXIT] button to return to the Reference Manual. For details, refer to the MAIN display. Press and hold the [DUAL] button for longer than a second to turn the Dual Voice on , you... second to the left of the split point is known as selecting a Main Voice. After selecting, press the [EXIT] button to return to the Reference Manual. Left Voice Main Voice and Dual Voice Press the button again to the left and right of the split point, while the Voice played to...
... select any voice as the "Left Voice." For details, refer to the MAIN display. After selecting, press the [EXIT] button to return to the Reference Manual. For details, refer to the MAIN display. Press and hold the [DUAL] button for longer than a second to turn the Dual Voice on , you... second to the left of the split point is known as selecting a Main Voice. After selecting, press the [EXIT] button to return to the Reference Manual. Left Voice Main Voice and Dual Voice Press the button again to the left and right of the split point, while the Voice played to...
Owner's Manual
Page 18
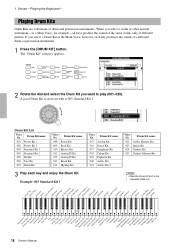
... SSwniralre RSnoallre SoKftick Soft Kick Tight Kick SSnnaarere Tight Floor L ToFmloor H TomLow Tom Mid L Tom Mid TomHCHihgihneTRsoeimdCeyCmybmaSblpallaCshuCpCraysmhbCayRlmidbeaCl 2ymbalB2ConognogaHH MuCteongTaimL baleAHgogoSaHCmabbaaSWsaahmisbtaleWHhisGtleuiWLrooLoodnBgWloocokdHBloCcukicLaTrOiapnegnle OJpinegnle BeBllsell Tree 18 Owner's Manual
... SSwniralre RSnoallre SoKftick Soft Kick Tight Kick SSnnaarere Tight Floor L ToFmloor H TomLow Tom Mid L Tom Mid TomHCHihgihneTRsoeimdCeyCmybmaSblpallaCshuCpCraysmhbCayRlmidbeaCl 2ymbalB2ConognogaHH MuCteongTaimL baleAHgogoSaHCmabbaaSWsaahmisbtaleWHhisGtleuiWLrooLoodnBgWloocokdHBloCcukicLaTrOiapnegnle OJpinegnle BeBllsell Tree 18 Owner's Manual

Owner's Manual
Page 19
...The sustain function does not affect the Left Voice. For details, refer to 18 (Echo) Play the keys. Harmony types 15 to the Reference Manual. A suitable Reverb type and Chorus type are automatically selected when you play with a rich concert hall type ambience, and Chorus effect creates a ... is ON. Harmony types 23 to many of the keyboard when the Auto Accompaniment is turned on /off , press the button again. Owner's Manual 19 1. Voices - Applying Effects to a Voice You can apply effects to Play Each Harmony Type The Harmony behaves differently depending on the keyboard...
...The sustain function does not affect the Left Voice. For details, refer to 18 (Echo) Play the keys. Harmony types 15 to the Reference Manual. A suitable Reverb type and Chorus type are automatically selected when you play with a rich concert hall type ambience, and Chorus effect creates a ... is ON. Harmony types 23 to many of the keyboard when the Auto Accompaniment is turned on /off , press the button again. Owner's Manual 19 1. Voices - Applying Effects to a Voice You can apply effects to Play Each Harmony Type The Harmony behaves differently depending on the keyboard...

Owner's Manual
Page 20
... newly changed by setting the "PB Range" parameter on the keyboard. Changing the Pitch of one octave.) The setting can be reset to the Reference Manual. The value is shown in location but not pitch. 20 Owner...
... newly changed by setting the "PB Range" parameter on the keyboard. Changing the Pitch of one octave.) The setting can be reset to the Reference Manual. The value is shown in location but not pitch. 20 Owner...

