
Owner's Manual
Page 3
...may not cause harmful interference, and 2) this device must accept any right to products distributed by YAMAHA CORPORATION OF AMERICA. (FCC DoC) IMPORTANT Please record the serial number of this product does not convey a license nor imply any interference received including ... INFORMATION STATEMENT (DECLARATION OF CONFORMITY PROCEDURE) Responsible Party : Yamaha Corporation of America Address : 6600 Orangethorpe Ave., Buena Park, Calif. 90620 Telephone : 714-522-9011 Type of Equipment : RECORDER Model Name : POCKETRAK PR7 This device complies with this product in the space below....
...may not cause harmful interference, and 2) this device must accept any right to products distributed by YAMAHA CORPORATION OF AMERICA. (FCC DoC) IMPORTANT Please record the serial number of this product does not convey a license nor imply any interference received including ... INFORMATION STATEMENT (DECLARATION OF CONFORMITY PROCEDURE) Responsible Party : Yamaha Corporation of America Address : 6600 Orangethorpe Ave., Buena Park, Calif. 90620 Telephone : 714-522-9011 Type of Equipment : RECORDER Model Name : POCKETRAK PR7 This device complies with this product in the space below....

Owner's Manual
Page 6
... insert the microSD card in the wrong orientation or upside down, the microSD card and/or the card slot may be damaged. • If the recorder does not recognize the installed microSD card when the power to the unit is turned on, first turn off the power, remove the card, insert...
... insert the microSD card in the wrong orientation or upside down, the microSD card and/or the card slot may be damaged. • If the recorder does not recognize the installed microSD card when the power to the unit is turned on, first turn off the power, remove the card, insert...
Owner's Manual
Page 7
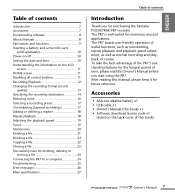
...-friendly operation of useful functions, such as overdubbing, repeat playback and playback speed adjustment, as well as normal recording and playback, of time, please read this Owner's Manual before you for purchasing the Yamaha POCKETRAK PR7 recorder. Accessories • AAA-size alkaline battery x1 • USB cable x1 • Owner's Manual (this book) x1...
...-friendly operation of useful functions, such as overdubbing, repeat playback and playback speed adjustment, as well as normal recording and playback, of time, please read this Owner's Manual before you for purchasing the Yamaha POCKETRAK PR7 recorder. Accessories • AAA-size alkaline battery x1 • USB cable x1 • Owner's Manual (this book) x1...
Owner's Manual
Page 8
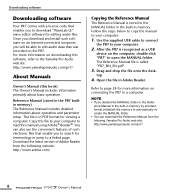
...Copying the Reference Manual The Reference Manual is recognized as a USB device on downloading this software, refer to the Yamaha Pro Audio website: http://www.yamahaproaudio.com/pr7/ About Manuals Owner's Manual (this manual using Adobe® Reader®. NOTE • If you to ... the supplied USB cable to connect the PR7 to your computer: 1. top. 4. Downloading software Downloading software Your PR7 comes with a license code that was recorded on connecting the PR7 to a computer. ence Manual in the built-in the PR7 builtin memory) The Reference Manual includes detailed...
...Copying the Reference Manual The Reference Manual is recognized as a USB device on downloading this software, refer to the Yamaha Pro Audio website: http://www.yamahaproaudio.com/pr7/ About Manuals Owner's Manual (this manual using Adobe® Reader®. NOTE • If you to ... the supplied USB cable to connect the PR7 to your computer: 1. top. 4. Downloading software Downloading software Your PR7 comes with a license code that was recorded on connecting the PR7 to a computer. ence Manual in the built-in the PR7 builtin memory) The Reference Manual includes detailed...

Owner's Manual
Page 9
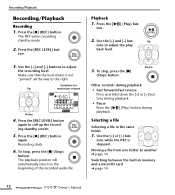
... 1 Built-in microphones 2 REC LED 3 LCD screen 4 [OVERDUB] button 5 [MARK] button 6 [MENU] button (Press and hold down this button to display the Folder screen.) 7 [●] (Record) button 8 [■] (Stop) button (Power on/Power off by pressing and holding down this button) 9 [REC LEVEL] button 0 [+]/[-] buttons A [] buttons B [ ] (Play) button C [REC SET] button...
... 1 Built-in microphones 2 REC LED 3 LCD screen 4 [OVERDUB] button 5 [MARK] button 6 [MENU] button (Press and hold down this button to display the Folder screen.) 7 [●] (Record) button 8 [■] (Stop) button (Power on/Power off by pressing and holding down this button) 9 [REC LEVEL] button 0 [+]/[-] buttons A [] buttons B [ ] (Play) button C [REC SET] button...

Owner's Manual
Page 11
...the unit is stopped, it will display the date and time. Hold "on" NOTE • You can use the [HOLD] switch even during recording or playback. • If you turn on the LCD screen HOME screen You can also set the calendar using the [■] (Stop) button.... Please refer to the "Other Functions" section in the file Option 3 kbps Option 4 File recording start time REMAIN Recording format Duration of four possible HOME screens using the system setting menu. Hold "off" Owner's Manual 11 Option 1 Option 2 Folder/File number...
...the unit is stopped, it will display the date and time. Hold "on" NOTE • You can use the [HOLD] switch even during recording or playback. • If you turn on the LCD screen HOME screen You can also set the calendar using the [■] (Stop) button.... Please refer to the "Other Functions" section in the file Option 3 kbps Option 4 File recording start time REMAIN Recording format Duration of four possible HOME screens using the system setting menu. Hold "off" Owner's Manual 11 Option 1 Option 2 Folder/File number...
Owner's Manual
Page 12
...playback. ] (Play) button during Selecting a file Selecting a file in memory and a microSD card ➔ page 14 12 Owner's Manual The PR7 enters recording standby mode. 2. Press the [REC LEVEL] but - 2. Press the [REC LEVEL] button again to another ➔ page 14 Switching between the... built-in the same folder 1. Recording starts. 6. To stop , press the [■] (Stop) button. ton. 3. tons while the PR7 is not "pinned" all the way to the beginning of the recorded audio file. Playback 1. Press the [ ton. ] (Play) ...
...playback. ] (Play) button during Selecting a file Selecting a file in memory and a microSD card ➔ page 14 12 Owner's Manual The PR7 enters recording standby mode. 2. Press the [REC LEVEL] but - 2. Press the [REC LEVEL] button again to another ➔ page 14 Switching between the... built-in the same folder 1. Recording starts. 6. To stop , press the [■] (Stop) button. ton. 3. tons while the PR7 is not "pinned" all the way to the beginning of the recorded audio file. Playback 1. Press the [ ton. ] (Play) ...
Owner's Manual
Page 13
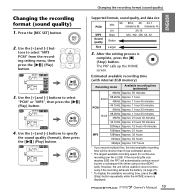
... using a microSDHC card). Use the [+] and [-] buttons to select "MP3 PCM" from the recording setting menu, then press the [ ] (Play) button. 3. The PR7 calls up the HOME screen. Owner's Manual 13 Changing the recording format (sound quality) 1. Changing the recording format (sound quality) Supported formats, sound quality, and data size PCM MP3 Sound quality...
... using a microSDHC card). Use the [+] and [-] buttons to select "MP3 PCM" from the recording setting menu, then press the [ ] (Play) button. 3. The PR7 calls up the HOME screen. Owner's Manual 13 Changing the recording format (sound quality) 1. Changing the recording format (sound quality) Supported formats, sound quality, and data size PCM MP3 Sound quality...

Owner's Manual
Page 14
...in memory and a microSD card 1. After the setting process is confirmed, the PR7 automatically calls up the HOME screen. 3. Selecting the recording destination folder 1. Use the [+] and [-] buttons to select "SD" from the recording setting menu, then press the [ ] (Play) button. Press the [REC... SET] button. 2. Use the [+] and [-] but - Use the [+] and [-] but - The PR7 calls up the HOME screen. 14 Owner's Manual Specifying the recording destination Specifying the recording destination Switching between the built-in memory) or "Sd" (microSD card), then press the [ ] (Play) ...
...in memory and a microSD card 1. After the setting process is confirmed, the PR7 automatically calls up the HOME screen. 3. Selecting the recording destination folder 1. Use the [+] and [-] buttons to select "SD" from the recording setting menu, then press the [ ] (Play) button. Press the [REC... SET] button. 2. Use the [+] and [-] but - Use the [+] and [-] but - The PR7 calls up the HOME screen. 14 Owner's Manual Specifying the recording destination Specifying the recording destination Switching between the built-in memory) or "Sd" (microSD card), then press the [ ] (Play) ...
Owner's Manual
Page 15
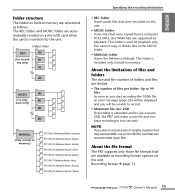
...only. You cannot copy or divide files in memory. About the file format The PR7 supports only those file formats that were copied from a computer. Folder structure The folders in built-in memory are structured as you start recording the 100th file, an error message (page 26) will be displayed and you... used for playback. NOTE If you will create a new file and continue recording in two seconds. This folder is extended and its size exceeds 2GB, the PR7 will be unable to record audio of files per folder: Up to 99 files As soon as follows: The REC folder and MUSIC folder are ...
...only. You cannot copy or divide files in memory. About the file format The PR7 supports only those file formats that were copied from a computer. Folder structure The folders in built-in memory are structured as you start recording the 100th file, an error message (page 26) will be displayed and you... used for playback. NOTE If you will create a new file and continue recording in two seconds. This folder is extended and its size exceeds 2GB, the PR7 will be unable to record audio of files per folder: Up to 99 files As soon as follows: The REC folder and MUSIC folder are ...

Owner's Manual
Page 16
... menu, then press the [ ] (Play) button. tons to select "HPF" from the recording setting menu, then press the [ ] (Play) button. 3. Press the [REC SET] button. 2. Use the [+] and [-] but - Use the [+] and [-] buttons to select "LIM" (Limiter), "ALC ...HI" (for soft sounds), or "ALC LO" (for loud sounds), then press the [ ] (Play) button. 4. The PR7 calls up the HOME screen. 16 Owner's Manual The PR7 calls up the HOME screen. 4. Press the [REC SET] button. 2. After the setting process is complete, press the [■] (Stop) button...
... menu, then press the [ ] (Play) button. tons to select "HPF" from the recording setting menu, then press the [ ] (Play) button. 3. Press the [REC SET] button. 2. Use the [+] and [-] but - Use the [+] and [-] buttons to select "LIM" (Limiter), "ALC ...HI" (for soft sounds), or "ALC LO" (for loud sounds), then press the [ ] (Play) button. 4. The PR7 calls up the HOME screen. 16 Owner's Manual The PR7 calls up the HOME screen. 4. Press the [REC SET] button. 2. After the setting process is complete, press the [■] (Stop) button...
Owner's Manual
Page 17
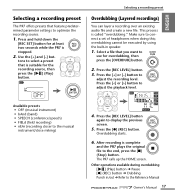
... be executed by using the built-in /out ➔ Refer to optimize the recording source. 1. Press the [+] or [-] button to adjust the playback level. After recording is complete and the PR7 plays the original file to the musical instrument/close miking) 4. Available presets •...display the previous screen. 5. Press the [REC LEVEL] button again to connect a set of headphones when doing this; Selecting a recording preset The PR7 offers presets that is suitable for overdubbing, then press the [OVERDUB] button. 2. tons to select a preset that feature predetermined parameter...
... be executed by using the built-in /out ➔ Refer to optimize the recording source. 1. Press the [+] or [-] button to adjust the playback level. After recording is complete and the PR7 plays the original file to the musical instrument/close miking) 4. Available presets •...display the previous screen. 5. Press the [REC LEVEL] button again to connect a set of headphones when doing this; Selecting a recording preset The PR7 offers presets that is suitable for overdubbing, then press the [OVERDUB] button. 2. tons to select a preset that feature predetermined parameter...
Owner's Manual
Page 18
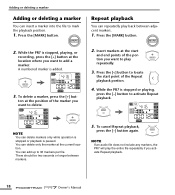
.... 1. Adding or deleting a marker Adding or deleting a marker You can repeatedly play repeatedly. 3. Press the [MARK] button. 2. Press the [ A numbered marker is stopped, playing, or recording, press the [+] button at the start and end points of the marker you want to add a marker. Insert markers at the location where you want...
.... 1. Adding or deleting a marker Adding or deleting a marker You can repeatedly play repeatedly. 3. Press the [MARK] button. 2. Press the [ A numbered marker is stopped, playing, or recording, press the [+] button at the start and end points of the marker you want to add a marker. Insert markers at the location where you want...

Owner's Manual
Page 19
...the [MENU] button during playback enables you to change only the playback speed. • PCM: With files recorded at sampling rates of 50% to tune your musical instrument. 1. Press the [MENU] button. 2. The PR7 calls up the HOME screen. Use the [+] and [-] but - Use the [+] and [-] but -... After tuning is complete, press the [■] (Stop) button. The PR7 calls up the HOME screen. After the setting process is complete, press the [■] (Stop) button. tons to specify the standard pitch (A=), then press ...
...the [MENU] button during playback enables you to change only the playback speed. • PCM: With files recorded at sampling rates of 50% to tune your musical instrument. 1. Press the [MENU] button. 2. The PR7 calls up the HOME screen. Use the [+] and [-] but - Use the [+] and [-] but -... After tuning is complete, press the [■] (Stop) button. The PR7 calls up the HOME screen. After the setting process is complete, press the [■] (Stop) button. tons to specify the standard pitch (A=), then press ...
Owner's Manual
Page 25
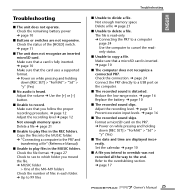
...> "y" (Yes) ■ No audio is read-only. ➔ Connecting the PR7 to a computer page 24 Use the computer to cancel the readonly status. ■ Unable to play files in the MUSIC folders. Adjust the recording level. ➔ page 12 Prevent excessive input levels. ➔ page 16 ■... format. ➔ Power on the computer. ■ The recorded sound is inserted. ➔ page 10 ■ The computer does not recognize a connected PR7. Copy the files into the MUSIC folder. ➔ "Connecting a computer to the PR7 and transferring a file" (Reference Manual) ■ Unable to...
...> "y" (Yes) ■ No audio is read-only. ➔ Connecting the PR7 to a computer page 24 Use the computer to cancel the readonly status. ■ Unable to play files in the MUSIC folders. Adjust the recording level. ➔ page 12 Prevent excessive input levels. ➔ page 16 ■... format. ➔ Power on the computer. ■ The recorded sound is inserted. ➔ page 10 ■ The computer does not recognize a connected PR7. Copy the files into the MUSIC folder. ➔ "Connecting a computer to the PR7 and transferring a file" (Reference Manual) ■ Unable to...
Owner's Manual
Page 26
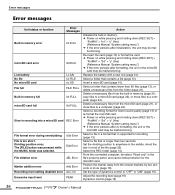
...be malfunctioning. Select the REC folder (page 14). Position the marker away from the microSD card (page 21), or move files to anywhere in recording into a microSD card REC Error File format error during overdubbing File is supported for the microSD card. Replace the battery with a new one (...FULL Int FULL Sd FULL Slow in the middle. dUb Error Edit Error File deletion error dEL Error Marker addition error Add Error Recording level setting disabled error ALC On Excessive input level PEAK Action Initialize the built-in the file's property panel, and cancel write-protection ...
...be malfunctioning. Select the REC folder (page 14). Position the marker away from the microSD card (page 21), or move files to anywhere in recording into a microSD card REC Error File format error during overdubbing File is supported for the microSD card. Replace the battery with a new one (...FULL Int FULL Sd FULL Slow in the middle. dUb Error Edit Error File deletion error dEL Error Marker addition error Add Error Recording level setting disabled error ALC On Excessive input level PEAK Action Initialize the built-in the file's property panel, and cancel write-protection ...
Owner's Manual
Page 27
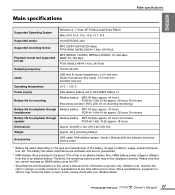
Please note that you cannot recharge an NiMH battery using the PR7. * Specifications and descriptions in every locale, please check with the ... Vista, XP Professional/Home Edition Mac OS X 10.4, 10.5, 10.6, 10.7, 10.8 Supported media microSD/SDHC card Supported recording format MP3 (32/64/128/192/320 kbps) PCM (WAV) (96/88.2/48/44.1 kHz, 24/16-bit)...kHz 16-bit approx. 22 hours 30 minutes Battery life for information purposes only. Owner's Manual (with your Yamaha dealer. stereo headphones 3.5 mm mini; Also, NiMH battery power voltage is estimated to change or modify products...
Please note that you cannot recharge an NiMH battery using the PR7. * Specifications and descriptions in every locale, please check with the ... Vista, XP Professional/Home Edition Mac OS X 10.4, 10.5, 10.6, 10.7, 10.8 Supported media microSD/SDHC card Supported recording format MP3 (32/64/128/192/320 kbps) PCM (WAV) (96/88.2/48/44.1 kHz, 24/16-bit)...kHz 16-bit approx. 22 hours 30 minutes Battery life for information purposes only. Owner's Manual (with your Yamaha dealer. stereo headphones 3.5 mm mini; Also, NiMH battery power voltage is estimated to change or modify products...
Reference Manual
Page 1
The application will search for terminology, use a terminology search function and a link function. RECORDER Reference Manual Using the Reference Manual The PPOCKETRAK PR7 Reference Manual (this book) enables you to use the search function built into the software application that displays this book. ...This feature is illustrated on the computer keyboard. Using the functional tree table The functional tree table for the PR7 is convenient if you are using Adobe Reader to display this diagram if you want to return to a page after you can ...
The application will search for terminology, use a terminology search function and a link function. RECORDER Reference Manual Using the Reference Manual The PPOCKETRAK PR7 Reference Manual (this book) enables you to use the search function built into the software application that displays this book. ...This feature is illustrated on the computer keyboard. Using the functional tree table The functional tree table for the PR7 is convenient if you are using Adobe Reader to display this diagram if you want to return to a page after you can ...
Reference Manual
Page 2
...Adding a marker 17 Jumping to a marked position 18 Deleting a marker 18 Repeat playback between the markers 18 Overdubbing (Layered Recordings 20 Overdubbing mode screen 20 Overdubbing 20 Contents Functions Useful for Musical Instrument Practice 24 Using the tuner 24 Using the metronome... Using the Reference Manual 1 Features 3 Function Tree Table 3 Controls and Functions 4 Understanding the Information on the LCD Screen 6 Preparing the PR7 7 Inserting a battery and a microSD card (sold separately 7 Turning the power on or off 37 Switching the tuner's pitch indication 38 ...
...Adding a marker 17 Jumping to a marked position 18 Deleting a marker 18 Repeat playback between the markers 18 Overdubbing (Layered Recordings 20 Overdubbing mode screen 20 Overdubbing 20 Contents Functions Useful for Musical Instrument Practice 24 Using the tuner 24 Using the metronome... Using the Reference Manual 1 Features 3 Function Tree Table 3 Controls and Functions 4 Understanding the Information on the LCD Screen 6 Preparing the PR7 7 Inserting a battery and a microSD card (sold separately 7 Turning the power on or off 37 Switching the tuner's pitch indication 38 ...
Reference Manual
Page 3
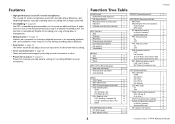
...support practicing musical instruments or choir. • Presets for musicians ➔ page 15 Presets for musicians provide optimal settings for recording different musical instruments. Features • High-performance crossed XY stereo microphones The crossed XY stereo microphones resolve left and right ...phase difference, and enable high-quality, naturally-sounding stereo recording with a deep sound field. • Overdubbing ➔ page 20 The PR7's overdubbing feature enables you to record an additional layer of an already-recorded sound.
...support practicing musical instruments or choir. • Presets for musicians ➔ page 15 Presets for musicians provide optimal settings for recording different musical instruments. Features • High-performance crossed XY stereo microphones The crossed XY stereo microphones resolve left and right ...phase difference, and enable high-quality, naturally-sounding stereo recording with a deep sound field. • Overdubbing ➔ page 20 The PR7's overdubbing feature enables you to record an additional layer of an already-recorded sound.


