
Owner's Manual
Page 8
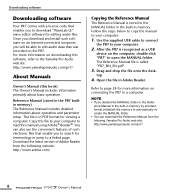
.... Once you download and install such software on connecting the PR7 to a linked page. top. 4. You can download the Reference Manual from the following Yamaha Pro Audio web site: http://www.yamahaproaudio.com/pr7/ 8 Owner's Manual Refer to page 24 for terminology or jump to a computer....in memory. Follow the steps below to copy the manual to the Yamaha Pro Audio website: http://www.yamahaproaudio.com/pr7/ About Manuals Owner's Manual (this manual using Adobe® Reader®. The Reference Manual file is stored in the MANUAL folder in the built-in Adobe Reader. For more...
.... Once you download and install such software on connecting the PR7 to a linked page. top. 4. You can download the Reference Manual from the following Yamaha Pro Audio web site: http://www.yamahaproaudio.com/pr7/ 8 Owner's Manual Refer to page 24 for terminology or jump to a computer....in memory. Follow the steps below to copy the manual to the Yamaha Pro Audio website: http://www.yamahaproaudio.com/pr7/ About Manuals Owner's Manual (this manual using Adobe® Reader®. The Reference Manual file is stored in the MANUAL folder in the built-in Adobe Reader. For more...

Owner's Manual
Page 11
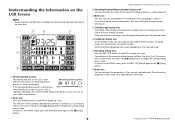
...the unit is stopped, it will display the date and time. Option 1 Option 2 Folder/File number Current position File date in the Reference Manual for more information. Hold "off" Owner's Manual 11 Hold "on the LCD screen 36 7 1 2 4 5 8 1 Remaining battery power 2 Menu items 3 Play/Record/Repeat ...File (sound quality) the entire file number Available recording time Disabling all control buttons Slide the [HOLD] switch upward. Please refer to the "Other Functions" section in the file Option 3 kbps Option 4 File recording start time REMAIN Recording format Duration of...
...the unit is stopped, it will display the date and time. Option 1 Option 2 Folder/File number Current position File date in the Reference Manual for more information. Hold "off" Owner's Manual 11 Hold "on the LCD screen 36 7 1 2 4 5 8 1 Remaining battery power 2 Menu items 3 Play/Record/Repeat ...File (sound quality) the entire file number Available recording time Disabling all control buttons Slide the [HOLD] switch upward. Please refer to the "Other Functions" section in the file Option 3 kbps Option 4 File recording start time REMAIN Recording format Duration of...
Owner's Manual
Page 15
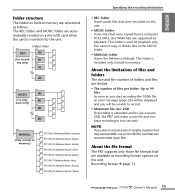
... (Reference Manual, English) PR7_RM_DE (Reference Manual, German) PR7_RM_FR (Reference Manual, French) PR7_RM_ES (Reference Manual, Spanish) PR7_RM_IT (Reference Manual, Italian) PR7_RM_RU (Reference Manual, Russian) PR7_RM_ZH (Reference Manual, Chinese) Specifying the recording destination • REC folder Stores audio files that were recorded on the unit. • MUSIC folder Stores files that can accommodate large files. This folder is extended and its size exceeds 2GB, the PR7 will...
... (Reference Manual, English) PR7_RM_DE (Reference Manual, German) PR7_RM_FR (Reference Manual, French) PR7_RM_ES (Reference Manual, Spanish) PR7_RM_IT (Reference Manual, Italian) PR7_RM_RU (Reference Manual, Russian) PR7_RM_ZH (Reference Manual, Chinese) Specifying the recording destination • REC folder Stores audio files that were recorded on the unit. • MUSIC folder Stores files that can accommodate large files. This folder is extended and its size exceeds 2GB, the PR7 will...
Owner's Manual
Page 17
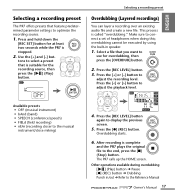
...; SPEECH (conference/speech) • FIELd (field recording) • nEAr (recording closer to the end, press the [■] (Stop) button. After recording is complete and the PR7 plays the original file to the musical instrument/close miking) 4. Other operations available during overdubbing [ ] (Play) button ➔ Pause [●] (REC) button ➔ Dubbing Punch... layer a recording over an existing audio file and create a new file. Press the [+] or [-] button to optimize the recording source. 1. Press the [] button to the Reference Manual Owner's Manual 17
...; SPEECH (conference/speech) • FIELd (field recording) • nEAr (recording closer to the end, press the [■] (Stop) button. After recording is complete and the PR7 plays the original file to the musical instrument/close miking) 4. Other operations available during overdubbing [ ] (Play) button ➔ Pause [●] (REC) button ➔ Dubbing Punch... layer a recording over an existing audio file and create a new file. Press the [+] or [-] button to optimize the recording source. 1. Press the [] button to the Reference Manual Owner's Manual 17
Owner's Manual
Page 25
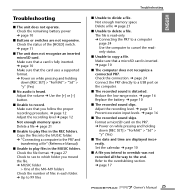
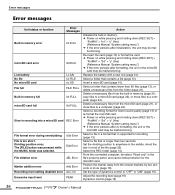
..."Sd" > "y" (Yes) ■ No audio is distorted. Copy the files into the MUSIC folder. ➔ "Connecting a computer to the PR7 and transferring a file" (Reference Manual) ■ Unable to play files in each folder. ➔ Up to 99 files Troubleshooting ■ Unable to a USB port on the computer....10132; page 24 Connect the PR7 directly to divide a file. Reduce the low-range noise. ➔ page 16 Replace the battery. ➔ page 10 ■ The recorded sound clips. Refer to the overdubbing section. ➔ page 17 Owner's Manual 25 Check the remaining battery ...
..."Sd" > "y" (Yes) ■ No audio is distorted. Copy the files into the MUSIC folder. ➔ "Connecting a computer to the PR7 and transferring a file" (Reference Manual) ■ Unable to play files in each folder. ➔ Up to 99 files Troubleshooting ■ Unable to a USB port on the computer....10132; page 24 Connect the PR7 directly to divide a file. Reduce the low-range noise. ➔ page 16 Replace the battery. ➔ page 10 ■ The recorded sound clips. Refer to the overdubbing section. ➔ page 17 Owner's Manual 25 Check the remaining battery ...
Owner's Manual
Page 26
...re-format the microSD card. ➔ Power on while pressing and holding down [REC SET] > "ForMAt" > "Int" > "y" (Yes) (Reference Manual "System setting menu.") ➔ If the error persists after re-formatting, the unit or the microSD card may be malfunctioning. Select a file in ...memory. ➔ Power on while pressing and holding down [REC SET] > "ForMAt" > "Sd" > "y" (Yes) (Reference Manual "System setting menu.") ➔ If the error persists after initialization, the unit may be malfunctioning. From the connected computer, de-select "Read only" ...
...re-format the microSD card. ➔ Power on while pressing and holding down [REC SET] > "ForMAt" > "Int" > "y" (Yes) (Reference Manual "System setting menu.") ➔ If the error persists after re-formatting, the unit or the microSD card may be malfunctioning. Select a file in ...memory. ➔ Power on while pressing and holding down [REC SET] > "ForMAt" > "Sd" > "y" (Yes) (Reference Manual "System setting menu.") ➔ If the error persists after initialization, the unit may be malfunctioning. From the connected computer, de-select "Read only" ...
Reference Manual
Page 1
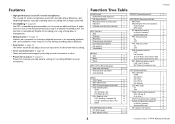
RECORDER Reference Manual Using the Reference Manual The PPOCKETRAK PR7 Reference Manual (this book) enables you to use the search function built into the software application that displays this book. If you are using Adobe Reader to a ... forth to display this diagram if you want to return to a page after you want to refer to a different page via the page link. Using the functional tree table The functional tree table for the PR7 is convenient if you jump to a description of the screen or the various functions of the...
RECORDER Reference Manual Using the Reference Manual The PPOCKETRAK PR7 Reference Manual (this book) enables you to use the search function built into the software application that displays this book. If you are using Adobe Reader to a ... forth to display this diagram if you want to return to a page after you want to refer to a different page via the page link. Using the functional tree table The functional tree table for the PR7 is convenient if you jump to a description of the screen or the various functions of the...
Reference Manual
Page 2
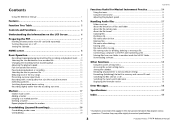
Contents Using the Reference Manual 1 Features 3 Function Tree Table 3 Controls and Functions 4 Understanding the Information on the LCD Screen 6 Preparing the PR7 7 Inserting a battery and a microSD card (sold separately 7 Turning the power on or off 37 Switching the tuner's ...moving 31 File naming rules for dividing, deleting or moving a file 32 Connecting a computer to the PR7 and transferring a file 32 Moving files from actual specifications. 2 Reference Manual Therefore, they may differ slightly from one folder to another inside the MUSIC folder 34 Downloading software ...
Contents Using the Reference Manual 1 Features 3 Function Tree Table 3 Controls and Functions 4 Understanding the Information on the LCD Screen 6 Preparing the PR7 7 Inserting a battery and a microSD card (sold separately 7 Turning the power on or off 37 Switching the tuner's ...moving 31 File naming rules for dividing, deleting or moving a file 32 Connecting a computer to the PR7 and transferring a file 32 Moving files from actual specifications. 2 Reference Manual Therefore, they may differ slightly from one folder to another inside the MUSIC folder 34 Downloading software ...
Reference Manual
Page 3
... 14 14 14 14 14 14 14 14 15 15 15 7 7 8 8 8 8 37 37 37 38 38 38 36 36 36 36 38 3 Reference Manual This function is tremendously helpful for recording your song writing ideas or arrangements. • Editing markers ➔ page 17 Markers are convenient for locating a playback... left and right phase difference, and enable high-quality, naturally-sounding stereo recording with a deep sound field. • Overdubbing ➔ page 20 The PR7's overdubbing feature enables you to record an additional layer of audio (such as you like during recording and/or playback. • Peak limiter ➔...
... 14 14 14 14 14 14 14 14 15 15 15 7 7 8 8 8 8 37 37 37 38 38 38 36 36 36 36 38 3 Reference Manual This function is tremendously helpful for recording your song writing ideas or arrangements. • Editing markers ➔ page 17 Markers are convenient for locating a playback... left and right phase difference, and enable high-quality, naturally-sounding stereo recording with a deep sound field. • Overdubbing ➔ page 20 The PR7's overdubbing feature enables you to record an additional layer of audio (such as you like during recording and/or playback. • Peak limiter ➔...

Reference Manual
Page 4
...mode screen is displayed. B About HOME screen ➔ page 8 5 [●] (Record) button Stands by, starts, or pauses recording. 6 [OVERDUB] button Places the PR7 into files (page 17). 9 [ ] (Play) button If the HOME screen is displayed, this button starts or pauses file playback, or starts recording. Controls and Functions... A 0 Folder name and file number ➔ Date and time ➔ Recording format for about three seconds to fast reverse and fast forward respectively. 4 Reference Manual While the LCD screen displays any setting screen is displayed, this button.
...mode screen is displayed. B About HOME screen ➔ page 8 5 [●] (Record) button Stands by, starts, or pauses recording. 6 [OVERDUB] button Places the PR7 into files (page 17). 9 [ ] (Play) button If the HOME screen is displayed, this button starts or pauses file playback, or starts recording. Controls and Functions... A 0 Folder name and file number ➔ Date and time ➔ Recording format for about three seconds to fast reverse and fast forward respectively. 4 Reference Manual While the LCD screen displays any setting screen is displayed, this button.

Reference Manual
Page 5
..., 1 such as a CD player or electronic musical instrument. While this socket to attach the PR7 to a recording on the PR7 to which you can connect your computer here to transfer audio files to and from the built...-in memory or the installed microSD card. 4 Handling audio files ➔ page 27 Connecting the PR7 to a computer ➔ page 32 Controls and Functions 1 Battery compartment Insert an AAA battery here. 2 microSD card ... automatically turned off. 2 3 [HOLD] switch Disables all control buttons on the spot. 4 1 1 2 3 2 5 Reference Manual
..., 1 such as a CD player or electronic musical instrument. While this socket to attach the PR7 to a recording on the PR7 to which you can connect your computer here to transfer audio files to and from the built...-in memory or the installed microSD card. 4 Handling audio files ➔ page 27 Connecting the PR7 to a computer ➔ page 32 Controls and Functions 1 Battery compartment Insert an AAA battery here. 2 microSD card ... automatically turned off. 2 3 [HOLD] switch Disables all control buttons on the spot. 4 1 1 2 3 2 5 Reference Manual
Reference Manual
Page 6
... area The HOME screen displays the playback/recording time or remaining time in the format of hours:minutes:seconds. Understanding the Information on the PR7 to the HOME screen, press the [MENU] button again or the [■] (Stop) button. Other information displayed here varies depending on...be limited. In Marker mode, this area will flash. Understanding the Information on the LCD Screen NOTE During operation, the PR7 does not display all of the following indicators and items at your earliest convenience. 2 Menu area Press the [MENU] button on the mode. 6 Reference Manual
... area The HOME screen displays the playback/recording time or remaining time in the format of hours:minutes:seconds. Understanding the Information on the PR7 to the HOME screen, press the [MENU] button again or the [■] (Stop) button. Other information displayed here varies depending on...be limited. In Marker mode, this area will flash. Understanding the Information on the LCD Screen NOTE During operation, the PR7 does not display all of the following indicators and items at your earliest convenience. 2 Menu area Press the [MENU] button on the mode. 6 Reference Manual
Reference Manual
Page 7
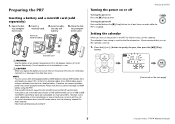
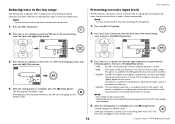
Insert a microSD card. 3. Insert an alka- CAUTION When you replace the battery, be sure to first turn on the next page) 7 Reference Manual If you turn the power off to specify the year, then press the [ ] (Play) button. (Continued on the power to the data may occur....4GB-32GB microSDHC card (these cards are compatible as of card) may not be about microSD cards, please visit the following Yamaha Pro Audio website: http://www.yamahaproaudio.com/pr7/ Preparing the PR7 Turning the power on or off Press and hold down the [■] (Stop) button for at an ambient temperature of...
Insert a microSD card. 3. Insert an alka- CAUTION When you replace the battery, be sure to first turn on the next page) 7 Reference Manual If you turn the power off to specify the year, then press the [ ] (Play) button. (Continued on the power to the data may occur....4GB-32GB microSDHC card (these cards are compatible as of card) may not be about microSD cards, please visit the following Yamaha Pro Audio website: http://www.yamahaproaudio.com/pr7/ Preparing the PR7 Turning the power on or off Press and hold down the [■] (Stop) button for at an ambient temperature of...

Reference Manual
Page 8
2. In the same way, specify the month, date, hour, and minute values. To return to the previous parameter, press the [
2. In the same way, specify the month, date, hour, and minute values. To return to the previous parameter, press the [
Reference Manual
Page 9
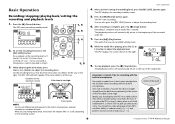
..., press the [+] or [-] button to adjust the recording level. 6. The REC LED will not pick up unnecessary noise. Press the [ ] (Play) button. The PR7 displays the screen shown on a stable surface that the level meter does not deflect all the way. The playback position will indicate "MIC" or "LInE...is too high: Flash rapidly NOTE You can also press the [REC LEVEL] button to adjust the recording level. One rule of the sound 9 Reference Manual The PR7 displays the recording standby screen. 5. Guideline for the built-in microphones. Press the [●] (Record) button.
..., press the [+] or [-] button to adjust the recording level. 6. The REC LED will not pick up unnecessary noise. Press the [ ] (Play) button. The PR7 displays the screen shown on a stable surface that the level meter does not deflect all the way. The playback position will indicate "MIC" or "LInE...is too high: Flash rapidly NOTE You can also press the [REC LEVEL] button to adjust the recording level. One rule of the sound 9 Reference Manual The PR7 displays the recording standby screen. 5. Guideline for the built-in microphones. Press the [●] (Record) button.

Reference Manual
Page 10
After the setting is the internal memory. Press the [REC SET] button. The PR7 displays the HOME screen. 2. NOTE If you plan to use a microSD card, you can select either the internal memory or microSD card (sold separately) as ... can select only the built-in memory. 4. Basic Operation 3. Preparing the PR7 ➔ page 7 Formatting (Initializing) a microSD card ➔ page 36 1. NOTE If a microSD card has not been installed in the record setting area, then press the [ ] (Play) button. 10 Reference Manual Press the [+] or [-] button to select the SD icon in the...
After the setting is the internal memory. Press the [REC SET] button. The PR7 displays the HOME screen. 2. NOTE If you plan to use a microSD card, you can select either the internal memory or microSD card (sold separately) as ... can select only the built-in memory. 4. Basic Operation 3. Preparing the PR7 ➔ page 7 Formatting (Initializing) a microSD card ➔ page 36 1. NOTE If a microSD card has not been installed in the record setting area, then press the [ ] (Play) button. 10 Reference Manual Press the [+] or [-] button to select the SD icon in the...
Reference Manual
Page 11
...which is the R0 folder in the built-in memory, so you to record audio into the available folder. 11 (Continued on the next page) Reference Manual Selecting a folder A location in memory provides folders R0 through R9. 3. Press and hold down 2. NOTE If you would prefer to find and ...PCM" or "MP3", then press the [ ] (Play) button. 4. Press the [REC SET] button. 2. Press the [+] or [-] button to the R0 folder. The PR7 displays the HOME screen. However, if you start recording while the MUSIC folder is called a "folder." The default setting is the same as the save...
...which is the R0 folder in the built-in memory, so you to record audio into the available folder. 11 (Continued on the next page) Reference Manual Selecting a folder A location in memory provides folders R0 through R9. 3. Press and hold down 2. NOTE If you would prefer to find and ...PCM" or "MP3", then press the [ ] (Play) button. 4. Press the [REC SET] button. 2. Press the [+] or [-] button to the R0 folder. The PR7 displays the HOME screen. However, if you start recording while the MUSIC folder is called a "folder." The default setting is the same as the save...

Reference Manual
Page 12
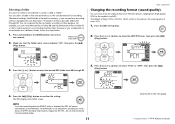
...PR7 displays the HOME screen. However, the unit will result in music production applications, projects use the recording before finally deciding on the Internet typically features lower resolution in one for a CD, you select a recording format, first consider which the sounds of a song idea with your application. 12 Reference Manual... data distributed on the recording format. We recommend that suits the purpose. If the recording file size reaches 2GB, the PR7 will use the format of 48kHz/24-bit. Battery life ➔ page 39 * To display the available recording time,...
...PR7 displays the HOME screen. However, the unit will result in music production applications, projects use the recording before finally deciding on the Internet typically features lower resolution in one for a CD, you select a recording format, first consider which the sounds of a song idea with your application. 12 Reference Manual... data distributed on the recording format. We recommend that suits the purpose. If the recording file size reaches 2GB, the PR7 will use the format of 48kHz/24-bit. Battery life ➔ page 39 * To display the available recording time,...

Reference Manual
Page 13
Adjusting the playback speed ➔ page 26 Fast forward and fast reverse While the PR7 is playing or while playback is useful if you practice fast phrases or listen to select the next file. Press the [ Adjusting the playback speed You can adjust the playback speed. This function is paused, press and hold down the [>] button to engage fast forward, or press and hold down the [] button to precisely how notes are playing.
Adjusting the playback speed ➔ page 26 Fast forward and fast reverse While the PR7 is playing or while playback is useful if you practice fast phrases or listen to select the next file. Press the [ Adjusting the playback speed You can adjust the playback speed. This function is paused, press and hold down the [>] button to engage fast forward, or press and hold down the [] button to precisely how notes are playing.
Reference Manual
Page 14
... for this filter is effective at reducing foot steps or other than "OFF," the DYN icon will appear on the HOME screen. 14 Reference Manual Press the [+] or [-] button to select "On" or "OFF" for recording performances of sound. This option is suitable for the high...then press the [ ] (Play) button. 4. Especially, this option. NOTE You can use this function only when recording with microphones. 1. The PR7 will record audio without using the dynamics control. • LIM .........The limiter will slightly lower higher volume levels of sound, and slightly raise lower ...
... for this filter is effective at reducing foot steps or other than "OFF," the DYN icon will appear on the HOME screen. 14 Reference Manual Press the [+] or [-] button to select "On" or "OFF" for recording performances of sound. This option is suitable for the high...then press the [ ] (Play) button. 4. Especially, this option. NOTE You can use this function only when recording with microphones. 1. The PR7 will record audio without using the dynamics control. • LIM .........The limiter will slightly lower higher volume levels of sound, and slightly raise lower ...


