
Owner's Manual
Page 2
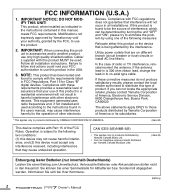
...Park, CA90620 The above statements apply ONLY to those products distributed by the FCC, to the following measures: Relocate either this manual, meets FCC requirements. CAN ICES-3(B)/NMB-3(B) • This applies only to accessories and/or another product use the product. ...2. Informieren Sie sich bei Ihrer Kommune. (battery) 2 Owner's Manual Modifications not expressly approved by YAMAHA CORPORATION OF AMERICA. (class B) This device complies with the requirements listed in all installation instructions. uct to products ...
...Park, CA90620 The above statements apply ONLY to those products distributed by the FCC, to the following measures: Relocate either this manual, meets FCC requirements. CAN ICES-3(B)/NMB-3(B) • This applies only to accessories and/or another product use the product. ...2. Informieren Sie sich bei Ihrer Kommune. (battery) 2 Owner's Manual Modifications not expressly approved by YAMAHA CORPORATION OF AMERICA. (class B) This device complies with the requirements listed in all installation instructions. uct to products ...
Owner's Manual
Page 3
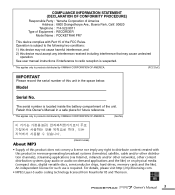
... to distribute content created with Part 15 of the FCC Rules. Operation is required. Owner's Manual 3 COMPLIANCE INFORMATION STATEMENT (DECLARATION OF CONFORMITY PROCEDURE) Responsible Party : Yamaha Corporation of America Address : 6600 Orangethorpe Ave., Buena Park, Calif. 90620 Telephone : 714-522...-9011 Type of Equipment : RECORDER Model Name : POCKETRAK PR7 This device complies with this product in revenue-...
... to distribute content created with Part 15 of the FCC Rules. Operation is required. Owner's Manual 3 COMPLIANCE INFORMATION STATEMENT (DECLARATION OF CONFORMITY PROCEDURE) Responsible Party : Yamaha Corporation of America Address : 6600 Orangethorpe Ave., Buena Park, Calif. 90620 Telephone : 714-522...-9011 Type of Equipment : RECORDER Model Name : POCKETRAK PR7 This device complies with this product in revenue-...

Owner's Manual
Page 4
... result in any abnormality • If this device should appear to rain, use immediately and have the device inspected by qualified Yamaha service personnel. Water warning • Do not expose the device to be dropped or damaged, immediately turn off the power and... have the device inspected by qualified Yamaha service personnel. (5)-6 1/3 4 Owner's Manual Then have it inspected by qualified Yamaha service personnel. Always follow the basic precautions listed below to prevent the likelihood of physical injury ...
... result in any abnormality • If this device should appear to rain, use immediately and have the device inspected by qualified Yamaha service personnel. Water warning • Do not expose the device to be dropped or damaged, immediately turn off the power and... have the device inspected by qualified Yamaha service personnel. (5)-6 1/3 4 Owner's Manual Then have it inspected by qualified Yamaha service personnel. Always follow the basic precautions listed below to prevent the likelihood of physical injury ...

Owner's Manual
Page 5
... while condensation is inserted in order to prevent the possibility of panel disfiguration, unstable operation, or damage to an external device such as a computer. (5)-6 2/3 Owner's Manual 5 If there is reason to believe that you continue operating the device, it to prevent possible leakage of flame, the battery electrolyte could cause battery...
... while condensation is inserted in order to prevent the possibility of panel disfiguration, unstable operation, or damage to an external device such as a computer. (5)-6 2/3 Owner's Manual 5 If there is reason to believe that you continue operating the device, it to prevent possible leakage of flame, the battery electrolyte could cause battery...

Owner's Manual
Page 6
...be mixed with general household waste. By disposing of Apple Inc., registered in this manual are trademarks. About this manual • The illustrations and LCD screens as shown in this manual are only valid in the vicinity of disposal. Note for the correct method of...products and used in combination with a chemical symbol. For proper treatment, recovery and recycling of their respective companies. (5)-6 3/3 6 Owner's Manual Information About copyrights • Copying of sale where you purchased the items. [For business users in the European Union] If you discard ...
...be mixed with general household waste. By disposing of Apple Inc., registered in this manual are trademarks. About this manual • The illustrations and LCD screens as shown in this manual are only valid in the vicinity of disposal. Note for the correct method of...products and used in combination with a chemical symbol. For proper treatment, recovery and recycling of their respective companies. (5)-6 3/3 6 Owner's Manual Information About copyrights • Copying of sale where you purchased the items. [For business users in the European Union] If you discard ...
Owner's Manual
Page 7
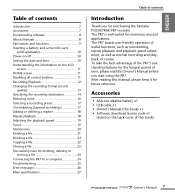
...and playback, of course. The PR7 is well-suited for numerous musical applications. To take the best advantage of the PR7's outstanding features for the longest period of time, please read this Owner's Manual before you for purchasing the Yamaha POCKETRAK PR7 recorder. Accessories • AAA-size... alkaline battery x1 • USB cable x1 • Owner's Manual (this book) x1 • ...
...and playback, of course. The PR7 is well-suited for numerous musical applications. To take the best advantage of the PR7's outstanding features for the longest period of time, please read this Owner's Manual before you for purchasing the Yamaha POCKETRAK PR7 recorder. Accessories • AAA-size... alkaline battery x1 • USB cable x1 • Owner's Manual (this book) x1 • ...
Owner's Manual
Page 8
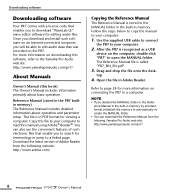
... page 24 for viewing a computer. The Reference Manual file is recognized as a USB device on connecting the PR7 to the Yamaha Pro Audio website: http://www.yamahaproaudio.com/pr7/ About Manuals Owner's Manual (this manual using Adobe® Reader®. Follow the steps below to copy the manual to automatically recreate the MANUAL folder. • You can also use...
... page 24 for viewing a computer. The Reference Manual file is recognized as a USB device on connecting the PR7 to the Yamaha Pro Audio website: http://www.yamahaproaudio.com/pr7/ About Manuals Owner's Manual (this manual using Adobe® Reader®. Follow the steps below to copy the manual to automatically recreate the MANUAL folder. • You can also use...

Owner's Manual
Page 9
... E MIC/LINE IN (external input) jack F [HOLD] switch G USB terminal 1 2 3 4 5 B A 6 0 H Battery compartment I microSD card slot J Threaded socket for tripod K Speaker Part names and functions D E 8 7 F 9 G C K H J I Owner's Manual 9
... E MIC/LINE IN (external input) jack F [HOLD] switch G USB terminal 1 2 3 4 5 B A 6 0 H Battery compartment I microSD card slot J Threaded socket for tripod K Speaker Part names and functions D E 8 7 F 9 G C K H J I Owner's Manual 9
Owner's Manual
Page 10
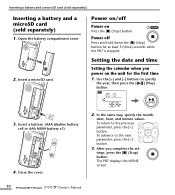
..., date, hour, and minute values. tings, press the [■] (Stop) button. Power off Power on the unit for at least 3 (three) seconds while the PR7 is stopped. To return to specify the year, then press the [ ] (Play) button. 3. After you power on Press the [■] (Stop) button. Power... (Stop) button for the first time 1. Open the battery compartment cover. 2. Use the [+] and [-] buttons to the previous parameter, press the [] button. 3. The PR7 displays the HOME screen. 10 Owner's Manual Setting the date and time Setting the calendar when you complete the set-
..., date, hour, and minute values. tings, press the [■] (Stop) button. Power off Power on the unit for at least 3 (three) seconds while the PR7 is stopped. To return to specify the year, then press the [ ] (Play) button. 3. After you power on Press the [■] (Stop) button. Power... (Stop) button for the first time 1. Open the battery compartment cover. 2. Use the [+] and [-] buttons to the previous parameter, press the [] button. 3. The PR7 displays the HOME screen. 10 Owner's Manual Setting the date and time Setting the calendar when you complete the set-

Owner's Manual
Page 11
... unit is stopped, it will display the date and time. Option 1 Option 2 Folder/File number Current position File date in the Reference Manual for more information. Understanding the information on " NOTE • You can also set the calendar using the [■] (Stop) button. Hold "off..." Owner's Manual 11 Please refer to the "Other Functions" section in the file Option 3 kbps Option 4 File recording start time REMAIN Recording format Duration of...
... unit is stopped, it will display the date and time. Option 1 Option 2 Folder/File number Current position File date in the Reference Manual for more information. Understanding the information on " NOTE • You can also set the calendar using the [■] (Stop) button. Hold "off..." Owner's Manual 11 Please refer to the "Other Functions" section in the file Option 3 kbps Option 4 File recording start time REMAIN Recording format Duration of...
Owner's Manual
Page 12
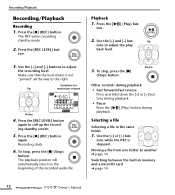
The PR7 enters recording standby mode. 2. ton. 3. Make sure that the level meter is stopped. Recording starts. 6. Press the [ ton. ] (Play) but - To stop , press the [■] (...) button during Selecting a file Selecting a file in memory and a microSD card ➔ page 14 12 Owner's Manual Press the [●] (REC) button again. Use the [] but - Recording/Playback Recording/Playback Recording 1. tons while the PR7 is not "pinned" all the way to adjust the play- Press the [●] (REC) button. Use the...
The PR7 enters recording standby mode. 2. ton. 3. Make sure that the level meter is stopped. Recording starts. 6. Press the [ ton. ] (Play) but - To stop , press the [■] (...) button during Selecting a file Selecting a file in memory and a microSD card ➔ page 14 12 Owner's Manual Press the [●] (REC) button again. Use the [] but - Recording/Playback Recording/Playback Recording 1. tons while the PR7 is not "pinned" all the way to adjust the play- Press the [●] (REC) button. Use the...
Owner's Manual
Page 13
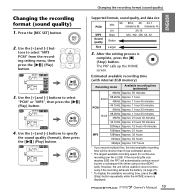
...button. 2. Use the [+] and [-] buttons to select "PCM" or "MP3", then press the [ ] (Play) button. 4. Owner's Manual 13 Changing the recording format (sound quality) Supported formats, sound quality, and data size PCM MP3 Sound quality kHz bit kbps 96, 88.2,...then press the [ ] (Play) button. However, the unit will automatically continue recording into a subsequent file (when using a microSDHC card). The PR7 calls up the HOME screen. Changing the recording format (sound quality) 1. tons to record continuously if the recording exhausts the battery (➔ page 27...
...button. 2. Use the [+] and [-] buttons to select "PCM" or "MP3", then press the [ ] (Play) button. 4. Owner's Manual 13 Changing the recording format (sound quality) Supported formats, sound quality, and data size PCM MP3 Sound quality kHz bit kbps 96, 88.2,...then press the [ ] (Play) button. However, the unit will automatically continue recording into a subsequent file (when using a microSDHC card). The PR7 calls up the HOME screen. Changing the recording format (sound quality) 1. tons to record continuously if the recording exhausts the battery (➔ page 27...

Owner's Manual
Page 14
... select "SD" from the recording setting menu, then press the [ ] (Play) button. Use the [+] and [-] but - The PR7 calls up the HOME screen. 14 Owner's Manual After the setting is complete, press the [■] (Stop) button. Press and hold down the [MENU] button for playback only), then... press the [ ] (Play) button. 3. Use the [+] and [-] but - After the setting process is confirmed, the PR7 automatically calls up the HOME...
... select "SD" from the recording setting menu, then press the [ ] (Play) button. Use the [+] and [-] but - The PR7 calls up the HOME screen. 14 Owner's Manual After the setting is complete, press the [■] (Stop) button. Press and hold down the [MENU] button for playback only), then... press the [ ] (Play) button. 3. Use the [+] and [-] but - After the setting process is confirmed, the PR7 automatically calls up the HOME...
Owner's Manual
Page 15
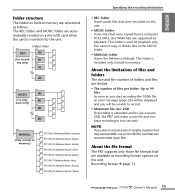
... Manual. About the limitations of files and folders The size and the number of folders and files are limited. • The number of lengthy duration that may exceed 2GB, use a microSDHC card that were copied from a computer. This folder is included only in built-in memory. About the file format The PR7...
... Manual. About the limitations of files and folders The size and the number of folders and files are limited. • The number of lengthy duration that may exceed 2GB, use a microSDHC card that were copied from a computer. This folder is included only in built-in memory. About the file format The PR7...

Owner's Manual
Page 16
...HPF" from the recording setting menu, then press the [ ] (Play) button. 3. After the setting process is complete, press the [■] (Stop) button. The PR7 calls up the HOME screen. 4. tons to select "On", then press the [ ] (Play) button. 3. Press the [REC SET] button. 2. Use the ...[+] and [-] buttons to select "DYN" from the recording setting menu, then press the [ ] (Play) button. The PR7 calls up the HOME screen. 16 Owner's Manual After the setting process is complete, press the [■] (Stop) button. tons to select "LIM" (Limiter), "ALC HI" (for ...
...HPF" from the recording setting menu, then press the [ ] (Play) button. 3. After the setting process is complete, press the [■] (Stop) button. The PR7 calls up the HOME screen. 4. tons to select "On", then press the [ ] (Play) button. 3. Press the [REC SET] button. 2. Use the ...[+] and [-] buttons to select "DYN" from the recording setting menu, then press the [ ] (Play) button. The PR7 calls up the HOME screen. 16 Owner's Manual After the setting process is complete, press the [■] (Stop) button. tons to select "LIM" (Limiter), "ALC HI" (for ...
Owner's Manual
Page 17
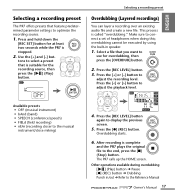
.... tons to display the previous screen. 5. Press the [REC LEVEL] button again to select a preset that is suitable for at least two seconds while the PR7 is called "overdubbing." Overdubbing starts. 6. This process is stopped. 2. Other operations available during overdubbing [ ] (Play) button ➔ Pause [●] (REC) ...1. overdubbing cannot be executed by using the built-in /out ➔ Refer to optimize the recording source. 1. Selecting a recording preset The PR7 offers presets that feature predetermined parameter settings to the Reference Manual Owner's Manual 17
.... tons to display the previous screen. 5. Press the [REC LEVEL] button again to select a preset that is suitable for at least two seconds while the PR7 is called "overdubbing." Overdubbing starts. 6. This process is stopped. 2. Other operations available during overdubbing [ ] (Play) button ➔ Pause [●] (REC) ...1. overdubbing cannot be executed by using the built-in /out ➔ Refer to optimize the recording source. 1. Selecting a recording preset The PR7 offers presets that feature predetermined parameter settings to the Reference Manual Owner's Manual 17
Owner's Manual
Page 18
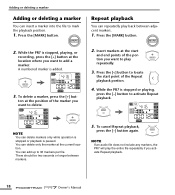
... want to mark the playback position. 1. Press the [MARK] button. 2. Insert markers at the position of the portion you want to add a marker. While the PR7 is added. 3. Press the [ Adding or deleting a marker Adding or deleting a marker You can repeatedly play repeatedly. 3. ton at the start and end points of...
... want to mark the playback position. 1. Press the [MARK] button. 2. Insert markers at the position of the portion you want to add a marker. While the PR7 is added. 3. Press the [ Adding or deleting a marker Adding or deleting a marker You can repeatedly play repeatedly. 3. ton at the start and end points of...

Owner's Manual
Page 19
... can use the tuner to 150%. Press the [MENU] button. 2. tons to specify the standard pitch (A=), then press the [ ] (Play) button. The PR7 calls up the HOME screen. Owner's Manual 19 Setting range: 50%-200% 4. After tuning is complete, press the [■] (Stop) button. Use the [+] and [-] but - Adjusting the playback speed...
... can use the tuner to 150%. Press the [MENU] button. 2. tons to specify the standard pitch (A=), then press the [ ] (Play) button. The PR7 calls up the HOME screen. Owner's Manual 19 Setting range: 50%-200% 4. After tuning is complete, press the [■] (Stop) button. Use the [+] and [-] but - Adjusting the playback speed...

Owner's Manual
Page 20
Press the [] button to specify the beat value, then press the [ ] (Play) button. 4. Setting range: 30-250 7. Use the [+] and [-] but- After the setting process is complete, press the [■] (Stop) button. Use the [+] and [-] buttons to select On/ OFF parameter, then press the [ ] (Play) button. Setting range: 0/4-8/4 8. tons to select "On", then press the [ ] (Play) button. Use the [+] and [-] buttons to select "MET", then press the [ ] (Play) button. 5. Metronome Metronome 1. Press the [MENU] button. 2. The PR7 calls up the HOME screen. 20 Owner's Manual
Press the [] button to specify the beat value, then press the [ ] (Play) button. 4. Setting range: 30-250 7. Use the [+] and [-] but- After the setting process is complete, press the [■] (Stop) button. Use the [+] and [-] buttons to select On/ OFF parameter, then press the [ ] (Play) button. Setting range: 0/4-8/4 8. tons to select "On", then press the [ ] (Play) button. Use the [+] and [-] buttons to select "MET", then press the [ ] (Play) button. 5. Metronome Metronome 1. Press the [MENU] button. 2. The PR7 calls up the HOME screen. 20 Owner's Manual

Owner's Manual
Page 21
tons to select a single file or all files in the folder, then press the [ ] (Play) button. Press the [ Press the [+] or [-] button to select "DEL", then press the [ ] (Play) button. 3. Delete only the currently selected file Deleting a file 4. Select a file that you want to increase the space. 1. Use the [+] and [-] but- Deleting a file If the available memory space is getting small, or if the folders contain the maximum number of files, delete unnecessary files to delete, then press the [MENU] button. 2.
tons to select a single file or all files in the folder, then press the [ ] (Play) button. Press the [ Press the [+] or [-] button to select "DEL", then press the [ ] (Play) button. 3. Delete only the currently selected file Deleting a file 4. Select a file that you want to increase the space. 1. Use the [+] and [-] but- Deleting a file If the available memory space is getting small, or if the folders contain the maximum number of files, delete unnecessary files to delete, then press the [MENU] button. 2.


