
Owner's Manual
Page 2
... dürfen nicht in all installation instructions. Compliance with the requirements listed in the users manual, may not cause harmful interference, and (2) this product MUST be determined by Yamaha Corporation of America or its subsidiaries. * This applies only to use of the FCC Rules...This product has been tested and found to be the source of interference, which can not locate the appropriate retailer, please contact Yamaha Corporation of America, Electronic Service Division, 6600 Orangethorpe Ave, Buena Park, CA90620 The above statements apply ONLY to those products ...
... dürfen nicht in all installation instructions. Compliance with the requirements listed in the users manual, may not cause harmful interference, and (2) this product MUST be determined by Yamaha Corporation of America or its subsidiaries. * This applies only to use of the FCC Rules...This product has been tested and found to be the source of interference, which can not locate the appropriate retailer, please contact Yamaha Corporation of America, Electronic Service Division, 6600 Orangethorpe Ave, Buena Park, CA90620 The above statements apply ONLY to those products ...
Owner's Manual
Page 3
...Thomson. Operation is located inside the battery compartment of the FCC Rules. See user manual instructions if interference to radio reception is required. Model Serial No. Retain this Owner's Manual in a safe place for such use is suspected. * This applies only to ... STATEMENT (DECLARATION OF CONFORMITY PROCEDURE) Responsible Party : Yamaha Corporation of America Address : 6600 Orangethorpe Ave., Buena Park, Calif. 90620 Telephone : 714-522-9011 Type of Equipment : RECORDER Model Name : POCKETRAK PR7 This device complies with this device must accept any interference...
...Thomson. Operation is located inside the battery compartment of the FCC Rules. See user manual instructions if interference to radio reception is required. Model Serial No. Retain this Owner's Manual in a safe place for such use is suspected. * This applies only to ... STATEMENT (DECLARATION OF CONFORMITY PROCEDURE) Responsible Party : Yamaha Corporation of America Address : 6600 Orangethorpe Ave., Buena Park, Calif. 90620 Telephone : 714-522-9011 Type of Equipment : RECORDER Model Name : POCKETRAK PR7 This device complies with this device must accept any interference...

Owner's Manual
Page 4
...power cord from electrical shock, short-circuiting, damage, fire or other property. Then have the device inspected by qualified Yamaha service personnel. (5)-6 1/3 4 Owner's Manual These precautions include, but are not limited to excessive dust or vibrations, or extreme cold or heat (such as water...you experience any abnormality • If this device should appear to rain, use immediately and have the device inspected by qualified Yamaha service personnel. Water warning • Do not expose the device to be dropped or damaged, immediately turn off the power and...
...power cord from electrical shock, short-circuiting, damage, fire or other property. Then have the device inspected by qualified Yamaha service personnel. (5)-6 1/3 4 Owner's Manual These precautions include, but are not limited to excessive dust or vibrations, or extreme cold or heat (such as water...you experience any abnormality • If this device should appear to rain, use immediately and have the device inspected by qualified Yamaha service personnel. Water warning • Do not expose the device to be dropped or damaged, immediately turn off the power and...

Owner's Manual
Page 5
... not leave the battery within the battery, causing ignition, explosion, leakage or ejection of the electrolyte, or overheating. • Insert the battery as a computer. (5)-6 2/3 Owner's Manual 5 Otherwise, the device, TV, or radio may cause a short-circuit within reach of the battery fluid. • Do not deform, disassemble, or modify the battery...
... not leave the battery within the battery, causing ignition, explosion, leakage or ejection of the electrolyte, or overheating. • Insert the battery as a computer. (5)-6 2/3 Owner's Manual 5 Otherwise, the device, TV, or radio may cause a short-circuit within reach of the battery fluid. • Do not deform, disassemble, or modify the battery...

Owner's Manual
Page 6
...logos are the trademarks or registered trademarks of disposal. Information for the correct method of their respective companies. (5)-6 3/3 6 Owner's Manual For more information about collection and recycling of old products and batteries, please contact your local municipality, your waste disposal service or ...Disposal in other countries. • Apple, Mac and Macintosh are only valid in combination with a chemical symbol. In this manual are for instructional purposes only, and may be damaged. • If the recorder does not recognize the installed microSD card ...
...logos are the trademarks or registered trademarks of disposal. Information for the correct method of their respective companies. (5)-6 3/3 6 Owner's Manual For more information about collection and recycling of old products and batteries, please contact your local municipality, your waste disposal service or ...Disposal in other countries. • Apple, Mac and Macintosh are only valid in combination with a chemical symbol. In this manual are for instructional purposes only, and may be damaged. • If the recorder does not recognize the installed microSD card ...
Owner's Manual
Page 7
... naming rules for purchasing the Yamaha POCKETRAK PR7 recorder. Accessories • AAA-size alkaline battery x1 • USB cable x1 • Owner's Manual (this Owner's Manual before you for dividing, deleting or moving a file 24 Connecting the PR7 to a computer 24 Troubleshooting ...25 Error messages 26 Main specifications 27 Table of contents Introduction Thank you start using the PR7. Table of contents Introduction 7 Accessories 7 Downloading software 8 About Manuals 8 Part names and functions 9 Inserting a battery and a microSD card (sold separately 10...
... naming rules for purchasing the Yamaha POCKETRAK PR7 recorder. Accessories • AAA-size alkaline battery x1 • USB cable x1 • Owner's Manual (this Owner's Manual before you for dividing, deleting or moving a file 24 Connecting the PR7 to a computer 24 Troubleshooting ...25 Error messages 26 Main specifications 27 Table of contents Introduction Thank you start using the PR7. Table of contents Introduction 7 Accessories 7 Downloading software 8 About Manuals 8 Part names and functions 9 Inserting a battery and a microSD card (sold separately 10...
Owner's Manual
Page 8
... the file in memory by accident, format (initialize) the memory to the Yamaha Pro Audio website: http://www.yamahaproaudio.com/pr7/ About Manuals Owner's Manual (this manual using Adobe® Reader®. For more information on downloading this software, refer to automatically recreate the MANUAL folder. • You can also use the convenient features of Adobe...
... the file in memory by accident, format (initialize) the memory to the Yamaha Pro Audio website: http://www.yamahaproaudio.com/pr7/ About Manuals Owner's Manual (this manual using Adobe® Reader®. For more information on downloading this software, refer to automatically recreate the MANUAL folder. • You can also use the convenient features of Adobe...

Owner's Manual
Page 9
... E MIC/LINE IN (external input) jack F [HOLD] switch G USB terminal 1 2 3 4 5 B A 6 0 H Battery compartment I microSD card slot J Threaded socket for tripod K Speaker Part names and functions D E 8 7 F 9 G C K H J I Owner's Manual 9
... E MIC/LINE IN (external input) jack F [HOLD] switch G USB terminal 1 2 3 4 5 B A 6 0 H Battery compartment I microSD card slot J Threaded socket for tripod K Speaker Part names and functions D E 8 7 F 9 G C K H J I Owner's Manual 9
Owner's Manual
Page 10
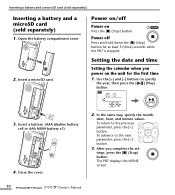
...) button. Insert a battery. (AAA alkaline battery cell or AAA NiMH battery x1) 4. Power on the unit for at least 3 (three) seconds while the PR7 is stopped. Close the cover. 2. Insert a microSD card. After you power on /off Press and hold down the [■] (Stop) button for the first... time 1. The PR7 displays the HOME screen. 10 Owner's Manual To return to specify the year, then press the [ ] (Play) button. 3. Setting the date and time Setting the calendar when you...
...) button. Insert a battery. (AAA alkaline battery cell or AAA NiMH battery x1) 4. Power on the unit for at least 3 (three) seconds while the PR7 is stopped. Close the cover. 2. Insert a microSD card. After you power on /off Press and hold down the [■] (Stop) button for the first... time 1. The PR7 displays the HOME screen. 10 Owner's Manual To return to specify the year, then press the [ ] (Play) button. 3. Setting the date and time Setting the calendar when you...

Owner's Manual
Page 11
... on the Hold function while the unit is stopped, it will display the date and time. Hold "off" Owner's Manual 11 Option 1 Option 2 Folder/File number Current position File date in the Reference Manual for more information. ing time 6 Folder/File number 7 Recording settings 8 Current mode Understanding the information on the LCD...
... on the Hold function while the unit is stopped, it will display the date and time. Hold "off" Owner's Manual 11 Option 1 Option 2 Folder/File number Current position File date in the Reference Manual for more information. ing time 6 Folder/File number 7 Recording settings 8 Current mode Understanding the information on the LCD...
Owner's Manual
Page 12
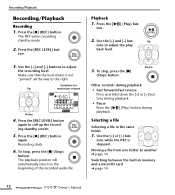
...Down 4. The playback position will automatically return to adjust the recording level. Press the [ ton. ] (Play) but - tons while the PR7 is not "pinned" all the way to another ➔ page 14 Switching between the built-in the same folder 1. ton. 3. To stop... Press the [ playback. ] (Play) button during Selecting a file Selecting a file in memory and a microSD card ➔ page 14 12 Owner's Manual Recording/Playback Recording/Playback Recording 1. Press the [●] (REC) button again. Use the [+] and [-] but - Moving a file from one folder to...
...Down 4. The playback position will automatically return to adjust the recording level. Press the [ ton. ] (Play) but - tons while the PR7 is not "pinned" all the way to another ➔ page 14 Switching between the built-in the same folder 1. ton. 3. To stop... Press the [ playback. ] (Play) button during Selecting a file Selecting a file in memory and a microSD card ➔ page 14 12 Owner's Manual Recording/Playback Recording/Playback Recording 1. Press the [●] (REC) button again. Use the [+] and [-] but - Moving a file from one folder to...
Owner's Manual
Page 13
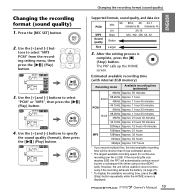
... recording into a subsequent file (when using a microSDHC card). tons to specify the sound quality (format), then press the [ ] (Play) button. Owner's Manual 13 Changing the recording format (sound quality) 1. Press the [REC SET] button. 2. Use the [+] and [-] buttons to select "MP3 PCM" from the... recording setting menu, then press the [ ] (Play) button. 3. The PR7 calls up the HOME screen. If the recording file size reaches 2GB, the PR7 will be unable to select "PCM" or "MP3", then press the [ ] (Play) button. 4. Use the [+] and [-]...
... recording into a subsequent file (when using a microSDHC card). tons to specify the sound quality (format), then press the [ ] (Play) button. Owner's Manual 13 Changing the recording format (sound quality) 1. Press the [REC SET] button. 2. Use the [+] and [-] buttons to select "MP3 PCM" from the... recording setting menu, then press the [ ] (Play) button. 3. The PR7 calls up the HOME screen. If the recording file size reaches 2GB, the PR7 will be unable to select "PCM" or "MP3", then press the [ ] (Play) button. 4. Use the [+] and [-]...

Owner's Manual
Page 14
... [ ] (Play) button. 3. Use the [+] and [-] buttons to select a folder (R1, M1, etc.), then press the [ ] (Play) button. The PR7 calls up the HOME screen. 14 Owner's Manual After the setting process is confirmed, the PR7 automatically calls up the HOME screen. 3. Use the [+] and [-] but - Specifying the recording destination Specifying the recording destination...
... [ ] (Play) button. 3. Use the [+] and [-] buttons to select a folder (R1, M1, etc.), then press the [ ] (Play) button. The PR7 calls up the HOME screen. 14 Owner's Manual After the setting process is confirmed, the PR7 automatically calls up the HOME screen. 3. Use the [+] and [-] but - Specifying the recording destination Specifying the recording destination...
Owner's Manual
Page 15
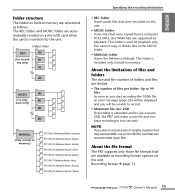
.... You cannot copy or divide files in two seconds. R1 ing only) R2 R9 MUSIC M0 (For play- Recording format ➔ page 13 Owner's Manual 15 This folder is inserted into the unit. Folder structure The folders in built-in memory are structured as follows: The REC folder and MUSIC...Maximum file size: 2GB If recording is used for playback. NOTE If you will create a new file and continue recording in the MUSIC folder. • MANUAL folder Stores the Reference Manual. About the file format The PR7 supports only those file formats that are supported for playback only.
.... You cannot copy or divide files in two seconds. R1 ing only) R2 R9 MUSIC M0 (For play- Recording format ➔ page 13 Owner's Manual 15 This folder is inserted into the unit. Folder structure The folders in built-in memory are structured as follows: The REC folder and MUSIC...Maximum file size: 2GB If recording is used for playback. NOTE If you will create a new file and continue recording in the MUSIC folder. • MANUAL folder Stores the Reference Manual. About the file format The PR7 supports only those file formats that are supported for playback only.

Owner's Manual
Page 16
...Use the [+] and [-] but - After the setting process is complete, press the [■] (Stop) button. Press the [REC SET] button. 2. The PR7 calls up the HOME screen. 16 Owner's Manual Press the [REC SET] button. 2. Use the [+] and [-] buttons to select "On", then press the [ ] (Play) button. 3. Reducing noise ... or noise. 1. Use the [+] and [-] but - tons to select "DYN" from the recording setting menu, then press the [ ] (Play) button. The PR7 calls up the HOME screen. 4. tons to select "HPF" from the recording setting menu, then press the [ ] (Play) button. 3.
...Use the [+] and [-] but - After the setting process is complete, press the [■] (Stop) button. Press the [REC SET] button. 2. The PR7 calls up the HOME screen. 16 Owner's Manual Press the [REC SET] button. 2. Use the [+] and [-] buttons to select "On", then press the [ ] (Play) button. 3. Reducing noise ... or noise. 1. Use the [+] and [-] but - tons to select "DYN" from the recording setting menu, then press the [ ] (Play) button. The PR7 calls up the HOME screen. 4. tons to select "HPF" from the recording setting menu, then press the [ ] (Play) button. 3.
Owner's Manual
Page 17
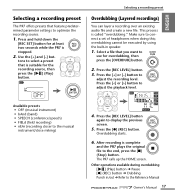
...this; Overdubbing starts. 6. After recording is suitable for at least two seconds while the PR7 is called "overdubbing." Press the [+] or [-] button to the Reference Manual Owner's Manual 17 The PR7 calls up the HOME screen. Other operations available during overdubbing [ ] (Play) button...the recording source, then press the [ ] (Play) button. Press the [REC LEVEL] button. 3. Selecting a recording preset The PR7 offers presets that feature predetermined parameter settings to the musical instrument/close miking) 4. Use the [+] and [-] but- This process is stopped...
...this; Overdubbing starts. 6. After recording is suitable for at least two seconds while the PR7 is called "overdubbing." Press the [+] or [-] button to the Reference Manual Owner's Manual 17 The PR7 calls up the HOME screen. Other operations available during overdubbing [ ] (Play) button...the recording source, then press the [ ] (Play) button. Press the [REC LEVEL] button. 3. Selecting a recording preset The PR7 offers presets that feature predetermined parameter settings to the musical instrument/close miking) 4. Use the [+] and [-] but- This process is stopped...
Owner's Manual
Page 18
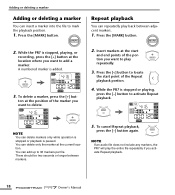
... the [MARK] button. 2. ton at the position of the portion you want to mark the playback position. 1. To delete a marker, press the [+] but- While the PR7 is added. 3. Press the [ Insert markers at the location where you want to delete. 2. Repeat playback You can insert a marker into the file to play...
... the [MARK] button. 2. ton at the position of the portion you want to mark the playback position. 1. To delete a marker, press the [+] but- While the PR7 is added. 3. Press the [ Insert markers at the location where you want to delete. 2. Repeat playback You can insert a marker into the file to play...

Owner's Manual
Page 19
Play and tune the musical instrument. Key Align with the center segment. 5. The PR7 calls up the HOME screen. Use the [+] and [-] but - Use the [+] and [-] buttons to specify the standard pitch (A=), then press the [ ] (Play) button. ...] button. 2. Press the [MENU] button. After the setting process is complete, press the [■] (Stop) button. Setting range: 50%-200% 4. The PR7 calls up the HOME screen. Owner's Manual 19 tons to select "SPD", then press the [ ] (Play) button. 2. Adjusting the playback speed You can use the tuner to 150%.
Play and tune the musical instrument. Key Align with the center segment. 5. The PR7 calls up the HOME screen. Use the [+] and [-] but - Use the [+] and [-] buttons to specify the standard pitch (A=), then press the [ ] (Play) button. ...] button. 2. Press the [MENU] button. After the setting process is complete, press the [■] (Stop) button. Setting range: 50%-200% 4. The PR7 calls up the HOME screen. Owner's Manual 19 tons to select "SPD", then press the [ ] (Play) button. 2. Adjusting the playback speed You can use the tuner to 150%.

Owner's Manual
Page 20
Use the [+] and [-] buttons to select On/ OFF parameter, then press the [ ] (Play) button. Setting range: 0/4-8/4 8. After the setting process is complete, press the [■] (Stop) button. Press the [] button to specify the beat value, then press the [ ] (Play) button. 4. The PR7 calls up the HOME screen. 20 Owner's Manual tons to select "On", then press the [ ] (Play) button. Press the [MENU] button. 2. Use the [+] and [-] but- Setting range: 30-250 7. Metronome Metronome 1. Use the [+] and [-] buttons to select "MET", then press the [ ] (Play) button. 5.
Use the [+] and [-] buttons to select On/ OFF parameter, then press the [ ] (Play) button. Setting range: 0/4-8/4 8. After the setting process is complete, press the [■] (Stop) button. Press the [] button to specify the beat value, then press the [ ] (Play) button. 4. The PR7 calls up the HOME screen. 20 Owner's Manual tons to select "On", then press the [ ] (Play) button. Press the [MENU] button. 2. Use the [+] and [-] but- Setting range: 30-250 7. Metronome Metronome 1. Use the [+] and [-] buttons to select "MET", then press the [ ] (Play) button. 5.

Owner's Manual
Page 21
Deleting a file If the available memory space is getting small, or if the folders contain the maximum number of files, delete unnecessary files to select "DEL", then press the [ ] (Play) button. 3. Use the [+] and [-] but- tons to increase the space. 1. Press the [+] or [-] button to delete, then press the [MENU] button. 2. Delete only the currently selected file Deleting a file 4. Press the [ Select a file that you want to select a single file or all files in the folder, then press the [ ] (Play) button.
Deleting a file If the available memory space is getting small, or if the folders contain the maximum number of files, delete unnecessary files to select "DEL", then press the [ ] (Play) button. 3. Use the [+] and [-] but- tons to increase the space. 1. Press the [+] or [-] button to delete, then press the [MENU] button. 2. Delete only the currently selected file Deleting a file 4. Press the [ Select a file that you want to select a single file or all files in the folder, then press the [ ] (Play) button.


