
Owner's Manual
Page 5
...panel 3 Front panel display 4 Remote control 5 Rear panel 6 Quick start guide 7 L PREPARATION Preparation of remote control 8 Connections 9 Placing speakers 9 Connecting speakers 9 Connecting video components 11 Connecting other components 13 Using the VIDEO AUX jacks on the front panel .... 15 Connecting the FM and AM ... Using Bluetooth™ components 30 Pairing the Bluetooth™ receiver and your Bluetooth™ component 30 Playback of the Bluetooth™ component 30 ADVANCED OPERATION Set menu 31 Using set menu 32 1 SOUND MENU 32 2 INPUT MENU 34 3 OPTION MENU 35 ...
...panel 3 Front panel display 4 Remote control 5 Rear panel 6 Quick start guide 7 L PREPARATION Preparation of remote control 8 Connections 9 Placing speakers 9 Connecting speakers 9 Connecting video components 11 Connecting other components 13 Using the VIDEO AUX jacks on the front panel .... 15 Connecting the FM and AM ... Using Bluetooth™ components 30 Pairing the Bluetooth™ receiver and your Bluetooth™ component 30 Playback of the Bluetooth™ component 30 ADVANCED OPERATION Set menu 31 Using set menu 32 1 SOUND MENU 32 2 INPUT MENU 34 3 OPTION MENU 35 ...
Owner's Manual
Page 6
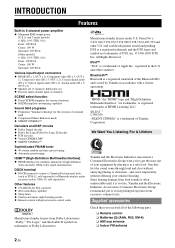
...video (IN x 3, OUT x 2), Coaxial digital audio (IN x 1), Optical digital audio (IN x 2), Analog audio (IN x 9, OUT x 2) ◆ Speaker out (5-channel), Subwoofer out ◆ Discrete multi-channel input (6-channel) SCENE select function ◆ Preset SCENE templates for various situations ◆ SCENE template customizing capability...sound come through loud and clear without affecting your equipment by Yamaha in the U.S. DTS is a trademark of Dolby Laboratories. One that you to connect a Yamaha iPod universal dock (such as YDS-11, sold separately) or Bluetooth wireless audio receiver...
...video (IN x 3, OUT x 2), Coaxial digital audio (IN x 1), Optical digital audio (IN x 2), Analog audio (IN x 9, OUT x 2) ◆ Speaker out (5-channel), Subwoofer out ◆ Discrete multi-channel input (6-channel) SCENE select function ◆ Preset SCENE templates for various situations ◆ SCENE template customizing capability...sound come through loud and clear without affecting your equipment by Yamaha in the U.S. DTS is a trademark of Dolby Laboratories. One that you to connect a Yamaha iPod universal dock (such as YDS-11, sold separately) or Bluetooth wireless audio receiver...
Owner's Manual
Page 7
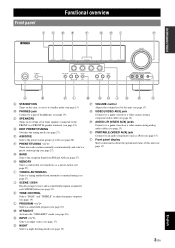
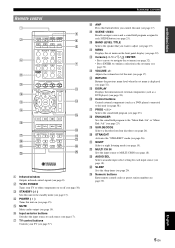
...a pair of this unit (see page 18). G BAND Selects the reception band from automatic or manual tuning (see page 15). L PROGRAM l / h Selects a sound field program (see page 27). N INPUT l / h Selects an input source (see page 15). S PORTABLE (VIDEO AUX) jack Connects to E) (see page ... a preset station group (see page 21). J SCENE 1/2/3/4 Recalls an input source and a sound field program assigned to a game console or a video camera using a composite video cable (see page 19). C SPEAKERS Turns on this unit, or sets it to standby mode (see page 27). F PRESET/TUNING...
...a pair of this unit (see page 18). G BAND Selects the reception band from automatic or manual tuning (see page 15). L PROGRAM l / h Selects a sound field program (see page 27). N INPUT l / h Selects an input source (see page 15). S PORTABLE (VIDEO AUX) jack Connects to E) (see page ... a preset station group (see page 21). J SCENE 1/2/3/4 Recalls an input source and a sound field program assigned to a game console or a video camera using a composite video cable (see page 19). C SPEAKERS Turns on this unit, or sets it to standby mode (see page 27). F PRESET/TUNING...
Owner's Manual
Page 8
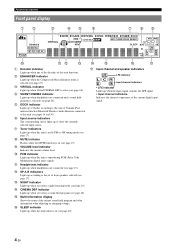
...night listening mode (see page 19). e DOCK indicator Lights up or flashes according to the state of Yamaha iPod universal dock or Bluetooth Wireless Audio Receiver connected to this unit is reproducing PCM (Pulse Code Modulation) digital audio signals. m NIGHT indicator Lights up... when you select a sound filed program (see page 26). j PCM indicator Lights up when this unit (see pages 14 and 30). n o p q q Input channel and speaker ...
...night listening mode (see page 19). e DOCK indicator Lights up or flashes according to the state of Yamaha iPod universal dock or Bluetooth Wireless Audio Receiver connected to this unit is reproducing PCM (Pulse Code Modulation) digital audio signals. m NIGHT indicator Lights up... when you select a sound filed program (see page 26). j PCM indicator Lights up when this unit (see pages 14 and 30). n o p q q Input channel and speaker ...
Owner's Manual
Page 9
... DISPLAY Displays the information of this unit (see page 38). r ENHANCER Sets the sound field program to each SCENE button (see page 19). x SLEEP Sets the sleep timer... remote control codes or preset station number (see page 18). j BAND LEVEL TITLE Selects the speaker that you control this unit to adjust (see page 18). d POWER ( ) Turns this ...on or off (see page 37). INTRODUCTION PREPARATION BASIC OPERATION ADVANCED OPERATION Remote control a c b POWER POWER STANDBY POWER TV AV d A B C MUTE e CD MD/CD-R TUNER f DVD DTV/CBL DVR TV CH V-AUX/DOCK D E g...
... DISPLAY Displays the information of this unit (see page 38). r ENHANCER Sets the sound field program to each SCENE button (see page 19). x SLEEP Sets the sleep timer... remote control codes or preset station number (see page 18). j BAND LEVEL TITLE Selects the speaker that you control this unit to adjust (see page 18). d POWER ( ) Turns this ...on or off (see page 37). INTRODUCTION PREPARATION BASIC OPERATION ADVANCED OPERATION Remote control a c b POWER POWER STANDBY POWER TV AV d A B C MUTE e CD MD/CD-R TUNER f DVD DTV/CBL DVR TV CH V-AUX/DOCK D E g...
Owner's Manual
Page 11
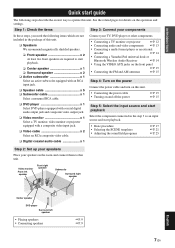
... components ☞P. 13 • Connecting a multi-format player or an external decoder ☞P. 14 • Connecting a Yamaha iPod universal dock or Bluetooth Wireless Audio Receiver ☞P. 14 • Using the VIDEO AUX jacks on the front panel ☞P. 15 • Connecting the FM ...8226; Basic procedure • Selecting the SCENE templates • Adjusting the sound field programs ☞P. 17 ☞P. 21 ☞P. 25 ❏ Digital coaxial audio cable x 1 Step 2: Set up your speakers Place your components In these steps, you need the following steps describe the...
... components ☞P. 13 • Connecting a multi-format player or an external decoder ☞P. 14 • Connecting a Yamaha iPod universal dock or Bluetooth Wireless Audio Receiver ☞P. 14 • Using the VIDEO AUX jacks on the front panel ☞P. 15 • Connecting the FM ...8226; Basic procedure • Selecting the SCENE templates • Adjusting the sound field programs ☞P. 17 ☞P. 21 ☞P. 25 ❏ Digital coaxial audio cable x 1 Step 2: Set up your speakers Place your components In these steps, you need the following steps describe the...
Owner's Manual
Page 13
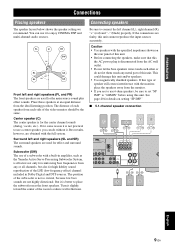
... the rear panel of a subwoofer with a built-in amplifier, such as the Yamaha Active Servo Processing Subwoofer System, is not so critical, because low bass sounds are obtained with the specified impedance shown on setting "SP IMP." ■ 5.1-channel speaker connection cd e fg D DTV/CBL HDMI VIDEO BL DVR IN OUT MONITOR OUT...
... the rear panel of a subwoofer with a built-in amplifier, such as the Yamaha Active Servo Processing Subwoofer System, is not so critical, because low bass sounds are obtained with the specified impedance shown on setting "SP IMP." ■ 5.1-channel speaker connection cd e fg D DTV/CBL HDMI VIDEO BL DVR IN OUT MONITOR OUT...
Owner's Manual
Page 15
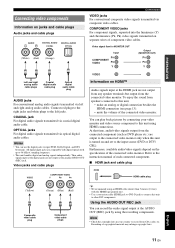
...8226; Use a conversion cable (HDMI jack ↔ DVI-D jack) to connect this unit, - To enjoy the sound from the connected component (such as DVD player etc.) are not output from any speaker terminals but output from CDs, radio, etc. Recording of the connected video monitor. Connect red plugs to the... right jacks and white plugs to the input source (DVD or DTV/ CBL). At that time, audio/video signals output from speakers connected to this unit is turned on jacks and cable plugs Audio jacks and cable plugs AUDIO L R DIGITAL AUDIO COAXIAL DIGITAL AUDIO OPTICAL (...
...8226; Use a conversion cable (HDMI jack ↔ DVI-D jack) to connect this unit, - To enjoy the sound from the connected component (such as DVD player etc.) are not output from any speaker terminals but output from CDs, radio, etc. Recording of the connected video monitor. Connect red plugs to the... right jacks and white plugs to the input source (DVD or DTV/ CBL). At that time, audio/video signals output from speakers connected to this unit is turned on jacks and cable plugs Audio jacks and cable plugs AUDIO L R DIGITAL AUDIO COAXIAL DIGITAL AUDIO OPTICAL (...
Owner's Manual
Page 18
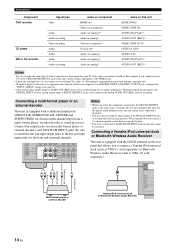
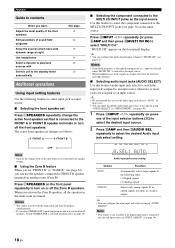
... record from a multi-format player, external decoder or sound processor. Be sure to match the left and right output jacks to the left and right input jacks for recording. Connecting a Yamaha iPod universal dock or Bluetooth Wireless Audio Receiver This unit is equipped with 6 additional input jacks (... MULTI CH INPUT jacks as those made for missing speakers. For example, if you connected your TV if the video conversion is equipped with the DOCK terminal on the rear panel that you connect a 5.1-channel speaker system before using the recording components. Connecting a multi...
... record from a multi-format player, external decoder or sound processor. Be sure to match the left and right output jacks to the left and right input jacks for recording. Connecting a Yamaha iPod universal dock or Bluetooth Wireless Audio Receiver This unit is equipped with 6 additional input jacks (... MULTI CH INPUT jacks as those made for missing speakers. For example, if you connected your TV if the video conversion is equipped with the DOCK terminal on the rear panel that you connect a 5.1-channel speaker system before using the recording components. Connecting a multi...
Owner's Manual
Page 20
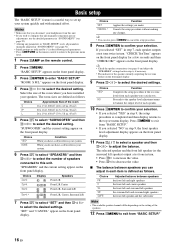
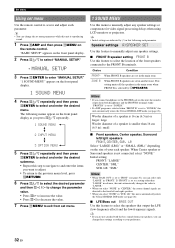
... 2 Press kMENU. CANCEL* Cancels the setup procedure without making any parameters in "BASIC SETUP" resets all parameters manually adjusted in "SOUND MENU" (see page 9) and adjust the "SPEAKERS" settings back in turn . • Press lh to increase the value. • Press ll to enter "BASIC SETUP." The...the balance. Press kMENU to exit from "BASIC SETUP." 16 En Select the size of the speakers. 12 Press kMENU to this unit manually using more precise adjustments, use the detailed parameters in "SOUND MENU" (see page 32). • Altering any changes. The room sizes are indicated by...
... 2 Press kMENU. CANCEL* Cancels the setup procedure without making any parameters in "BASIC SETUP" resets all parameters manually adjusted in "SOUND MENU" (see page 9) and adjust the "SPEAKERS" settings back in turn . • Press lh to increase the value. • Press ll to enter "BASIC SETUP." The...the balance. Press kMENU to exit from "BASIC SETUP." 16 En Select the size of the speakers. 12 Press kMENU to this unit manually using more precise adjustments, use the detailed parameters in "SOUND MENU" (see page 32). • Altering any changes. The room sizes are indicated by...
Owner's Manual
Page 21
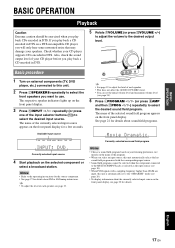
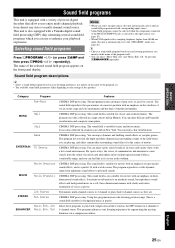
... then qPROG l / h) repeatedly to select the desired sound field program. See page 21 for details about sound field programs. Movie Dramatic Currently selected surround field program Notes • Choose a sound field program based on your speakers. ADVANCED OPERATION ADDITIONAL INFORMATION APPENDIX English 17 En y &#...appears on the selected component or select a broadcast station. The respective speaker indicators lights up on the front panel display. 3 Press NINPUT l / h repeatedly (or press one of the selected sound field program appears on a DTS-incompatible CD player, you play ...
... then qPROG l / h) repeatedly to select the desired sound field program. See page 21 for details about sound field programs. Movie Dramatic Currently selected surround field program Notes • Choose a sound field program based on your speakers. ADVANCED OPERATION ADDITIONAL INFORMATION APPENDIX English 17 En y &#...appears on the selected component or select a broadcast station. The respective speaker indicators lights up on the front panel display. 3 Press NINPUT l / h repeatedly (or press one of the selected sound field program appears on a DTS-incompatible CD player, you play ...
Owner's Manual
Page 22
Notes • You cannot activate both the main room and Zone B speakers simultaneously. • If you select CINEMA DSP sound field program and activate the Zone B speakers, Virtual CINEMA DSP is activated automatically (see page 26). ■ Selecting the component connected to the MULTI CH INPUT jacks...If no analog signals are input, no digital input jack is output. Notes • Sound field programs, or the night listening mode, etc. Adjust the tonal quality of the front speakers Edit parameters of the input selector buttons (f)) to select the desired input source. 2 Press...
Notes • You cannot activate both the main room and Zone B speakers simultaneously. • If you select CINEMA DSP sound field program and activate the Zone B speakers, Virtual CINEMA DSP is activated automatically (see page 26). ■ Selecting the component connected to the MULTI CH INPUT jacks...If no analog signals are input, no digital input jack is output. Notes • Sound field programs, or the night listening mode, etc. Adjust the tonal quality of the front speakers Edit parameters of the input selector buttons (f)) to select the desired input source. 2 Press...

Owner's Manual
Page 23
... to adjust. Notes • When you increase or decrease the high-frequency or low-frequency sound to an extreme level, the tonal quality of the surround speakers may not match that of the front left speaker Surround right speaker Playback y • Once you press jBAND LEVEL TITLE on the remote control, you can ..." (see page 33). 1 Press hAMP and then press jBAND LEVEL TITLE repeatedly to select the speaker you select a sound field program, SILENT CINEMA mode is defined as follows. y • When a night listening mode is selected, the NIGHT indicator lights up on the front panel...
... to adjust. Notes • When you increase or decrease the high-frequency or low-frequency sound to an extreme level, the tonal quality of the surround speakers may not match that of the front left speaker Surround right speaker Playback y • Once you press jBAND LEVEL TITLE on the remote control, you can ..." (see page 33). 1 Press hAMP and then press jBAND LEVEL TITLE repeatedly to select the speaker you select a sound field program, SILENT CINEMA mode is defined as follows. y • When a night listening mode is selected, the NIGHT indicator lights up on the front panel...
Owner's Manual
Page 29
.... CINEMA DSP processing. The program lets you feel like surrounding sound effects for the scenes of movies. For sports relays, the voices of the speakers. The program reproduces a wide dynamic range from minimum sound effects to enjoy multi-channel playback from the center; Downmixes multi... music. the cheers and atmosphere in stereo and variety shows with a Yamaha digital sound field processing (DSP) chip containing several sound field programs which you can use to an moderate extent, but reproduces sound effects and background music in a compression artifact. The name of the...
.... CINEMA DSP processing. The program lets you feel like surrounding sound effects for the scenes of movies. For sports relays, the voices of the speakers. The program reproduces a wide dynamic range from minimum sound effects to enjoy multi-channel playback from the center; Downmixes multi... music. the cheers and atmosphere in stereo and variety shows with a Yamaha digital sound field processing (DSP) chip containing several sound field programs which you can use to an moderate extent, but reproduces sound effects and background music in a compression artifact. The name of the...
Owner's Manual
Page 30
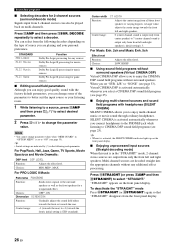
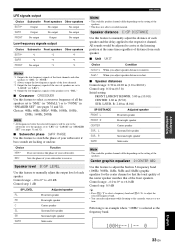
... MIN, MID*, MAX For PRO LOGIC II Music: Panorama PANORAMA Function: Sends stereo signals to enjoy the CINEMA DSP sound field programs without surround speakers. Center width CT WIDTH Function: Adjusts the center image from the front panel display. 26 En A larger value adjusts...display. Choices: OFF*, ON Dimension DIMENSION Function: Gradually adjusts the sound field either towards the front or towards the front left and right speakers. When you to the surround speakers as well as the front speakers for 2-channel sources (surround decode mode) Signals input from 2-...
... MIN, MID*, MAX For PRO LOGIC II Music: Panorama PANORAMA Function: Sends stereo signals to enjoy the CINEMA DSP sound field programs without surround speakers. Center width CT WIDTH Function: Adjusts the center image from the front panel display. 26 En A larger value adjusts...display. Choices: OFF*, ON Dimension DIMENSION Function: Gradually adjusts the sound field either towards the front or towards the front left and right speakers. When you to the surround speakers as well as the front speakers for 2-channel sources (surround decode mode) Signals input from 2-...
Owner's Manual
Page 35
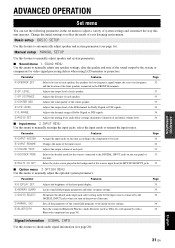
Adjusts the output level of each speaker. Adjusts the tonal quality of the sound field programs to the FRONT B terminals. Locks sound field program parameters and other set menu to adjust a variety of the front speakers connected to the initial factory settings. Pairs the connected Bluetooth Wireless Audio Receiver (such as YBA-10, sold separately) with...
Adjusts the output level of each speaker. Adjusts the tonal quality of the sound field programs to the FRONT B terminals. Locks sound field program parameters and other set menu to adjust a variety of the front speakers connected to the initial factory settings. Pairs the connected Bluetooth Wireless Audio Receiver (such as YBA-10, sold separately) with...
Owner's Manual
Page 36
... changes the value to "LARGE." • When you select "NONE" in "CENTER," the center channel signals are not satisfied with the bass sounds from your speakers, you can change the parameter value. • Press lh to increase the value. • Press ll to decrease the value. 7 Press ... En Initial setting: FRONT: "LARGE" CENTER: "SML" SUR. If "FRONT" is set to manually adjust any speaker settings. ■ FRONT B speaker setting FRONT B Use this unit, the sound is output from set to access and adjust each parameter. LR," this step to navigate to and enter the items you...
... changes the value to "LARGE." • When you select "NONE" in "CENTER," the center channel signals are not satisfied with the bass sounds from your speakers, you can change the parameter value. • Press lh to increase the value. • Press ll to decrease the value. 7 Press ... En Initial setting: FRONT: "LARGE" CENTER: "SML" SUR. If "FRONT" is set to manually adjust any speaker settings. ■ FRONT B speaker setting FRONT B Use this unit, the sound is output from set to access and adjust each parameter. LR," this step to navigate to and enter the items you...
Owner's Manual
Page 37
... output the low-frequency signals of the front channels. *3 Output the low-frequency signals if the sizes of speakers are lacking or unclear. All sounds would be sent to the subwoofer or to the speakers set to "LRG" (or "LARGE") in 5-frequency band (100Hz, 300Hz, 1kHz, 3kHz and 10kHz) ... this feature to manually adjust the output level of your subwoofer if bass sounds are set to "LARGE" (or "LRG"). *4 Output the low-frequency signals of the speakers set to "SML" (or "SMALL") or to "NONE" in feet. ■ Speaker distances Control range: 0.30 to 24.00 m (1.0 to the currently ...
... output the low-frequency signals of the front channels. *3 Output the low-frequency signals if the sizes of speakers are lacking or unclear. All sounds would be sent to the subwoofer or to the speakers set to "LRG" (or "LARGE") in 5-frequency band (100Hz, 300Hz, 1kHz, 3kHz and 10kHz) ... this feature to manually adjust the output level of your subwoofer if bass sounds are set to "LARGE" (or "LRG"). *4 Output the low-frequency signals of the speakers set to "SML" (or "SMALL") or to "NONE" in feet. ■ Speaker distances Control range: 0.30 to 24.00 m (1.0 to the currently ...
Owner's Manual
Page 38
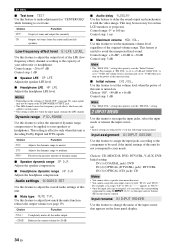
...This feature is turned on. For example, if "INI.VOL." Use this feature to delay the sound output and synchronize it with the video image. Choices: Off*, -80 dB to avoid the unexpected loud sound. y • Initial settings are reassigned, you turn on the settings of this unit next time... to assign the input jacks according to the component to be used if the initial settings of dynamic range compression to be applied to your speakers or headphones. setting. 2 INPUT MENU Use this menu to both "IN (2)" and "IN (3)." Choice Function OFF* Stops test tones and output ...
...This feature is turned on. For example, if "INI.VOL." Use this feature to delay the sound output and synchronize it with the video image. Choices: Off*, -80 dB to avoid the unexpected loud sound. y • Initial settings are reassigned, you turn on the settings of this unit next time... to assign the input jacks according to the component to be used if the initial settings of dynamic range compression to be applied to your speakers or headphones. setting. 2 INPUT MENU Use this menu to both "IN (2)" and "IN (3)." Choice Function OFF* Stops test tones and output ...

Owner's Manual
Page 45
... this unit, disconnect the power cable, and contact the nearest authorized Yamaha dealer or service center. ■ General Problem Cause Remedy This unit fails to turn off this unit back on. The front speakers to be defective. manual of a short circuit, etc. on the... that the impedance setting is muted. Press eMUTE or mVOLUME +/- The speaker impedance setting is turned down. No appropriate Audio input jack select has Set an appropriate Audio input jack select. The sound is correct. The protection circuitry has been activated because of the connected...
... this unit, disconnect the power cable, and contact the nearest authorized Yamaha dealer or service center. ■ General Problem Cause Remedy This unit fails to turn off this unit back on. The front speakers to be defective. manual of a short circuit, etc. on the... that the impedance setting is muted. Press eMUTE or mVOLUME +/- The speaker impedance setting is turned down. No appropriate Audio input jack select has Set an appropriate Audio input jack select. The sound is correct. The protection circuitry has been activated because of the connected...


