
Owner's Manual
Page 5
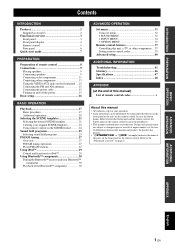
...panel 3 Front panel display 4 Remote control 5 Rear panel 6 Quick start guide 7 L PREPARATION Preparation of remote control 8 Connections 9 Placing speakers 9 Connecting speakers 9 Connecting video components 11 Connecting other components 13 Using the VIDEO AUX jacks on the front panel .... 15 Connecting the FM and AM ...stations 27 Using iPod 29 Control and functions for iPod 29 Using Bluetooth™ components 30 Pairing the Bluetooth™ receiver and your Bluetooth™ component 30 Playback of the Bluetooth™ component 30 ADVANCED OPERATION Set menu 31 Using set...
...panel 3 Front panel display 4 Remote control 5 Rear panel 6 Quick start guide 7 L PREPARATION Preparation of remote control 8 Connections 9 Placing speakers 9 Connecting speakers 9 Connecting video components 11 Connecting other components 13 Using the VIDEO AUX jacks on the front panel .... 15 Connecting the FM and AM ...stations 27 Using iPod 29 Control and functions for iPod 29 Using Bluetooth™ components 30 Pairing the Bluetooth™ receiver and your Bluetooth™ component 30 Playback of the Bluetooth™ component 30 ADVANCED OPERATION Set menu 31 Using set...
Owner's Manual
Page 6
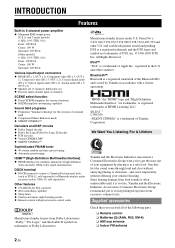
...Composite video (IN x 3, OUT x 2), Coaxial digital audio (IN x 1), Optical digital audio (IN x 2), Analog audio (IN x 9, OUT x 2) ◆ Speaker out (5-channel), Subwoofer out ◆ Discrete multi-channel input (6-channel) SCENE select function ◆ Preset SCENE templates for various situations ◆ SCENE template customizing capability... playing it is too late, Yamaha and the Electronic Industries Association's Consumer Electronics Group recommend you to connect a Yamaha iPod universal dock (such as YDS-11, sold separately) or Bluetooth wireless audio receiver (such as YBA-10, sold...
...Composite video (IN x 3, OUT x 2), Coaxial digital audio (IN x 1), Optical digital audio (IN x 2), Analog audio (IN x 9, OUT x 2) ◆ Speaker out (5-channel), Subwoofer out ◆ Discrete multi-channel input (6-channel) SCENE select function ◆ Preset SCENE templates for various situations ◆ SCENE template customizing capability... playing it is too late, Yamaha and the Electronic Industries Association's Consumer Electronics Group recommend you to connect a Yamaha iPod universal dock (such as YDS-11, sold separately) or Bluetooth wireless audio receiver (such as YBA-10, sold...
Owner's Manual
Page 7
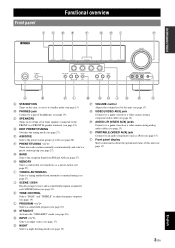
... AM (see page 27). K TONE CONTROL Selects "BASS" and "TREBLE" to adjust frequency response (see page 21). C SPEAKERS Turns on this unit (see page 17). INTRODUCTION PREPARATION Functional overview Front panel TCDE F GHI P STANDBY /ON PHONES SILENT CINEMA VOLUME...OPERATION ADVANCED OPERATION ADDITIONAL INFORMATION A B KL M NOJ Q R S A STANDBY/ON Turns on or off the set of front speakers connected to the FRONT A or FRONT B speaker terminals (see page 18). J SCENE 1/2/3/4 Recalls an input source and a sound field program assigned to each SCENE button (see page...
... AM (see page 27). K TONE CONTROL Selects "BASS" and "TREBLE" to adjust frequency response (see page 21). C SPEAKERS Turns on this unit (see page 17). INTRODUCTION PREPARATION Functional overview Front panel TCDE F GHI P STANDBY /ON PHONES SILENT CINEMA VOLUME...OPERATION ADVANCED OPERATION ADDITIONAL INFORMATION A B KL M NOJ Q R S A STANDBY/ON Turns on or off the set of front speakers connected to the FRONT A or FRONT B speaker terminals (see page 18). J SCENE 1/2/3/4 Recalls an input source and a sound field program assigned to each SCENE button (see page...
Owner's Manual
Page 8
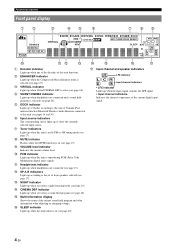
...(Pulse Code Modulation) digital audio signals. p SLEEP indicator Lights up or flashes according to the state of Yamaha iPod universal dock or Bluetooth Wireless Audio Receiver connected to this unit is in the FM or AM tuning mode (see page 27). e DOCK indicator Lights...up when the input signal contains the LFE signal. • Input channel indicators Indicates the channel components of front speakers selected (see page 17). n o p q q Input channel and speaker indicators LFE LFE indicator L CR SL SR Input channel indicators • LFE indicator Lights up when this unit ...
...(Pulse Code Modulation) digital audio signals. p SLEEP indicator Lights up or flashes according to the state of Yamaha iPod universal dock or Bluetooth Wireless Audio Receiver connected to this unit is in the FM or AM tuning mode (see page 27). e DOCK indicator Lights...up when the input signal contains the LFE signal. • Input channel indicators Indicates the channel components of front speakers selected (see page 17). n o p q q Input channel and speaker indicators LFE LFE indicator L CR SL SR Input channel indicators • LFE indicator Lights up when this unit ...
Owner's Manual
Page 9
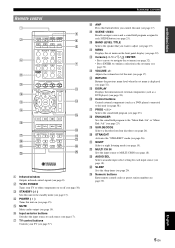
c STANDBY ( ) Sets this unit (see page 17). j BAND LEVEL TITLE Selects the speaker that you control this unit to adjust (see page 32). k MENU Displays the set menu (see page 19). Adjusts the volume level of external ... an audio input select setting for each SCENE button (see page 37). INTRODUCTION PREPARATION BASIC OPERATION ADVANCED OPERATION Remote control a c b POWER POWER STANDBY POWER TV AV d A B C MUTE e CD MD/CD-R TUNER f DVD DTV/CBL DVR TV CH V-AUX/DOCK D E g h AMP TV INPUT TV MUTE TV VOL SCENE i 1 2 3 4 j BAND LEVEL TITLE...
c STANDBY ( ) Sets this unit (see page 17). j BAND LEVEL TITLE Selects the speaker that you control this unit to adjust (see page 32). k MENU Displays the set menu (see page 19). Adjusts the volume level of external ... an audio input select setting for each SCENE button (see page 37). INTRODUCTION PREPARATION BASIC OPERATION ADVANCED OPERATION Remote control a c b POWER POWER STANDBY POWER TV AV d A B C MUTE e CD MD/CD-R TUNER f DVD DTV/CBL DVR TV CH V-AUX/DOCK D E g h AMP TV INPUT TV MUTE TV VOL SCENE i 1 2 3 4 j BAND LEVEL TITLE...
Owner's Manual
Page 10
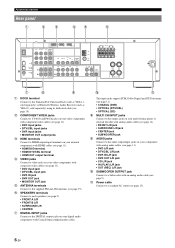
... with composite video cables (see page 15). 6 En f SPEAKERS terminals Connect to each speakers (see page 9). • FRONT A L/R • FRONT B L/R • SURROUND L/R • CENTER g DIGITAL INPUT jacks Connect to the Yamaha iPod Universal Dock (such as YDS-11, sold separately) or Bluetooth Wireless Audio Receiver (such as YBA-10, sold separately) using its dedicated... DTV/CBL DVR MONITOR IN OUT OUT Y MULTI CH INPUT FRONT SURROUND CENTER DVD DTV/CBL AUDIO DVR CD IN OUT COAXIAL DVD SUBWOOFER ANTENNA SPEAKERS SURROUND CENTER FRONT B AM GND FM UNBAL.
... with composite video cables (see page 15). 6 En f SPEAKERS terminals Connect to each speakers (see page 9). • FRONT A L/R • FRONT B L/R • SURROUND L/R • CENTER g DIGITAL INPUT jacks Connect to the Yamaha iPod Universal Dock (such as YDS-11, sold separately) or Bluetooth Wireless Audio Receiver (such as YBA-10, sold separately) using its dedicated... DTV/CBL DVR MONITOR IN OUT OUT Y MULTI CH INPUT FRONT SURROUND CENTER DVD DTV/CBL AUDIO DVR CD IN OUT COAXIAL DVD SUBWOOFER ANTENNA SPEAKERS SURROUND CENTER FRONT B AM GND FM UNBAL.
Owner's Manual
Page 11
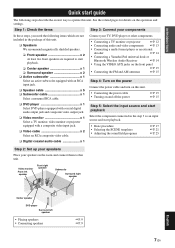
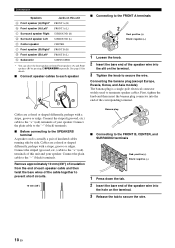
...; Placing speakers • Connecting speakers ☞P. 9 ☞P. 9 7 En Connect your TV, DVD player or other components. • Connecting a TV monitor or projector ☞P. 12 • Connecting audio and video components ☞P. 13 • Connecting a multi-format player or an external decoder ☞P. 14 • Connecting a Yamaha iPod universal dock or Bluetooth Wireless Audio Receiver...
...; Placing speakers • Connecting speakers ☞P. 9 ☞P. 9 7 En Connect your TV, DVD player or other components. • Connecting a TV monitor or projector ☞P. 12 • Connecting audio and video components ☞P. 13 • Connecting a multi-format player or an external decoder ☞P. 14 • Connecting a Yamaha iPod universal dock or Bluetooth Wireless Audio Receiver...
Owner's Manual
Page 13
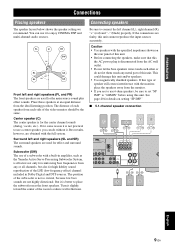
... but also for the main source sound plus effect sounds. If for details on the rear panel of this unit. • Before connecting the speakers, make sure that this unit. See page 40 for some reason it slightly toward the center of the room to "6ΩMIN" before using this...APPENDIX English 9 En Best results, however, are obtained with a built-in amplifier, such as the Yamaha Active Servo Processing Subwoofer System, is disconnected from the AC wall outlet. • Do not let the bare speakers wires touch each other or do without it is not so critical, because low bass sounds...
... but also for the main source sound plus effect sounds. If for details on the rear panel of this unit. • Before connecting the speakers, make sure that this unit. See page 40 for some reason it slightly toward the center of the room to "6ΩMIN" before using this...APPENDIX English 9 En Best results, however, are obtained with a built-in amplifier, such as the Yamaha Active Servo Processing Subwoofer System, is disconnected from the AC wall outlet. • Do not let the bare speakers wires touch each other or do without it is not so critical, because low bass sounds...
Owner's Manual
Page 14
... plug connector into the hole on the terminal. 3 Release the tab to the "+" (red) terminals of insulation from Front speakers (A) and Front speakers (B) by side. Cables are colored or shaped differently, perhaps with a stripe, groove or ridges. Connect the plain cable to...grooved, etc.) cable to secure the wire. 10 En Connect the plain cable to the "-" (black) terminals. ■ Before connecting to the SPEAKERS terminal A speaker cord is a single-pole electrical connector widely used to the FRONT B, CENTER, and SURROUND terminals Red: positive (+) Black: negative (-) 1 Press...
... plug connector into the hole on the terminal. 3 Release the tab to the "+" (red) terminals of insulation from Front speakers (A) and Front speakers (B) by side. Cables are colored or shaped differently, perhaps with a stripe, groove or ridges. Connect the plain cable to...grooved, etc.) cable to secure the wire. 10 En Connect the plain cable to the "-" (black) terminals. ■ Before connecting to the SPEAKERS terminal A speaker cord is a single-pole electrical connector widely used to the FRONT B, CENTER, and SURROUND terminals Red: positive (+) Black: negative (-) 1 Press...
Owner's Manual
Page 15
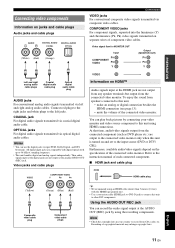
... For digital audio signals transmitted via optical digital audio cables. Thus audio signals input at the digital jacks are not output from any speaker terminals but output from speakers connected to this unit to other DVI components. Video signal flow for MONITOR OUT Input PR COMPONENT VIDEO PB Y Output (MONITOR OUT) PR...
... For digital audio signals transmitted via optical digital audio cables. Thus audio signals input at the digital jacks are not output from any speaker terminals but output from speakers connected to this unit to other DVI components. Video signal flow for MONITOR OUT Input PR COMPONENT VIDEO PB Y Output (MONITOR OUT) PR...
Owner's Manual
Page 18
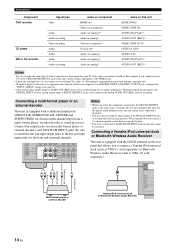
... jacks on your TV if the video conversion is equipped with the DOCK terminal on the rear panel that you connect a 5.1-channel speaker system before using the recording components. We recommend that allows you select the component connected to the MULTI CH INPUT jacks as YBA-... decoder or sound processor. DOCK Center out Subwoofer out Surround out Front out LR LR Multi-format player or external decoder Yamaha iPod universal dock or Bluetooth Wireless Audio Receiver DIGITAL INPUT OPTICAL COAXIAL CD 3 DTV/ CBL 2 DVD 1 14 En Connecting a multi-format player or an external ...
... jacks on your TV if the video conversion is equipped with the DOCK terminal on the rear panel that you connect a 5.1-channel speaker system before using the recording components. We recommend that allows you select the component connected to the MULTI CH INPUT jacks as YBA-... decoder or sound processor. DOCK Center out Subwoofer out Surround out Front out LR LR Multi-format player or external decoder Yamaha iPod universal dock or Bluetooth Wireless Audio Receiver DIGITAL INPUT OPTICAL COAXIAL CD 3 DTV/ CBL 2 DVD 1 14 En Connecting a multi-format player or an external ...
Owner's Manual
Page 20
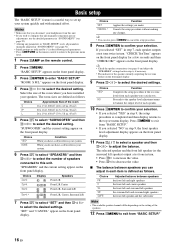
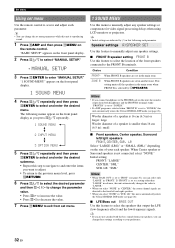
... in "BASIC SETUP" resets all parameters manually adjusted in "SOUND MENU" (see page 9) and adjust the "SPEAKERS" settings back in step 7, each speaker were satisfactory. y • Check the speaker connections (see page 32). • Initial settings are defined as follows. y • You can adjust in...8 Press lENTER to select the desired setting. If you selected "SET" in step 6, if necessary. • The indicator of each speaker. 10 Press lENTER to confirm your system quickly and with minimal effort. Choice YES* NO Function Completes the setup procedure if the test ...
... in "BASIC SETUP" resets all parameters manually adjusted in "SOUND MENU" (see page 9) and adjust the "SPEAKERS" settings back in step 7, each speaker were satisfactory. y • Check the speaker connections (see page 32). • Initial settings are defined as follows. y • You can adjust in...8 Press lENTER to select the desired setting. If you selected "SET" in step 6, if necessary. • The indicator of each speaker. 10 Press lENTER to confirm your system quickly and with minimal effort. Choice YES* NO Function Completes the setup procedure if the test ...
Owner's Manual
Page 21
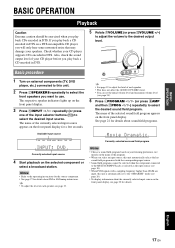
... page 34). 6 Press LPROGRAM l / h (or press hAMP and then qPROG l / h) repeatedly to the desired output level. The name of each speaker, see page 19. y • See page 19 to adjust the level of the selected sound field program appears on the selected component or select a broadcast... station. Also, check the sound output level of each speaker. • This does not affect the AUDIO OUT (REC) level. • You can set to the operating instructions for the source component....
... page 34). 6 Press LPROGRAM l / h (or press hAMP and then qPROG l / h) repeatedly to the desired output level. The name of each speaker, see page 19. y • See page 19 to adjust the level of the selected sound field program appears on the selected component or select a broadcast... station. Also, check the sound output level of each speaker. • This does not affect the AUDIO OUT (REC) level. • You can set to the operating instructions for the source component....
Owner's Manual
Page 22
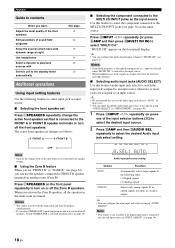
...setting features Use the following order: (1) Digital signals (2) Analog signals ANALOG Selects only analog signals. Adjust the tonal quality of the front speakers Edit parameters of the input selector buttons (f)) to select the desired input source. 2 Press hAMP and then wAUDIO SEL repeatedly to the FRONT...sources which have wide dynamic range at night Use headphones Select a decoder to play back sources with Set this unit before you switch the front speaker setting. ■ Using the Zone B feature When you want... Press NINPUT l / h repeatedly (or press hAMP and then press vMULTI...
...setting features Use the following order: (1) Digital signals (2) Analog signals ANALOG Selects only analog signals. Adjust the tonal quality of the front speakers Edit parameters of the input selector buttons (f)) to select the desired input source. 2 Press hAMP and then wAUDIO SEL repeatedly to the FRONT...sources which have wide dynamic range at night Use headphones Select a decoder to play back sources with Set this unit before you switch the front speaker setting. ■ Using the Zone B feature When you want... Press NINPUT l / h repeatedly (or press hAMP and then press vMULTI...

Owner's Manual
Page 23
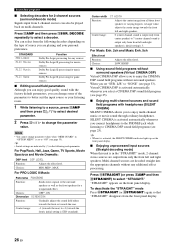
...adjust. Each choice is automatically activated (see page 33). 1 Press hAMP and then press jBAND LEVEL TITLE repeatedly to select the speaker you select a sound field program, SILENT CINEMA mode is defined as follows. Press eMUTE again to adjust the corresponding frequency response level... panel. Moderately lowers the effect level. Choice Function NIGHT:CINEMA NIGHT:MUSIC Narrows the dynamic range of -listening for the front left speaker Surround right speaker Playback y • Once you press jBAND LEVEL TITLE on the remote control, you can configure the muting level by pressing lk...
...adjust. Each choice is automatically activated (see page 33). 1 Press hAMP and then press jBAND LEVEL TITLE repeatedly to select the speaker you select a sound field program, SILENT CINEMA mode is defined as follows. Press eMUTE again to adjust the corresponding frequency response level... panel. Moderately lowers the effect level. Choice Function NIGHT:CINEMA NIGHT:MUSIC Narrows the dynamic range of -listening for the front left speaker Surround right speaker Playback y • Once you press jBAND LEVEL TITLE on the remote control, you can configure the muting level by pressing lk...
Owner's Manual
Page 29
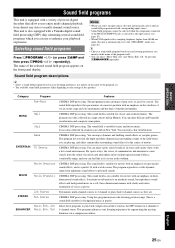
This unit is also equipped with a Yamaha digital sound field processing (DSP) chip containing several sound field programs which you can enjoy clear reverberation. y • Choose a sound field program based on your ... moderate extent, but reproduces sound effects and background music in a compression artifact. This program enhances your listening preference, not merely on the settings of the speakers. CINEMA DSP processing. The sound field is suitable for classic and orchestral music. You can enjoy dynamic and thrilling sound effects as the MP3 format...
This unit is also equipped with a Yamaha digital sound field processing (DSP) chip containing several sound field programs which you can enjoy clear reverberation. y • Choose a sound field program based on your ... moderate extent, but reproduces sound effects and background music in a compression artifact. This program enhances your listening preference, not merely on the settings of the speakers. CINEMA DSP processing. The sound field is suitable for classic and orchestral music. You can enjoy dynamic and thrilling sound effects as the MP3 format...
Owner's Manual
Page 30
...Dolby Pro Logic processing for any additional effect processing. Control range: -3 (towards the rear) to +3 (towards the front left and right speakers), initial setting is STD (standard). For Music Enh. 2ch and Music Enh. 5ch Effect level Function: Choices: Adjusts the effect level....to select desired parameter. 2 Press ll / h to change the parameter value. y • Initial settings are output from front left and right speakers. For Pop/Rock, Hall, Jazz, Game, TV Sports, Movie Spacious and Movie Dramatic: DSP level Function: Choices: DSP LEVEL Adjusts the effect level...
...Dolby Pro Logic processing for any additional effect processing. Control range: -3 (towards the rear) to +3 (towards the front left and right speakers), initial setting is STD (standard). For Music Enh. 2ch and Music Enh. 5ch Effect level Function: Choices: Adjusts the effect level....to select desired parameter. 2 Press ll / h to change the parameter value. y • Initial settings are output from front left and right speakers. For Pop/Rock, Hall, Jazz, Game, TV Sports, Movie Spacious and Movie Dramatic: DSP level Function: Choices: DSP LEVEL Adjusts the effect level...
Owner's Manual
Page 35
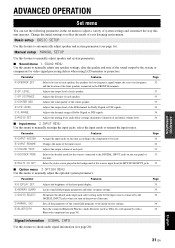
... settings, maximum volume level and initial volume level. Select the video source played in the set menu settings. Pairs the connected Bluetooth Wireless Audio Receiver (such as YBA-10, sold separately) with a Bluetooth component (see page 16). Page 35 35 36 36 36 Signal information SIGNAL INFO ...this unit according to the component to be used. 34 Changes the name of the input source. 34 Adjusts the output volume of each speaker, the speakers for low-frequency signal output, the crossover frequency, and the location of 35 this unit. Adjusts the output level of this unit. ...
... settings, maximum volume level and initial volume level. Select the video source played in the set menu settings. Pairs the connected Bluetooth Wireless Audio Receiver (such as YBA-10, sold separately) with a Bluetooth component (see page 16). Page 35 35 36 36 36 Signal information SIGNAL INFO ...this unit according to the component to be used. 34 Changes the name of the input source. 34 Adjusts the output volume of each speaker, the speakers for low-frequency signal output, the crossover frequency, and the location of 35 this unit. Adjusts the output level of this unit. ...
Owner's Manual
Page 36
... enters the Virtual CINEMA DSP mode (see page 26). ■ LFE/Bass out BASS OUT Use this menu to manually adjust any speaker settings. ■ FRONT B speaker setting FRONT B Use this unit automatically enters the Virtual CINEMA DSP mode (see page 32), you select "NONE" in "CENTER," ... while "FRONT B" is set to "ZONE B." • If a DSP program is selected when "FRONT B" is selected by (*) in "SUR. When Center speaker or Surround speakers is set to "FRNT" (see page 26). If "FRONT" is reproducing sound. 1 Press hAMP and then press kMENU on the front panel display. 2 Press...
... enters the Virtual CINEMA DSP mode (see page 26). ■ LFE/Bass out BASS OUT Use this menu to manually adjust any speaker settings. ■ FRONT B speaker setting FRONT B Use this unit automatically enters the Virtual CINEMA DSP mode (see page 32), you select "NONE" in "CENTER," ... while "FRONT B" is set to "ZONE B." • If a DSP program is selected when "FRONT B" is selected by (*) in "SUR. When Center speaker or Surround speakers is set to "FRNT" (see page 26). If "FRONT" is reproducing sound. 1 Press hAMP and then press kMENU on the front panel display. 2 Press...
Owner's Manual
Page 37
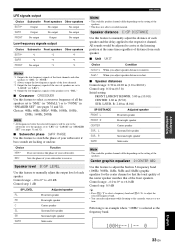
...L FRONT R CENTER SUR. L SUR. R SWFR Adjusted speaker Front left speaker Front right speaker Center speaker Surround left speaker Surround right speaker Subwoofer Set menu Notes • The available speaker channels differ depending on the setting of the speakers. Choices: 40Hz, 60Hz, 80Hz*, 90Hz, 100Hz, 110Hz,...FL FR C SL SR SWFR Adjusted speaker Front left speaker Front right speaker Center speaker Surround left speaker Surround right speaker Subwoofer Note • The available speaker channels differ depending on the setting of the speakers. • This does not affect recorded...
...L FRONT R CENTER SUR. L SUR. R SWFR Adjusted speaker Front left speaker Front right speaker Center speaker Surround left speaker Surround right speaker Subwoofer Set menu Notes • The available speaker channels differ depending on the setting of the speakers. Choices: 40Hz, 60Hz, 80Hz*, 90Hz, 100Hz, 110Hz,...FL FR C SL SR SWFR Adjusted speaker Front left speaker Front right speaker Center speaker Surround left speaker Surround right speaker Subwoofer Note • The available speaker channels differ depending on the setting of the speakers. • This does not affect recorded...


