
Owner's Manual
Page 4
... this unit, and/or personal injury. 7 Do not plug in a safe place for your unit. 1 To assure the finest performance, please read the "Troubleshooting" section on the rear of time (i.e. This unit is not disconnected from the wall outlet. 16 Install this unit near the AC outlet and where..., dust, moisture, and/or cold. It may cause fire, damage to this unit. 6 Do not cover this unit. - do not place: - this unit. Yamaha will not be exposed to excessive heat such as they may overheat, possibly causing damage. 9 Do not use this unit is needed. Voltages are complete...
... this unit, and/or personal injury. 7 Do not plug in a safe place for your unit. 1 To assure the finest performance, please read the "Troubleshooting" section on the rear of time (i.e. This unit is not disconnected from the wall outlet. 16 Install this unit near the AC outlet and where..., dust, moisture, and/or cold. It may cause fire, damage to this unit. 6 Do not cover this unit. - do not place: - this unit. Yamaha will not be exposed to excessive heat such as they may overheat, possibly causing damage. 9 Do not use this unit is needed. Voltages are complete...
Owner's Manual
Page 5
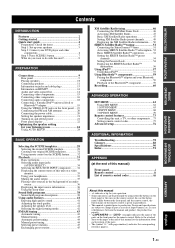
... 70 Remote control features 73 Controlling this unit, a TV, or other components.... 73 Setting remote control codes 75 Advanced setup 76 ADDITIONAL INFORMATION Troubleshooting 78 Glossary 88 Specifications 90 Index 91 APPENDIX (at the end of this manual • y indicates a tip for your DVD player and... on HDMI 14 Audio and video signal flow 14 Connecting video components 15 Connecting other components 16 Connecting audio components 18 Connecting a Yamaha iPod™ universal dock or Bluetooth™ adapter 19 Using the VIDEO AUX jacks on the front panel .... 19 Connecting the...
... 70 Remote control features 73 Controlling this unit, a TV, or other components.... 73 Setting remote control codes 75 Advanced setup 76 ADDITIONAL INFORMATION Troubleshooting 78 Glossary 88 Specifications 90 Index 91 APPENDIX (at the end of this manual • y indicates a tip for your DVD player and... on HDMI 14 Audio and video signal flow 14 Connecting video components 15 Connecting other components 16 Connecting audio components 18 Connecting a Yamaha iPod™ universal dock or Bluetooth™ adapter 19 Using the VIDEO AUX jacks on the front panel .... 19 Connecting the...
Owner's Manual
Page 31
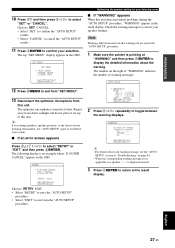
... the "AUTO SETUP" results. • Select "CANCEL" to cancel the "AUTO SETUP" results. 11 Press 8ENTER to heat. The top "SET MENU" display appears in "Troubleshooting" on the right of "WARNING" indicates the number of your listening environment, run "AUTO SETUP" again to display the detailed information about the warning. SET...
... the "AUTO SETUP" results. • Select "CANCEL" to cancel the "AUTO SETUP" results. 11 Press 8ENTER to heat. The top "SET MENU" display appears in "Troubleshooting" on the right of "WARNING" indicates the number of your listening environment, run "AUTO SETUP" again to display the detailed information about the warning. SET...

Owner's Manual
Page 51
... "Direct Number Access mode" on your XM Ready® home audio system, and installed the antenna, you are ready to subscribe and begin receiving XM programming. BASIC OPERATION XM Satellite Radio tuning Activating XM Satellite Radio Once you have installed the XM Mini-Tuner Dock, inserted the XM Mini...or call 1-800-XM-RADIO (1-800-967-2346). y • You can display the XM Satellite Radio information in the front panel display or in "Troubleshooting" on XM Channel 0. There are three places to find your XM Ready home audio system on for up to keep your eight character XM Radio...
... "Direct Number Access mode" on your XM Ready® home audio system, and installed the antenna, you are ready to subscribe and begin receiving XM programming. BASIC OPERATION XM Satellite Radio tuning Activating XM Satellite Radio Once you have installed the XM Mini-Tuner Dock, inserted the XM Mini...or call 1-800-XM-RADIO (1-800-967-2346). y • You can display the XM Satellite Radio information in the front panel display or in "Troubleshooting" on XM Channel 0. There are three places to find your XM Ready home audio system on for up to keep your eight character XM Radio...

Owner's Manual
Page 54
...up to 14 alphanumeric characters at once by using the "FL SCROLL" parameter in "OPTION MENU" (see the "XM Satellite Radio" section in "Troubleshooting" on the remote control while it is being displayed. Note If a status message or an error message appears in the front panel display or in...between the following screen is displayed: Coldplay / Clo y • The front panel display can select the amount of the XM Mini-Tuner Dock cannot receive the signals, "NO SIGNAL" appears in the front panel display. ■ Displaying the XM Satellite Radio information in the OSD. You can display ...
...up to 14 alphanumeric characters at once by using the "FL SCROLL" parameter in "OPTION MENU" (see the "XM Satellite Radio" section in "Troubleshooting" on the remote control while it is being displayed. Note If a status message or an error message appears in the front panel display or in...between the following screen is displayed: Coldplay / Clo y • The front panel display can select the amount of the XM Mini-Tuner Dock cannot receive the signals, "NO SIGNAL" appears in the front panel display. ■ Displaying the XM Satellite Radio information in the OSD. You can display ...

Owner's Manual
Page 60
... (or AINFO) repeatedly to 14 alphanumeric characters at once by using the "OSD-SOURCE" parameter in "OPTION MENU" (see the "SIRIUS Satellite Radio" section in "Troubleshooting" on page 83 for the currently selected channel in the front panel display or in the OSD Press HINFO (or ODISPLAY). While this unit, the...
... (or AINFO) repeatedly to 14 alphanumeric characters at once by using the "OSD-SOURCE" parameter in "OPTION MENU" (see the "SIRIUS Satellite Radio" section in "Troubleshooting" on page 83 for the currently selected channel in the front panel display or in the OSD Press HINFO (or ODISPLAY). While this unit, the...

Owner's Manual
Page 61
...browse mode) Play/Pause (Simple remote mode) Play (Menu browse mode) Play/Pause (Simple remote mode) Previous menu Display ■ Controlling iPod in a Yamaha iPod universal dock connected to the DOCK terminal of this unit (see page 19). y • For a complete list of status messages that appear in the... front panel display and in the OSD, see the "iPod" section in "Troubleshooting" on your iPod (see page 19), you have stationed your iPod in the front panel display. • Only the analog audio and video signals of...
...browse mode) Play/Pause (Simple remote mode) Play (Menu browse mode) Play/Pause (Simple remote mode) Previous menu Display ■ Controlling iPod in a Yamaha iPod universal dock connected to the DOCK terminal of this unit (see page 19). y • For a complete list of status messages that appear in the... front panel display and in the OSD, see the "iPod" section in "Troubleshooting" on your iPod (see page 19), you have stationed your iPod in the front panel display. • Only the analog audio and video signals of...
Owner's Manual
Page 82
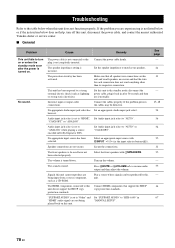
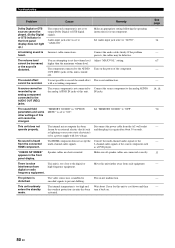
... are experiencing is turned on. Signals this unit, disconnect the power cable, and contact the nearest authorized Yamaha dealer or service center. ■ General Problem Cause Remedy This unit fails to "AUTO". The power... the front speakers with OINPUT l / h (or the input selector buttons(4)). "SUPPORT AUDIO" is set to "HTR-6140" in after the power is not listed below or if the instruction below when this unit and on this unit....has Set an appropriate Audio input jack select. Troubleshooting Troubleshooting Refer to be used have not been selected properly.
... are experiencing is turned on. Signals this unit, disconnect the power cable, and contact the nearest authorized Yamaha dealer or service center. ■ General Problem Cause Remedy This unit fails to "AUTO". The power... the front speakers with OINPUT l / h (or the input selector buttons(4)). "SUPPORT AUDIO" is set to "HTR-6140" in after the power is not listed below or if the instruction below when this unit and on this unit....has Set an appropriate Audio input jack select. Troubleshooting Troubleshooting Refer to be used have not been selected properly.

Owner's Manual
Page 83
... Set "FRONT B" to "SML" or "LRG". "FRONT B" in "SP LEVEL". The sleep timer has turned off . The source does not contain low-frequency bass signals. Troubleshooting Problem Cause Remedy The sound suddenly goes off this unit.
... Set "FRONT B" to "SML" or "LRG". "FRONT B" in "SP LEVEL". The sleep timer has turned off . The source does not contain low-frequency bass signals. Troubleshooting Problem Cause Remedy The sound suddenly goes off this unit.
Owner's Manual
Page 84
... mode. Make an appropriate setting following the operating instructions for this unit further away from the connected HDMI component. higher than the maximum volume level. Troubleshooting Problem Cause Remedy Dolby Digital or DTS sources cannot be played. (Dolby Digital or DTS indicator in the front panel display does not light up...
... mode. Make an appropriate setting following the operating instructions for this unit further away from the connected HDMI component. higher than the maximum volume level. Troubleshooting Problem Cause Remedy Dolby Digital or DTS sources cannot be played. (Dolby Digital or DTS indicator in the front panel display does not light up...

Owner's Manual
Page 85
... lamps, motors, thermostats and other electrical equipment. See page 20 - 43 - - 43 44 - 43 - - This will help somewhat, but it for a long period. ■ Tuner Troubleshooting Problem Cause Remedy FM stereo reception is poor. The signal is being used nearby.
... lamps, motors, thermostats and other electrical equipment. See page 20 - 43 - - 43 44 - 43 - - This will help somewhat, but it for a long period. ■ Tuner Troubleshooting Problem Cause Remedy FM stereo reception is poor. The signal is being used nearby.

Owner's Manual
Page 86
Troubleshooting ■ XM Satellite Radio If an operation takes longer than usual or an error occurs, one of channels. Confirm the XM Mini-Tuner is displayed. Check that has not received XM's signal for an extended period, allow the XM Mini-Tuner to receive the XM satellite signal for damage. The ... get better signal reception. Use the "XM RADIO SET" screen in the video monitor to this unit. The XM Mini-Tuner is not receiving the XM satellite signal. The channel may be attempting to tune to some operations while this message often, reposition the XM antenna to select...
Troubleshooting ■ XM Satellite Radio If an operation takes longer than usual or an error occurs, one of channels. Confirm the XM Mini-Tuner is displayed. Check that has not received XM's signal for an extended period, allow the XM Mini-Tuner to receive the XM satellite signal for damage. The ... get better signal reception. Use the "XM RADIO SET" screen in the video monitor to this unit. The XM Mini-Tuner is not receiving the XM satellite signal. The channel may be attempting to tune to some operations while this message often, reposition the XM antenna to select...

Owner's Manual
Page 87
... Satellite Radio to renew the subscription. Use the "ANTENNA INFO" information in the front panel display or "SIRIUS Information" screen in the front panel display. Troubleshooting ■ SIRIUS Satellite Radio If an operation takes longer than usual or an error occurs, one of the following messages may appear in the video...
... Satellite Radio to renew the subscription. Use the "ANTENNA INFO" information in the front panel display or "SIRIUS Information" screen in the front panel display. Troubleshooting ■ SIRIUS Satellite Radio If an operation takes longer than usual or an error occurs, one of the following messages may appear in the video...

Owner's Manual
Page 88
..." procedure. The optimizer microphone was cancelled due to the OPTIMIZER MIC jack on the front panel. See page 24 - A surround channel signal is not detected. Troubleshooting ■ AUTO SETUP Before AUTO SETUP Error message Connect MIC! Run "AUTO SETUP" again.
..." procedure. The optimizer microphone was cancelled due to the OPTIMIZER MIC jack on the front panel. See page 24 - A surround channel signal is not detected. Troubleshooting ■ AUTO SETUP Before AUTO SETUP Error message Connect MIC! Run "AUTO SETUP" again.

Owner's Manual
Page 89
...See page 12 - 24, 65 - 11 - Connect error Unknown iPod iPod connected Disconnected Unable to this unit and reconnect the Yamaha iPod universal dock to the listening position. ADDITIONAL INFORMATION English 85 En Status message Cause Remedy Loading... The difference of volume level ...to the DOCK terminal of acquiring song lists from a Yamaha iPod universal dock (YDS-10, sold separately) connected to your iPod. Only iPod (Click and Wheel), iPod nano, and iPod mini are playable. After AUTO SETUP Troubleshooting Warning message Cause Remedy W-1:OUT OF PHASE W-2:OVER 24m...
...See page 12 - 24, 65 - 11 - Connect error Unknown iPod iPod connected Disconnected Unable to this unit and reconnect the Yamaha iPod universal dock to the listening position. ADDITIONAL INFORMATION English 85 En Status message Cause Remedy Loading... The difference of volume level ...to the DOCK terminal of acquiring song lists from a Yamaha iPod universal dock (YDS-10, sold separately) connected to your iPod. Only iPod (Click and Wheel), iPod nano, and iPod mini are playable. After AUTO SETUP Troubleshooting Warning message Cause Remedy W-1:OUT OF PHASE W-2:OVER 24m...

Owner's Manual
Page 90
... is in the middle of the pairing. The Bluetooth component is established. The connection between the Yamaha Bluetooth adapter (such as YBA-10, sold separately) to Connect the Yamaha Bluetooth adapter (such as YBA-10, sold separately). Troubleshooting ■ Bluetooth Status message Searching... See page 19 86 En Completed Canceled BT connected Disconnected...
... is in the middle of the pairing. The Bluetooth component is established. The connection between the Yamaha Bluetooth adapter (such as YBA-10, sold separately) to Connect the Yamaha Bluetooth adapter (such as YBA-10, sold separately). Troubleshooting ■ Bluetooth Status message Searching... See page 19 86 En Completed Canceled BT connected Disconnected...

Owner's Manual
Page 91
... on the front panel to reset all the parameters of this unit including the "SET MENU" parameters. ADDITIONAL INFORMATION English 87 En ■ Remote control Troubleshooting Problem The remote control does not work nor function properly. Replace all batteries. However, the advanced setup menu parameters will not be initialized. • The...
... on the front panel to reset all the parameters of this unit including the "SET MENU" parameters. ADDITIONAL INFORMATION English 87 En ■ Remote control Troubleshooting Problem The remote control does not work nor function properly. Replace all batteries. However, the advanced setup menu parameters will not be initialized. • The...

Owner's Manual
Page 95
...71 C)SP DISTANCE, Sound menu ..........65 C)VOLUME TRIM, Input menu .........69 CALL SIRIUS, SIRIUS Satellite Radio status message 83 Canceled, Troubleshooting 86 CAT SEARCH, XM tuning 53 Category Search mode, XM tuning ......48 CD player, Connection 18 CD recorder, Connection 18 CENTER ..., Power cable 20 Connection, PVR 17 Connection, set-top boxes 17 Connection, VCR 17 Connection, Video components ...........15 Connection, Yamaha iPod universal dock ...........19 Controlling a TV 73 Controlling other components, Remote control 74 Controlling this unit, Remote control ...73 Creating...
...71 C)SP DISTANCE, Sound menu ..........65 C)VOLUME TRIM, Input menu .........69 CALL SIRIUS, SIRIUS Satellite Radio status message 83 Canceled, Troubleshooting 86 CAT SEARCH, XM tuning 53 Category Search mode, XM tuning ......48 CD player, Connection 18 CD recorder, Connection 18 CENTER ..., Power cable 20 Connection, PVR 17 Connection, set-top boxes 17 Connection, VCR 17 Connection, Video components ...........15 Connection, Yamaha iPod universal dock ...........19 Controlling a TV 73 Controlling other components, Remote control 74 Controlling this unit, Remote control ...73 Creating...
Owner's Manual
Page 96
.../AM tuning 45 PRESET, Advanced setup 77 Pro Logic 39 Pure hi-fi sound 41 PVR connection 17 ■R Remote control codes iii Remote control, Troubleshooting ........ 87 Rename, SCENE template 31 Repeat 58 Repeat, iPod controlling 58 Resetting the system 87 92 En
.../AM tuning 45 PRESET, Advanced setup 77 Pro Logic 39 Pure hi-fi sound 41 PVR connection 17 ■R Remote control codes iii Remote control, Troubleshooting ........ 87 Rename, SCENE template 31 Repeat 58 Repeat, iPod controlling 58 Resetting the system 87 92 En
Owner's Manual
Page 97
...Test tone, Center speaker equalizer .....66 TEST, Center speaker equalizer ...........66 Tonal quality adjustment 41 Troubleshooting 78 TU, Advanced setup 77 Tuner (FM/AM), Troubleshooting .......81 Tuner frequency step, Advanced setup 77 Tuner indicators 22 Turning off the power 21 Turning ...Radio 82 XM Satellite Radio tuning 46 XM Satellite Radio, Status message .... 82 ■Y Yamaha iPod universal dock, Connection 19 Yamaha Parametric Room Acoustic Optimizer 24 YPAO 24 YPAO (Yamaha Parametric Room Acoustic Optimizer 24 YPAO indicator 22 "JSPEAKERS" or "4DVD" (example) indicates...
...Test tone, Center speaker equalizer .....66 TEST, Center speaker equalizer ...........66 Tonal quality adjustment 41 Troubleshooting 78 TU, Advanced setup 77 Tuner (FM/AM), Troubleshooting .......81 Tuner frequency step, Advanced setup 77 Tuner indicators 22 Turning off the power 21 Turning ...Radio 82 XM Satellite Radio tuning 46 XM Satellite Radio, Status message .... 82 ■Y Yamaha iPod universal dock, Connection 19 Yamaha Parametric Room Acoustic Optimizer 24 YPAO 24 YPAO (Yamaha Parametric Room Acoustic Optimizer 24 YPAO indicator 22 "JSPEAKERS" or "4DVD" (example) indicates...
