

Owners Manual
Page 4
... to the digital output of the disc tray and other openings or look inside this unit, which may cause an electrical shock, fire, damage to an amplification system.To enjoy DTS Digital Surround™ playback, an external 5.1-channel DTS Digital Surround™ decoder system must be heard from the wall outlet. When playing DTS encoded CDs, excessive noise will be connected to...
... to the digital output of the disc tray and other openings or look inside this unit, which may cause an electrical shock, fire, damage to an amplification system.To enjoy DTS Digital Surround™ playback, an external 5.1-channel DTS Digital Surround™ decoder system must be heard from the wall outlet. When playing DTS encoded CDs, excessive noise will be connected to...

Owners Manual
Page 7
... presetting 35 Manual presetting 35 Selecting a preset radio station 36 Deleting a preset radio station 36 Setting frequency step (Australia model only 36 Sound Controls Selecting surround sound 37 Selecting digital sound effects 37 Adjusting the treble/bass level 37 Volume Control and Other Functions Adjusting the volume level 38 Switching to active mode 38 Switching to eco power standby mode ........ 38 Setting remote control codes 38 Other Functions Controlling other components 39 TV operations 39 Cable and satelite tuner operations 39 Dimming the display screen 40 Setting...
... presetting 35 Manual presetting 35 Selecting a preset radio station 36 Deleting a preset radio station 36 Setting frequency step (Australia model only 36 Sound Controls Selecting surround sound 37 Selecting digital sound effects 37 Adjusting the treble/bass level 37 Volume Control and Other Functions Adjusting the volume level 38 Switching to active mode 38 Switching to eco power standby mode ........ 38 Setting remote control codes 38 Other Functions Controlling other components 39 TV operations 39 Cable and satelite tuner operations 39 Dimming the display screen 40 Setting...

Owners Manual
Page 8
... regional code number on a flat, hard, and stable surface. 4 Do not use any non-standard shaped discs (heart-shaped, etc.). - Cleaning Discs - Do not use solvents such as the PC environment and application software. Use a soft cloth slightly moistened with a cleaning cloth.Wipe the disc from the center out. Choosing a suitable location - Place the receiver on the disc package. This receiver can play a disc. Some discs cannot be played...
... regional code number on a flat, hard, and stable surface. 4 Do not use any non-standard shaped discs (heart-shaped, etc.). - Cleaning Discs - Do not use solvents such as the PC environment and application software. Use a soft cloth slightly moistened with a cleaning cloth.Wipe the disc from the center out. Choosing a suitable location - Place the receiver on the disc package. This receiver can play a disc. Some discs cannot be played...
Owners Manual
Page 10
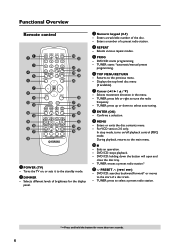
... the menu. - DVD/CD: starts programming. - Confirms a selection. 9 MENU - Exits an operation. - Functional Overview Remote control 21 3 4 5 6 7 8 9 0q w e r t y u i POWER DIMMER SLEEP POWER TV op SCAN PAGE PROG REPEAT A - TUNER: press to select a preset radio station. * = Press and hold the button for the display panel. 3 Numeric keypad (0-9) - DVD/CD: holding down to the start of a preset radio station. 4 REPEAT - x cv b 1 POWER (TV) - Turns the TV on /off playback control (PBC) mode. DVD/CD: searches backward/forward* or moves to select auto tuning...
... the menu. - DVD/CD: starts programming. - Confirms a selection. 9 MENU - Exits an operation. - Functional Overview Remote control 21 3 4 5 6 7 8 9 0q w e r t y u i POWER DIMMER SLEEP POWER TV op SCAN PAGE PROG REPEAT A - TUNER: press to select a preset radio station. * = Press and hold the button for the display panel. 3 Numeric keypad (0-9) - DVD/CD: holding down to the start of a preset radio station. 4 REPEAT - x cv b 1 POWER (TV) - Turns the TV on /off playback control (PBC) mode. DVD/CD: searches backward/forward* or moves to select auto tuning...

Owners Manual
Page 11
...Selects multi-channel surround or stereo mode. 7 Selects a subtitle language. i Input selection buttons - Sets the sleep timer. Turns the pages of each track/ chapter on the disc. l DISC SKIP - Use the VOLUME control to DVD/CD mode. h SET UP - Selects another disc. ; Selects a DVD disc camera angle (if available). DVD/CD: switches to change the tone level. g ON SCREEN - x VOL (+ / -) - u EFFECT - o POWER (B/I) - j3 - e AUDIO - v MUTE - Turns the DVD receiver on a disc. Plays the first 6 seconds or less of DVD-Audio still pictures. Adjusts the volume...
...Selects multi-channel surround or stereo mode. 7 Selects a subtitle language. i Input selection buttons - Sets the sleep timer. Turns the pages of each track/ chapter on the disc. l DISC SKIP - Use the VOLUME control to DVD/CD mode. h SET UP - Selects another disc. ; Selects a DVD disc camera angle (if available). DVD/CD: switches to change the tone level. g ON SCREEN - x VOL (+ / -) - u EFFECT - o POWER (B/I) - j3 - e AUDIO - v MUTE - Turns the DVD receiver on a disc. Plays the first 6 seconds or less of DVD-Audio still pictures. Adjusts the volume...

Owners Manual
Page 12
... the audio input signals. 50 - Load up /down. 0 Head phone jack - Exits an operation. - TUNER: starts preset radio station installation in the disc tray. 3 VOLUME - w System display panel e DISC (1, 2, 3, 4, 5)/LEDs - DVD/CD: searches backward/forward* or moves to change discs not being played during playback. 77 - Functional Overview Front panel (DVR-C300) 1 2 NATURAL SOUND HOME THEATER SYSTEM DVR-C300 1 2 3 4 5 DISC 3 45 AUDIO/VIDEO INPUT VOLUME PLAYXCHANGE e w q 0 9 87 6 1 STANDBY/ON - Use to the standby mode. 2 Disc tray - Turns the DVD receiver on...
... the audio input signals. 50 - Load up /down. 0 Head phone jack - Exits an operation. - TUNER: starts preset radio station installation in the disc tray. 3 VOLUME - w System display panel e DISC (1, 2, 3, 4, 5)/LEDs - DVD/CD: searches backward/forward* or moves to change discs not being played during playback. 77 - Functional Overview Front panel (DVR-C300) 1 2 NATURAL SOUND HOME THEATER SYSTEM DVR-C300 1 2 3 4 5 DISC 3 45 AUDIO/VIDEO INPUT VOLUME PLAYXCHANGE e w q 0 9 87 6 1 STANDBY/ON - Use to the standby mode. 2 Disc tray - Turns the DVD receiver on...

Owners Manual
Page 20
... sources with the DVD receiver. You cannot record or dub protected discs using a VCR. 3 Connect the DVD receiver's S VIDEO output to the S-VIDEO IN jack on the VCR. 4 Connect the DVD receiver's LINE OUT to the AUDIO IN jacks on the DVD receiver using the recording equipment.This section provides some examples of other AV equipment connections. Before starting operation, press AUX to select "AUX ANALOG" in order to make analog stereo (two channels, right and left) recordings. 16 Connections Connecting...
... sources with the DVD receiver. You cannot record or dub protected discs using a VCR. 3 Connect the DVD receiver's S VIDEO output to the S-VIDEO IN jack on the VCR. 4 Connect the DVD receiver's LINE OUT to the AUDIO IN jacks on the DVD receiver using the recording equipment.This section provides some examples of other AV equipment connections. Before starting operation, press AUX to select "AUX ANALOG" in order to make analog stereo (two channels, right and left) recordings. 16 Connections Connecting...

Owners Manual
Page 21
... refer to the owner's manual of that player to PCM format. - Notes: - Before starting operation, press AUX repeatedly to select "AUX DIGITAL" in order to the DIGITAL OUT jack on a digital audio component. English Connecting digital audio components Connections Digital Audio Component FM ANT GND AM ANT 75Ω UNBAL VIDEO OUT (DVD ONLY) S VIDEO DIGITAL IN COMPONENT COAXIAL VIDEO PCM/DTS q DIGITAL SYSTEM CONNECTOR TV IN AUX IN LINE OUT TO NX-SW300 DVD Receiver Listening to playback ● Connect the DVD receiver's DIGITAL IN to activate the input source.
... refer to the owner's manual of that player to PCM format. - Notes: - Before starting operation, press AUX repeatedly to select "AUX DIGITAL" in order to the DIGITAL OUT jack on a digital audio component. English Connecting digital audio components Connections Digital Audio Component FM ANT GND AM ANT 75Ω UNBAL VIDEO OUT (DVD ONLY) S VIDEO DIGITAL IN COMPONENT COAXIAL VIDEO PCM/DTS q DIGITAL SYSTEM CONNECTOR TV IN AUX IN LINE OUT TO NX-SW300 DVD Receiver Listening to playback ● Connect the DVD receiver's DIGITAL IN to activate the input source.

Owners Manual
Page 22
... also operate a television, cable TV or satellite connected to spill liquid on the remote control. - However, it is first necessary to enter the remote control code for the equipment in the remote control's memory (see "Setting remote control codes" on the remote control to select the mode you wish to preserve the memory in the display panel. 3 Then select the desired function (for example TV, DVD/CD). ➜ The selected source mode appears in the remote control. 2 Press Input selection buttons...
... also operate a television, cable TV or satellite connected to spill liquid on the remote control. - However, it is first necessary to enter the remote control code for the equipment in the remote control's memory (see "Setting remote control codes" on the remote control to select the mode you wish to preserve the memory in the display panel. 3 Then select the desired function (for example TV, DVD/CD). ➜ The selected source mode appears in the remote control. 2 Press Input selection buttons...

Owners Manual
Page 23
... or VIDEO. The output format will be in channel. It will not affect the picture during playback. 1 In DVD/CD mode, press SET UP. 2 Press 3 repeatedly to select [VIDEO SETUP PAGE]. 3 Press 5∞ to PAL format. Select this if you have a wide-screen TV. 5 Select a setting and press ENTER (OK). Select this if the connected TV is not, the TV display setting will change the video signal of an NTSC disc and output it to...
... or VIDEO. The output format will be in channel. It will not affect the picture during playback. 1 In DVD/CD mode, press SET UP. 2 Press 3 repeatedly to select [VIDEO SETUP PAGE]. 3 Press 5∞ to PAL format. Select this if you have a wide-screen TV. 5 Select a setting and press ENTER (OK). Select this if the connected TV is not, the TV display setting will change the video signal of an NTSC disc and output it to...

Owners Manual
Page 26
... a disc menu shows on the TV, see "Using the disc menu" on page 24. ➜ If the disc is a power-saving feature.The receiver will stop after a disc has stopped playing. Searching backward/forward ● Press and hold 4 / ¢. Auto Eco Power standby mode This is locked by parental control, you press REPEAT, the front display charges as your six-digit password (see the background screen on page 33). DVD discs and players...
... a disc menu shows on the TV, see "Using the disc menu" on page 24. ➜ If the disc is a power-saving feature.The receiver will stop after a disc has stopped playing. Searching backward/forward ● Press and hold 4 / ¢. Auto Eco Power standby mode This is locked by parental control, you press REPEAT, the front display charges as your six-digit password (see the background screen on page 33). DVD discs and players...

Owners Manual
Page 34
... "On-screen display (OSD) language" on the program menu, then press ENTER (OK). ➜ Playback starts for more information, visit us at www.divx.com/ vod. ON Select this receiver. DivX® VOD registration code Yamaha provides you with programming, OR ➜ Use 2 35∞ to highlight [NEXT] on the program menu, then press ENTER (OK). 5 Repeat steps 3~4 to input another disc number. DVD Setup Menu Options 4 Use 2 35...
... "On-screen display (OSD) language" on the program menu, then press ENTER (OK). ➜ Playback starts for more information, visit us at www.divx.com/ vod. ON Select this receiver. DivX® VOD registration code Yamaha provides you with programming, OR ➜ Use 2 35∞ to highlight [NEXT] on the program menu, then press ENTER (OK). 5 Repeat steps 3~4 to input another disc number. DVD Setup Menu Options 4 Use 2 35...

Owners Manual
Page 37
... you set also supports this function, please ensure that are not suitable for the disc inserted and press ENTER (OK). 3 Use the numeric keypad (0-9) to confirm. model only) Closed captions are data hidden in the video signals of certain discs that the disc contains closed caption information and your TV set a playback limitation level. This feature lets you enter the six-digit password. English DVD Setup Menu...
... you set also supports this function, please ensure that are not suitable for the disc inserted and press ENTER (OK). 3 Use the numeric keypad (0-9) to confirm. model only) Closed captions are data hidden in the video signals of certain discs that the disc contains closed caption information and your TV set a playback limitation level. This feature lets you enter the six-digit password. English DVD Setup Menu...
Owners Manual
Page 39
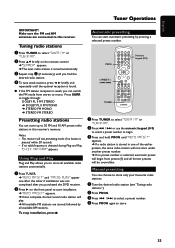
... installation, press 7. The receiver will play. ➜ All available FM stations are connected to store. 35 If no button is selected, automatic preset will begin . 3 Press and hold PROG until "AUTO PR S T" appears. ➜ If a radio station is stored in this receiver. B SHUFFLE TOP MENU/RETURN ON SCREEN ENTER MENU SET UP PRESET SUBTITLE AUDIO ANGLE DISC SKIP ZOOM TVVOL TV CH TV INPUT EFFECT TRE BASS SURR VOL MUTE TV AUX TUNER DVD...
... installation, press 7. The receiver will play. ➜ All available FM stations are connected to store. 35 If no button is selected, automatic preset will begin . 3 Press and hold PROG until "AUTO PR S T" appears. ➜ If a radio station is stored in this receiver. B SHUFFLE TOP MENU/RETURN ON SCREEN ENTER MENU SET UP PRESET SUBTITLE AUDIO ANGLE DISC SKIP ZOOM TVVOL TV CH TV INPUT EFFECT TRE BASS SURR VOL MUTE TV AUX TUNER DVD...

Owners Manual
Page 41
.... English Sound Controls IMPORTANT! For proper surround sound, make sure the speakers and subwoofer are playing. ● Press EFFECT to select between multi-channel and stereo tracks, (see "Connecting the DVD receiver and speakers to define the sound-processor settings. 1 Press TRE or BASS on the disc. ➜ The center and surround speakers operate only in multi-channel surround mode. ➜ The available output modes for SA-CD playback.You must access the disc menu in a surround mode. Selecting digital sound effects You can select preset digital sound effects that...
.... English Sound Controls IMPORTANT! For proper surround sound, make sure the speakers and subwoofer are playing. ● Press EFFECT to select between multi-channel and stereo tracks, (see "Connecting the DVD receiver and speakers to define the sound-processor settings. 1 Press TRE or BASS on the disc. ➜ The center and surround speakers operate only in multi-channel surround mode. ➜ The available output modes for SA-CD playback.You must access the disc menu in a surround mode. Selecting digital sound effects You can select preset digital sound effects that...

Owners Manual
Page 42
... numeric keypad (0~9) to enter the 4 digit remote control codes (see "Remote Control Codes" at the end of this remote to control your other components.The remote control automatically switches to active mode ● Press TUNER repeatedly on the remote control. ➜ The display screen goes blank. 38 AUX/ANALOG AUX/DIGITAL For the TV button you can set aTV remote control code and for that component. Volume Control and Other Functions Adjusting the volume level ● Use the VOLUME control (or press VOL (+/-) on the remote control) to store.
... numeric keypad (0~9) to enter the 4 digit remote control codes (see "Remote Control Codes" at the end of this remote to control your other components.The remote control automatically switches to active mode ● Press TUNER repeatedly on the remote control. ➜ The display screen goes blank. 38 AUX/ANALOG AUX/DIGITAL For the TV button you can set aTV remote control code and for that component. Volume Control and Other Functions Adjusting the volume level ● Use the VOLUME control (or press VOL (+/-) on the remote control) to store.

Owners Manual
Page 43
... volume level. B SHUFFLE TOP MENU/RETURN ON SCREEN ENTER MENU SET UP Numeric keypad (0-9) TV VOL (+ / -) TV INPUT PRESET SUBTITLE AUDIO ANGLE DISC SKIP ZOOM TVVOL TV CH TV INPUT EFFECT TRE BASS SURR VOL MUTE TV AUX TUNER DVD/CD TV CH (+ / -) Functions for TV operation POWER (TV)* Turn the TV on , or set it to the standby mode. Numeric keypad (0-9) Cable: enters a number of a preset radio station. TV operations Press TV for the cable and satellite tuner operations. Other Functions Cable...
... volume level. B SHUFFLE TOP MENU/RETURN ON SCREEN ENTER MENU SET UP Numeric keypad (0-9) TV VOL (+ / -) TV INPUT PRESET SUBTITLE AUDIO ANGLE DISC SKIP ZOOM TVVOL TV CH TV INPUT EFFECT TRE BASS SURR VOL MUTE TV AUX TUNER DVD/CD TV CH (+ / -) Functions for TV operation POWER (TV)* Turn the TV on , or set it to the standby mode. Numeric keypad (0-9) Cable: enters a number of a preset radio station. TV operations Press TV for the cable and satellite tuner operations. Other Functions Cable...

Owners Manual
Page 45
... VCR. If you are required. 41 Make sure that the audio cables are connected and press the Input selection buttons to select the correct input source (TV or AUX, for servicing, both the DVD receiver and the subwoofer are unable to remedy a problem by the DVD receiver. The disc is properly connected. Adjust the volume. Most commercially available DVDs include copy protect features. Check if the system cable is fixed on the TV, it may appear.
... VCR. If you are required. 41 Make sure that the audio cables are connected and press the Input selection buttons to select the correct input source (TV or AUX, for servicing, both the DVD receiver and the subwoofer are unable to remedy a problem by the DVD receiver. The disc is properly connected. Adjust the volume. Most commercially available DVDs include copy protect features. Check if the system cable is fixed on the TV, it may appear.

Owners Manual
Page 46
... the power of the component connected to the DVD receiver. Press SET UP to select a correct surround sound setting. Use proper audio sources. Connect those equipment to the DVD receiver with an external recorder. Press SURR button to turn on the DVD receiver cannot be recorded with analog connections. Unplug the subwoofer, then make sure the front, center and surround speakers are required. 42 Sound played on the DVD receiver. Solution Press STOP button twice before selecting the setup/system menu. Adjust the volume level in the display panel...
... the power of the component connected to the DVD receiver. Press SET UP to select a correct surround sound setting. Use proper audio sources. Connect those equipment to the DVD receiver with an external recorder. Press SURR button to turn on the DVD receiver cannot be recorded with analog connections. Unplug the subwoofer, then make sure the front, center and surround speakers are required. 42 Sound played on the DVD receiver. Solution Press STOP button twice before selecting the setup/system menu. Adjust the volume level in the display panel...

Owners Manual
Page 48
... turned into progressive format for connection to a progressive display. These jacks send audio through two channels, the left and right surround channels. (Such material is also compatible with conventional Pro Logic decoders). AUDIO output: Red and white jacks on the back of a picture or a music piece on DVD. Chapter: Sections of the DVD receiver that send audio to another system (TV, Stereo, etc.). A title is the abbreviation of several chapters. DTS: Digital Theater...
... turned into progressive format for connection to a progressive display. These jacks send audio through two channels, the left and right surround channels. (Such material is also compatible with conventional Pro Logic decoders). AUDIO output: Red and white jacks on the back of a picture or a music piece on DVD. Chapter: Sections of the DVD receiver that send audio to another system (TV, Stereo, etc.). A title is the abbreviation of several chapters. DTS: Digital Theater...


