Owner's Manual
Page 2
...the unit is approximately five years. If this manual is believed to be aware of battery is operating as regulated by Yamaha. If the antenna lead-in is used . If a cart, etc., is 300 ohm ribbon lead, change or modify any retailer of printing. IMPORTANT: The louder ...unable to assist you can be determined by turning the unit "OFF" and "ON", please try to eliminate the problem by Yamaha Corporation of America or its useful life is being affected by the interference. Purchase Date 92-BP (bottom) PLEASE KEEP THIS MANUAL FCC INFORMATION (U.S.A.) 1. This equipment...
...the unit is approximately five years. If this manual is believed to be aware of battery is operating as regulated by Yamaha. If the antenna lead-in is used . If a cart, etc., is 300 ohm ribbon lead, change or modify any retailer of printing. IMPORTANT: The louder ...unable to assist you can be determined by turning the unit "OFF" and "ON", please try to eliminate the problem by Yamaha Corporation of America or its useful life is being affected by the interference. Purchase Date 92-BP (bottom) PLEASE KEEP THIS MANUAL FCC INFORMATION (U.S.A.) 1. This equipment...
Owner's Manual
Page 3
...this book) *May not be connected to it provides a large selection of the drum pads which can use either the [] button in quotation marks indicate a message shown on your Yamaha dealer. Panel buttons and controls are for enhancing your instrument. ■ About the pads This Owner's ...described the model names of preset songs that you can play along with [ ] (brackets). • [SHIFT] + [DRUM KIT], etc. http://www.yamaha.co.jp/english/product/drums/ed/ 3 DTX500 Owner's Manual etc. Words in the operation. • "Completed!", etc. About the Descriptions and Conventions in...
...this book) *May not be connected to it provides a large selection of the drum pads which can use either the [] button in quotation marks indicate a message shown on your Yamaha dealer. Panel buttons and controls are for enhancing your instrument. ■ About the pads This Owner's ...described the model names of preset songs that you can play along with [ ] (brackets). • [SHIFT] + [DRUM KIT], etc. http://www.yamaha.co.jp/english/product/drums/ed/ 3 DTX500 Owner's Manual etc. Words in the operation. • "Completed!", etc. About the Descriptions and Conventions in...
Owner's Manual
Page 4
...have accumulated on it in damage to do not use immediately and have the instrument inspected by qualified Yamaha service personnel. • Never insert or remove an electric plug with wet hands. These precautions include, but are using a multiple-connector. Even when the power switch... minimum levels and gradually raise the volume controls while playing the instrument to be used for extended periods of time, or during use the provided screws only. Pulling by qualified Yamaha service personnel. If some trouble or malfunction occurs, immediately turn off for all ...
...have accumulated on it in damage to do not use immediately and have the instrument inspected by qualified Yamaha service personnel. • Never insert or remove an electric plug with wet hands. These precautions include, but are using a multiple-connector. Even when the power switch... minimum levels and gradually raise the volume controls while playing the instrument to be used for extended periods of time, or during use the provided screws only. Pulling by qualified Yamaha service personnel. If some trouble or malfunction occurs, immediately turn off for all ...

Owner's Manual
Page 5
...of damage to the product, data or other property, follow the notices below. ■ Handling and Maintenance • Do not use the instrument in which Yamaha owns copyrights or with general household waste. If you wish to discard these products correctly, you are for instructional purposes only, ... screens as in direct sunlight, near a heater, or in other electric devices. Yamaha cannot be held responsible for damage caused by improper use or modifications to the instrument, or data that used electrical and electronic products should not be able to start up properly, even when...
...of damage to the product, data or other property, follow the notices below. ■ Handling and Maintenance • Do not use the instrument in which Yamaha owns copyrights or with general household waste. If you wish to discard these products correctly, you are for instructional purposes only, ... screens as in direct sunlight, near a heater, or in other electric devices. Yamaha cannot be held responsible for damage caused by improper use or modifications to the instrument, or data that used electrical and electronic products should not be able to start up properly, even when...
Owner's Manual
Page 6
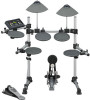
... the new pads (XP series.) • Built into a compact, portable package. With this, you can be individually controlled and simultaneously played by using the various drum voices. * The word "trigger" refers to the means by tapping in sequencer and a variety of situations such as the trigger ...which hitting a pad sends a signal to the DTX500 as you connect other devices and play along with an external audio device, such as Yamaha DT20. The instrument also features jacks that are an AUX IN jack, which lets you set breaks which naturally contain acoustic drum kits, and...
... the new pads (XP series.) • Built into a compact, portable package. With this, you can be individually controlled and simultaneously played by using the various drum voices. * The word "trigger" refers to the means by tapping in sequencer and a variety of situations such as the trigger ...which hitting a pad sends a signal to the DTX500 as you connect other devices and play along with an external audio device, such as Yamaha DT20. The instrument also features jacks that are an AUX IN jack, which lets you set breaks which naturally contain acoustic drum kits, and...
Owner's Manual
Page 7
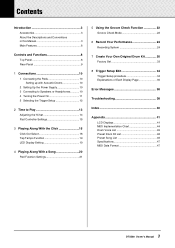
... With the Click 16 Click Out Select 18 Tap Tempo Function 19 LED Display Setting 19 4 Playing Along With a Song 20 Pad Function Settings 21 5 Using the Groove Check Function 22 Groove Check Mode 22 6 Record Your Performance 24 Recording System 24 7 Create Your Own Original Drum Kit 26 Factory Set...
... With the Click 16 Click Out Select 18 Tap Tempo Function 19 LED Display Setting 19 4 Playing Along With a Song 20 Pad Function Settings 21 5 Using the Groove Check Function 22 Groove Check Mode 22 6 Record Your Performance 24 Recording System 24 7 Create Your Own Original Drum Kit 26 Factory Set...

Owner's Manual
Page 8
... 8.8.8. ~~~~~YAMAHA ~~~~ ~~~ DTX drums~~ !0 q w t e r !1 y u q Drum Kit button (DRUM KIT) • For entering the Drum Kit Select display. (p. 13) • Hold the [SHIFT] button and press the [DRUM KIT] button to enter the Trigger Setup Select page. (p. 12) • This button can also be used to the... button to start/stop song playback or recording. If there are multiple pages either before or after the page currently displayed, the buttons are used to edit (the selected item flashes). w Click button (CLICK) • For entering the Click (Metronome) Setting page. (p. ...
... 8.8.8. ~~~~~YAMAHA ~~~~ ~~~ DTX drums~~ !0 q w t e r !1 y u q Drum Kit button (DRUM KIT) • For entering the Drum Kit Select display. (p. 13) • Hold the [SHIFT] button and press the [DRUM KIT] button to enter the Trigger Setup Select page. (p. 12) • This button can also be used to the... button to start/stop song playback or recording. If there are multiple pages either before or after the page currently displayed, the buttons are used to edit (the selected item flashes). w Click button (CLICK) • For entering the Click (Metronome) Setting page. (p. ...
Owner's Manual
Page 9
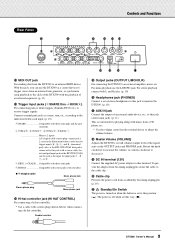
...receive trigger signals. Double insulator !4 !9 @0 @1 !5 Output jacks (OUTPUT L/MONO, R) For connecting the DTX500 to an external MIDI device. For mono playback use the DTX500 as a control device to trigger voices from an external tone generator, or synchronize song playback or the click of the DTX500 with the... playback of an external sequencer. (p. 11) !3 Trigger Input jacks (1SNARE thru 8KICK/9) For connecting pads or drum triggers (Yamaha DT20, etc.) to this jack to monitor the DTX500. (p. 10) !7 AUX IN jack Connect the output of the signal sent via the OUTPUT ...
...receive trigger signals. Double insulator !4 !9 @0 @1 !5 Output jacks (OUTPUT L/MONO, R) For connecting the DTX500 to an external MIDI device. For mono playback use the DTX500 as a control device to trigger voices from an external tone generator, or synchronize song playback or the click of the DTX500 with the... playback of an external sequencer. (p. 11) !3 Trigger Input jacks (1SNARE thru 8KICK/9) For connecting pads or drum triggers (Yamaha DT20, etc.) to this jack to monitor the DTX500. (p. 10) !7 AUX IN jack Connect the output of the signal sent via the OUTPUT ...

Owner's Manual
Page 10
... to Speakers or Headphones Since the DTX500 has no built-in the following order to the DTX500's input and output jacks. WARNING • Please use of drum triggers (such as improper sound, or inappropriate volume balance among the pads. Monitor system for the DTX500. You'll need an external audio...panel of the power cord to the input jacks of drum set you are using. Connect the other adaptors may occur-such as Yamaha DT20 Drum Triggers) and the triggers are properly connected to an AC outlet. The use the specified AC power adaptor. Doing this chapter, you 'll...
... to Speakers or Headphones Since the DTX500 has no built-in the following order to the DTX500's input and output jacks. WARNING • Please use of drum triggers (such as improper sound, or inappropriate volume balance among the pads. Monitor system for the DTX500. You'll need an external audio...panel of the power cord to the input jacks of drum set you are using. Connect the other adaptors may occur-such as Yamaha DT20 Drum Triggers) and the triggers are properly connected to an AC outlet. The use the specified AC power adaptor. Doing this chapter, you 'll...
Owner's Manual
Page 11
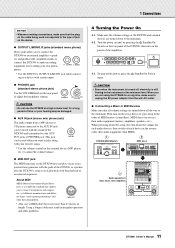
...the DTX500's song or click playback with the playback of the DTX500, then turn on the external device (MP3 player, etc.) to the minimum. 4-2. Using a longer cable may be damaged. ● AUX IN jack (stereo mini phone jack) The audio output from the wall AC outlet. ● ...DTX500 for recording your hearing may result in the reverse order (first audio equipment, then MIDI). 1 DTX500 (MIDI Master) 2 MIDI slave 8.8.8. ~~~~~YAMAHA ~~~~ ~~~ DTX drums~~ 3 Audio equipment (first mixer, then amplifier) 11 DTX500 Owner's Manual CAUTION • Even when the instrument...
...the DTX500's song or click playback with the playback of the DTX500, then turn on the external device (MP3 player, etc.) to the minimum. 4-2. Using a longer cable may be damaged. ● AUX IN jack (stereo mini phone jack) The audio output from the wall AC outlet. ● ...DTX500 for recording your hearing may result in the reverse order (first audio equipment, then MIDI). 1 DTX500 (MIDI Master) 2 MIDI slave 8.8.8. ~~~~~YAMAHA ~~~~ ~~~ DTX drums~~ 3 Audio equipment (first mixer, then amplifier) 11 DTX500 Owner's Manual CAUTION • Even when the instrument...

Owner's Manual
Page 12
... designed for Input jack 9. • In addition to the 8KICK/ 9 jack, the 2TOM1/ 0, 3TOM2/ !, and 4 TOM3/ @ jacks can be used to use. ● Procedure 5-1. Excessive vibration however, may result in crosstalk (sound being produced by other pads). 3 SP Med 4 SP Dyna for these reasons, ...that most closely matches the trigger output levels and functions of pad or a drum trigger (Yamaha DT20, etc.) to the input jack...
... designed for Input jack 9. • In addition to the 8KICK/ 9 jack, the 2TOM1/ 0, 3TOM2/ !, and 4 TOM3/ @ jacks can be used to use. ● Procedure 5-1. Excessive vibration however, may result in crosstalk (sound being produced by other pads). 3 SP Med 4 SP Dyna for these reasons, ...that most closely matches the trigger output levels and functions of pad or a drum trigger (Yamaha DT20, etc.) to the input jack...
Owner's Manual
Page 13
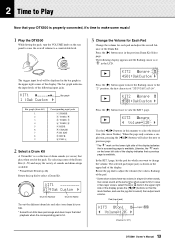
..., select the ˙ or ¶ mark in the upper right side of the display (press the [] buttons so that the mark flashes, and use the jog dial to select) then adjust each pad and adjust the overall balance of the Drum Kit. KIT2~~~ƒsnare~~˙ "S01:OakCustom~, Press... of sounds and drum setups available. * Preset Drum Kit List (p. 46) Rotate the jog dial to select a Drum Kit. KIT3~~~ƒsnare~~ "~~Volume=120~~, Use the [] buttons in the previous Drum Kit Select page. KIT1 1~:Oak~Custom~~, Bar graph Bar graph (from left side of the display indicates that a previous...
..., select the ˙ or ¶ mark in the upper right side of the display (press the [] buttons so that the mark flashes, and use the jog dial to select) then adjust each pad and adjust the overall balance of the Drum Kit. KIT2~~~ƒsnare~~˙ "S01:OakCustom~, Press... of sounds and drum setups available. * Preset Drum Kit List (p. 46) Rotate the jog dial to select a Drum Kit. KIT3~~~ƒsnare~~ "~~Volume=120~~, Use the [] buttons in the previous Drum Kit Select page. KIT1 1~:Oak~Custom~~, Bar graph Bar graph (from left side of the display indicates that a previous...
Owner's Manual
Page 14
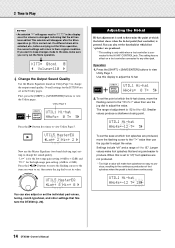
...to their original condition. If a different drum kit is carried out. First, press the [SHIFT] + [SAVE/ENTER] buttons to view Utility Page 5. Use this is set the threshold at which foot splashes are produced. * This setting is only valid when a foot controller is -32 to 0 to +32.... values make foot splashes that fine tune the DTX500 (p. 26). KIT3*~~™tom1~~~˙ "~~Volume=110~~, 4 Change the Output Sound Quality Use the Master Equalizer found on a foot controller connected to any other settings that are set the ease at which foot 'splashes' are produced, move ...
...to their original condition. If a different drum kit is carried out. First, press the [SHIFT] + [SAVE/ENTER] buttons to view Utility Page 5. Use this is set the threshold at which foot splashes are produced. * This setting is only valid when a foot controller is -32 to 0 to +32.... values make foot splashes that fine tune the DTX500 (p. 26). KIT3*~~™tom1~~~˙ "~~Volume=110~~, 4 Change the Output Sound Quality Use the Master Equalizer found on a foot controller connected to any other settings that are set the ease at which foot 'splashes' are produced, move ...
Owner's Manual
Page 15
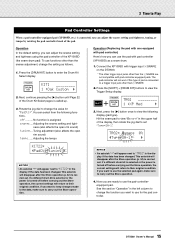
...power is turned off before carrying out the Store operation, the current settings will disappear after the Store operation (p. 34) is carried out. To use the selected pad again, make sure to carry out the Store operation. 4. Press the [SHIFT] + [DRUM KIT] buttons to enter the ...selected or the power is turned off .......... Press the [DRUM KIT] button to view the Trigger Setup display. No function is connected to use functions other than the snares adjustment, change the function you want to set "Type=SN-1." Adjusting the tempo Operation (Replacing the pad with...
...power is turned off before carrying out the Store operation, the current settings will disappear after the Store operation (p. 34) is carried out. To use the selected pad again, make sure to carry out the Store operation. 4. Press the [SHIFT] + [DRUM KIT] buttons to enter the ...selected or the power is turned off .......... Press the [DRUM KIT] button to view the Trigger Setup display. No function is connected to use functions other than the snares adjustment, change the function you want to set "Type=SN-1." Adjusting the tempo Operation (Replacing the pad with...

Owner's Manual
Page 16
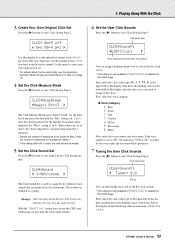
...; 1~:User~~~⁄=123, Click Set Number: Click Set Name Tempo Click Timer • Click Set Number [Range] 1 to 30 Selects the Click Set to be used. • Beat [Range] 1 to 9 Determines the click's time signature. • Tempo [Range] 30 to 300 Determines the click's tempo (q=). * The...3 Playing Along With the Click Play the DTX500 along with the right lamp in the DTX500's memory. CLK1~~~~∫~B=4~÷ç 1~:User~~~⁄=123, Use this , you can also be displayed. NOTICE • An asterisk "*" will return to "CLK1" in the LED display. If a different Click Set...
...; 1~:User~~~⁄=123, Click Set Number: Click Set Name Tempo Click Timer • Click Set Number [Range] 1 to 30 Selects the Click Set to be used. • Beat [Range] 1 to 9 Determines the click's time signature. • Tempo [Range] 30 to 300 Determines the click's tempo (q=). * The...3 Playing Along With the Click Play the DTX500 along with the right lamp in the DTX500's memory. CLK1~~~~∫~B=4~÷ç 1~:User~~~⁄=123, Use this , you can also be displayed. NOTICE • An asterisk "*" will return to "CLK1" in the LED display. If a different Click Set...
Owner's Manual
Page 17
...page 16. 4 Set the Click Measure Break Press the [>] button to create your own original click set the tuning value in the Click Setting display. Use this display to set the individual volume levels (0 to 9). The sounds are changed as above, the click is played for a measure then muted for 3...the "UserClick" setting you can assign a different drum voice to each of the five click voices. * This setting is only available if "UserClick" is used, the click will be muted. 5 Set the Click Sound Set Press the [>] button to view page 4 in semitones (-24.0 to 0 to the click.) First...
...page 16. 4 Set the Click Measure Break Press the [>] button to create your own original click set the tuning value in the Click Setting display. Use this display to set the individual volume levels (0 to 9). The sounds are changed as above, the click is played for a measure then muted for 3...the "UserClick" setting you can assign a different drum voice to each of the five click voices. * This setting is only available if "UserClick" is used, the click will be muted. 5 Set the Click Sound Set Press the [>] button to view page 4 in semitones (-24.0 to 0 to the click.) First...

Owner's Manual
Page 18
...3. The click signal is output from which you want to the PHONES jack's stereo L and R. 18 DTX500 Owner's Manual The settings in the DTX500's memory using the Store Operation described below . Press the [SAVE/ENTER] button. NOTE • You can be applied to store the Click Set. 8-3. UTIL1~Hi-hat.... Rotate the jog dial to select the destination memory number (1 to 30) to which output jack the signal of six characters, and these can use the Factory Set operation to reset the click sets 1 through 30 to select the desired character. 3 Playing Along With the Click 8 Save an ...
...3. The click signal is output from which you want to the PHONES jack's stereo L and R. 18 DTX500 Owner's Manual The settings in the DTX500's memory using the Store Operation described below . Press the [SAVE/ENTER] button. NOTE • You can be applied to store the Click Set. 8-3. UTIL1~Hi-hat.... Rotate the jog dial to select the destination memory number (1 to 30) to which output jack the signal of six characters, and these can use the Factory Set operation to reset the click sets 1 through 30 to select the desired character. 3 Playing Along With the Click 8 Save an ...

Owner's Manual
Page 19
...by one of the operations below will immediately change the tempo value. 3. First, press the [SHIFT] + [SAVE/ENTER] buttons to play the song. (Or use the [] buttons.) Tap on a pad. tempo ..... mode When pressing the [DRUM KIT] button: Drum kit Number • When pressing the [SHIFT] + [... >/■] button to display. UTIL4~LED "~Disp=tempo~~~, 3. timer ......Shows the current click timer (p. 16). You can change the value to be used to set the tempo to one that is changed by holding the [SHIFT] button and rotating the jog dial. • When operating a pad controller ...
...by one of the operations below will immediately change the tempo value. 3. First, press the [SHIFT] + [SAVE/ENTER] buttons to play the song. (Or use the [] buttons.) Tap on a pad. tempo ..... mode When pressing the [DRUM KIT] button: Drum kit Number • When pressing the [SHIFT] + [... >/■] button to display. UTIL4~LED "~Disp=tempo~~~, 3. timer ......Shows the current click timer (p. 16). You can change the value to be used to set the tempo to one that is changed by holding the [SHIFT] button and rotating the jog dial. • When operating a pad controller ...
Owner's Manual
Page 20
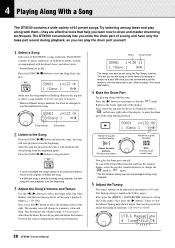
... the tuning in increments of the display. SONG1~~~⁄=123~÷ç 1~:Demo~1~~~~∞¢, Make sure the song number is flashing, then use the jog dial to select a song number (1 to 63) you want to return to the original, re-select the song. * If a different... it will automatically start playback from the beginning again. Tempo Song Volume SONG1~~~⁄=130~11 1~:Demo~1~~~~∞¢, * The tempo can conveniently set using the Tap Tempo function. Press the [SONG >/■] button to stop playback. * If you can also be changed the song's tempo or its...
... the tuning in increments of the display. SONG1~~~⁄=123~÷ç 1~:Demo~1~~~~∞¢, Make sure the song number is flashing, then use the jog dial to select a song number (1 to 63) you want to return to the original, re-select the song. * If a different... it will automatically start playback from the beginning again. Tempo Song Volume SONG1~~~⁄=130~11 1~:Demo~1~~~~∞¢, * The tempo can conveniently set using the Tap Tempo function. Press the [SONG >/■] button to stop playback. * If you can also be changed the song's tempo or its...
Owner's Manual
Page 21
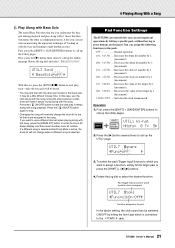
... specific pad-without having to the kit that with the song. Switches the click sound on the panel. UTIL1~Hi-hat HHofs=~~0~T=~~5, 2. Using the click sound as a reference will not change the drum kit to press buttons on /off Normal operation. dec~kitNo..... Increases the click set ..."Func=off ~, With this function mutes the other accompaniment parts, it easier to the 2TOM1/ 0 jack. 21 DTX500 Owner's Manual In this case, use a different drum kit when playing along with the song, press the [DRUM KIT] button to assign a function, simply hit the target pad, or press...
... specific pad-without having to the kit that with the song. Switches the click sound on the panel. UTIL1~Hi-hat HHofs=~~0~T=~~5, 2. Using the click sound as a reference will not change the drum kit to press buttons on /off Normal operation. dec~kitNo..... Increases the click set ..."Func=off ~, With this function mutes the other accompaniment parts, it easier to the 2TOM1/ 0 jack. 21 DTX500 Owner's Manual In this case, use a different drum kit when playing along with the song, press the [DRUM KIT] button to assign a function, simply hit the target pad, or press...
