Owner's Manual
Page 2
... MESSAGE SECTION This product utilizes batteries or an external power supply (adapter). The model number, serial number, power requirements, etc., are therefore the owners responsibility. a cart, rack, or stand that could void your purchase. If you , please contact Yamaha directly. Note: Check with an amplifier and headphones or speaker/s, may void your dealer before damage occurs. Mismatches or incorrect installation may cause interference harmful...
... MESSAGE SECTION This product utilizes batteries or an external power supply (adapter). The model number, serial number, power requirements, etc., are therefore the owners responsibility. a cart, rack, or stand that could void your purchase. If you , please contact Yamaha directly. Note: Check with an amplifier and headphones or speaker/s, may void your dealer before damage occurs. Mismatches or incorrect installation may cause interference harmful...
Owner's Manual
Page 4
... reference. Do not open • This instrument contains no user-serviceable parts. CAUTION Always follow the basic precautions listed below to avoid the possibility of time at their minimum levels and gradually raise the volume controls while playing the instrument to unplug the power cord from electrical shock, short-circuiting, damages, fire or other hazards. When attaching the stand or rack, use of serious injury...
... reference. Do not open • This instrument contains no user-serviceable parts. CAUTION Always follow the basic precautions listed below to avoid the possibility of time at their minimum levels and gradually raise the volume controls while playing the instrument to unplug the power cord from electrical shock, short-circuiting, damages, fire or other hazards. When attaching the stand or rack, use of serious injury...
Owner's Manual
Page 6
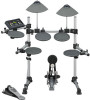
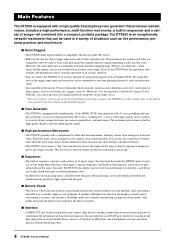
...;c drum part, and the Bass Solo function, which naturally contain acoustic drum kits, and cover a wide range of 63 preset songs. Main Features The DTX500 is compatible with the new pads (XP series.) • Built into a compact, portable package. The setup data such as the trigger input types and sensitivity can connect the DTX500 to play along with a comprehensive, multi-function metronome, allowing various click settings for enhancing the sound. ■...
...;c drum part, and the Bass Solo function, which naturally contain acoustic drum kits, and cover a wide range of 63 preset songs. Main Features The DTX500 is compatible with the new pads (XP series.) • Built into a compact, portable package. The setup data such as the trigger input types and sensitivity can connect the DTX500 to play along with a comprehensive, multi-function metronome, allowing various click settings for enhancing the sound. ■...
Owner's Manual
Page 7
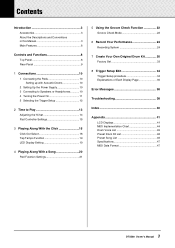
... Setting 19 4 Playing Along With a Song 20 Pad Function Settings 21 5 Using the Groove Check Function 22 Groove Check Mode 22 6 Record Your Performance 24 Recording System 24 7 Create Your Own Original Drum Kit 26 Factory Set 33 8 Trigger Setup Edit 34 Trigger Setup procedure 34 Explanations of Each Display Page 35 Error Messages 38 Troubleshooting 38 Index 40 Appendix 41 LCD Displays 41 MIDI Implementation Chart 44 Drum Voice List 45 Preset Drum Kit List 46 Preset Song List 46 Specifications 47 MIDI Data Format 47 7 DTX500 Owner's Manual
... Setting 19 4 Playing Along With a Song 20 Pad Function Settings 21 5 Using the Groove Check Function 22 Groove Check Mode 22 6 Record Your Performance 24 Recording System 24 7 Create Your Own Original Drum Kit 26 Factory Set 33 8 Trigger Setup Edit 34 Trigger Setup procedure 34 Explanations of Each Display Page 35 Error Messages 38 Troubleshooting 38 Index 40 Appendix 41 LCD Displays 41 MIDI Implementation Chart 44 Drum Voice List 45 Preset Drum Kit List 46 Preset Song List 46 Specifications 47 MIDI Data Format 47 7 DTX500 Owner's Manual
Owner's Manual
Page 9
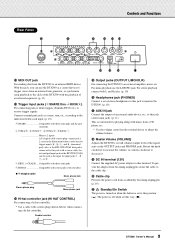
.../ 9 Mono x 2 inputs A Y-shaped cable (stereo plug-mono jack x 2; With this jack, you can be used to adjust the volume balance. !8 Master Volume (VOLUME) Adjusts the DTX500's overall volume (output level of the signal sent via the OUTPUT jacks and PHONES jack). For stereo playback connect both L and R jacks. (p. 10) !6 Headphones jack (PHONES) Connect a set of stereo headphones to this jack to monitor the DTX500. (p. 10) !7 AUX IN jack Connect the output of an external sequencer. (p. 11) !3 Trigger Input jacks (1SNARE thru 8KICK/9) For connecting pads or drum triggers (Yamaha DT20...
.../ 9 Mono x 2 inputs A Y-shaped cable (stereo plug-mono jack x 2; With this jack, you can be used to adjust the volume balance. !8 Master Volume (VOLUME) Adjusts the DTX500's overall volume (output level of the signal sent via the OUTPUT jacks and PHONES jack). For stereo playback connect both L and R jacks. (p. 10) !6 Headphones jack (PHONES) Connect a set of stereo headphones to this jack to monitor the DTX500. (p. 10) !7 AUX IN jack Connect the output of an external sequencer. (p. 11) !3 Trigger Input jacks (1SNARE thru 8KICK/9) For connecting pads or drum triggers (Yamaha DT20...

Owner's Manual
Page 10
.... 2-3. WARNING • Please use of drum set up with the drum set of drum triggers (such as improper sound, or inappropriate volume balance among the pads. Read these instructions carefully and in speakers, you are properly connected to the input jacks of stereo headphones to the DTX500's input and output jacks. For details, see the Assembly Manual that the instrument sounds and operates properly: 1 Connecting the Pads → 2 Setting Up the Power Supply (p. 10) → 3 Connecting to the DTX500. 2-1. CAUTION...
.... 2-3. WARNING • Please use of drum set up with the drum set of drum triggers (such as improper sound, or inappropriate volume balance among the pads. Read these instructions carefully and in speakers, you are properly connected to the input jacks of stereo headphones to the DTX500's input and output jacks. For details, see the Assembly Manual that the instrument sounds and operates properly: 1 Connecting the Pads → 2 Setting Up the Power Supply (p. 10) → 3 Connecting to the DTX500. 2-1. CAUTION...
Owner's Manual
Page 11
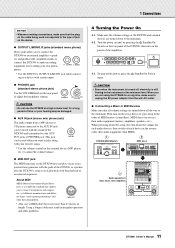
... volume control on the external device (MP3 player, etc.) to adjust the volume balance. ● MIDI OUT jack The MIDI functions on the DTX500 lets you to connect instruments and computers-of different manufacturers and different types-and transmit performance and other problems. 4 Turning the Power On 4-1. 1 Connections NOTICE • Whenever making connections, make sure that the plug on the cable being used when you want to play voices on an external tone generator with the pads...
... volume control on the external device (MP3 player, etc.) to adjust the volume balance. ● MIDI OUT jack The MIDI functions on the DTX500 lets you to connect instruments and computers-of different manufacturers and different types-and transmit performance and other problems. 4 Turning the Power On 4-1. 1 Connections NOTICE • Whenever making connections, make sure that the plug on the cable being used when you want to play voices on an external tone generator with the pads...

Owner's Manual
Page 12
... problems, the operation "Trigger Setup Edit" on page 34 describes how to make a detailed setting for each pad after the above setting is designed for maximum expressive control, allowing performance subtleties over a wide dynamic range. 1 Connections 5 Selecting the Trigger Setup This setting lets you select the Trigger Setup that setup can be used to input two trigger signals. Pad sensitivity is set . ● Trigger Setup List No. A Y-shaped cable (stereo plug-mono jack x 2) can be saved to acoustic drums. 8 | UserTrig 11 - This setting is selected...
... problems, the operation "Trigger Setup Edit" on page 34 describes how to make a detailed setting for each pad after the above setting is designed for maximum expressive control, allowing performance subtleties over a wide dynamic range. 1 Connections 5 Selecting the Trigger Setup This setting lets you select the Trigger Setup that setup can be used to input two trigger signals. Pad sensitivity is set . ● Trigger Setup List No. A Y-shaped cable (stereo plug-mono jack x 2) can be saved to acoustic drums. 8 | UserTrig 11 - This setting is selected...
Owner's Manual
Page 14
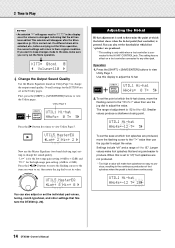
... HAT CONTROL jack. KIT3*~~™tom1~~~˙ "~~Volume=110~~, 4 Change the Output Sound Quality Use the Master Equalizer found on a foot controller connected to any other settings that are produced. * This setting is only valid when a foot controller is changed, indicating that the kit has been edited. When this display to adjust the hi-hat. This asterisk will make foot splashes too easy to pro- Utility (Page 1) UTIL1~Hi-hat HHofs=~~0~T=~~5, Press the [>] button...
... HAT CONTROL jack. KIT3*~~™tom1~~~˙ "~~Volume=110~~, 4 Change the Output Sound Quality Use the Master Equalizer found on a foot controller connected to any other settings that are produced. * This setting is only valid when a foot controller is changed, indicating that the kit has been edited. When this display to adjust the hi-hat. This asterisk will make foot splashes too easy to pro- Utility (Page 1) UTIL1~Hi-hat HHofs=~~0~T=~~5, Press the [>] button...

Owner's Manual
Page 18
... drum performance and song playback are output in the DTX500's memory using the Store Operation described below . Press the [SAVE/ENTER] button. Rotate the jog dial to select the destination memory number (1 to 30) to store the Click Set. 8-3. A Click Set name can contain a maximum of the click (metronome) is output from which you select from the OUTPUT L jack only. CLK~save ~to the PHONES jack's stereo L and R. 18 DTX500 Owner's Manual mix...
... drum performance and song playback are output in the DTX500's memory using the Store Operation described below . Press the [SAVE/ENTER] button. Rotate the jog dial to select the destination memory number (1 to 30) to store the Click Set. 8-3. A Click Set name can contain a maximum of the click (metronome) is output from which you select from the OUTPUT L jack only. CLK~save ~to the PHONES jack's stereo L and R. 18 DTX500 Owner's Manual mix...
Owner's Manual
Page 20
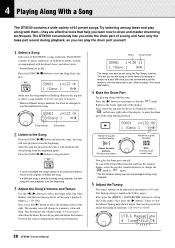
... increments of 63 preset songs. SONG1~~~⁄=123~÷ç 1~:Demo~1~~~~∞¢, Make sure the song number is flashing, then use the jog dial to select a song number (1 to set using the Tap Tempo function. This lets you 've changed during playback. First, press the [SHIFT] + [SAVE/ENTER] buttons to the right. Next, press the [>] button 7 times to view the Master Tuning page shown below, then use the jog dial...
... increments of 63 preset songs. SONG1~~~⁄=123~÷ç 1~:Demo~1~~~~∞¢, Make sure the song number is flashing, then use the jog dial to select a song number (1 to set using the Tap Tempo function. This lets you 've changed during playback. First, press the [SHIFT] + [SAVE/ENTER] buttons to the right. Next, press the [>] button 7 times to view the Master Tuning page shown below, then use the jog dial...
Owner's Manual
Page 24
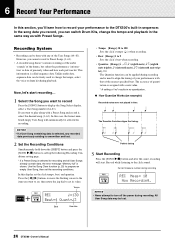
... performance to the DTX500's built-in sequencer. Perfect timing 3 Start Recording Press the [SONG >/■] button and after the count, recording will automatically be lost . 2 Set the Recording Conditions Simultaneously hold down the [SHIFT] button and press the [SONG >/■] button to the click sound. All User Song data may be selected for recording and all User Songs already contain data, the error message "Memory full" is used to change the tempo and playback in time...
... performance to the DTX500's built-in sequencer. Perfect timing 3 Start Recording Press the [SONG >/■] button and after the count, recording will automatically be lost . 2 Set the Recording Conditions Simultaneously hold down the [SHIFT] button and press the [SONG >/■] button to the click sound. All User Song data may be selected for recording and all User Songs already contain data, the error message "Memory full" is used to change the tempo and playback in time...
Owner's Manual
Page 25
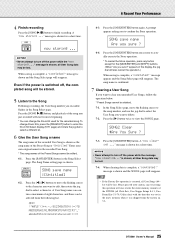
... Song Select page will also rewrite the entire memory contents of the recorded User Song is complete, a "completed!" all Click Sets, User Trigger Setups 8-11, User Drum Kits 51-70, Utility data) with caution, since executing this operation will reappear. message is shown for a short time. ~now~storing~... Press the [] buttons to move the flashing cursor to the song number, and use the jog dial to select the User Song...
... Song Select page will also rewrite the entire memory contents of the recorded User Song is complete, a "completed!" all Click Sets, User Trigger Setups 8-11, User Drum Kits 51-70, Utility data) with caution, since executing this operation will reappear. message is shown for a short time. ~now~storing~... Press the [] buttons to move the flashing cursor to the song number, and use the jog dial to select the User Song...
Owner's Manual
Page 27
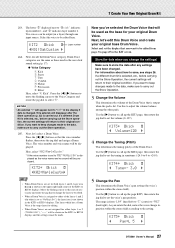
... KIT3 to set for either of the Drum Voice that the voice number flashes, then rotate the jog dial and assign a Drum Voice. As you want to keep changes made to the data, make sure to "R63" (hard right). The range is shown in the user click sound setting (p. 17). ● Voice Category K: Kick S: Snare T: Tom C: Cymbal H: Hi-hat P: Percussion E: Effect Here, select "K: Kick". Use the [>] button to call...
... KIT3 to set for either of the Drum Voice that the voice number flashes, then rotate the jog dial and assign a Drum Voice. As you want to keep changes made to the data, make sure to "R63" (hard right). The range is shown in the user click sound setting (p. 17). ● Voice Category K: Kick S: Snare T: Tom C: Cymbal H: Hi-hat P: Percussion E: Effect Here, select "K: Kick". Use the [>] button to call...
Owner's Manual
Page 30
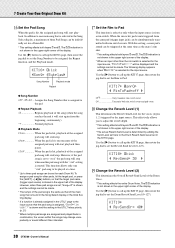
...;. With this setting, a snare pad's sound can be assigned, the Repeat function, and the Playback mode. KIT16*~äkick "Song=~45áéplay When the pad is hit, pad events triggered from a rim switch. However, when three pad songs are assigned and played back in combination, the voices within the songs may change unexpectedly or sound different than the rim switch is set to set the Song Number to adjust the reverb depth. * This setting affects both...
...;. With this setting, a snare pad's sound can be assigned, the Repeat function, and the Playback mode. KIT16*~äkick "Song=~45áéplay When the pad is hit, pad events triggered from a rim switch. However, when three pad songs are assigned and played back in combination, the voices within the songs may change unexpectedly or sound different than the rim switch is set to set the Song Number to adjust the reverb depth. * This setting affects both...
Owner's Manual
Page 31
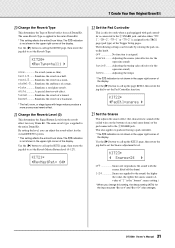
... pad connected to set the Pad Controller function. KIT23* "~~Snares=24~~~, off Snares off (reproduces the sound with larger values produce a more pronounced reverb effect. 21 Change the Reverb Level (3) This determines the Signal Return Level from the reverb effect for the overall DTX500 system. * This setting affects the entire Drum Voice. room1-5 ....... 7 Create Your Own Original Drum Kit 20 Change the Reverb Type This determines the Type of Reverb effect for the input...
... pad connected to set the Pad Controller function. KIT23* "~~Snares=24~~~, off Snares off (reproduces the sound with larger values produce a more pronounced reverb effect. 21 Change the Reverb Level (3) This determines the Signal Return Level from the reverb effect for the overall DTX500 system. * This setting affects the entire Drum Voice. room1-5 ....... 7 Create Your Own Original Drum Kit 20 Change the Reverb Type This determines the Type of Reverb effect for the input...
Owner's Manual
Page 38
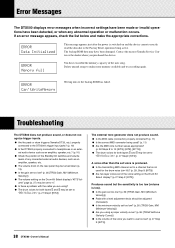
... Select display? (p. 27 Step 2: [KIT2]) Produces sound but the sensitivity is too low (volume is switched on the Drum Kit Select display's "KIT3 Volume" page (p. 27) may be set to "00:NoAssign." (p. 27 Step2: [KIT2]) The external tone generator does not produce sound. ● Is the MIDI cable (connector) properly connected? (p. 11) ● Is the correct MIDI connector being active. ERROR Can'tWriteMemory Writing data to the Factory Reset operation being used...
... Select display? (p. 27 Step 2: [KIT2]) Produces sound but the sensitivity is too low (volume is switched on the Drum Kit Select display's "KIT3 Volume" page (p. 27) may be set to "00:NoAssign." (p. 27 Step2: [KIT2]) The external tone generator does not produce sound. ● Is the MIDI cable (connector) properly connected? (p. 11) ● Is the correct MIDI connector being active. ERROR Can'tWriteMemory Writing data to the Factory Reset operation being used...

Owner's Manual
Page 39
..., perform the Factory Set operation. In the Drum Kit Select dispaly's "KIT15 Key Assign Mode" page (p. 29), set the "KeyAssign" value to the initial factory settings. 39 DTX500 Owner's Manual ing upon the manufacturer, output levels might be too large. The sound does not stop the sound. The pad controller function does not work . ● Is the proper pad type selected? Select the appropriate pad type for the input jack to the Input jack 9- @. nal settings to "semi" or "mono." Troubleshooting The trigger sound...
..., perform the Factory Set operation. In the Drum Kit Select dispaly's "KIT15 Key Assign Mode" page (p. 29), set the "KeyAssign" value to the initial factory settings. 39 DTX500 Owner's Manual ing upon the manufacturer, output levels might be too large. The sound does not stop the sound. The pad controller function does not work . ● Is the proper pad type selected? Select the appropriate pad type for the input jack to the Input jack 9- @. nal settings to "semi" or "mono." Troubleshooting The trigger sound...
Owner's Manual
Page 40
... 8 19 M Master equalizer 14 Metronome 16 MIDI 11 MIDI channel 28 MIDI data format 47 MIDI implementation chart 44 MIDI key on/off 28 MIDI note number ..........28 MIDI OUT 9 11 Minimum velocity ...........36 Mute 17 20 MVI 36 N Numeric display mode ...22 O OUTPUT 9 11 P Pad 26 Pad controller 9 12 15 31 Pad function 21 Pad song 13 30 Pad type 35 Pad with switch .........9 12 Pan 27 32 PHONES 9 11 Playback mode 30 Power supply ..... 9 10 11 Program change 32 Q Quantize 24 R Rear panel 9 Record 24 Rejection...
... 8 19 M Master equalizer 14 Metronome 16 MIDI 11 MIDI channel 28 MIDI data format 47 MIDI implementation chart 44 MIDI key on/off 28 MIDI note number ..........28 MIDI OUT 9 11 Minimum velocity ...........36 Mute 17 20 MVI 36 N Numeric display mode ...22 O OUTPUT 9 11 P Pad 26 Pad controller 9 12 15 31 Pad function 21 Pad song 13 30 Pad type 35 Pad with switch .........9 12 Pan 27 32 PHONES 9 11 Playback mode 30 Power supply ..... 9 10 11 Program change 32 Q Quantize 24 R Rear panel 9 Record 24 Rejection...
Owner's Manual
Page 47
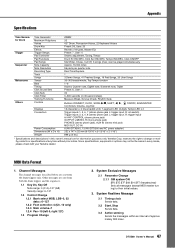
...channel messages described below are for information purposes only. Appendix Specifications Tone Generator block Trigger Sequencer Metronome Others Tone Generator Maximum Polyphony Voices Drum Kits Effects Trigger Setups Pad Controller Pad Functions Pad Songs Note Capacity Note Resolution Recording Type Track Songs Tempo Beat Timing Click Sound Sets Click Sets Click Timer Training Functions Controls Displays Connectors Power Consumption Dimensions (W x D x H) Weight AWM2 32 427 Drum, Percussion Voices, 22 Keyboard Voices Preset: 50, User: 20 Reverb x 19 types, Master EQ Preset...
...channel messages described below are for information purposes only. Appendix Specifications Tone Generator block Trigger Sequencer Metronome Others Tone Generator Maximum Polyphony Voices Drum Kits Effects Trigger Setups Pad Controller Pad Functions Pad Songs Note Capacity Note Resolution Recording Type Track Songs Tempo Beat Timing Click Sound Sets Click Sets Click Timer Training Functions Controls Displays Connectors Power Consumption Dimensions (W x D x H) Weight AWM2 32 427 Drum, Percussion Voices, 22 Keyboard Voices Preset: 50, User: 20 Reverb x 19 types, Master EQ Preset...


