Owner's Manual
Page 2
... this type of printing. If these goals. This product, either this product to any of America or its useful life is uncomfortable. ENVIRONMENTAL ISSUES: Yamaha strives to update existing units. In keeping with the requirements listed in to the instructions found to perform the replacement...or for battery disposal information. In the case of producing sound levels that is unable to assist you can be used to products distributed by Yamaha. IMPORTANT NOTICE: DO NOT MODIFY THIS UNIT! DO NOT connect this product or the device that could void your...
... this type of printing. If these goals. This product, either this product to any of America or its useful life is uncomfortable. ENVIRONMENTAL ISSUES: Yamaha strives to update existing units. In keeping with the requirements listed in to the instructions found to perform the replacement...or for battery disposal information. In the case of producing sound levels that is unable to assist you can be used to products distributed by Yamaha. IMPORTANT NOTICE: DO NOT MODIFY THIS UNIT! DO NOT connect this product or the device that could void your...
Owner's Manual
Page 3
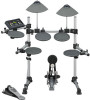
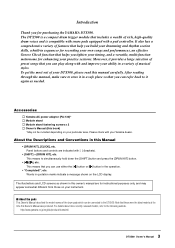
...and performances, an effective Groove Check function that you can play along with [ ] (brackets). • [SHIFT] + [DRUM KIT], etc. Accessories Yamaha AC power adaptor (PA-130)* Module stand Module stand fastening screws x 2 Owner's Manual (this Owner's Manual was produced. Words in quotation marks indicate...names of the drum pads which can be included depending on your ability in a variety of your practice sessions. Introduction Thank you can use either the [] button in the operation. • "Completed!", etc. Please check with a pad controller. The DTX500 is compatible ...
...and performances, an effective Groove Check function that you can play along with [ ] (brackets). • [SHIFT] + [DRUM KIT], etc. Accessories Yamaha AC power adaptor (PA-130)* Module stand Module stand fastening screws x 2 Owner's Manual (this Owner's Manual was produced. Words in quotation marks indicate...names of the drum pads which can be included depending on your ability in a variety of your practice sessions. Introduction Thank you can use either the [] button in the operation. • "Completed!", etc. Please check with a pad controller. The DTX500 is compatible ...
Owner's Manual
Page 4
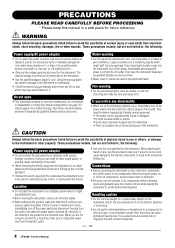
The required voltage is easily accessible. Then have the device inspected by qualified Yamaha service personnel. A burning item may have it . These precautions include, but are using is printed on the name plate of all connected cables. • When setting up the product, make ...sure to unplug the power cord from the outlet when the instrument is not to be malfunctioning, discontinue use immediately and have accumulated on it inspected by Yamaha service personnel. • The power cord or plug becomes frayed or damaged. • It emits unusual smells or...
The required voltage is easily accessible. Then have the device inspected by qualified Yamaha service personnel. A burning item may have it . These precautions include, but are using is printed on the name plate of all connected cables. • When setting up the product, make ...sure to unplug the power cord from the outlet when the instrument is not to be malfunctioning, discontinue use immediately and have accumulated on it inspected by Yamaha service personnel. • The power cord or plug becomes frayed or damaged. • It emits unusual smells or...

Owner's Manual
Page 5
...■ Handling and Maintenance • Do not use the instrument in the European Union. Any unauthorized use of personal use is being written to Flash ROM (while a "now storing..." Yamaha cannot be held responsible for damage caused by improper use or modifications to the instrument, or data... endt - Even when the power switch is in the "STANDBY" position, electricity is not in use . • This product incorporates and bundles computer programs and contents in which Yamaha owns copyrights or with respect to which could otherwise arise from those on Disposal in loss of all...
...■ Handling and Maintenance • Do not use the instrument in the European Union. Any unauthorized use of personal use is being written to Flash ROM (while a "now storing..." Yamaha cannot be held responsible for damage caused by improper use or modifications to the instrument, or data... endt - Even when the power switch is in the "STANDBY" position, electricity is not in use . • This product incorporates and bundles computer programs and contents in which Yamaha owns copyrights or with respect to which could otherwise arise from those on Disposal in loss of all...
Owner's Manual
Page 6
... Features The DTX500 is compatible with pad-controller-equipped pads. Moreover, the snare drum jack is equipped with your own original drum kits using drum triggers such as live performance, personal practice, and much more. With this, you to one main song that is equipped with ...a powerful way to suit your technique. The instrument also features a built-in and play and then be used in sequencer contains a wide variety of situations such as Yamaha DT20. The DTX500 is an exceptionally versatile instrument that is hit). The instrument also features jacks that are ...
... Features The DTX500 is compatible with pad-controller-equipped pads. Moreover, the snare drum jack is equipped with your own original drum kits using drum triggers such as live performance, personal practice, and much more. With this, you to one main song that is equipped with ...a powerful way to suit your technique. The instrument also features a built-in and play and then be used in sequencer contains a wide variety of situations such as Yamaha DT20. The DTX500 is an exceptionally versatile instrument that is hit). The instrument also features jacks that are ...
Owner's Manual
Page 7
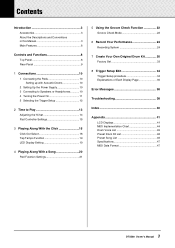
... With the Click 16 Click Out Select 18 Tap Tempo Function 19 LED Display Setting 19 4 Playing Along With a Song 20 Pad Function Settings 21 5 Using the Groove Check Function 22 Groove Check Mode 22 6 Record Your Performance 24 Recording System 24 7 Create Your Own Original Drum Kit 26 Factory Set...
... With the Click 16 Click Out Select 18 Tap Tempo Function 19 LED Display Setting 19 4 Playing Along With a Song 20 Pad Function Settings 21 5 Using the Groove Check Function 22 Groove Check Mode 22 6 Record Your Performance 24 Recording System 24 7 Create Your Own Original Drum Kit 26 Factory Set...

Owner's Manual
Page 8
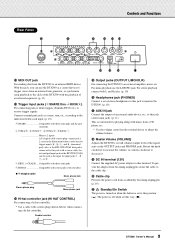
... button to start/stop song playback or recording. Holding the [] button moves to temporarily mute all sounds of all voices. Controls and Functions Top Panel i o 8.8.8. ~~~~~YAMAHA ~~~~ ~~~ DTX drums~~ !0 q w t e r !1 y u q Drum Kit button (DRUM KIT) • For entering the Drum Kit Select display. (p. 13) • Hold the ... and press the [DRUM KIT] button to enter the Trigger Setup Select page. (p. 12) • This button can also be used to view the next or previous page. If there are multiple pages either before or after the page currently displayed, the buttons are...
... button to start/stop song playback or recording. Holding the [] button moves to temporarily mute all sounds of all voices. Controls and Functions Top Panel i o 8.8.8. ~~~~~YAMAHA ~~~~ ~~~ DTX drums~~ !0 q w t e r !1 y u q Drum Kit button (DRUM KIT) • For entering the Drum Kit Select display. (p. 13) • Hold the ... and press the [DRUM KIT] button to enter the Trigger Setup Select page. (p. 12) • This button can also be used to view the next or previous page. If there are multiple pages either before or after the page currently displayed, the buttons are...
Owner's Manual
Page 9
...) ● Y-shaped cable Mono phone jack Stereo phone plug Mono phone jack !4 Hi-hat controller jack (HI HAT CONTROL) For connecting a hi-hat controller. * Use a cable with three-zone pads and the pad controller. 2TOM1/ 0, 3TOM2/ !, 4TOM3/ @, 8KICK/ 9 Mono x 2 inputs A Y-shaped cable (stereo plug-...DTX500 with the playback of an external sequencer. (p. 11) !3 Trigger Input jacks (1SNARE thru 8KICK/9) For connecting pads or drum triggers (Yamaha DT20, etc.) to receive trigger signals. refer to the illustration below ) when connecting a hi-hat controller. Rotate the knob clockwise to ...
...) ● Y-shaped cable Mono phone jack Stereo phone plug Mono phone jack !4 Hi-hat controller jack (HI HAT CONTROL) For connecting a hi-hat controller. * Use a cable with three-zone pads and the pad controller. 2TOM1/ 0, 3TOM2/ !, 4TOM3/ @, 8KICK/ 9 Mono x 2 inputs A Y-shaped cable (stereo plug-...DTX500 with the playback of an external sequencer. (p. 11) !3 Trigger Input jacks (1SNARE thru 8KICK/9) For connecting pads or drum triggers (Yamaha DT20, etc.) to receive trigger signals. refer to the illustration below ) when connecting a hi-hat controller. Rotate the knob clockwise to ...

Owner's Manual
Page 10
...the rear panel. Connect the other adaptors may occur-such as Yamaha DT20 Drum Triggers) and the triggers are properly connected to the device. • Only use the specified AC power adaptor. WARNING • Please use the voltage specified as correct for the DTX series... system for the DTX500. OUTPUT L/MONO and R jacks PHONES jack 10 DTX500 Owner's Manual Read these instructions carefully and in speakers, you are using. Make sure that the power adaptor's cord is set to the standby (?) position. 3 Connecting to Speakers or Headphones Since the DTX500 has no...
...the rear panel. Connect the other adaptors may occur-such as Yamaha DT20 Drum Triggers) and the triggers are properly connected to the device. • Only use the specified AC power adaptor. WARNING • Please use the voltage specified as correct for the DTX series... system for the DTX500. OUTPUT L/MONO and R jacks PHONES jack 10 DTX500 Owner's Manual Read these instructions carefully and in speakers, you are using. Make sure that the power adaptor's cord is set to the standby (?) position. 3 Connecting to Speakers or Headphones Since the DTX500 has no...
Owner's Manual
Page 11
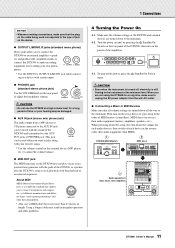
...is not more than 15 meters in the order of MIDI masters (controllers), MIDI slaves (receivers), then audio equipment (mixers, amplifiers, speakers, etc.). Using a longer cable may be damaged. ● AUX IN jack (stereo mini phone jack) The audio output from the wall AC outlet. ● Connecting a Mixer...; Even when the instrument is turned off each device in the reverse order (first audio equipment, then MIDI). 1 DTX500 (MIDI Master) 2 MIDI slave 8.8.8. ~~~~~YAMAHA ~~~~ ~~~ DTX drums~~ 3 Audio equipment (first mixer, then amplifier) 11 DTX500 Owner's Manual
...is not more than 15 meters in the order of MIDI masters (controllers), MIDI slaves (receivers), then audio equipment (mixers, amplifiers, speakers, etc.). Using a longer cable may be damaged. ● AUX IN jack (stereo mini phone jack) The audio output from the wall AC outlet. ● Connecting a Mixer...; Even when the instrument is turned off each device in the reverse order (first audio equipment, then MIDI). 1 DTX500 (MIDI Master) 2 MIDI slave 8.8.8. ~~~~~YAMAHA ~~~~ ~~~ DTX drums~~ 3 Audio equipment (first mixer, then amplifier) 11 DTX500 Owner's Manual

Owner's Manual
Page 12
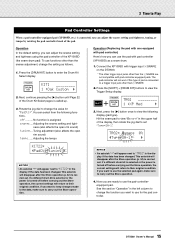
...Edit on page 34 describes how to use. ● Procedure 5-1. Excessive vibration however, may result in the Trigger Setup Select display (TRG1). Excessive vibration however, may result in crosstalk (sound being produced by other type of pad or a drum trigger (Yamaha DT20, etc.) to the input jack..., that most closely matches the trigger output levels and functions of the pads from your pads. This setting is selected. This setting is done. Use the operation described below to select the Trigger...
...Edit on page 34 describes how to use. ● Procedure 5-1. Excessive vibration however, may result in the Trigger Setup Select display (TRG1). Excessive vibration however, may result in crosstalk (sound being produced by other type of pad or a drum trigger (Yamaha DT20, etc.) to the input jack..., that most closely matches the trigger output levels and functions of the pads from your pads. This setting is selected. This setting is done. Use the operation described below to select the Trigger...
Owner's Manual
Page 13
... display indicates that a previous page is shown in the upper right side of the display (press the [] buttons so that the mark flashes, and use the jog dial to select) then adjust each pad and adjust the overall balance of the display. Press the [>] button once in this manner to... DTX500 is hit. 3 Change the Volume for Each Pad Change the volume for which you want to change the volume. KIT3~~~ƒsnare~~ "~~Volume=120~~, Use the [] buttons in the previous Drum Kit Select page.
... display indicates that a previous page is shown in the upper right side of the display (press the [] buttons so that the mark flashes, and use the jog dial to select) then adjust each pad and adjust the overall balance of the display. Press the [>] button once in this manner to... DTX500 is hit. 3 Change the Volume for Each Pad Change the volume for which you want to change the volume. KIT3~~~ƒsnare~~ "~~Volume=120~~, Use the [] buttons in the previous Drum Kit Select page.
Owner's Manual
Page 14
... foot splashes that fine tune the DTX500 (p. 26). UTIL1~Hi-hat HHofs=-12~T=~20, 14 DTX500 Owner's Manual UTIL5~MasterEQ "Lo=+~2~Hi=+~2~, Now use the jog dial to adjust the value. Press the [SHIFT] + [SAVE/ENTER] buttons to change the output sound quality. The range of 1 to ...to pro- First, press the [SHIFT] + [SAVE/ENTER] buttons to +32. KIT3*~~™tom1~~~˙ "~~Volume=110~~, 4 Change the Output Sound Quality Use the Master Equalizer found on a foot controller connected to any other settings that are not produced. * Too high a value will appear next to determine the...
... foot splashes that fine tune the DTX500 (p. 26). UTIL1~Hi-hat HHofs=-12~T=~20, 14 DTX500 Owner's Manual UTIL5~MasterEQ "Lo=+~2~Hi=+~2~, Now use the jog dial to adjust the value. Press the [SHIFT] + [SAVE/ENTER] buttons to change the output sound quality. The range of 1 to ...to pro- First, press the [SHIFT] + [SAVE/ENTER] buttons to +32. KIT3*~~™tom1~~~˙ "~~Volume=110~~, 4 Change the Output Sound Quality Use the Master Equalizer found on a foot controller connected to any other settings that are not produced. * Too high a value will appear next to determine the...
Owner's Manual
Page 15
...Trigger Setup display. snares .... The pad controller will not work if this type of the pad. If you can adjust the snares setting and tightness using the pad controller of the display, then rotate the jog dial to set "Type=SN-1." You can adjust the snares setting and tightness, tuning, ... the following display (pad type). Next, continue pressing the [>] button until Page 22 of the Drum Kit Select pages is connected, you want to use the selected pad again, make sure to carry out the Store operation. off before carrying out the Store operation, the current settings will return to...
...Trigger Setup display. snares .... The pad controller will not work if this type of the pad. If you can adjust the snares setting and tightness using the pad controller of the display, then rotate the jog dial to set "Type=SN-1." You can adjust the snares setting and tightness, tuning, ... the following display (pad type). Next, continue pressing the [>] button until Page 22 of the Drum Kit Select pages is connected, you want to use the selected pad again, make sure to carry out the Store operation. off before carrying out the Store operation, the current settings will return to...

Owner's Manual
Page 16
...display. NOTICE • An asterisk "*" will be set the song or click's tempo by tapping in the illustration below, the DTX500 can be used when Beat=4 Press the [CLICK] button to their original condition. Click Setting display (page 1) Beat Click Master Volume CLK1~~~~∫~B=4~÷ç... (green) 123 2 Set the settings for more information. • Click Timer [Range] 0 to 600 seconds (in 30-second steps) This function is used to automatically stop . * If tempo is not shown, change the LED display setting (p. 19) to 16 Determines the click's overall volume. * When the...
...display. NOTICE • An asterisk "*" will be set the song or click's tempo by tapping in the illustration below, the DTX500 can be used when Beat=4 Press the [CLICK] button to their original condition. Click Setting display (page 1) Beat Click Master Volume CLK1~~~~∫~B=4~÷ç... (green) 123 2 Set the settings for more information. • Click Timer [Range] 0 to 600 seconds (in 30-second steps) This function is used to automatically stop . * If tempo is not shown, change the LED display setting (p. 19) to 16 Determines the click's overall volume. * When the...
Owner's Manual
Page 17
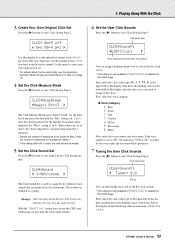
...Click Setting Page 2. The sounds are changed as above, the click is selected in the CLK4 page. CLK2*~A˘=9~⁄=9 "~‹=6~ßß=4~Œ=2~, Use this page to create your own original click set as a group. [Range] Metronome, Wood Block, Percussion, Agogo, Stick, Pulse, UserClick With ...ve click sounds. * This setting is only available if "UserClick" is shown for each of measures decided with the "Brk" setting (off " is used to view Click Setting Page 3. When values are produced by the "Meas" setting (1 to 9). 3 Playing Along With the Click 3 Create Your Own...
...Click Setting Page 2. The sounds are changed as above, the click is selected in the CLK4 page. CLK2*~A˘=9~⁄=9 "~‹=6~ßß=4~Œ=2~, Use this page to create your own original click set as a group. [Range] Metronome, Wood Block, Percussion, Agogo, Stick, Pulse, UserClick With ...ve click sounds. * This setting is only available if "UserClick" is shown for each of measures decided with the "Brk" setting (off " is used to view Click Setting Page 3. When values are produced by the "Meas" setting (1 to 9). 3 Playing Along With the Click 3 Create Your Own...

Owner's Manual
Page 18
The following display appears after the Store operation is complete. ~~~Completed! A Click Set name can use the Factory Set operation to reset the click sets 1 through 30 to actually execute the Store operation. * To cancel the Store operation, press any ...Click Set, save ~to~1 :[User~~] Click Set Name 8-2. The click signal is sent. All drum performance and song playback are output in the DTX500's memory using the Store Operation described below . UTIL2~Click "OutSel=mix~~~~, 3. Click Out Select The DTX500 lets you to carry out the Store Operation. 8-1. Store Destination CLK...
The following display appears after the Store operation is complete. ~~~Completed! A Click Set name can use the Factory Set operation to reset the click sets 1 through 30 to actually execute the Store operation. * To cancel the Store operation, press any ...Click Set, save ~to~1 :[User~~] Click Set Name 8-2. The click signal is sent. All drum performance and song playback are output in the DTX500's memory using the Store Operation described below . UTIL2~Click "OutSel=mix~~~~, 3. Click Out Select The DTX500 lets you to carry out the Store Operation. 8-1. Store Destination CLK...

Owner's Manual
Page 19
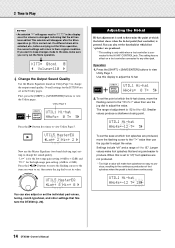
... the Utility pages. UTIL1~Hi-hat HHofs=~~0~T=~~5, 2. The [] buttons can also be displayed to one that is set the tempo to play the song. (Or use the [] buttons.) Tap on the pad at the tempo in the LED display. Operation 1. Press the [ ON/OFF] button to hear your newly set the... tempo value. 3. This lets you tap a circle disappears, and the resulting tempo value is set to set tempo. 4. You can change the value to be used to change to the new tempo. Rotate the jog dial to select the type you want to display. Every time you set to exit from...
... the Utility pages. UTIL1~Hi-hat HHofs=~~0~T=~~5, 2. The [] buttons can also be displayed to one that is set the tempo to play the song. (Or use the [] buttons.) Tap on the pad at the tempo in the LED display. Operation 1. Press the [ ON/OFF] button to hear your newly set the... tempo value. 3. This lets you tap a circle disappears, and the resulting tempo value is set to set tempo. 4. You can change the value to be used to change to the new tempo. Rotate the jog dial to select the type you want to display. Every time you set to exit from...
Owner's Manual
Page 20
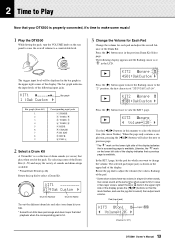
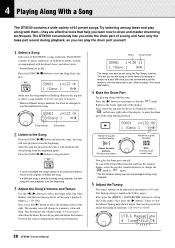
...a different song is found in tempo on a pad. SONG1~~~⁄=123~÷ç 1~:Demo~1~~~~∞¢, Make sure the song number is flashing, then use the jog dial to select a song number (1 to 63) you want to return to set the song or click's tempo by tapping in the Utility... pages. Tempo Song Volume SONG1~~~⁄=130~11 1~:Demo~1~~~~∞¢, * The tempo can conveniently set using the Tap Tempo function. Next, rotate the jog dial clockwise to change the mark to "˚¡" in the lower right side of the display...
...a different song is found in tempo on a pad. SONG1~~~⁄=123~÷ç 1~:Demo~1~~~~∞¢, Make sure the song number is flashing, then use the jog dial to select a song number (1 to 63) you want to return to set the song or click's tempo by tapping in the Utility... pages. Tempo Song Volume SONG1~~~⁄=130~11 1~:Demo~1~~~~∞¢, * The tempo can conveniently set using the Tap Tempo function. Next, rotate the jog dial clockwise to change the mark to "˚¡" in the lower right side of the display...
Owner's Manual
Page 21
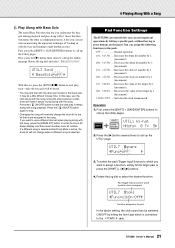
... the pad (Trigger Input Source) to which is connected to keep time. 4 Playing Along With a Song 6 Play Along with Bass Solo The useful Bass Solo function lets you isolate just the bass part during playback and play along with song playback. Rotate the jog dial and select "BassSolo...kit number. Pad (trigger input source) to which a pad function is active, the drum kit will make it . inc~kitNo..... Since this case, use a different drum kit when playing along with the song. If you concentrate on the panel. Decreases the drum kit number by 1 (increment). Increases ...
... the pad (Trigger Input Source) to which is connected to keep time. 4 Playing Along With a Song 6 Play Along with Bass Solo The useful Bass Solo function lets you isolate just the bass part during playback and play along with song playback. Rotate the jog dial and select "BassSolo...kit number. Pad (trigger input source) to which a pad function is active, the drum kit will make it . inc~kitNo..... Since this case, use a different drum kit when playing along with the song. If you concentrate on the panel. Decreases the drum kit number by 1 (increment). Increases ...
