
Owner's Manual
Page 2
... radiation exposure. Contact qualified YAMAHA service personnel when any reason. 15 When not planning to use excessive force on switches, knobs and/or cords. 10 When disconnecting the power cord from the AC power source as long as a plug with chemical solvents; The unit is not disconnected from the wall outlet, grasp the plug; SPECIAL INSTRUCTIONS FOR U.K. Making sure that this unit is...
... radiation exposure. Contact qualified YAMAHA service personnel when any reason. 15 When not planning to use excessive force on switches, knobs and/or cords. 10 When disconnecting the power cord from the AC power source as long as a plug with chemical solvents; The unit is not disconnected from the wall outlet, grasp the plug; SPECIAL INSTRUCTIONS FOR U.K. Making sure that this unit is...

Owner's Manual
Page 3
... time control • CD-RW compatible The receiver (RX-E400) and CD player (CDX-E400) are the main units of the YAMAHA Piano Craft Series. English FEATURES • Minimum RMS output power per channel 40 W + 40 W (6Ω, 20 Hz to the radio 10 Presetting stations 11 NAMES OF BUTTONS AND CONTROLS Front panel 17 Display 17 Remote control 18 CD OPERATIONS Playing a disc 19 Selecting the time display and CD TEXT ......... 20 Random-sequence play 20 Repeat play 21 Program play 21 SYSTEM CONTROL Controlling other components 23...
... time control • CD-RW compatible The receiver (RX-E400) and CD player (CDX-E400) are the main units of the YAMAHA Piano Craft Series. English FEATURES • Minimum RMS output power per channel 40 W + 40 W (6Ω, 20 Hz to the radio 10 Presetting stations 11 NAMES OF BUTTONS AND CONTROLS Front panel 17 Display 17 Remote control 18 CD OPERATIONS Playing a disc 19 Selecting the time display and CD TEXT ......... 20 Random-sequence play 20 Repeat play 21 Program play 21 SYSTEM CONTROL Controlling other components 23...

Owner's Manual
Page 4
TIME D E TAPE DIRECTION PRESET TUNER PRESET MD CD TAPE AUX MD REC/PAUSE TAPE REC/PAUSE MODE DUBBING START SLEEP DISPLAY VOLUME • Batteries (AA, R6, UM-3) • AM loop antenna • Indoor FM antenna • Audio pin cable • System control cable CD PREVENTIVE CARE • This compact disc player is being handled can adversely affect the disc's play , but even so they should be kept clean. Wipe by using any type of disc cleaner, record spray, antistatic spray or...
TIME D E TAPE DIRECTION PRESET TUNER PRESET MD CD TAPE AUX MD REC/PAUSE TAPE REC/PAUSE MODE DUBBING START SLEEP DISPLAY VOLUME • Batteries (AA, R6, UM-3) • AM loop antenna • Indoor FM antenna • Audio pin cable • System control cable CD PREVENTIVE CARE • This compact disc player is being handled can adversely affect the disc's play , but even so they should be kept clean. Wipe by using any type of disc cleaner, record spray, antistatic spray or...

Owner's Manual
Page 5
...2 Remote control operation range STANDBY/ON TIMER PHONES NATURAL SOUND STEREO RECEIVER RX-E400 VOLUME DISPLAY MEMORY AUTO/MAN'L PRESET/BAND PRESET/TUNING TIMER ADJ BASS TIMER TREBLE HOUR MIN BALANCE - + - + L R MIN MAX INPUT Remote control sensor Within approximately 6 m (20 feet) 30° 30° 1 Remove the battery compartment cover. 2 Insert batteries into the battery compartment. 3 Replace the battery compartment cover. Operating buttons for an extended period of time. • If batteries leak, dispose of the remote control so that level up your system can...
...2 Remote control operation range STANDBY/ON TIMER PHONES NATURAL SOUND STEREO RECEIVER RX-E400 VOLUME DISPLAY MEMORY AUTO/MAN'L PRESET/BAND PRESET/TUNING TIMER ADJ BASS TIMER TREBLE HOUR MIN BALANCE - + - + L R MIN MAX INPUT Remote control sensor Within approximately 6 m (20 feet) 30° 30° 1 Remove the battery compartment cover. 2 Insert batteries into the battery compartment. 3 Replace the battery compartment cover. Operating buttons for an extended period of time. • If batteries leak, dispose of the remote control so that level up your system can...

Owner's Manual
Page 6
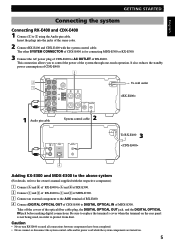
... each of the subwoofer. R GND AM ANT L + - Set up the AM loop antenna, then connect it. 4 Connect the AC power cord to connect the system using the supplied cords and accessories. Be sure all connections are made correctly, that is to say L (left) to L, R (right) to R, "+" to "+" and "-" to "-". Right speaker 3 FM antenna 2 AM loop antenna Left speaker C IN MD OUT D A IN TAPE OUT B IN CD E IN AUX R FM ANT...
... each of the subwoofer. R GND AM ANT L + - Set up the AM loop antenna, then connect it. 4 Connect the AC power cord to connect the system using the supplied cords and accessories. Be sure all connections are made correctly, that is to say L (left) to L, R (right) to R, "+" to "+" and "-" to "-". Right speaker 3 FM antenna 2 AM loop antenna Left speaker C IN MD OUT D A IN TAPE OUT B IN CD E IN AUX R FM ANT...
Owner's Manual
Page 7
... disconnect the system control cable and/or power cord while the system components are turned on the rear panel is for connecting MDX-E300 or KX-E300. 3 Connect the AC power plug of CDX-E400 to control the power of RX-E400. C IN MD OUT D A IN TAPE OUT B IN CD E IN AUX R 1 Audio pin cable FM ANT 75Ω UNBAL. SUBWOOFER SYSTEM OUT CONNECTOR 6Ω MIN./SPEAKER L SPEAKERS 2 System control cable To wall outlet ANALOG E OUT L DIGITAL OPTICAL OUT R SYSTEM CONNECTOR 3 To RX-E400 Adding KX...
... disconnect the system control cable and/or power cord while the system components are turned on the rear panel is for connecting MDX-E300 or KX-E300. 3 Connect the AC power plug of CDX-E400 to control the power of RX-E400. C IN MD OUT D A IN TAPE OUT B IN CD E IN AUX R 1 Audio pin cable FM ANT 75Ω UNBAL. SUBWOOFER SYSTEM OUT CONNECTOR 6Ω MIN./SPEAKER L SPEAKERS 2 System control cable To wall outlet ANALOG E OUT L DIGITAL OPTICAL OUT R SYSTEM CONNECTOR 3 To RX-E400 Adding KX...

Owner's Manual
Page 8
... holding TIME ADJ and PRESET/BAND. STANDBY/ON DISPLAY HOUR MIN STANDBY/ON TIMER PHONES NATURAL SOUND STEREO RECEIVER RX-E400 VOLUME DISPLAY MEMORY AUTO/MAN'L PRESET/BAND TIMER ADJ BASS TIMER TREBLE PRESET/TUNING HOUR MIN BALANCE - + - + L R MIN MAX INPUT TIME ADJ PRESET/BAND 1 Turn on the power by pressing STANDBY/ON on the front panel, or POWER on the remote control. 2 While the power is disconnected for more than five minutes, you must set the minutes. • If you use the timer...
... holding TIME ADJ and PRESET/BAND. STANDBY/ON DISPLAY HOUR MIN STANDBY/ON TIMER PHONES NATURAL SOUND STEREO RECEIVER RX-E400 VOLUME DISPLAY MEMORY AUTO/MAN'L PRESET/BAND TIMER ADJ BASS TIMER TREBLE PRESET/TUNING HOUR MIN BALANCE - + - + L R MIN MAX INPUT TIME ADJ PRESET/BAND 1 Turn on the power by pressing STANDBY/ON on the front panel, or POWER on the remote control. 2 While the power is disconnected for more than five minutes, you must set the minutes. • If you use the timer...

Owner's Manual
Page 9
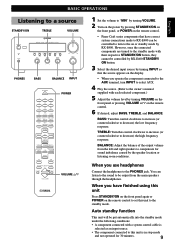
English RX-E400 NAMES OF BUTTONS AND CONTROLS Front panel 12 3 45 6 7 8 9 STANDBY/ON NATURAL SOUND STEREO RECEIVER RX-E400 VOLUME TIMER PHONES DISPLAY MEMORY AUTO/MAN'L PRESET/BAND PRESET/TUNING TIMER ADJ BASS TIMER TREBLE HOUR MIN BALANCE - + - + L R MIN MAX INPUT 0q w 1 STANDBY/ON (P.9) 2 TIMER indicator (P.15) 3 DISPLAY (P.15) 4 TIME ADJ/MEMORY (P.6/P.11) 5 AUTO/MAN'L/TIMER (P.10/P.15) 6 PRESET/BAND (P.10) 7 Display (P.7) 8 PRESET/TUNING / (P.10) HOUR/MIN (P.6/P.15) er t 9 VOLUME (P.9) 0 PHONES (P.9) q Remote control sensor (P.3) w BASS (P.9) e TREBLE (P.9) r...
English RX-E400 NAMES OF BUTTONS AND CONTROLS Front panel 12 3 45 6 7 8 9 STANDBY/ON NATURAL SOUND STEREO RECEIVER RX-E400 VOLUME TIMER PHONES DISPLAY MEMORY AUTO/MAN'L PRESET/BAND PRESET/TUNING TIMER ADJ BASS TIMER TREBLE HOUR MIN BALANCE - + - + L R MIN MAX INPUT 0q w 1 STANDBY/ON (P.9) 2 TIMER indicator (P.15) 3 DISPLAY (P.15) 4 TIME ADJ/MEMORY (P.6/P.11) 5 AUTO/MAN'L/TIMER (P.10/P.15) 6 PRESET/BAND (P.10) 7 Display (P.7) 8 PRESET/TUNING / (P.10) HOUR/MIN (P.6/P.15) er t 9 VOLUME (P.9) 0 PHONES (P.9) q Remote control sensor (P.3) w BASS (P.9) e TREBLE (P.9) r...

Owner's Manual
Page 10
TIME D E 4 5 7 9 e TAPE DIRECTION PRESET TUNER PRESET MD CD TAPE AUX MD REC/PAUSE TAPE REC/PAUSE MODE DUBBING START SLEEP DISPLAY VOLUME 8 0 q w r t 1 POWER (P.9) 2 Preset numbers (P.11) 3 FREQ/RDS (P.12) 4 PTY SEEK MODE (P.13/P.14) 5 PTY SEEK START (P.13/P.14) 6 A/B/C/D/E (P.11) 7 PRESET / (P.11) 8 TUNER (RX-E400) (P.11) 9 MD (MDX-E300) (P.23) 0 TAPE (KX-E300) (P.23) q CD (CDX-E400) (P.19) w AUX (The equipment connected to the AUX terminal) (P.5) e SLEEP (P.16) r DISPLAY (P.15) t VOLUME %/fi (P.9) Note • 8~w are operation buttons and input selectors for each ...
TIME D E 4 5 7 9 e TAPE DIRECTION PRESET TUNER PRESET MD CD TAPE AUX MD REC/PAUSE TAPE REC/PAUSE MODE DUBBING START SLEEP DISPLAY VOLUME 8 0 q w r t 1 POWER (P.9) 2 Preset numbers (P.11) 3 FREQ/RDS (P.12) 4 PTY SEEK MODE (P.13/P.14) 5 PTY SEEK START (P.13/P.14) 6 A/B/C/D/E (P.11) 7 PRESET / (P.11) 8 TUNER (RX-E400) (P.11) 9 MD (MDX-E300) (P.23) 0 TAPE (KX-E300) (P.23) q CD (CDX-E400) (P.19) w AUX (The equipment connected to the AUX terminal) (P.5) e SLEEP (P.16) r DISPLAY (P.15) t VOLUME %/fi (P.9) Note • 8~w are operation buttons and input selectors for each ...
Owner's Manual
Page 11
... series components that the source appears on the display. • When you use headphones Connect the headphones to decrease) the low frequency response. Auto standby function This unit will be controlled by RX-E400 STANDBY/ ON button. 3 Select the desired input source by pressing STANDBY/ON on the front panel, or POWER on the remote control. 6 If desired, adjust BASS, TREBLE, and BALANCE. TIME D E POWER TAPE DIRECTION PRESET TUNER PRESET MD CD TAPE AUX MD REC/PAUSE TAPE REC/PAUSE MODE DUBBING START SLEEP DISPLAY VOLUME VOLUME...
... series components that the source appears on the display. • When you use headphones Connect the headphones to decrease) the low frequency response. Auto standby function This unit will be controlled by RX-E400 STANDBY/ ON button. 3 Select the desired input source by pressing STANDBY/ON on the front panel, or POWER on the remote control. 6 If desired, adjust BASS, TREBLE, and BALANCE. TIME D E POWER TAPE DIRECTION PRESET TUNER PRESET MD CD TAPE AUX MD REC/PAUSE TAPE REC/PAUSE MODE DUBBING START SLEEP DISPLAY VOLUME VOLUME...

Owner's Manual
Page 13
... on the display. PRESET STEREO TUNED MEMORY 4 Press MEMORY. • "MEMORY", "PRESET", and preset number will show the preset station A1. TUNING To preset stations automatically 1 Select TUNER as input source by Automatic tuning or Manual tuning. TIME D E TAPE DIRECTION PRESET TUNER PRESET MD CD TAPE AUX MD REC/PAUSE TAPE REC/PAUSE MODE DUBBING START SLEEP DISPLAY TUNER PRESET / VOLUME PRESET STEREO TUNED MEMORY 5 Repeat steps 1 to 4 until all FM and AM stations are retained for about 5 seconds, use PRESET/TUNING / to select a desired preset number. POWER...
... on the display. PRESET STEREO TUNED MEMORY 4 Press MEMORY. • "MEMORY", "PRESET", and preset number will show the preset station A1. TUNING To preset stations automatically 1 Select TUNER as input source by Automatic tuning or Manual tuning. TIME D E TAPE DIRECTION PRESET TUNER PRESET MD CD TAPE AUX MD REC/PAUSE TAPE REC/PAUSE MODE DUBBING START SLEEP DISPLAY TUNER PRESET / VOLUME PRESET STEREO TUNED MEMORY 5 Repeat steps 1 to 4 until all FM and AM stations are retained for about 5 seconds, use PRESET/TUNING / to select a desired preset number. POWER...

Owner's Manual
Page 14
TIME D E TUNER TAPE DIRECTION PRESET TUNER PRESET MD CD TAPE AUX MD REC/PAUSE TAPE REC/PAUSE MODE DUBBING START SLEEP DISPLAY VOLUME PS The name of the RDS station being received is displayed. • If the unit cannot find a station with CT data, the unit stops searching and "NO CT" appears on the display. 1 Tune in the FM station. (Refer to the normal radio signal. RDS RT CT Current time is displayed. • If the...
TIME D E TUNER TAPE DIRECTION PRESET TUNER PRESET MD CD TAPE AUX MD REC/PAUSE TAPE REC/PAUSE MODE DUBBING START SLEEP DISPLAY VOLUME PS The name of the RDS station being received is displayed. • If the unit cannot find a station with CT data, the unit stops searching and "NO CT" appears on the display. 1 Tune in the FM station. (Refer to the normal radio signal. RDS RT CT Current time is displayed. • If the...

Owner's Manual
Page 16
... 11.) TAPE DIRECTION TUNER PRESET TUNER PRESET MD CD TAPE AUX MD REC/PAUSE TAPE REC/PAUSE MODE DUBBING START SLEEP DISPLAY DISPLAY VOLUME 1 Select the FM band by the automatic preset tuning operation when the setting is cancelled and turns into the PS mode. 6 Press FREQ/RDS again to restore the frequency display mode. 14 TIME D E PTY SEEK START • If you can turn , reducing the speed. CT = CLOCK (ON/OFF) The tuner corrects the time of the...
... 11.) TAPE DIRECTION TUNER PRESET TUNER PRESET MD CD TAPE AUX MD REC/PAUSE TAPE REC/PAUSE MODE DUBBING START SLEEP DISPLAY DISPLAY VOLUME 1 Select the FM band by the automatic preset tuning operation when the setting is cancelled and turns into the PS mode. 6 Press FREQ/RDS again to restore the frequency display mode. 14 TIME D E PTY SEEK START • If you can turn , reducing the speed. CT = CLOCK (ON/OFF) The tuner corrects the time of the...

Owner's Manual
Page 17
.... STANDBY/ON TIMER PHONES NATURAL SOUND STEREO RECEIVER RX-E400 VOLUME DISPLAY MEMORY AUTO/MAN'L PRESET/BAND TIMER ADJ BASS TIMER TREBLE PRESET/TUNING HOUR MIN BALANCE - + - + L R MIN MAX INPUT TIMER INPUT 1 Press DISPLAY. The system is completed, call the mode again by pressing DISPLAY once or more than TUNER and AUX on "2. To cancel the timer play setting Press DISPLAY to set the ON time but not OFF time, the timer play and recording By using the built-in timer, you must first make the connections as...
.... STANDBY/ON TIMER PHONES NATURAL SOUND STEREO RECEIVER RX-E400 VOLUME DISPLAY MEMORY AUTO/MAN'L PRESET/BAND TIMER ADJ BASS TIMER TREBLE PRESET/TUNING HOUR MIN BALANCE - + - + L R MIN MAX INPUT TIMER INPUT 1 Press DISPLAY. The system is completed, call the mode again by pressing DISPLAY once or more than TUNER and AUX on "2. To cancel the timer play setting Press DISPLAY to set the ON time but not OFF time, the timer play and recording By using the built-in timer, you must first make the connections as...

Owner's Manual
Page 21
TIME D E & TAPE DIRECTION PRESET TUNER PRESET CD MD CD TAPE AUX MD REC/PAUSE TAPE REC/PAUSE MODE DUBBING START SLEEP DISPLAY VOLUME 1 Turn on the power of RX-E400 and CDX-E400. (Refer to page 9.) 2 Press CD on the disc (Skip) Direct play Select a desired track using the numeric button. (Example: To select 35, press +10 three times so that is higher than the last track number on the tray. To eject the CD Press to open the disc tray, and place...
TIME D E & TAPE DIRECTION PRESET TUNER PRESET CD MD CD TAPE AUX MD REC/PAUSE TAPE REC/PAUSE MODE DUBBING START SLEEP DISPLAY VOLUME 1 Turn on the power of RX-E400 and CDX-E400. (Refer to page 9.) 2 Press CD on the disc (Skip) Direct play Select a desired track using the numeric button. (Example: To select 35, press +10 three times so that is higher than the last track number on the tray. To eject the CD Press to open the disc tray, and place...

Owner's Manual
Page 25
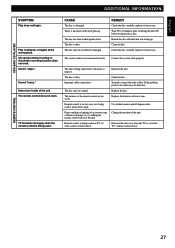
English 1 2 3 4 8,3 9,4 0 q SYSTEM CONTROL Controlling other components POWER 1 2 3 1 2 3 4 5 6 4 5 6 7 8 9 7 8 0 +10 +100 FREQ/RDS MODE-PTY SEEK-START REP RANDOM PROG A B C TEXT/TIME R. TIME D E TAPE DIRECTION PRESET TUNER PRESET MD CD TAPE AUX MD REC/PAUSE TAPE REC/PAUSE MODE DUBBING START 5 6,1 7,2 5 6 MDX-E300 1 Numeric buttons 2 REP (Repeat) 3 RANDOM 4 TEXT/TIME 5 PROG (Program) 6 ^ (Play/Pause) 7 ⁄ › (Skip/Search Forward) 8 $ ! (Skip/Search Backward) 9 & (Stop) 0 MD input q MD REC/PAUSE KX-E300 1 ^ (Play) 2 ⁄ › (Fast-foward...
English 1 2 3 4 8,3 9,4 0 q SYSTEM CONTROL Controlling other components POWER 1 2 3 1 2 3 4 5 6 4 5 6 7 8 9 7 8 0 +10 +100 FREQ/RDS MODE-PTY SEEK-START REP RANDOM PROG A B C TEXT/TIME R. TIME D E TAPE DIRECTION PRESET TUNER PRESET MD CD TAPE AUX MD REC/PAUSE TAPE REC/PAUSE MODE DUBBING START 5 6,1 7,2 5 6 MDX-E300 1 Numeric buttons 2 REP (Repeat) 3 RANDOM 4 TEXT/TIME 5 PROG (Program) 6 ^ (Play/Pause) 7 ⁄ › (Skip/Search Forward) 8 $ ! (Skip/Search Backward) 9 & (Stop) 0 MD input q MD REC/PAUSE KX-E300 1 ^ (Play) 2 ⁄ › (Fast-foward...

Owner's Manual
Page 26
... instructions supplied with the MDX-E300 or KX-E300. Each time you press DUBBING MODE, the mode will be recorded on a tape or MD. SYSTEM CONTROL Before recording When you record by using MDX-E300 or KX-E300, you must first make the connections as CD = TAPE DUBBING MODE TAPE DIRECTION PRESET TUNER PRESET MD CD TAPE AUX MD REC/PAUSE TAPE REC/PAUSE MODE DUBBING START SLEEP DISPLAY VOLUME DUBBING START 1 Decide the combination of the components. Dubbing setting...
... instructions supplied with the MDX-E300 or KX-E300. Each time you press DUBBING MODE, the mode will be recorded on a tape or MD. SYSTEM CONTROL Before recording When you record by using MDX-E300 or KX-E300, you must first make the connections as CD = TAPE DUBBING MODE TAPE DIRECTION PRESET TUNER PRESET MD CD TAPE AUX MD REC/PAUSE TAPE REC/PAUSE MODE DUBBING START SLEEP DISPLAY VOLUME DUBBING START 1 Decide the combination of the components. Dubbing setting...

Owner's Manual
Page 27
... "Manual tape programming". 2 Press RANDOM to start programming. • Programming of CD tracks is done randomly from side A to side B. TIME D E PROG R.TIME DUBBING MODE TAPE DIRECTION PRESET TUNER PRESET MD CD TAPE AUX MD REC/PAUSE TAPE REC/PAUSE MODE DUBBING START SLEEP DISPLAY DUBBING START VOLUME 1 Insert the desired disc into the CD player, and load a blank tape into the KX-E300. 2 Press R.TIME repeatedly to select the length of tape to be used. When complete, the programmed track number and...
... "Manual tape programming". 2 Press RANDOM to start programming. • Programming of CD tracks is done randomly from side A to side B. TIME D E PROG R.TIME DUBBING MODE TAPE DIRECTION PRESET TUNER PRESET MD CD TAPE AUX MD REC/PAUSE TAPE REC/PAUSE MODE DUBBING START SLEEP DISPLAY DUBBING START VOLUME 1 Insert the desired disc into the CD player, and load a blank tape into the KX-E300. 2 Press R.TIME repeatedly to select the length of tape to be used. When complete, the programmed track number and...

Owner's Manual
Page 28
... AC power cord is not proper. Connect properly. Position the FM antenna as high and as far away from an external unit connected with low voltage. Antenna input is being used nearby. Cannot select preset stations. Properly connect the AM loop antenna. The unit does not work normally. Check the speaker wires are noisy and Insufficient antenna input. Make a proper input source selection. Sound distorted. Connect using a coaxial cable. Install a multi-element type FM antenna if...
... AC power cord is not proper. Connect properly. Position the FM antenna as high and as far away from an external unit connected with low voltage. Antenna input is being used nearby. Cannot select preset stations. Properly connect the AM loop antenna. The unit does not work normally. Check the speaker wires are noisy and Insufficient antenna input. Make a proper input source selection. Sound distorted. Connect using a coaxial cable. Install a multi-element type FM antenna if...
Owner's Manual
Page 29
English CDX-E400 CD PLAYER ADDITIONAL INFORMATION SYMPTOM Play does not begin. Sound "skips." The disc is not connected securely. REMEDY Check the disc carefully; replace it if necessary. Clean the disc. The system cable is dirty. Clean the disc. If the problem persists, the cables may be scratched or damaged. Change the position of the unit. Sound "hums." Noise from the TV or cover the TV's remote control sensor...
English CDX-E400 CD PLAYER ADDITIONAL INFORMATION SYMPTOM Play does not begin. Sound "skips." The disc is not connected securely. REMEDY Check the disc carefully; replace it if necessary. Clean the disc. The system cable is dirty. Clean the disc. If the problem persists, the cables may be scratched or damaged. Change the position of the unit. Sound "hums." Noise from the TV or cover the TV's remote control sensor...


