
Owner's Manual
Page 3
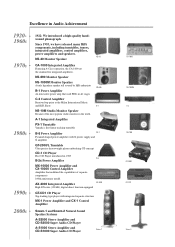
... Monitor Speaker Became of separate components 100th anniversary model AX-2000 Integrated Amplifier High S/N ratio (128 dB), digital direct function equipped AX-2000 GT-CD1 CD Player Top-loading type player with X power supply and X amplifier GT-2000/L Turntable Ultra-precise heavyweight player embodying GT concept CD-1 CD Player First CD Player introduced in 1983 B-6 B-2x Power Amplifier MX-10000 Power Amplifier and CX-10000 Control Amplifier Amplifier that used FETs in Audio...
... Monitor Speaker Became of separate components 100th anniversary model AX-2000 Integrated Amplifier High S/N ratio (128 dB), digital direct function equipped AX-2000 GT-CD1 CD Player Top-loading type player with X power supply and X amplifier GT-2000/L Turntable Ultra-precise heavyweight player embodying GT concept CD-1 CD Player First CD Player introduced in 1983 B-6 B-2x Power Amplifier MX-10000 Power Amplifier and CX-10000 Control Amplifier Amplifier that used FETs in Audio...
Owner's Manual
Page 4
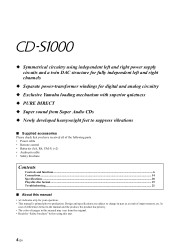
.... • The color of images in this manual may vary from Super Audio CDs ◆ Newly developed heavyweight feet to change in part as a result of the following parts. • Power cable • Remote control • Batteries (AA, R6, UM-3) (×2) • Audio pin cable • Safety brochure Contents Controls and functions...6 Connections...14 Specifications ...18 Playable disc format...19 Troubleshooting...21 ■ About this unit. 4 En Design...
.... • The color of images in this manual may vary from Super Audio CDs ◆ Newly developed heavyweight feet to change in part as a result of the following parts. • Power cable • Remote control • Batteries (AA, R6, UM-3) (×2) • Audio pin cable • Safety brochure Contents Controls and functions...6 Connections...14 Specifications ...18 Playable disc format...19 Troubleshooting...21 ■ About this unit. 4 En Design...
Owner's Manual
Page 6
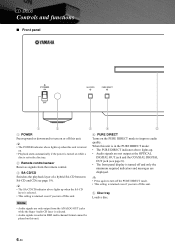
... selected. • This setting is turned off and only the minimum required indicators and messages are displayed. Controls and functions ■ Front panel POWER ON OFF SA-CD/CD PURE DIRECT 1 2 3 4 5 1 POWER Press upward or downward to turn off this unit. 4 PURE DIRECT Turns on the PURE DIRECT mode to turn off this unit. 5 Disc tray Loads a disc. Notes • Audio signals are not output at the OPTICAL DIGITAL OUT jack and the COAXIAL DIGITAL...
... selected. • This setting is turned off and only the minimum required indicators and messages are displayed. Controls and functions ■ Front panel POWER ON OFF SA-CD/CD PURE DIRECT 1 2 3 4 5 1 POWER Press upward or downward to turn off this unit. 4 PURE DIRECT Turns on the PURE DIRECT mode to turn off this unit. 5 Disc tray Loads a disc. Notes • Audio signals are not output at the OPTICAL DIGITAL OUT jack and the COAXIAL DIGITAL...
Owner's Manual
Page 7
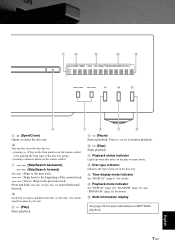
...8 9 0 6 (Open/Close) Opens or closes the disc tray. y Each time you press and hold or to the beginning of disc set in the play or pause mode. C Time display mode indicator See "DISPLAY" (page 11) for more information on the remote control. 7 (Skip/Search ...Play) on the front panel or on the remote control or by 4 levels. D Playback mode indicator See "REPEAT" (page 10), "RANDOM" (page 11), and "PROGRAM" (page 11) for details. Press or to the previous track. Press and hold speed increases by pushing the front edge of the disc tray gently. • pressing a numeric button...
...8 9 0 6 (Open/Close) Opens or closes the disc tray. y Each time you press and hold or to the beginning of disc set in the play or pause mode. C Time display mode indicator See "DISPLAY" (page 11) for more information on the remote control. 7 (Skip/Search ...Play) on the front panel or on the remote control or by 4 levels. D Playback mode indicator See "REPEAT" (page 10), "RANDOM" (page 11), and "PROGRAM" (page 11) for details. Press or to the previous track. Press and hold speed increases by pushing the front edge of the disc tray gently. • pressing a numeric button...
Owner's Manual
Page 8
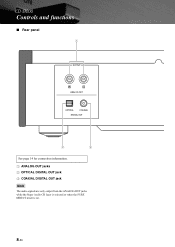
Controls and functions ■ Rear panel 1 OUTPUT R L ANALOG OUT OPTICAL COAXIAL DIGITAL OUT 2 3 See page 14 for connection information. 1 ANALOG OUT jacks 2 OPTICAL DIGITAL OUT jack 3 COAXIAL DIGITAL OUT jack Note The audio signals are only output from the ANALOG OUT jacks while the Super Audio CD layer is selected or when the PURE DIRECT mode is on. 8 En
Controls and functions ■ Rear panel 1 OUTPUT R L ANALOG OUT OPTICAL COAXIAL DIGITAL OUT 2 3 See page 14 for connection information. 1 ANALOG OUT jacks 2 OPTICAL DIGITAL OUT jack 3 COAXIAL DIGITAL OUT jack Note The audio signals are only output from the ANALOG OUT jacks while the Super Audio CD layer is selected or when the PURE DIRECT mode is on. 8 En

Owner's Manual
Page 9
(Asia and General models) VOLTAGE SELECTOR AC IN 45 4 VOLTAGE SELECTOR (Asia and General models only) The VOLTAGE SELECTOR on the rear panel of this inlet to plug in the supplied power cable. See page 15 for further information. 5 Foot If this unit is unstable, you can adjust the foot height by rotating it. 6 AC IN Use this unit must be set for connection information. 6 9 En English See page 15 for your local main voltage BEFORE plugging the power cable into the AC wall outlet.
(Asia and General models) VOLTAGE SELECTOR AC IN 45 4 VOLTAGE SELECTOR (Asia and General models only) The VOLTAGE SELECTOR on the rear panel of this inlet to plug in the supplied power cable. See page 15 for further information. 5 Foot If this unit is unstable, you can adjust the foot height by rotating it. 6 AC IN Use this unit must be set for connection information. 6 9 En English See page 15 for your local main voltage BEFORE plugging the power cable into the AC wall outlet.
Owner's Manual
Page 10
... repeats from the ANALOG OUT jacks while the Super Audio CD layer is playing. • Audio signals recorded in the following order. → Brightest → Bright (default) Darkest ← Dark ← y This setting is retained even if you turn off this unit. 4 Numeric buttons Use to this unit. 3 DIMMER Selects brightness level for the front panel display. Note This operation is ineffective for MP3 or...
... repeats from the ANALOG OUT jacks while the Super Audio CD layer is playing. • Audio signals recorded in the following order. → Brightest → Bright (default) Darkest ← Dark ← y This setting is retained even if you turn off this unit. 4 Numeric buttons Use to this unit. 3 DIMMER Selects brightness level for the front panel display. Note This operation is ineffective for MP3 or...

Owner's Manual
Page 11
...; Audio signals are not output at the OPTICAL DIGITAL OUT jack and the COAXIAL DIGITAL OUT jack (see page 8). • The front panel display is in the front panel display. • Total remaining time of the programmed sequence. See "Program playback" on MP3/WMA playback. ■ Program playback In the program playback mode, you are displayed. E (Pause) Pauses playback. or , the search speed increases by using the numeric buttons and...
...; Audio signals are not output at the OPTICAL DIGITAL OUT jack and the COAXIAL DIGITAL OUT jack (see page 8). • The front panel display is in the front panel display. • Total remaining time of the programmed sequence. See "Program playback" on MP3/WMA playback. ■ Program playback In the program playback mode, you are displayed. E (Pause) Pauses playback. or , the search speed increases by using the numeric buttons and...
Owner's Manual
Page 14
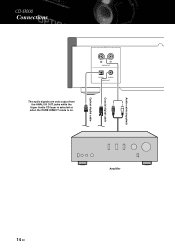
OUTPUT R L ANALOG OUT OPTICAL COAXIAL DIGITAL OUT Amplifier Audio cable (supplied) Coaxial digital cable Optical digital cable 14 En Connections The audio signals are only output from the ANALOG OUT jacks while the Super Audio CD layer is selected or when the PURE DIRECT mode is on.
OUTPUT R L ANALOG OUT OPTICAL COAXIAL DIGITAL OUT Amplifier Audio cable (supplied) Coaxial digital cable Optical digital cable 14 En Connections The audio signals are only output from the ANALOG OUT jacks while the Super Audio CD layer is selected or when the PURE DIRECT mode is on.

Owner's Manual
Page 15
... General models only) Caution The VOLTAGE SELECTOR on the rear panel of the VOLTAGE SELECTOR may cause damage to this unit must be set for your local voltage BEFORE plugging the power cable into the AC IN inlet on the rear panel when all connections are as follows: AC 110/120/220/230-240 V, 50/60 Hz ■ Connecting the power cable Connect the power cable...
... General models only) Caution The VOLTAGE SELECTOR on the rear panel of the VOLTAGE SELECTOR may cause damage to this unit must be set for your local voltage BEFORE plugging the power cable into the AC IN inlet on the rear panel when all connections are as follows: AC 110/120/220/230-240 V, 50/60 Hz ■ Connecting the power cable Connect the power cable...
Owner's Manual
Page 16
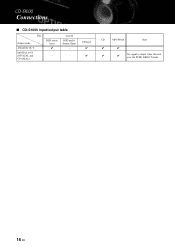
SA-CD DSD multichannel layer - - Connections ■ CD-S1000 input/output table Disc Output jacks ANALOG OUT DIGITAL OUT (OPTICAL and COAXIAL) DSD stereo layer ✔ - CD layer ✔ ✔ CD MP3/WMA Note ✔ ✔ ✔ ✔ No signal is output when this unit is in the PURE DIRECT mode. 16 En
SA-CD DSD multichannel layer - - Connections ■ CD-S1000 input/output table Disc Output jacks ANALOG OUT DIGITAL OUT (OPTICAL and COAXIAL) DSD stereo layer ✔ - CD layer ✔ ✔ CD MP3/WMA Note ✔ ✔ ✔ ✔ No signal is output when this unit is in the PURE DIRECT mode. 16 En

Owner's Manual
Page 18
...use chemical solvents (ex. Specifications AUDIO SECTION • Frequency Response SA-CD 2 Hz to 50 kHz (-3 dB) CD 2 Hz to 20 kHz • Total Harmonic Distortion (1 kHz) SA-CD, CD 0.002% or less • Signal to change without notice. Taking care of this unit When you wipe this might damage the finish. and Canada models...17-5/16") • Weight 15 kg (33 lbs. 1 oz.) * Specifications are subject to Noise Ratio (IHF-A Network 113 dB or more • Dynamic Range SA-CD 105 dB or more CD 100 dB or more • Output Level (1 kHz, 0 dB 2.0 ± 0.3 V LASER DIODE PROPERTIES &#...
...use chemical solvents (ex. Specifications AUDIO SECTION • Frequency Response SA-CD 2 Hz to 50 kHz (-3 dB) CD 2 Hz to 20 kHz • Total Harmonic Distortion (1 kHz) SA-CD, CD 0.002% or less • Signal to change without notice. Taking care of this unit When you wipe this might damage the finish. and Canada models...17-5/16") • Weight 15 kg (33 lbs. 1 oz.) * Specifications are subject to Noise Ratio (IHF-A Network 113 dB or more • Dynamic Range SA-CD 105 dB or more CD 100 dB or more • Output Level (1 kHz, 0 dB 2.0 ± 0.3 V LASER DIODE PROPERTIES &#...
Owner's Manual
Page 19
... in DSD multi-channel format cannot be played on conventional CD players as well as it might damage this unit. Compact discs (digital audio) Discs on which recording was not made by copying onto a CD-R or CD-RW (including MP3 or WMA format files). Playable disc format ■ Supported disc types This unit is compatible with tape, seals, or paste on it. FOR MUSIC USE ONLY •...
... in DSD multi-channel format cannot be played on conventional CD players as well as it might damage this unit. Compact discs (digital audio) Discs on which recording was not made by copying onto a CD-R or CD-RW (including MP3 or WMA format files). Playable disc format ■ Supported disc types This unit is compatible with tape, seals, or paste on it. FOR MUSIC USE ONLY •...

Owner's Manual
Page 20
... software settings, this unit. ■ Handling compact discs • Always handle a disc with care so that its surface is not scratched. • Compact discs are recognized; wipe it straight outward from this unit. However, the original level of sound quality is not supported. • The disc must be ISO9660 compatible. • The text data contained in the files are not displayed...
... software settings, this unit. ■ Handling compact discs • Always handle a disc with care so that its surface is not scratched. • Compact discs are recognized; wipe it straight outward from this unit. However, the original level of sound quality is not supported. • The disc must be ISO9660 compatible. • The text data contained in the files are not displayed...
Owner's Manual
Page 21
... down. Switch the playback layer. Connect the power cable firmly. replace it if necessary. Replace the disc with a correctly recorded disc playable with the label side up. Improper amplifier operation. Noise from inside of a component connected to the correct input selection. Replace the disc. If the problem you are not compatible with this unit. Problem Cause Remedy This unit fails to turn off . The disc is playing. Set the amplifier controls to the DIGITAL OUT jacks is...
... down. Switch the playback layer. Connect the power cable firmly. replace it if necessary. Replace the disc with a correctly recorded disc playable with the label side up. Improper amplifier operation. Noise from inside of a component connected to the correct input selection. Replace the disc. If the problem you are not compatible with this unit. Problem Cause Remedy This unit fails to turn off . The disc is playing. Set the amplifier controls to the DIGITAL OUT jacks is...
Owner's Manual
Page 22
Replace all batteries. The batteries are weak. Troubleshooting Problem The remote control does not work or function properly. of fluorescent lamp, etc.) is striking the remote control sensor of 6 m (20 ft) and no more than 30 degrees off-axis from an inverter type Reposition this unit. Cause Remedy Wrong distance or angle. The remote control functions within a maximum range of this unit. See page 12 - 12 22 En Direct sunlight or lighting (from the front panel.
Replace all batteries. The batteries are weak. Troubleshooting Problem The remote control does not work or function properly. of fluorescent lamp, etc.) is striking the remote control sensor of 6 m (20 ft) and no more than 30 degrees off-axis from an inverter type Reposition this unit. Cause Remedy Wrong distance or angle. The remote control functions within a maximum range of this unit. See page 12 - 12 22 En Direct sunlight or lighting (from the front panel.
Owner's Manual
Page 25
... unit. i En REFER SERVICING TO QUALIFIED SERVICE PERSONNEL. • Explanation of the obsolete outlet. 10 Protect the power cord from tip-over. 13 Unplug this unit in accordance with the manufacturer's instructions. 8 Do not install near water. 6 Clean only with arrowhead symbol, within an equilateral triangle, is located on or pinched particularly at a safe level. IMPORTANT Please record...
... unit. i En REFER SERVICING TO QUALIFIED SERVICE PERSONNEL. • Explanation of the obsolete outlet. 10 Protect the power cord from tip-over. 13 Unplug this unit in accordance with the manufacturer's instructions. 8 Do not install near water. 6 Clean only with arrowhead symbol, within an equilateral triangle, is located on or pinched particularly at a safe level. IMPORTANT Please record...
Owner's Manual
Page 26
... local retailer authorized to coaxial type cable. This equipment generates/uses radio frequencies and, if not installed and used . Utilize power outlets that interference will not result in harmful interference with the requirements listed in the users manual, may cause interference harmful to the U.K. If you can be used according to the instructions found to use of other electronic devices. AVERTISSEMENT L'utilisation...
... local retailer authorized to coaxial type cable. This equipment generates/uses radio frequencies and, if not installed and used . Utilize power outlets that interference will not result in harmful interference with the requirements listed in the users manual, may cause interference harmful to the U.K. If you can be used according to the instructions found to use of other electronic devices. AVERTISSEMENT L'utilisation...
Owner's Manual
Page 27
... not be opened for any service is needed. If the temperature inside this unit rises, it is connected to the AC wall outlet, it may cause electrical shock to the user and/or damage to this unit. 6 Do not cover this unit must be reached easily. 17 Be sure to sudden temperature changes from direct sunlight, heat sources, vibration...
... not be opened for any service is needed. If the temperature inside this unit rises, it is connected to the AC wall outlet, it may cause electrical shock to the user and/or damage to this unit. 6 Do not cover this unit must be reached easily. 17 Be sure to sudden temperature changes from direct sunlight, heat sources, vibration...

Owner's Manual
Page 28
... or in transit from direct lighting. ■ Special Instructions for U.K. b. Damage resulting from: (1) Repairs performed by the customer himself or by Yamaha in the EEA and/or Switzerland. (7) Non AV (Audio Visual) related products. (Products subject to replace a product with that neither core is in accordance with third party products. (6) Use of the three pin plug. dispose of them...
... or in transit from direct lighting. ■ Special Instructions for U.K. b. Damage resulting from: (1) Repairs performed by the customer himself or by Yamaha in the EEA and/or Switzerland. (7) Non AV (Audio Visual) related products. (Products subject to replace a product with that neither core is in accordance with third party products. (6) Use of the three pin plug. dispose of them...


