

Owner's Manual
Page 2
...and other musical instruments, and are involved with music in 1887. Thereafter we were one of audio components in 1955. HiFi Began with Yamaha Yamaha's involvement with set up and sound tuning. We manufacture professional recording equipment, we design concert halls and we are the world's leading producer ...of Yamaha Natural Sound. Now we assist artists at concerts with and passion for music goes back more than a century, to offer mass-produced, ...
...and other musical instruments, and are involved with music in 1887. Thereafter we were one of audio components in 1955. HiFi Began with Yamaha Yamaha's involvement with set up and sound tuning. We manufacture professional recording equipment, we design concert halls and we are the world's leading producer ...of Yamaha Natural Sound. Now we assist artists at concerts with and passion for music goes back more than a century, to offer mass-produced, ...
Owner's Manual
Page 3
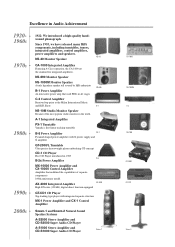
... AX-2000 Integrated Amplifier High S/N ratio (128 dB), digital direct function equipped AX-2000 GT-CD1 CD Player Top-loading type player with integrated separate structure MX-1 Power Amplifier and CX-1 Control Amplifier Soavo-1 and Soavo-2 Natural Sound Speaker Systems.... A-1 Integrated Amplifier PX-1 Turntable Yamaha's first linear tracking turntable B-6 Power Amplifier PX-1 Pyramid-shaped power amplifier with X power supply and X amplifier GT-2000/L Turntable Ultra-precise heavyweight player embodying GT concept CD-1 CD Player First CD Player introduced in 1983 B-6 B-2x Power...
... AX-2000 Integrated Amplifier High S/N ratio (128 dB), digital direct function equipped AX-2000 GT-CD1 CD Player Top-loading type player with integrated separate structure MX-1 Power Amplifier and CX-1 Control Amplifier Soavo-1 and Soavo-2 Natural Sound Speaker Systems.... A-1 Integrated Amplifier PX-1 Turntable Yamaha's first linear tracking turntable B-6 Power Amplifier PX-1 Pyramid-shaped power amplifier with X power supply and X amplifier GT-2000/L Turntable Ultra-precise heavyweight player embodying GT concept CD-1 CD Player First CD Player introduced in 1983 B-6 B-2x Power...
Owner's Manual
Page 4
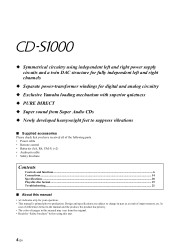
... supply circuits and a twin DAC structure for fully independent left and right channels ◆ Separate power-transformer windings for digital and analog circuitry ◆ Exclusive Yamaha loading mechanism with superior quietness ◆ PURE DIRECT ◆ Super sound from Super Audio CDs ◆ Newly developed heavyweight feet to suppress vibrations ■ Supplied...
... supply circuits and a twin DAC structure for fully independent left and right channels ◆ Separate power-transformer windings for digital and analog circuitry ◆ Exclusive Yamaha loading mechanism with superior quietness ◆ PURE DIRECT ◆ Super sound from Super Audio CDs ◆ Newly developed heavyweight feet to suppress vibrations ■ Supplied...
Owner's Manual
Page 5
CONTROLS AND FUNCTIONS Controls and functions In this chapter, you will learn the controls and functions of CD-S1000. 5 En
CONTROLS AND FUNCTIONS Controls and functions In this chapter, you will learn the controls and functions of CD-S1000. 5 En
Owner's Manual
Page 6
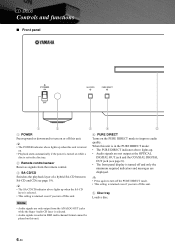
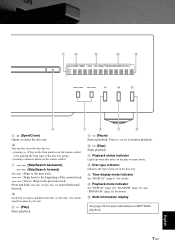
Controls and functions ■ Front panel POWER ON OFF SA-CD/CD PURE DIRECT 1 2 3 4 5 1 POWER Press upward or downward to turn on or off this unit. 5 Disc tray Loads a disc. y • Press again to improve audio quality. y • The POWER indicator above lights up when this unit is turned on. • Playback starts automatically if the power is turned on while a disc is set in the disc tray. 2 Remote control sensor Receives signals from the ANALOG OUT jacks while the Super Audio CD layer is selected. • Audio signals recorded in the PURE DIRECT mode: • The ...
Controls and functions ■ Front panel POWER ON OFF SA-CD/CD PURE DIRECT 1 2 3 4 5 1 POWER Press upward or downward to turn on or off this unit. 5 Disc tray Loads a disc. y • Press again to improve audio quality. y • The POWER indicator above lights up when this unit is turned on. • Playback starts automatically if the power is turned on while a disc is set in the disc tray. 2 Remote control sensor Receives signals from the ANALOG OUT jacks while the Super Audio CD layer is selected. • Audio signals recorded in the PURE DIRECT mode: • The ...
Owner's Manual
Page 7
y You can also close the disc tray by: • pressing (Play) on the front panel or on the remote control or by 4 levels. y Each time you press and hold or to the previous track. A B C D E SA-CD MP3 WMA TRACK TOTAL REMAIN PROG RANDOM REP OFF S ALL 6 7 8 9 0 6 (Open/Close) Opens or closes the disc tray. C Time display mode indicator See "DISPLAY" (page 11) for more information on the remote control. 7 (Skip/Search backward), (Skip/Search forward) : Skips to the next track. : Skips back to resume playback. 0 (Stop) Stops playback. or , the search 8 (Play) ...
y You can also close the disc tray by: • pressing (Play) on the front panel or on the remote control or by 4 levels. y Each time you press and hold or to the previous track. A B C D E SA-CD MP3 WMA TRACK TOTAL REMAIN PROG RANDOM REP OFF S ALL 6 7 8 9 0 6 (Open/Close) Opens or closes the disc tray. C Time display mode indicator See "DISPLAY" (page 11) for more information on the remote control. 7 (Skip/Search backward), (Skip/Search forward) : Skips to the next track. : Skips back to resume playback. 0 (Stop) Stops playback. or , the search 8 (Play) ...
Owner's Manual
Page 8
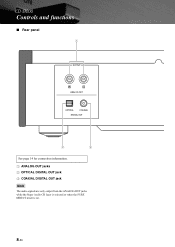
Controls and functions ■ Rear panel 1 OUTPUT R L ANALOG OUT OPTICAL COAXIAL DIGITAL OUT 2 3 See page 14 for connection information. 1 ANALOG OUT jacks 2 OPTICAL DIGITAL OUT jack 3 COAXIAL DIGITAL OUT jack Note The audio signals are only output from the ANALOG OUT jacks while the Super Audio CD layer is selected or when the PURE DIRECT mode is on. 8 En
Controls and functions ■ Rear panel 1 OUTPUT R L ANALOG OUT OPTICAL COAXIAL DIGITAL OUT 2 3 See page 14 for connection information. 1 ANALOG OUT jacks 2 OPTICAL DIGITAL OUT jack 3 COAXIAL DIGITAL OUT jack Note The audio signals are only output from the ANALOG OUT jacks while the Super Audio CD layer is selected or when the PURE DIRECT mode is on. 8 En

Owner's Manual
Page 9
See page 15 for your local main voltage BEFORE plugging the power cable into the AC wall outlet. See page 15 for further information. 5 Foot If this unit is unstable, you can adjust the foot height by rotating it. 6 AC IN Use this unit must be set for connection information. 6 9 En English (Asia and General models) VOLTAGE SELECTOR AC IN 45 4 VOLTAGE SELECTOR (Asia and General models only) The VOLTAGE SELECTOR on the rear panel of this inlet to plug in the supplied power cable.
See page 15 for your local main voltage BEFORE plugging the power cable into the AC wall outlet. See page 15 for further information. 5 Foot If this unit is unstable, you can adjust the foot height by rotating it. 6 AC IN Use this unit must be set for connection information. 6 9 En English (Asia and General models) VOLTAGE SELECTOR AC IN 45 4 VOLTAGE SELECTOR (Asia and General models only) The VOLTAGE SELECTOR on the rear panel of this inlet to plug in the supplied power cable.
Owner's Manual
Page 10
Each time you press DIMMER, the brightness level changes in DSD multi-channel format cannot be played on the front panel lights up when the SA-CD layer is selected. • This setting is retained even if you press REPEAT during playback, the repeat playback mode changes as follows: • REP S (single repeat playback): On reaching the end of the current track, playback repeats from the beginning of a hybrid SA-CD between SA-CD and CD (see page 19). Notes • Audio signals are only output from the beginning of the last track, playback repeats from the ANALOG OUT jacks while the...
Each time you press DIMMER, the brightness level changes in DSD multi-channel format cannot be played on the front panel lights up when the SA-CD layer is selected. • This setting is retained even if you press REPEAT during playback, the repeat playback mode changes as follows: • REP S (single repeat playback): On reaching the end of the current track, playback repeats from the beginning of a hybrid SA-CD between SA-CD and CD (see page 19). Notes • Audio signals are only output from the beginning of the last track, playback repeats from the ANALOG OUT jacks while the...

Owner's Manual
Page 11
y Each time you can play back tracks in the PURE DIRECT mode: • The PURE DIRECT indicator above lights up to 24 tracks. 4 Press p. y This setting is set to the program editing mode. 2 Select a track by 4 7 (Skip backward), (Skip forward) : Skips to the next track. : Skips back to the beginning of the current track. (twice): Skips to program the next track. Each time you press DISPLAY during playback, the time display changes as follows: • Elapsed time of the current track (default setting): The TRACK indicator lights up in the front panel display. • Remaining time...
y Each time you can play back tracks in the PURE DIRECT mode: • The PURE DIRECT indicator above lights up to 24 tracks. 4 Press p. y This setting is set to the program editing mode. 2 Select a track by 4 7 (Skip backward), (Skip forward) : Skips to the next track. : Skips back to the beginning of the current track. (twice): Skips to program the next track. Each time you press DISPLAY during playback, the time display changes as follows: • Elapsed time of the current track (default setting): The TRACK indicator lights up in the front panel display. • Remaining time...

Owner's Manual
Page 12
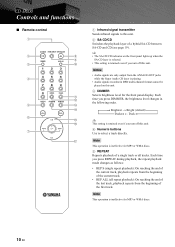
Controls and functions ■ Installing batteries in the remote control 1 3 2 ■ Using the remote control The remote control transmits a directional infrared beam. Be sure to aim the remote control directly at the remote control sensor on the front panel of this unit during operation. 1 Press the part and slide the battery compartment cover off. 2 Insert the two supplied batteries (AA, R6, UM-3) according to the polarity markings (+ and -) on the inside of the battery compartment. 3 Slide the cover back until it snaps into place. Within 6 m (20 ft) 30 30 12 En
Controls and functions ■ Installing batteries in the remote control 1 3 2 ■ Using the remote control The remote control transmits a directional infrared beam. Be sure to aim the remote control directly at the remote control sensor on the front panel of this unit during operation. 1 Press the part and slide the battery compartment cover off. 2 Insert the two supplied batteries (AA, R6, UM-3) according to the polarity markings (+ and -) on the inside of the battery compartment. 3 Slide the cover back until it snaps into place. Within 6 m (20 ft) 30 30 12 En
Owner's Manual
Page 13
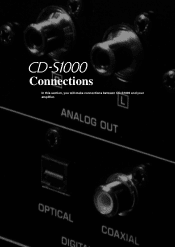
CONNECTIONS Connections In this section, you will make connections between CD-S1000 and your amplifier. 13 En
CONNECTIONS Connections In this section, you will make connections between CD-S1000 and your amplifier. 13 En
Owner's Manual
Page 14
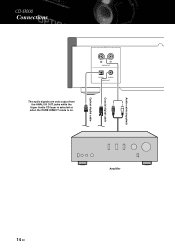
OUTPUT R L ANALOG OUT OPTICAL COAXIAL DIGITAL OUT Amplifier Audio cable (supplied) Coaxial digital cable Optical digital cable 14 En Connections The audio signals are only output from the ANALOG OUT jacks while the Super Audio CD layer is selected or when the PURE DIRECT mode is on.
OUTPUT R L ANALOG OUT OPTICAL COAXIAL DIGITAL OUT Amplifier Audio cable (supplied) Coaxial digital cable Optical digital cable 14 En Connections The audio signals are only output from the ANALOG OUT jacks while the Super Audio CD layer is selected or when the PURE DIRECT mode is on.

Owner's Manual
Page 15
Voltages are as follows: AC 110/120/220/230-240 V, 50/60 Hz ■ Connecting the power cable Connect the power cable into the AC IN inlet on the rear panel of the VOLTAGE SELECTOR may cause damage to this unit must be set for your local voltage BEFORE plugging the power cable into the AC wall outlet. (Asia and General models) VOLTAGE SELECTOR AC IN ■ VOLTAGE SELECTOR (Asia and General models only) Caution The VOLTAGE SELECTOR on the rear panel when all connections are complete, and then plug in the power cable to the AC outlet. 230240V VOLTAGE SELECTOR Voltage indication...
Voltages are as follows: AC 110/120/220/230-240 V, 50/60 Hz ■ Connecting the power cable Connect the power cable into the AC IN inlet on the rear panel of the VOLTAGE SELECTOR may cause damage to this unit must be set for your local voltage BEFORE plugging the power cable into the AC wall outlet. (Asia and General models) VOLTAGE SELECTOR AC IN ■ VOLTAGE SELECTOR (Asia and General models only) Caution The VOLTAGE SELECTOR on the rear panel when all connections are complete, and then plug in the power cable to the AC outlet. 230240V VOLTAGE SELECTOR Voltage indication...
Owner's Manual
Page 16
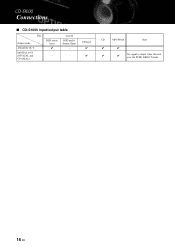
Connections ■ CD-S1000 input/output table Disc Output jacks ANALOG OUT DIGITAL OUT (OPTICAL and COAXIAL) DSD stereo layer ✔ - CD layer ✔ ✔ CD MP3/WMA Note ✔ ✔ ✔ ✔ No signal is output when this unit is in the PURE DIRECT mode. 16 En SA-CD DSD multichannel layer - -
Connections ■ CD-S1000 input/output table Disc Output jacks ANALOG OUT DIGITAL OUT (OPTICAL and COAXIAL) DSD stereo layer ✔ - CD layer ✔ ✔ CD MP3/WMA Note ✔ ✔ ✔ ✔ No signal is output when this unit is in the PURE DIRECT mode. 16 En SA-CD DSD multichannel layer - -
Owner's Manual
Page 17
Specifications In this section, you will find technical specifications for CD-S1000.
Specifications In this section, you will find technical specifications for CD-S1000.

Owner's Manual
Page 18
and Europe models AC 230 V, 50 Hz • Power Consumption 30 W • Off-state Power Consumption 0 W • Dimensions (W x H x D 435 x 137 x 440 mm (17-1/8" x 5-3/8" x 17-5/16") • Weight 15 kg (33 lbs. 1 oz.) * Specifications are subject to Noise Ratio (IHF-A Network 113 dB or more • Dynamic Range SA-CD 105 dB or more CD 100 dB or more • Output Level (1 kHz, 0 dB 2.0 ± 0.3 V LASER DIODE PROPERTIES • Type SA-CD Semiconductor laser (AlGaInP) CD Semiconductor laser (AlGaAs) • Wavelength SA-CD 650 nm CD 780 nm • Output Power SA-CD 5 mW ...
and Europe models AC 230 V, 50 Hz • Power Consumption 30 W • Off-state Power Consumption 0 W • Dimensions (W x H x D 435 x 137 x 440 mm (17-1/8" x 5-3/8" x 17-5/16") • Weight 15 kg (33 lbs. 1 oz.) * Specifications are subject to Noise Ratio (IHF-A Network 113 dB or more • Dynamic Range SA-CD 105 dB or more CD 100 dB or more • Output Level (1 kHz, 0 dB 2.0 ± 0.3 V LASER DIODE PROPERTIES • Type SA-CD Semiconductor laser (AlGaInP) CD Semiconductor laser (AlGaAs) • Wavelength SA-CD 650 nm CD 780 nm • Output Power SA-CD 5 mW ...
Owner's Manual
Page 19
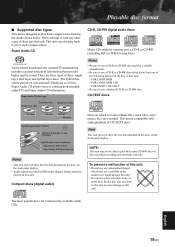
...TEXT discs. Notes • Be sure to use a CD-R or CD-RW disc made by a reliable manufacturer. • Be sure to load any CD player High Density layer containing: 2 - To prevent a malfunction of discs into this unit. The most popular discs for commercially available audio CDs. NOTE: This unit ...CD-RW (including MP3 or WMA format files). FOR CONSUMER - English 19 En FOR CONSUMER USE - This unit can be played on conventional CD players as well as it might damage this unit. • Do not use a disc with audio playback of information that plays on it contains both ...
...TEXT discs. Notes • Be sure to use a CD-R or CD-RW disc made by a reliable manufacturer. • Be sure to load any CD player High Density layer containing: 2 - To prevent a malfunction of discs into this unit. The most popular discs for commercially available audio CDs. NOTE: This unit ...CD-RW (including MP3 or WMA format files). FOR CONSUMER - English 19 En FOR CONSUMER USE - This unit can be played on conventional CD players as well as it might damage this unit. • Do not use a disc with audio playback of information that plays on it contains both ...

Owner's Manual
Page 20
WMA WMA (Windows Media Audio) is a Microsoft file format for a long period of time as these may damage the disc and may warp or otherwise damage the disc. • To play back the disc or files in the order they were recorded. • This unit is compatible with a sampling frequency of 44.1 kHz. • This unit is compatible with a bitrate of 48, 64, 80, 96, 128, 160, or 192 kbps. Notes • This unit plays back WMA files in alphanumeric order. • Up to 648 folders and files (combined) and up to MP3 although WMA can compress files at a higher rate than MP3. wipe it ...
WMA WMA (Windows Media Audio) is a Microsoft file format for a long period of time as these may damage the disc and may warp or otherwise damage the disc. • To play back the disc or files in the order they were recorded. • This unit is compatible with a sampling frequency of 44.1 kHz. • This unit is compatible with a bitrate of 48, 64, 80, 96, 128, 160, or 192 kbps. Notes • This unit plays back WMA files in alphanumeric order. • Up to 648 folders and files (combined) and up to MP3 although WMA can compress files at a higher rate than MP3. wipe it ...
Owner's Manual
Page 21
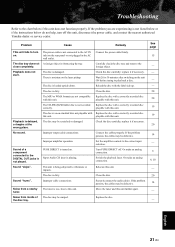
... disc playable with this unit. Replace the disc with a correctly recorded disc playable with this unit, disconnect the power cable, and contact the nearest authorized Yamaha dealer or service center. replace it if necessary. Turn PURE DIRECT off this unit. Sound "skips". The disc is obstructing the tray. Noise from a nearby...
... disc playable with this unit. Replace the disc with a correctly recorded disc playable with this unit, disconnect the power cable, and contact the nearest authorized Yamaha dealer or service center. replace it if necessary. Turn PURE DIRECT off this unit. Sound "skips". The disc is obstructing the tray. Noise from a nearby...
