

Owner's Manual
Page 3
...APPENDIX APPENDIX GLOSSARY 28 TROUBLESHOOTING 29 SPECIFICATIONS 30 INDEX 31 Manufactured under license from other manufacturers as well merely by setting the proper manufacturer code. PREPARATION PREPARATION FEATURES q Home Theater Sound This system delivers a realistic and powerful sound experience...to concerts, and sporting events. q Virtual Surround The front speaker unit can produce a virtual Dolby Surround sound field when playing software with the g or s logo mark. q Seven DSP programs including YAMAHA CINEMA DSP Connecting the YAMAHA NX-SW70 (sold separately) allows seven ...
...APPENDIX APPENDIX GLOSSARY 28 TROUBLESHOOTING 29 SPECIFICATIONS 30 INDEX 31 Manufactured under license from other manufacturers as well merely by setting the proper manufacturer code. PREPARATION PREPARATION FEATURES q Home Theater Sound This system delivers a realistic and powerful sound experience...to concerts, and sporting events. q Virtual Surround The front speaker unit can produce a virtual Dolby Surround sound field when playing software with the g or s logo mark. q Seven DSP programs including YAMAHA CINEMA DSP Connecting the YAMAHA NX-SW70 (sold separately) allows seven ...

Owner's Manual
Page 18
...pressing w decreases the level. A test tone will be using VOL +/-. (This sets the standard audio level you can be adjusted in the following range. • When only the front speaker unit is being used or the VIRTUAL SURROUND DSP program is selected: - Right and left main channels: -10 to &#...rear virtual channels is -3 dB. • When an NX-SW70 is connected: - decreases the level. 4 Adjust the level of the virtual channels sets the other virtual channel to the same level. 5 When the adjustment is complete, press TEST. Adjusting either of each channel while listening to the ...
...pressing w decreases the level. A test tone will be using VOL +/-. (This sets the standard audio level you can be adjusted in the following range. • When only the front speaker unit is being used or the VIRTUAL SURROUND DSP program is selected: - Right and left main channels: -10 to &#...rear virtual channels is -3 dB. • When an NX-SW70 is connected: - decreases the level. 4 Adjust the level of the virtual channels sets the other virtual channel to the same level. 5 When the adjustment is complete, press TEST. Adjusting either of each channel while listening to the ...

Owner's Manual
Page 23
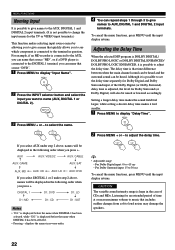
...to select the "Auto Power 2". Pressing + will cycle through the selections from -3 (dimmest) to change the sensitivity of connected component. To set Auto Power On, use the MENU + or - Adjustments on the menu functions should be turned on again using the Auto Power function. No... for naming input, and "Delay Time" for adjusting the delay time used for surround sound. Pressing + will cycle through the selections from bottom to display "Auto Power". to bottom, while pressing - Display OFF 1 2 3 Setting/Symptom Do not use the MENU - If a signal is input, Auto Power ...
...to select the "Auto Power 2". Pressing + will cycle through the selections from -3 (dimmest) to change the sensitivity of connected component. To set Auto Power On, use the MENU + or - Adjustments on the menu functions should be turned on again using the Auto Power function. No... for naming input, and "Delay Time" for adjusting the delay time used for surround sound. Pressing + will cycle through the selections from bottom to display "Auto Power". to bottom, while pressing - Display OFF 1 2 3 Setting/Symptom Do not use the MENU - If a signal is input, Auto Power ...
Owner's Manual
Page 24
... be displayed in reverse order. Setting a longer delay time makes the sound field feel larger, while setting a shorter delay time makes it is possible to set the delay time separately for Dolby Digital and Dolby Surround input, if the Dolby Digital (or Dolby Surround) delay time is displayed before ...the name when DIGITAL 1 has been selected, while "D2:" is adjusted, the level for Dolby Surround (or Dolby Digital) ...
... be displayed in reverse order. Setting a longer delay time makes the sound field feel larger, while setting a shorter delay time makes it is possible to set the delay time separately for Dolby Digital and Dolby Surround input, if the Dolby Digital (or Dolby Surround) delay time is displayed before ...the name when DIGITAL 1 has been selected, while "D2:" is adjusted, the level for Dolby Surround (or Dolby Digital) ...

Owner's Manual
Page 30
...channels: three front channels and two rear channels, plus a distinct LFE channel for use in AV reproduction that come to record an extremely large amount of Dolby Surround. Using a built-in YAMAHA DSP (digital sound field processor) to create sound fields, this front speaker unit allows you...four channels: two front channels (right and left ears and differences in comparison to easily set up a home AV system capable of digital signal processing) and right and left . s Virtual surround We basically perceive the direction from front to back and right to sound sources. 28 ...
...channels: three front channels and two rear channels, plus a distinct LFE channel for use in AV reproduction that come to record an extremely large amount of Dolby Surround. Using a built-in YAMAHA DSP (digital sound field processor) to create sound fields, this front speaker unit allows you...four channels: two front channels (right and left ears and differences in comparison to easily set up a home AV system capable of digital signal processing) and right and left . s Virtual surround We basically perceive the direction from front to back and right to sound sources. 28 ...

Owner's Manual
Page 33
... Dimmer → Adjusting display brightness 21 Display 4 DOLBY DIGITAL, DOLBY PRO LOGIC 19, 20 DSP programs 19 I Input Name → Naming input 22 M Manually setting a manufacturer code 23 Manufacturer codes i (at the end of this manual) Menu functions 21 N Naming input 22 NIGHT MODE 18 R Reducing the audio 18 S ...input 17 Speaker placement 6 T Test tone 15 THROUGH OUT terminal 11 TRUBASS mode 18 U Using the height adjustment bracket 8 Using velcro strips 7 V VIRTUAL SURROUND 19, 20 W Wire installation (to prevent falling 8 OPERATION REMOTE CONTROL APPENDIX English 31
... Dimmer → Adjusting display brightness 21 Display 4 DOLBY DIGITAL, DOLBY PRO LOGIC 19, 20 DSP programs 19 I Input Name → Naming input 22 M Manually setting a manufacturer code 23 Manufacturer codes i (at the end of this manual) Menu functions 21 N Naming input 22 NIGHT MODE 18 R Reducing the audio 18 S ...input 17 Speaker placement 6 T Test tone 15 THROUGH OUT terminal 11 TRUBASS mode 18 U Using the height adjustment bracket 8 Using velcro strips 7 V VIRTUAL SURROUND 19, 20 W Wire installation (to prevent falling 8 OPERATION REMOTE CONTROL APPENDIX English 31

