
Owners Manual
Page 1
U Front Surround System ATS-1010 OWNER'S MANUAL
U Front Surround System ATS-1010 OWNER'S MANUAL

Owners Manual
Page 2
...an electrician for replacement of the obsolete outlet. 10 Protect the power cord from being walked on the rear of electric shock to qualified service personnel. Servicing is required when the apparatus has been damaged in accordance with the manufacturer's instructions. 8 Do not install near water. 6...openings. i En NO USERSERVICEABLE PARTS INSIDE. Install in any way, such as radiators, heat registers, stoves, or other . FOR CANADIAN CUSTOMERS To prevent electric shock, match wide blade of this Owner's Manual in the space below. IMPORTANT Please record the serial number of plug ...
...an electrician for replacement of the obsolete outlet. 10 Protect the power cord from being walked on the rear of electric shock to qualified service personnel. Servicing is required when the apparatus has been damaged in accordance with the manufacturer's instructions. 8 Do not install near water. 6...openings. i En NO USERSERVICEABLE PARTS INSIDE. Install in any way, such as radiators, heat registers, stoves, or other . FOR CANADIAN CUSTOMERS To prevent electric shock, match wide blade of this Owner's Manual in the space below. IMPORTANT Please record the serial number of plug ...
Owners Manual
Page 3
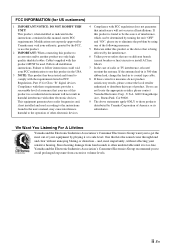
... from excessive volume levels. If the antenna lead-in is 300 ohm ribbon lead, change the lead-in all installation instructions. If you to comply with other electronic devices. 4 Compliance with FCC regulations does not guarantee that lets the sound come through loud and clear without affecting your equipment by playing it is being affected by using one of...
... from excessive volume levels. If the antenna lead-in is 300 ohm ribbon lead, change the lead-in all installation instructions. If you to comply with other electronic devices. 4 Compliance with FCC regulations does not guarantee that lets the sound come through loud and clear without affecting your equipment by playing it is being affected by using one of...
Owners Manual
Page 4
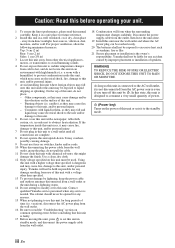
... common operating errors before concluding that this unit is faulty. 17 Before moving this unit, press to set this unit in standby mode, and disconnect the power supply cable from the wall outlet. 18 Condensation will not be exposed to liquid dripping or splashing. Other components, as they may cause damage and/or discoloration on switches, knobs and/or cords. 10...
... common operating errors before concluding that this unit is faulty. 17 Before moving this unit, press to set this unit in standby mode, and disconnect the power supply cable from the wall outlet. 18 Condensation will not be exposed to liquid dripping or splashing. Other components, as they may cause damage and/or discoloration on switches, knobs and/or cords. 10...
Owners Manual
Page 5
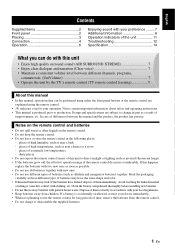
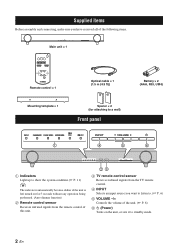
.... English Français Deutsch Svenska Italiano Contents Supplied items 2 Front panel 2 Placing 3 Connection 4 Operation 6 Enjoying sound with your preference ......... 7 Additional Information 8 Operation indicators of the unit 11 Troubleshooting 12 Specification 14 What you can be performed using the remote control. • y indicates a tip for long periods of time, remove the batteries from children. dusty places • Do not expose the...
.... English Français Deutsch Svenska Italiano Contents Supplied items 2 Front panel 2 Placing 3 Connection 4 Operation 6 Enjoying sound with your preference ......... 7 Additional Information 8 Operation indicators of the unit 11 Troubleshooting 12 Specification 14 What you can be performed using the remote control. • y indicates a tip for long periods of time, remove the batteries from children. dusty places • Do not expose the...
Owners Manual
Page 6
... indicators automatically become darker if the unit is left turned on for 5 seconds without any operation being performed. (Auto dimmer function) 2 Remote control sensor Receives infrared signals from the remote control of this unit. 23 3 TV remote control sensor Receives infrared signals from the TV remote control. 4 INPUT Selects an input source you want to listen to. (☞ P. 6) 5 VOLUME -/+ Controls the volume of the unit. (☞ P. 8) 6 (Power) Turns on the unit, or sets it to standby mode. 2 En
... indicators automatically become darker if the unit is left turned on for 5 seconds without any operation being performed. (Auto dimmer function) 2 Remote control sensor Receives infrared signals from the remote control of this unit. 23 3 TV remote control sensor Receives infrared signals from the TV remote control. 4 INPUT Selects an input source you want to listen to. (☞ P. 6) 5 VOLUME -/+ Controls the volume of the unit. (☞ P. 8) 6 (Power) Turns on the unit, or sets it to standby mode. 2 En

Owners Manual
Page 7
... mm (3/4") (1/16" to external components such as not to perform this installation work must never attempt to damage your installation environment, connections to 3/16") 3 Hang the unit on the screws using the brackets on the rear of the unit may fall . • When connecting the unit, fix the cables in order to decide which procedure is best done first. • When...
... mm (3/4") (1/16" to external components such as not to perform this installation work must never attempt to damage your installation environment, connections to 3/16") 3 Hang the unit on the screws using the brackets on the rear of the unit may fall . • When connecting the unit, fix the cables in order to decide which procedure is best done first. • When...
Owners Manual
Page 8
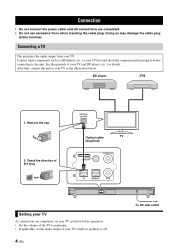
... operation. • Set the volume of your TV as the illustration below before connecting to off. 4 En To AC wall outlet See the manuals of your TV. Remove the cap 2. Check the direction of the plug OPTICAL OUTPUT Optical cable TV (supplied) SYSTEM CONNECTOR SUBWOOFER OUT SYSTEM CONNECTOR SUBWOOFER OUT Setting your TV As connections are completed. • Do not use excessive force when inserting the cable plug. Connecting a TV The unit plays the audio output...
... operation. • Set the volume of your TV as the illustration below before connecting to off. 4 En To AC wall outlet See the manuals of your TV. Remove the cap 2. Check the direction of the plug OPTICAL OUTPUT Optical cable TV (supplied) SYSTEM CONNECTOR SUBWOOFER OUT SYSTEM CONNECTOR SUBWOOFER OUT Setting your TV As connections are completed. • Do not use excessive force when inserting the cable plug. Connecting a TV The unit plays the audio output...
Owners Manual
Page 9
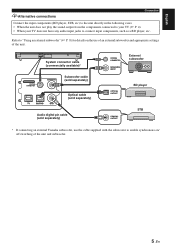
... CONNECTOR SUBWOOFER OUT Subwoofer cable (sold separately) Optical cable (sold separately) SYSTEM CONNECTOR MONAURAL INPUT External subwoofer OPTICAL OUTPUT BD player Audio digital pin cable (sold separately) COAXIAL OUTPUT STB * If connecting an external Yamaha subwoofer, use of an external subwoofer and appropriate settings of the unit and subwoofer. 5 En English yAlternative connections Connection Connect the input components (BD player, STB, etc) to the unit directly in the following cases. • When the unit does not play the sound output from the components connected...
... CONNECTOR SUBWOOFER OUT Subwoofer cable (sold separately) Optical cable (sold separately) SYSTEM CONNECTOR MONAURAL INPUT External subwoofer OPTICAL OUTPUT BD player Audio digital pin cable (sold separately) COAXIAL OUTPUT STB * If connecting an external Yamaha subwoofer, use of an external subwoofer and appropriate settings of the unit and subwoofer. 5 En English yAlternative connections Connection Connect the input components (BD player, STB, etc) to the unit directly in the following cases. • When the unit does not play the sound output from the components connected...
Owners Manual
Page 10
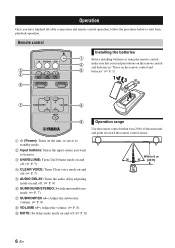
... to listen to. 3 UNIVOLUME: Turns UniVolume mode on and off. (☞ P. 7) 4 CLEAR VOICE: Turns Clear voice mode on and off. (☞ P. 7) 5 AUDIO DELAY: Turns the audio delay adjusting mode on and off. (☞ P. 8) 6 SURROUND/STEREO: Switch surround/stereo mode. (☞ P. 7) 7 SUBWOOFER +/-: Adjust the subwoofer volume. (☞ P. 8) 8 VOLUME +/-: Adjust the volume. (☞ P. 8) 9 MUTE: Switches mute mode on the unit, or sets it to standby mode. 2 Input buttons: Select the input source you have finished all cable connections and remote control operation, follow the procedure below...
... to listen to. 3 UNIVOLUME: Turns UniVolume mode on and off. (☞ P. 7) 4 CLEAR VOICE: Turns Clear voice mode on and off. (☞ P. 7) 5 AUDIO DELAY: Turns the audio delay adjusting mode on and off. (☞ P. 8) 6 SURROUND/STEREO: Switch surround/stereo mode. (☞ P. 7) 7 SUBWOOFER +/-: Adjust the subwoofer volume. (☞ P. 8) 8 VOLUME +/-: Adjust the volume. (☞ P. 8) 9 MUTE: Switches mute mode on the unit, or sets it to standby mode. 2 Input buttons: Select the input source you have finished all cable connections and remote control operation, follow the procedure below...
Owners Manual
Page 11
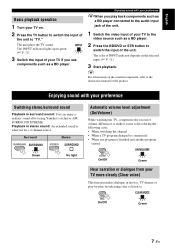
... English Basic playback operation 1 Turn your preference Switching stereo/surround sound Playback in surround sound: You can enjoy a realistic sound effect using Yamaha's exclusive AIR SURROUND XTREME. Enjoying sound with your preference yWhen you use components such as a BD player. 2 Press the BD/DVD or STB button to switch the input of the unit to the instruction manual for a 2 channel source. Enjoying sound with your TV on. 2 Press the TV button to . The unit plays the TV...
... English Basic playback operation 1 Turn your preference Switching stereo/surround sound Playback in surround sound: You can enjoy a realistic sound effect using Yamaha's exclusive AIR SURROUND XTREME. Enjoying sound with your preference yWhen you use components such as a BD player. 2 Press the BD/DVD or STB button to switch the input of the unit to the instruction manual for a 2 channel source. Enjoying sound with your TV on. 2 Press the TV button to . The unit plays the TV...
Owners Manual
Page 12
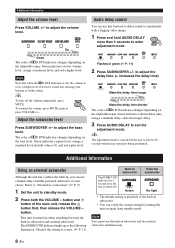
... level. Adjust the subwoofer level Press SUBWOOFER +/- y The adjustment mode is canceled if the unit is left for 2 seconds after the unit is turned on the bass level. button and button of qD DTS indicator changes depending on ) Built-in subwoofer Green External subwoofer No light • The default setting is correct. (☞ P. 11) The SURROUND indicator (for 20 seconds without any operation being performed. Up Audio delay control You can use this function to delay sound...
... level. Adjust the subwoofer level Press SUBWOOFER +/- y The adjustment mode is canceled if the unit is left for 2 seconds after the unit is turned on the bass level. button and button of qD DTS indicator changes depending on ) Built-in subwoofer Green External subwoofer No light • The default setting is correct. (☞ P. 11) The SURROUND indicator (for 20 seconds without any operation being performed. Up Audio delay control You can use this function to delay sound...
Owners Manual
Page 13
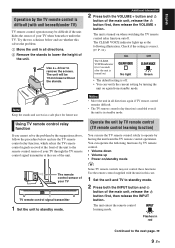
... (for future use the TV remote control relay function, which relays the TV remote control signal received at the rear of the unit. Notes • Move the unit in all directions. 2 Remove the stands to standby mode. You can verify the current setting by TV remote control. • Volume down • Volume up as the following functions by turning the unit on ) On No light Off Green • The default setting is in...
... (for future use the TV remote control relay function, which relays the TV remote control signal received at the rear of the unit. Notes • Move the unit in all directions. 2 Remove the stands to standby mode. You can verify the current setting by TV remote control. • Volume down • Volume up as the following functions by turning the unit on ) On No light Off Green • The default setting is in...
Owners Manual
Page 14
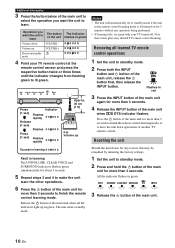
... remote control operations 1 Set the unit to standby mode. 2 Press both the INPUT button and button of another TV remote control. The unit enters standby mode. Removing all the indicators light up in green Volume down VOLUME - Volume up VOLUME + Power on for any operation being performed. • If learning fails, try again with your TV remote control at the remote control sensor and press the respective button twice or three times until the indicator changes from flashing...
... remote control operations 1 Set the unit to standby mode. 2 Press both the INPUT button and button of another TV remote control. The unit enters standby mode. Removing all the indicators light up in green Volume down VOLUME - Volume up VOLUME + Power on for any operation being performed. • If learning fails, try again with your TV remote control at the remote control sensor and press the respective button twice or three times until the indicator changes from flashing...
Owners Manual
Page 15
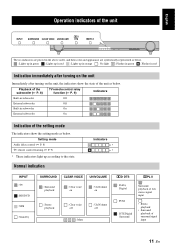
... red Indication immediately after turning on the unit Immediately after turning on : Stereo playback : Clear voice off : UniVolume off : Mute qD DTS : Dolby Digital : PCM : DTS Digital Surround qPL II : Surround playback of 2ch stereo signal input : • Stereo playback • Surround playback of surround signal input 11 En Setting mode Audio delay control (☞ P. 8) TV remote control learning (☞ P. 9) * These indicators light up in orange : No light : Flashes in green : Flashes in subwoofer On External subwoofer On Indication of the setting mode...
... red Indication immediately after turning on the unit Immediately after turning on : Stereo playback : Clear voice off : UniVolume off : Mute qD DTS : Dolby Digital : PCM : DTS Digital Surround qPL II : Surround playback of 2ch stereo signal input : • Stereo playback • Surround playback of surround signal input 11 En Setting mode Audio delay control (☞ P. 8) TV remote control learning (☞ P. 9) * These indicators light up in orange : No light : Flashes in green : Flashes in subwoofer On External subwoofer On Indication of the setting mode...
Owners Manual
Page 16
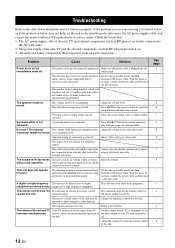
... any operation being performed. Troubleshooting Refer to the chart below does not help, set the unit to the standby mode, disconnect the AC power supply cable, and contact the nearest authorized Yamaha dealer or service center. The power cable may be placed close to play back the source in power supply. Make sure the power cable is selected. The input source or input setting may be Adjust the volume level of the unit may be connected improperly. subwoofer makes no sound...
... any operation being performed. Troubleshooting Refer to the chart below does not help, set the unit to the standby mode, disconnect the AC power supply cable, and contact the nearest authorized Yamaha dealer or service center. The power cable may be placed close to play back the source in power supply. Make sure the power cable is selected. The input source or input setting may be Adjust the volume level of the unit may be connected improperly. subwoofer makes no sound...
Owners Manual
Page 17
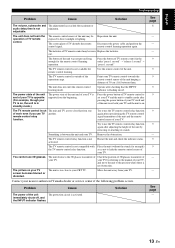
... TV is opposite. (For example, though your TV is on . The unit does not enter the remote control learning mode. Remove the obstruction. The button of your TV. English Troubleshooting Problem Cause Solution The volume, subwoofer and The adjustment has reached the maximum or audio delay time is activated. The unit obstructs the 3D glasses transmitter of the unit was not pressed...
... TV is opposite. (For example, though your TV is on . The unit does not enter the remote control learning mode. Remove the obstruction. The button of your TV. English Troubleshooting Problem Cause Solution The volume, subwoofer and The adjustment has reached the maximum or audio delay time is activated. The unit obstructs the 3D glasses transmitter of the unit was not pressed...

Owners Manual
Page 18
... shielding type Subwoofer Bass reflex type/ Non-magnetic shielding type • Driver Front speaker 6.5 cm (2-1/2 in) cone × 2 Subwoofer 7.5 cm (3 in) cone × 2 • Impedance Front speaker 6 Ω Subwoofer 3 Ω • Frequency Response (-10 dB, Stereo mode) Front speaker 150 Hz to 20 kHz Subwoofer 50 Hz to 150 Hz Input Jacks • Optical 2 (TV,BD/DVD) • Coaxial 1 (STB) Output Jacks • Subwoofer 1 • System Connector (for subwoofer power interlock)......... 1 General...
... shielding type Subwoofer Bass reflex type/ Non-magnetic shielding type • Driver Front speaker 6.5 cm (2-1/2 in) cone × 2 Subwoofer 7.5 cm (3 in) cone × 2 • Impedance Front speaker 6 Ω Subwoofer 3 Ω • Frequency Response (-10 dB, Stereo mode) Front speaker 150 Hz to 20 kHz Subwoofer 50 Hz to 150 Hz Input Jacks • Optical 2 (TV,BD/DVD) • Coaxial 1 (STB) Output Jacks • Subwoofer 1 • System Connector (for subwoofer power interlock)......... 1 General...

Owners Manual
Page 20
© 2011 Yamaha Corporation Printed in Malaysia ZA81330
© 2011 Yamaha Corporation Printed in Malaysia ZA81330


