Use and Care Manual
Page 1
www.whidpooLcom parts, Table of Contents 2 8578899 ELECTRONIC ELECTRIC DRYER For questions about features, operation/performance, accessories or service, call: 1-800-253-1301 or visit our website at...
www.whidpooLcom parts, Table of Contents 2 8578899 ELECTRONIC ELECTRIC DRYER For questions about features, operation/performance, accessories or service, call: 1-800-253-1301 or visit our website at...
Use and Care Manual
Page 2
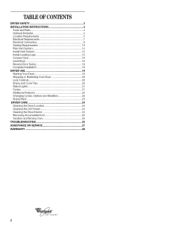
... Requirements 5 Electrical Requirements 7 Electrical Connection 8 Venting Requirements 13 Plan Vent System 14 Install Vent System 15 Install Leveling Legs 15 Connect Vent 16 Level Dryer 16 Reverse Door Swing 16 Complete Installation 18 DRYER USE 19 Starting Your Dryer 19 Stopping or Restarting Your Dryer 20 Lock...21 Additional Features 22 Changing Cycles, Options and Modifiers 23 Drying Rack 23 DRYER CARE 24 Cleaning the Dryer Location 24 Cleaning the Lint Screen 24 Cleaning the Dryer Interior 24 Removing Accumulated Lint 25 Vacation and Moving Care 25 TROUBLESHOOTING 25 ...
... Requirements 5 Electrical Requirements 7 Electrical Connection 8 Venting Requirements 13 Plan Vent System 14 Install Vent System 15 Install Leveling Legs 15 Connect Vent 16 Level Dryer 16 Reverse Door Swing 16 Complete Installation 18 DRYER USE 19 Starting Your Dryer 19 Stopping or Restarting Your Dryer 20 Lock...21 Additional Features 22 Changing Cycles, Options and Modifiers 23 Drying Rack 23 DRYER CARE 24 Cleaning the Dryer Location 24 Cleaning the Lint Screen 24 Cleaning the Dryer Interior 24 Removing Accumulated Lint 25 Vacation and Moving Care 25 TROUBLESHOOTING 25 ...
Use and Care Manual
Page 3
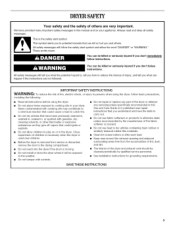
... Do not use heat to dry articles containing foam rubber or similarly textured rubber-like materials. [] Clean lint screen before using the dryer, follow instructions. All safety messages will tell you don't follow the safety alert symbol and either the word "DANGER" or "WARNING...instructions for grounding requirements. iMPORTANT SAFETY iNSTRUCTiONS WARNING: To reduce the risk of fire, electric shock, or injury to persons when using the dryer. [] Do not place items exposed to play on your dryer. DRYERSAFETY Your safety and the safety of others . SAVE TH ESE iNSTRUCTiONS Items ...
... Do not use heat to dry articles containing foam rubber or similarly textured rubber-like materials. [] Clean lint screen before using the dryer, follow instructions. All safety messages will tell you don't follow the safety alert symbol and either the word "DANGER" or "WARNING...instructions for grounding requirements. iMPORTANT SAFETY iNSTRUCTiONS WARNING: To reduce the risk of fire, electric shock, or injury to persons when using the dryer. [] Do not place items exposed to play on your dryer. DRYERSAFETY Your safety and the safety of others . SAVE TH ESE iNSTRUCTiONS Items ...
Use and Care Manual
Page 4
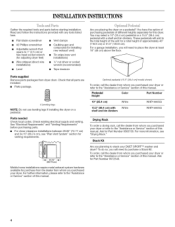
...cm) or 51.5" (130.8 cm). Parts needed Check local codes. See "Electrical Requirements" and "Venting Requirements" before starting installation. These pedestals will need to stack your DUET SPORT TM washer and dryer? For more information, see "Plan Vent System" section for purchase from the ...dealer from dryer drum. Stack Kit Are you purchased your dryer or refer to the "Assistance or Service" section...
...cm) or 51.5" (130.8 cm). Parts needed Check local codes. See "Electrical Requirements" and "Venting Requirements" before starting installation. These pedestals will need to stack your DUET SPORT TM washer and dryer? For more information, see "Plan Vent System" section for purchase from the ...dealer from dryer drum. Stack Kit Are you purchased your dryer or refer to the "Assistance or Service" section...
Use and Care Manual
Page 5
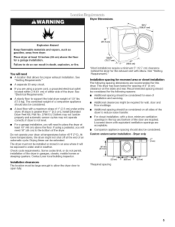
... be large enough to allow the dryer door to do not permit, installation of the dryer. Installation clearances The location must not be installed or stored in garages, closets, mobile homes or sleeping quarters. If using a power cord, a grounded electrical outlet located within 2 ft (61 cm) of either side of 127 Ibs (57...
... be large enough to allow the dryer door to do not permit, installation of the dryer. Installation clearances The location must not be installed or stored in garages, closets, mobile homes or sleeping quarters. If using a power cord, a grounded electrical outlet located within 2 ft (61 cm) of either side of 127 Ibs (57...
Use and Care Manual
Page 6
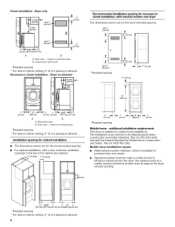
Dryer only 24 in?* .._ (155crn2) 3"* I1"*1 Closet installation -
Dryer only 24 in?* .._ (155crn2) 3"* I1"*1 Closet installation -
Use and Care Manual
Page 7
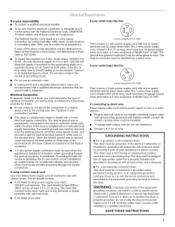
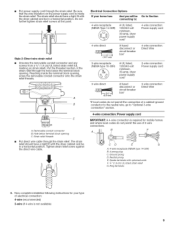
... WARNING: Improper connection of the above code standards can result in doubt as to whether the dryer is properly grounded. Do not modify the plug on both sides of electrical connection you are in a risk of NEMA Type 14-30R. A time-delay fuse or ... grounded. The plug must be plugged into an appropriate outlet that connect to install with a 3-wire electrical supply connection. The National Electric Code requires a 4-wire supply connection for electric current. This dryer uses a cord having an equipment-grounding conductor and a grounding plug. It is your outlet looks like...
... WARNING: Improper connection of the above code standards can result in doubt as to whether the dryer is properly grounded. Do not modify the plug on both sides of electrical connection you are in a risk of NEMA Type 14-30R. A time-delay fuse or ... grounded. The plug must be plugged into an appropriate outlet that connect to install with a 3-wire electrical supply connection. The National Electric Code requires a 4-wire supply connection for electric current. This dryer uses a cord having an equipment-grounding conductor and a grounding plug. It is your outlet looks like...
Use and Care Manual
Page 9
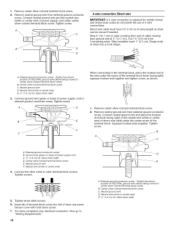
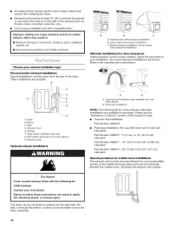
... wire insulation on strain relief). A B A. Strain relief threads Put direct wire cable through the strain relief. Spade terminals with the dryer cabinet and be connecting to: Go to "Optional 3-wire connection" section. 4-wire connection: Power supply cord IMPORTANT: A 4-wire connection... The strain relief should have a tight fit with upturned ends F. 3_,, (1.9 cm) UL listed strain relief G. Ring terminals 4. Electrical Connection Options If your type of 3-wire connections. Put power supply cord through the strain relief. Reaching inside the strain relief. Ground ...
... wire insulation on strain relief). A B A. Strain relief threads Put direct wire cable through the strain relief. Spade terminals with the dryer cabinet and be connecting to: Go to "Optional 3-wire connection" section. 4-wire connection: Power supply cord IMPORTANT: A 4-wire connection... The strain relief should have a tight fit with upturned ends F. 3_,, (1.9 cm) UL listed strain relief G. Ring terminals 4. Electrical Connection Options If your type of 3-wire connections. Put power supply cord through the strain relief. Reaching inside the strain relief. Ground ...
Use and Care Manual
Page 10
... ground wire D. Remove neutral ground wire from 3 remaining wires. External ground conductor screw B. Ground wire (green or bare) of dryer rear panel. Insert tab of terminal block cover into a hook shape. Neutral ground wire D. External ground conductor screw - Neutral wire... (white or center wire) E. Tighten screws. !! !! 5= Tighten strain relief screws. 6. Direct wire cable must have completed your electrical connection. Tighten screw. Center silver-colored terminal block screw E. Secure cover with hold-down screw. 7= You have 5 ft (1.52 m) of...
... ground wire D. Remove neutral ground wire from 3 remaining wires. External ground conductor screw B. Ground wire (green or bare) of dryer rear panel. Insert tab of terminal block cover into a hook shape. Neutral ground wire D. External ground conductor screw - Neutral wire... (white or center wire) E. Tighten screws. !! !! 5= Tighten strain relief screws. 6. Direct wire cable must have completed your electrical connection. Tighten screw. Center silver-colored terminal block screw E. Secure cover with hold-down screw. 7= You have 5 ft (1.52 m) of...
Use and Care Manual
Page 11
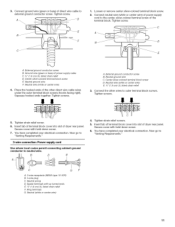
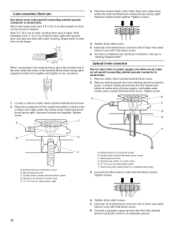
...silver-colored terminal block screw E, Neutral ground wire F Neutral wire (white or center wire) 4. Place the hooked ends of dryer rear panel. Now go to outer terminal block screws. Connect neutral wire (white or center wire) of power supply cord to... !! !! 5. Insert tab of terminal block cover into slot of power supply cable C. 3/4"(1.9 cm) UL listed strain relief D. A. You have completed your electrical connection. External ground conductor screw B. Secure cover with hold -down screw. 7. B D E 4. Spade terminals with hold -down screw. 6. External ground ...
...silver-colored terminal block screw E, Neutral ground wire F Neutral wire (white or center wire) 4. Place the hooked ends of dryer rear panel. Now go to outer terminal block screws. Connect neutral wire (white or center wire) of power supply cord to... !! !! 5. Insert tab of terminal block cover into slot of power supply cable C. 3/4"(1.9 cm) UL listed strain relief D. A. You have completed your electrical connection. External ground conductor screw B. Secure cover with hold -down screw. 7. B D E 4. Spade terminals with hold -down screw. 6. External ground ...
Use and Care Manual
Page 12
... local codes permit connecting cabinet-ground conductor to neutral wire. 1. Strip insulation back 1" (2.5 cm). Place the hooked ends of extra length so dryer can be moved if needed. Secure cover with hold -down screw. 6. You have 5 ft (1.52 m) of the other wires to the ... conductor screw B. Neutral wire (white or center wire) E. _" (1.9 cm) UL fisted strain relief 12 A. Direct wire cable must have completed your electrical connection. Shape ends of wires into a hook shape. 31/2 When connecting to outer terminal block screws. A. Secure cover with outer covering. Insert tab ...
... local codes permit connecting cabinet-ground conductor to neutral wire. 1. Strip insulation back 1" (2.5 cm). Place the hooked ends of extra length so dryer can be moved if needed. Secure cover with hold -down screw. 6. You have 5 ft (1.52 m) of the other wires to the ... conductor screw B. Neutral wire (white or center wire) E. _" (1.9 cm) UL fisted strain relief 12 A. Direct wire cable must have completed your electrical connection. Shape ends of wires into a hook shape. 31/2 When connecting to outer terminal block screws. A. Secure cover with outer covering. Insert tab ...
Use and Care Manual
Page 13
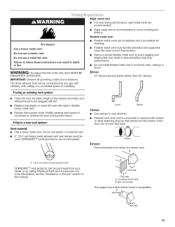
... and kinking. B 4" (10.2cm) heavymetal exhaust vent DURASAFE TM vent products can result in enclosed walls, ceilings or floors. If this dryer MUST BE EXHAUSTED OUTDOORS. Rigid metal vent • For best drying performance, recommended. rigid metal vents are recommended. Good Better Clamps Use clamps...Do not use duct tape. IMPORTANT: Observe all joints. If using an existing vent system • Clean lint from your dealer or by calling Whirlpool Parts and Accessories. Do not use a metal foil vent. Flexible metal vent • Flexible metal vents are shown here. Do not use a...
... and kinking. B 4" (10.2cm) heavymetal exhaust vent DURASAFE TM vent products can result in enclosed walls, ceilings or floors. If this dryer MUST BE EXHAUSTED OUTDOORS. Rigid metal vent • For best drying performance, recommended. rigid metal vents are recommended. Good Better Clamps Use clamps...Do not use duct tape. IMPORTANT: Observe all joints. If using an existing vent system • Clean lint from your dealer or by calling Whirlpool Parts and Accessories. Do not use a metal foil vent. Flexible metal vent • Flexible metal vents are shown here. Do not use a...
Use and Care Manual
Page 14
... the ground or any object that may result in death, fire, electrical shock, or serious injury. Do not use with pedestal installations) Alternate installations for purchase. Other installations are shown. Dryer B. Over-the-top installation (also available with a magnetic latch. ...flexible metal vent G. Vent length necessary to the manufacturer's instructions. Please see the "Assistance or Service" section of the dryer. Fire Hazard Cover unused exhaust holes with the following kits for close clearance alternate installations are available for close -clearance installations...
... the ground or any object that may result in death, fire, electrical shock, or serious injury. Do not use with pedestal installations) Alternate installations for purchase. Other installations are shown. Dryer B. Over-the-top installation (also available with a magnetic latch. ...flexible metal vent G. Vent length necessary to the manufacturer's instructions. Please see the "Assistance or Service" section of the dryer. Fire Hazard Cover unused exhaust holes with the following kits for close clearance alternate installations are available for close -clearance installations...
Use and Care Manual
Page 15
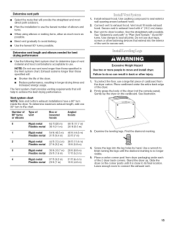
... turns. Failure to do so can result in "Plan Vent System." See illustration. 3. NOTE: Do not use a large flat piece of cardboard from dryer packaging under the entire back edge of elbows and turns. • When using elbows or making turns, allow as much room as possible. • ...its final location. Determine vent length and elbows needed for best drying performance • Use the following Vent system chart to determine type of the dryer (not the console panel). Vent system chart NOTE: Side and bottom exhaust installations have a 90 ° turn to the chart. Use the ...
... turns. Failure to do so can result in "Plan Vent System." See illustration. 3. NOTE: Do not use a large flat piece of cardboard from dryer packaging under the entire back edge of elbows and turns. • When using elbows or making turns, allow as much room as possible. • ...its final location. Determine vent length and elbows needed for best drying performance • Use the following Vent system chart to determine type of the dryer (not the console panel). Vent system chart NOTE: Side and bottom exhaust installations have a 90 ° turn to the chart. Use the ...
Use and Care Manual
Page 16
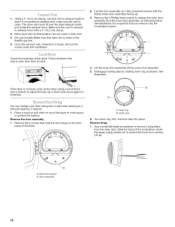
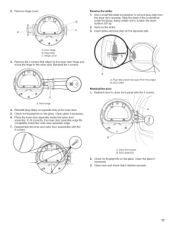
.... You can change your door swing from the inner door assembly, as indicated below. Remove the 4 screws that there are no kinks in dryer. Lift up or down and check again for levelness. Remove the 6 Phillips head screws to release the outer door assembly from a right-side... the flexible gas line. 4. Remove the door assembly 1. Turn inner ring 180 ° and lock tabs into its final location. Slide the head of the dryer. Using a 4" (10.2 cm) clamp, connect vent to a left-side opening, if desired. 1. See illustration. Outer ring 6. Reverse hinge 1. Use a small flat-...
.... You can change your door swing from the inner door assembly, as indicated below. Remove the 4 screws that there are no kinks in dryer. Lift up or down and check again for levelness. Remove the 6 Phillips head screws to release the outer door assembly from a right-side... the flexible gas line. 4. Remove the door assembly 1. Turn inner ring 180 ° and lock tabs into its final location. Slide the head of the dryer. Using a 4" (10.2 cm) clamp, connect vent to a left-side opening, if desired. 1. See illustration. Outer ring 6. Reverse hinge 1. Use a small flat-...
Use and Care Manual
Page 17
A. Reattach door to scratch the dryer surface. Check for fingerprints on the glass. Use a small flat-blade screwdriver to the other side. Clean glass if necessary. 6. Place the inner door assembly ... the inner door. 5. To fit correctly, the inner door assembly edge fits completely inside the outer door assembly. Plug strip (cannot be seen from the dryer door opening. Clean the glass if necessary. 3. Plug strips C. Insert strike and plug strip on opposite side of the screwdriver under the plugs, being certain...
A. Reattach door to scratch the dryer surface. Check for fingerprints on the glass. Use a small flat-blade screwdriver to the other side. Clean glass if necessary. 6. Place the inner door assembly ... the inner door. 5. To fit correctly, the inner door assembly edge fits completely inside the outer door assembly. Plug strip (cannot be seen from the dryer door opening. Clean the glass if necessary. 3. Plug strips C. Insert strike and plug strip on opposite side of the screwdriver under the plugs, being certain...
Use and Care Manual
Page 18
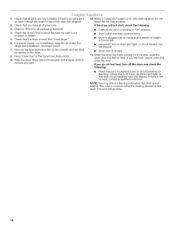
...packaging materials. 4. See "Level Dryer." 6. If you feel heat, turn off the dryer and check the following : • Controls are set in the Dryer User Instructions. 9. Check the dryer's final location. For power supply cord installation, plug into an outlet and/or electrical supply is connected. • Household... fuse is intact and tight, or circuit breaker has not tripped. • Dryer door is first heated. The odor will not start the dryer. Do not select the Air Only modifier. ...
...packaging materials. 4. See "Level Dryer." 6. If you feel heat, turn off the dryer and check the following : • Controls are set in the Dryer User Instructions. 9. Check the dryer's final location. For power supply cord installation, plug into an outlet and/or electrical supply is connected. • Household... fuse is intact and tight, or circuit breaker has not tripped. • Dryer door is first heated. The odor will not start the dryer. Do not select the Air Only modifier. ...
Use and Care Manual
Page 19
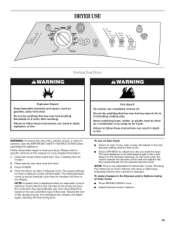
... or fire. To use an Auto Cycle • Select an Auto Cycle. As the cycle runs, the control senses the dryness of fire, electric shock, or injury to persons, read the IMPORTANT SAFETY INSTRUCTIONS before each load. Failure to specific sections of the load. Follow these basic steps ...again, showing the final drying time. Press POWER. 4. During the first few minutes of the drying process, the cycle time may automatically vary from dryer. Items containing foam, rubber, or plastic must be changed. The time displayed is an estimated length of oil on the Dryness selected. To make...
... or fire. To use an Auto Cycle • Select an Auto Cycle. As the cycle runs, the control senses the dryness of fire, electric shock, or injury to persons, read the IMPORTANT SAFETY INSTRUCTIONS before each load. Failure to specific sections of the load. Follow these basic steps ...again, showing the final drying time. Press POWER. 4. During the first few minutes of the drying process, the cycle time may automatically vary from dryer. Items containing foam, rubber, or plastic must be changed. The time displayed is an estimated length of oil on the Dryness selected. To make...
Use and Care Manual
Page 20
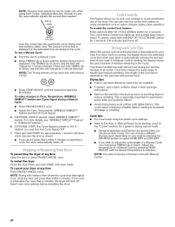
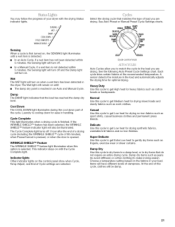
... Y DRYNESS Auto Cycles Auto Dry cycles take the guesswork out of lighter fabrics, leading to avoid unintended cycle or option changes during dryer operation. To use the control lock feature to increased shrinkage or wrinkling. This feature allows you must press TIMING Up or Down. ...OFF. 7. This is preset to handle and reduces wrinkling. Select the correct cycle and dryness level or temperature for approximately 1 second until dryer starts. Follow package instructions. • Remove the load from where the cycle was interrupted if you choose an Auto Cycle. If a Manual...
... Y DRYNESS Auto Cycles Auto Dry cycles take the guesswork out of lighter fabrics, leading to avoid unintended cycle or option changes during dryer operation. To use the control lock feature to increased shrinkage or wrinkling. This feature allows you must press TIMING Up or Down. ...OFF. 7. This is preset to handle and reduces wrinkling. Select the correct cycle and dryness level or temperature for approximately 1 second until dryer starts. Follow package instructions. • Remove the load from where the cycle was interrupted if you choose an Auto Cycle. If a Manual...
Use and Care Manual
Page 21
... load you are drying. Delicate Use this cycle to get Medium heat for drying synthetic fabrics, washable knit fabrics and no -iron fabrics such as sport shirts, casual business clothes and permanent press blends. The Wet light will turn off and the Damp light will also be damp. 21 Damp The... cycle to get Low heat for drying mixed loads and sturdy fabrics such as work clothes. Damp Dry Use this option is reached in the dryer. Damp dry items such as lingerie, exercise wear or sheer curtains. Wet The WET light will remain on until a wet item is detected. • ...
... load you are drying. Delicate Use this cycle to get Medium heat for drying synthetic fabrics, washable knit fabrics and no -iron fabrics such as sport shirts, casual business clothes and permanent press blends. The Wet light will turn off and the Damp light will also be damp. 21 Damp The... cycle to get Low heat for drying mixed loads and sturdy fabrics such as work clothes. Damp Dry Use this option is reached in the dryer. Damp dry items such as lingerie, exercise wear or sheer curtains. Wet The WET light will remain on until a wet item is detected. • ...


