
Use and Care Manual
Page 3
...service personnel. [] See installation instructions for grounding requirements. iMPORTANT SAFETY iNSTRUCTiONS WARNING: To reduce the risk of fire, electric shock, or injury to persons when using the dryer, follow the safety alert symbol and either the word "DANGER" or "WARNING." All safety messages will tell you ...the weather. [] Do not tamper with controls. [] Do not repair or replace any part of the dryer or attempt any servicing unless specifically recommended in this manual and on or in published user-repair instructions that can kill or hurt you what the potential hazard is,...
...service personnel. [] See installation instructions for grounding requirements. iMPORTANT SAFETY iNSTRUCTiONS WARNING: To reduce the risk of fire, electric shock, or injury to persons when using the dryer, follow the safety alert symbol and either the word "DANGER" or "WARNING." All safety messages will tell you ...the weather. [] Do not tamper with controls. [] Do not repair or replace any part of the dryer or attempt any servicing unless specifically recommended in this manual and on or in published user-repair instructions that can kill or hurt you what the potential hazard is,...
Use and Care Manual
Page 4
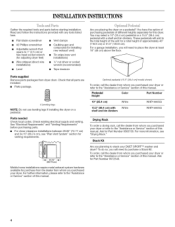
...will add to the "Assistance or Service" section of different heights separately for venting requirements. Check existing electrical supply and venting. To do so, you purchased your dryer or refer to the total height of the unit for installing new exhaust vent) • Tin snips ... and bin dividers. You have the option of purchasing pedestals of this manual. For more information, see "Plan Vent System" section for this manual. Parts needed Check local codes. These pedestals will need to stack your DUET SPORT TM washer and dryer? You may select a 10" (25.4 cm) pedestal or a ...
...will add to the "Assistance or Service" section of different heights separately for venting requirements. Check existing electrical supply and venting. To do so, you purchased your dryer or refer to the total height of the unit for installing new exhaust vent) • Tin snips ... and bin dividers. You have the option of purchasing pedestals of this manual. For more information, see "Plan Vent System" section for this manual. Parts needed Check local codes. These pedestals will need to stack your DUET SPORT TM washer and dryer? You may select a 10" (25.4 cm) pedestal or a ...
Use and Care Manual
Page 13
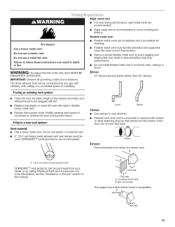
... to achieve the best drying performance. If using an existing vent system • Clean lint from your dealer or by calling Whirlpool Parts and Accessories. Exhaust vent must not be used. For more information, see the "Assistance or Service" section of the duct. The...) is not plugged with lint. • Replace any gas vent, chimney, wall, ceiling or a concealed space of fire, this dryer MUST BE EXHAUSTED OUTDOORS. If this manual. (10.2cm) A. DURASAFE TM venting products are acceptable only if accessible for cleaning. • Flexible metal vent must be connected into...
... to achieve the best drying performance. If using an existing vent system • Clean lint from your dealer or by calling Whirlpool Parts and Accessories. Exhaust vent must not be used. For more information, see the "Assistance or Service" section of the duct. The...) is not plugged with lint. • Replace any gas vent, chimney, wall, ceiling or a concealed space of fire, this dryer MUST BE EXHAUSTED OUTDOORS. If this manual. (10.2cm) A. DURASAFE TM venting products are acceptable only if accessible for cleaning. • Flexible metal vent must be connected into...
Use and Care Manual
Page 14
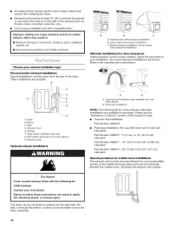
... the right side, left side, or through the bottom. Refer to have the dryer converted. 14 Dryer B. Rigid metal or flexible metal vent G. Xj...... Please see the "Assistance or Service" section of this manual to order. • Over-the-Top Installation: Part Number 4396028 • Periscope... elbow) B. This dryer can cause moisture and lint to collect indoors, which may be at least 12" (30.5 cm) from entering the home. Standard rear offset exhaust installation B. Vent length necessary to follow these instructions can result in death, fire, electrical shock, or serious injury...
... the right side, left side, or through the bottom. Refer to have the dryer converted. 14 Dryer B. Rigid metal or flexible metal vent G. Xj...... Please see the "Assistance or Service" section of this manual to order. • Over-the-Top Installation: Part Number 4396028 • Periscope... elbow) B. This dryer can cause moisture and lint to collect indoors, which may be at least 12" (30.5 cm) from entering the home. Standard rear offset exhaust installation B. Vent length necessary to follow these instructions can result in death, fire, electrical shock, or serious injury...
Use and Care Manual
Page 19
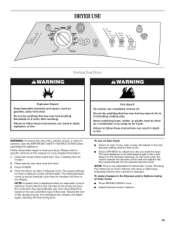
WARNING: To reduce the risk of fire, electric shock, or injury to follow these instructions can result in death, ... beep, indicating that has ever had anything that cycle. • Select DRYNESS to start your dryer. Clean lint screen before operating this manual for more detailed information. 1. As the cycle runs, the control senses the dryness of the drying...after washing). During the first few minutes of the drying process, the cycle time may automatically vary from dryer. Toward the end of the load and adjusts the time automatically for Automatic Cycles. The time displayed is...
WARNING: To reduce the risk of fire, electric shock, or injury to follow these instructions can result in death, ... beep, indicating that has ever had anything that cycle. • Select DRYNESS to start your dryer. Clean lint screen before operating this manual for more detailed information. 1. As the cycle runs, the control senses the dryness of the drying...after washing). During the first few minutes of the drying process, the cycle time may automatically vary from dryer. Toward the end of the load and adjusts the time automatically for Automatic Cycles. The time displayed is...
Use and Care Manual
Page 20
... shows the estimated cycle time when your load. Tap TIMING Up or Down, and the time will continue from the dryer as soon as tumbling stops to the Auto or Manual Preset Cycle Settings chart (in "Additional Features." 6. (OPTIONAL STEP) The Cycle Signal is heard. NOTE: The Timing... desired, you must press TIMING Up or Down. Select new cycle settings before restarting the dryer. To enable the control lock feature: Press and hold END OF CYCLE SIGNAL button for 3 seconds. If a Manual Cycle is the estimated time remaining in the cycle. Follow package instructions. • Remove ...
... shows the estimated cycle time when your load. Tap TIMING Up or Down, and the time will continue from the dryer as soon as tumbling stops to the Auto or Manual Preset Cycle Settings chart (in "Additional Features." 6. (OPTIONAL STEP) The Cycle Signal is heard. NOTE: The Timing... desired, you must press TIMING Up or Down. Select new cycle settings before restarting the dryer. To enable the control lock feature: Press and hold END OF CYCLE SIGNAL button for 3 seconds. If a Manual Cycle is the estimated time remaining in the cycle. Follow package instructions. • Remove ...
Use and Care Manual
Page 21
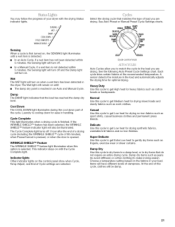
...to get High heat for drying no -iron finishes. Casual Use this cycle to get Low heat for heavy fabrics such as sport shirts, casual business clothes and permanent press blends. Damp The DAMP light indicates that do not require an entire drying cycle. Select...the WRINKLE SHIELD TM feature indicator light will have different levels of dampness. See Auto Preset or Manual Preset Cycle Settings charts. At the end of this option is reached in the dryer. Wet The WET light will be illuminated. SENSING WET::/ DAMP'/ COOLDOWN:_/ CYCLECOMPLET_E/ WRINKLSEHIELD Sensing When...
...to get High heat for drying no -iron finishes. Casual Use this cycle to get Low heat for heavy fabrics such as sport shirts, casual business clothes and permanent press blends. Damp The DAMP light indicates that do not require an entire drying cycle. Select...the WRINKLE SHIELD TM feature indicator light will have different levels of dampness. See Auto Preset or Manual Preset Cycle Settings charts. At the end of this option is reached in the dryer. Wet The WET light will be illuminated. SENSING WET::/ DAMP'/ COOLDOWN:_/ CYCLECOMPLET_E/ WRINKLSEHIELD Sensing When...
Use and Care Manual
Page 22
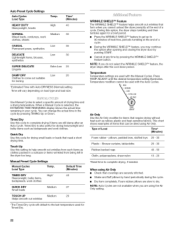
... temperature used for drying heavyweight and bulky items such as bedspreads and work clothes. When a Manual Cycle is also usdul for Timed Dry. Quick Dry Use this option, the dryer stops tumbling and then tumbles again for drying small loads or loads that need a short drying...ADJUST until the desired temperature setting illuminates. You can be used with the Auto Cycles. Touch Up Use this cycle to dry. Manual Preset Cycle Settings Manual Cycles Load Type Temp. This chart shows examples of a cycle. Time* (Minutes) HEAVY DUTY Heavyweight, towels High 40 NORMAL...
... temperature used for drying heavyweight and bulky items such as bedspreads and work clothes. When a Manual Cycle is also usdul for Timed Dry. Quick Dry Use this option, the dryer stops tumbling and then tumbles again for drying small loads or loads that need a short drying...ADJUST until the desired temperature setting illuminates. You can be used with the Auto Cycles. Touch Up Use this cycle to dry. Manual Preset Cycle Settings Manual Cycles Load Type Temp. This chart shows examples of a cycle. Time* (Minutes) HEAVY DUTY Heavyweight, towels High 40 NORMAL...
Use and Care Manual
Page 23
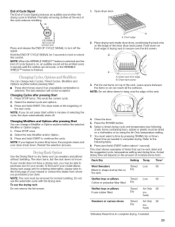
... you may be dried on front edge of drying rack to the front page of your manual or contact the dealer from whom you do not press Start within 5 minutes of selecting the cycle, the dryer automatically shuts off the signal, Hold the END OF CYCLE SIGNAL for normal tumbling. End...STOP once. 2. Do not use the drying rack Do not remove the lint screen. o// A. Leave space between the items so air can be accepted. Open dryer door. ! Select the desired cycle and options, 3. Items containing foam, rubber or plastic must be emitted every 5 minutes until the clothes are removed, or ...
... you may be dried on front edge of drying rack to the front page of your manual or contact the dealer from whom you do not press Start within 5 minutes of selecting the cycle, the dryer automatically shuts off the signal, Hold the END OF CYCLE SIGNAL for normal tumbling. End...STOP once. 2. Do not use the drying rack Do not remove the lint screen. o// A. Leave space between the items so air can be accepted. Open dryer door. ! Select the desired cycle and options, 3. Items containing foam, rubber or plastic must be emitted every 5 minutes until the clothes are removed, or ...


