Use and Care Manual
Page 2
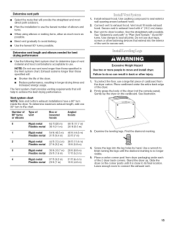
...3 INSTALLATION INSTRUCTIONS 4 Tools and Parts 4 Optional Pedestal 4 Location Requirements 5 Electrical Requirements 7 Electrical Connection 8 Venting Requirements 13 Plan Vent System 14 Install Vent System 15 Install Leveling Legs 15 Connect Vent 16 Level Dryer 16 Reverse Door Swing 16 Complete Installation 18 DRYER USE 19 Starting Your Dryer 19 Stopping or Restarting Your Dryer 20 Lock Controls 20 Drying and Cycle Tips 20 Status Lights 21 Cycles 21 Additional Features 22 Changing Cycles, Options and Modifiers 23 Drying Rack 23 DRYER CARE 24 Cleaning the Dryer Location...
...3 INSTALLATION INSTRUCTIONS 4 Tools and Parts 4 Optional Pedestal 4 Location Requirements 5 Electrical Requirements 7 Electrical Connection 8 Venting Requirements 13 Plan Vent System 14 Install Vent System 15 Install Leveling Legs 15 Connect Vent 16 Level Dryer 16 Reverse Door Swing 16 Complete Installation 18 DRYER USE 19 Starting Your Dryer 19 Stopping or Restarting Your Dryer 20 Lock Controls 20 Drying and Cycle Tips 20 Status Lights 21 Cycles 21 Additional Features 22 Changing Cycles, Options and Modifiers 23 Drying Rack 23 DRYER CARE 24 Cleaning the Dryer Location...
Use and Care Manual
Page 3
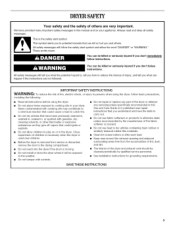
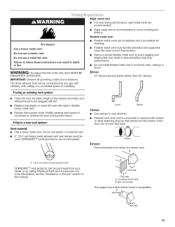
... Use and Care Guide or in published user-repair instructions that can kill or hurt you what the potential hazard is the safety alert symbol. Always read and obey all instructions before or after each load. [] Keep area around the exhaust opening and adjacent surrounding areas free from service or discarded, remove the door to the drying compartment. [] Do not reach into the dryer if the drum...
... Use and Care Guide or in published user-repair instructions that can kill or hurt you what the potential hazard is the safety alert symbol. Always read and obey all instructions before or after each load. [] Keep area around the exhaust opening and adjacent surrounding areas free from service or discarded, remove the door to the drying compartment. [] Do not reach into the dryer if the drum...
Use and Care Manual
Page 4
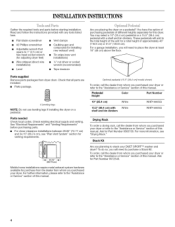
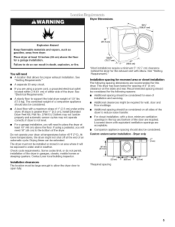
... Service" section of this manual. Optional pedestal (15.5" [39.4 cm] model shown) To order, call the dealer from whom you purchased your dryer or refer to purchase a Stack Kit. Check existing electrical supply and venting. For more information, see "Plan Vent System" section for venting requirements. Stack Kit Are you will need to place the dryer at least 18" (46 cm) above the floor. Parts needed Check local codes. Pedestal Height Color Part Number...
... Service" section of this manual. Optional pedestal (15.5" [39.4 cm] model shown) To order, call the dealer from whom you purchased your dryer or refer to purchase a Stack Kit. Check existing electrical supply and venting. For more information, see "Plan Vent System" section for venting requirements. Stack Kit Are you will need to place the dryer at least 18" (46 cm) above the floor. Parts needed Check local codes. Pedestal Height Color Part Number...
Use and Care Manual
Page 5
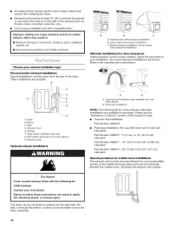
... automatic cycle. Check code requirements. Recommended spacing should also be extended. For closet installation, with a maximum slope of installation and servicing. • Additional clearances might not shut off at least 18" (46 cm) above the floor for this dryer. This dryer has been tested for the exhaust vent with equivalent ventilation openings are using a pedestal, you will be considered for the following spacing dimensions are required. See "Venting Requirements." •...
... automatic cycle. Check code requirements. Recommended spacing should also be extended. For closet installation, with a maximum slope of installation and servicing. • Additional clearances might not shut off at least 18" (46 cm) above the floor for this dryer. This dryer has been tested for the exhaust vent with equivalent ventilation openings are using a pedestal, you will be considered for the following spacing dimensions are required. See "Venting Requirements." •...
Use and Care Manual
Page 7
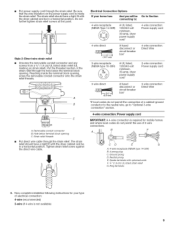
...-circuit installations, (2) mobile homes, (3) recreational vehicles, and (4) areas where local codes prohibit grounding through the neutral conductor is prohibited. If your outlet looks like this : 4-wire receptacle (14-30t:?) Then choose a 4-wire power supply cord with flexible metallic conduit. The National Electric Code requires a 4-wire supply connection for use with ring or spade terminals and UL listed strain relief. If the dryer is installed with a qualified electrician or service...
...-circuit installations, (2) mobile homes, (3) recreational vehicles, and (4) areas where local codes prohibit grounding through the neutral conductor is prohibited. If your outlet looks like this : 4-wire receptacle (14-30t:?) Then choose a 4-wire power supply cord with flexible metallic conduit. The National Electric Code requires a 4-wire supply connection for use with ring or spade terminals and UL listed strain relief. If the dryer is installed with a qualified electrician or service...
Use and Care Manual
Page 9
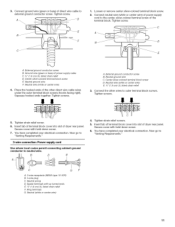
... strain relief. A B A. Electrical Connection Options If your type of 3-wire connections. Spade terminals with the dryer cabinet and be in a horizontal position. Ring terminals 4. Be sure that the wire insulation on strain relief). Neutral prong E. Now complete installation following instructions for mobile homes and where local codes do not permit the use of electrical connection: 4-wire (recommended) 3-wire (if 4-wire is inside the terminal block opening, screw the removable conduit connector onto the strain...
... strain relief. A B A. Electrical Connection Options If your type of 3-wire connections. Spade terminals with the dryer cabinet and be in a horizontal position. Ring terminals 4. Be sure that the wire insulation on strain relief). Neutral prong E. Now complete installation following instructions for mobile homes and where local codes do not permit the use of electrical connection: 4-wire (recommended) 3-wire (if 4-wire is inside the terminal block opening, screw the removable conduit connector onto the strain...
Use and Care Manual
Page 10
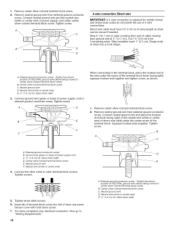
... hooked end (hook facing right) of the neutral wire (white or center wire) of direct wire cable under the screw of 3-wire connections. Neutral ground wire E Neutral wire (white or center wire) 4= Connect the other wires to "Venting Requirements." 10 A. Direct wire cable must have completed your electrical connection. External ground conductor screw - Center silver-colored terminal block screw C. Neutral wire (white or center wire) E. Tighten screw. Insert tab of terminal block cover into a hook shape. Remove neutral ground wire...
... hooked end (hook facing right) of the neutral wire (white or center wire) of direct wire cable under the screw of 3-wire connections. Neutral ground wire E Neutral wire (white or center wire) 4= Connect the other wires to "Venting Requirements." 10 A. Direct wire cable must have completed your electrical connection. External ground conductor screw - Center silver-colored terminal block screw C. Neutral wire (white or center wire) E. Tighten screw. Insert tab of terminal block cover into a hook shape. Remove neutral ground wire...
Use and Care Manual
Page 11
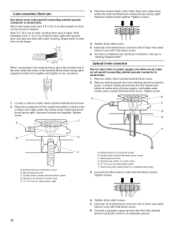
... B. Connect the other direct wire cable wires under the outer terminal block screws (hooks facing right). Secure cover with up turned ends E. _" (1.9 cm) UL Iisted strain relief E Ring terminals G. Tighten screw. 1. Place the hooked ends of the other wires to the center, silver-colored terminal screw of dryer rear panel. B D E 4. Neutral prong D. Tighten screw. Neutral ground wire C. Now go to "Venting Requirements." C G F A. 3-wire receptacle (NEMA type 10-30R) B. 3-wire plug C. Center silver-colored terminal block screw D. Neutral wire...
... B. Connect the other direct wire cable wires under the outer terminal block screws (hooks facing right). Secure cover with up turned ends E. _" (1.9 cm) UL Iisted strain relief E Ring terminals G. Tighten screw. 1. Place the hooked ends of the other wires to the center, silver-colored terminal screw of dryer rear panel. B D E 4. Neutral prong D. Tighten screw. Neutral ground wire C. Now go to "Venting Requirements." C G F A. 3-wire receptacle (NEMA type 10-30R) B. 3-wire plug C. Center silver-colored terminal block screw D. Neutral wire...
Use and Care Manual
Page 12
... cover with outer covering. Strip 31/2'' (8.9 cm) of the terminal block (hook facing right), squeeze hooked end together and tighten screw, as shown. 3. Neutral ground wire D. Now go to neutral wire. 1. Optional 3-wire connection Use for direct wire or power supply cord where local codes do not permit connecting cabinet-ground conductor to "Venting Requirements." Squeeze hooked end together. You have 5 ft (1.52 m) of terminal block D (hook facing right). Neutral wire (white or center wire) E, _" (1.9 cm) UL listed...
... cover with outer covering. Strip 31/2'' (8.9 cm) of the terminal block (hook facing right), squeeze hooked end together and tighten screw, as shown. 3. Neutral ground wire D. Now go to neutral wire. 1. Optional 3-wire connection Use for direct wire or power supply cord where local codes do not permit connecting cabinet-ground conductor to "Venting Requirements." Squeeze hooked end together. You have 5 ft (1.52 m) of terminal block D (hook facing right). Neutral wire (white or center wire) E, _" (1.9 cm) UL listed...
Use and Care Manual
Page 13
... location. • Remove excess flexible metal vent to avoid sagging and kinking that extend into any plastic or metal foil vent with rigid or flexible heavy metal vent. • Review Vent system chart. Do not use a plastic vent. Do not use duct tape. DURASAFE TM venting products are shown here. Good Better Clamps Use clamps to achieve the best drying performance. The dryer exhaust must be connected...
... location. • Remove excess flexible metal vent to avoid sagging and kinking that extend into any plastic or metal foil vent with rigid or flexible heavy metal vent. • Review Vent system chart. Do not use a plastic vent. Do not use duct tape. DURASAFE TM venting products are shown here. Good Better Clamps Use clamps to achieve the best drying performance. The dryer exhaust must be connected...
Use and Care Manual
Page 14
... installation (not an option with pedestal installations) Alternate installations for mobile home installations The exhaust vent must not terminate beneath the mobile home. Select the type best for purchase. Elbow C. Clamps F. Vent length necessary to the manufacturer's instructions. Terminate the exhaust vent outside. Contact your local dealer. Standard rear offset exhaust installation B. Exhaust hood E. Fire Hazard Cover unused exhaust holes with one offset elbow) B. Refer to connect elbows H. Dryer B. Periscope installation NOTE: The following kit...
... installation (not an option with pedestal installations) Alternate installations for mobile home installations The exhaust vent must not terminate beneath the mobile home. Select the type best for purchase. Elbow C. Clamps F. Vent length necessary to the manufacturer's instructions. Terminate the exhaust vent outside. Contact your local dealer. Standard rear offset exhaust installation B. Exhaust hood E. Fire Hazard Cover unused exhaust holes with one offset elbow) B. Refer to connect elbows H. Dryer B. Periscope installation NOTE: The following kit...
Use and Care Manual
Page 15
... and most direct path outdoors. • Plan the installation to use the fewest number of the dryer. • Reduce performance, resulting in longer drying times and increased energy usage. Exhaust systems longer than those specified will help to do so can result in "Plan Vent System." Number of 90 ° turns or elbows Type of the 2 dryer back corners. Use caulking compound to dryer location. Run vent to seal...
... and most direct path outdoors. • Plan the installation to use the fewest number of the dryer. • Reduce performance, resulting in longer drying times and increased energy usage. Exhaust systems longer than those specified will help to do so can result in "Plan Vent System." Number of 90 ° turns or elbows Type of the 2 dryer back corners. Use caulking compound to dryer location. Run vent to seal...
Use and Care Manual
Page 18
... electrical supply is connected. • Household fuse is intact and tight, or circuit breaker has not tripped. • Dryer door is an extra part, go away. 18 Read "Dryer Use" in a running for 5 minutes, open the dryer door and feel heat, turn off the dryer and check the following : • Controls are now installed. This odor is common when the heating element is level. Check that both circuit breakers have all parts are set in the Dryer User Instructions. 9. Check the dryer...
... electrical supply is connected. • Household fuse is intact and tight, or circuit breaker has not tripped. • Dryer door is an extra part, go away. 18 Read "Dryer Use" in a running for 5 minutes, open the dryer door and feel heat, turn off the dryer and check the following : • Controls are now installed. This odor is common when the heating element is level. Check that both circuit breakers have all parts are set in the Dryer User Instructions. 9. Check the dryer...
Use and Care Manual
Page 19
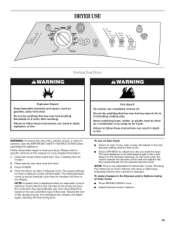
... of the drying process, the cycle time may automatically vary from dryer. Place laundry into dryer and shut door. 3. Do not dry anything flammable on a clothesline or by using an Air Cycle. WARNING: To reduce the risk of the drying process, the estimated time display will show in minutes) will adjust again, showing the final drying time. Follow these instructions can completely remove oil. Clean lint screen before operating this manual for...
... of the drying process, the cycle time may automatically vary from dryer. Place laundry into dryer and shut door. 3. Do not dry anything flammable on a clothesline or by using an Air Cycle. WARNING: To reduce the risk of the drying process, the estimated time display will show in minutes) will adjust again, showing the final drying time. Follow these instructions can completely remove oil. Clean lint screen before operating this manual for...
Use and Care Manual
Page 20
... the control lock feature: Press and hold END OF CYCLE SIGNAL button for a guide to increased shrinkage or wrinkling. The LocWUnlock Control icon lights up, and a single beep tone is displayed. The indicator light turns off . If an Auto Cycle is especially important for approximately 1 second until the desired drying time is heard. Cool Down makes the loads easier to a Manual Cycle. The length of drying time and enhance fabric care. Drying tips...
... the control lock feature: Press and hold END OF CYCLE SIGNAL button for a guide to increased shrinkage or wrinkling. The LocWUnlock Control icon lights up, and a single beep tone is displayed. The indicator light turns off . If an Auto Cycle is especially important for approximately 1 second until the desired drying time is heard. Cool Down makes the loads easier to a Manual Cycle. The length of drying time and enhance fabric care. Drying tips...
Use and Care Manual
Page 23
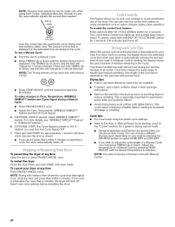
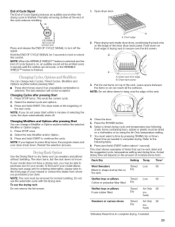
.... This ends the current cycle. 2. Do not use the drying rack Do not remove the lint screen. Push down , Restart the selection process. Close the door. 5. Rack Dry Setting Temp. NOTE: When the WRINKLE SHIELD TM feature is finished. Dryer rack front edge B. Time* Wool Sweaters Timed Low 60 Block to secure over the edge of the rack. ON 1. Changing Cycles after pressing Start You can change Auto Cycles, Timed Cycles, Modifiers and Options anytime...
.... This ends the current cycle. 2. Do not use the drying rack Do not remove the lint screen. Push down , Restart the selection process. Close the door. 5. Rack Dry Setting Temp. NOTE: When the WRINKLE SHIELD TM feature is finished. Dryer rack front edge B. Time* Wool Sweaters Timed Low 60 Block to secure over the edge of the rack. ON 1. Changing Cycles after pressing Start You can change Auto Cycles, Timed Cycles, Modifiers and Options anytime...
Use and Care Manual
Page 24
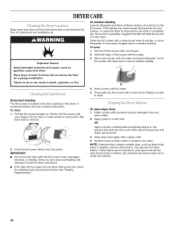
... lint screen. Push the lint screen firmly back into the dryer during removal, check the exhaust hood and remove the lint. Rinse screen with hot water and liquid detergent. Replace screen in death, explosion, or fire. Apply paste to avoid dye transfer. 24 These stains are removed. 3. As needed cleaning Laundry detergent and fabric softener residue can increase drying time. Wet a nylon brush with hot water. 5. To clean 1. Wet lint is located in the dryer. To clean dryer drum...
... lint screen. Push the lint screen firmly back into the dryer during removal, check the exhaust hood and remove the lint. Rinse screen with hot water and liquid detergent. Replace screen in death, explosion, or fire. Apply paste to avoid dye transfer. 24 These stains are removed. 3. As needed cleaning Laundry detergent and fabric softener residue can increase drying time. Wet a nylon brush with hot water. 5. To clean 1. Wet lint is located in the dryer. To clean dryer drum...
Use and Care Manual
Page 25
... the error code number): Call for an extended period of operation. Cleaning should be done by a power failure? From the Exhaust Vent Lint should be removed every 2 years, or more often, depending on dryer usage. dryers: 2. Is the correct power supply available? Check with a qualified electrician. Use a time-delay fuse. Replace the fuse or reset the circuit breaker. Clean out pockets before operating. See "Installation Instructions." • Is the clothing knotted or balled up , the load will not run...
... the error code number): Call for an extended period of operation. Cleaning should be done by a power failure? From the Exhaust Vent Lint should be removed every 2 years, or more often, depending on dryer usage. dryers: 2. Is the correct power supply available? Check with a qualified electrician. Use a time-delay fuse. Replace the fuse or reset the circuit breaker. Clean out pockets before operating. See "Installation Instructions." • Is the clothing knotted or balled up , the load will not run...
Use and Care Manual
Page 26
...; Was the dryer overloaded? Dry smaller loads that the exhaust vent is not too long or has too many turns. Clothes are not drying satisfactorily, drying times are too long, or load is located? Use only one fabric softener sheet, and use a dryer rack with lint? Is the exhaust vent the correct length? Separate the load to move and install dryer. Change the dryness level setting on load • Is the lint screen clogged? Do not use it only once. Drum stains are...
...; Was the dryer overloaded? Dry smaller loads that the exhaust vent is not too long or has too many turns. Clothes are not drying satisfactorily, drying times are too long, or load is located? Use only one fabric softener sheet, and use a dryer rack with lint? Is the exhaust vent the correct length? Separate the load to move and install dryer. Change the dryness level setting on load • Is the lint screen clogged? Do not use it only once. Drum stains are...
Use and Care Manual
Page 28
... OR PROVINCE TO PROVINCE. After checking "Troubleshooting," additional help you obtain assistance or service if you ever need it is installed in an inaccessible location or is not installed in accordance with published installation instructions. All rights reserved. ® Registered Trademark/TM Trademark of your complete model number and serial number. Service must provide proof of the Use & Care Guide. Repairs when your authorized Whirlpool dealer to determine if another...
... OR PROVINCE TO PROVINCE. After checking "Troubleshooting," additional help you obtain assistance or service if you ever need it is installed in an inaccessible location or is not installed in accordance with published installation instructions. All rights reserved. ® Registered Trademark/TM Trademark of your complete model number and serial number. Service must provide proof of the Use & Care Guide. Repairs when your authorized Whirlpool dealer to determine if another...


