Use and Care Manual
Page 1
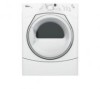
ELECTRONIC ELECTRIC DRYER For questions about features, operation/performance, accessories or service, call: 1-800-253-1301 or visit our website at... www.whidpooLcom parts, Table of Contents 2 8578899
ELECTRONIC ELECTRIC DRYER For questions about features, operation/performance, accessories or service, call: 1-800-253-1301 or visit our website at... www.whidpooLcom parts, Table of Contents 2 8578899
Use and Care Manual
Page 2
... Requirements 5 Electrical Requirements 7 Electrical Connection 8 Venting Requirements 13 Plan Vent System 14 Install Vent System 15 Install Leveling Legs 15 Connect Vent 16 Level Dryer 16 Reverse Door Swing 16 Complete Installation 18 DRYER USE 19 Starting Your Dryer 19 Stopping or Restarting Your Dryer 20 Lock... Tips 20 Status Lights 21 Cycles 21 Additional Features 22 Changing Cycles, Options and Modifiers 23 Drying Rack 23 DRYER CARE 24 Cleaning the Dryer Location 24 Cleaning the Lint Screen 24 Cleaning the Dryer Interior 24 Removing Accumulated Lint 25 Vacation and ...
... Requirements 5 Electrical Requirements 7 Electrical Connection 8 Venting Requirements 13 Plan Vent System 14 Install Vent System 15 Install Leveling Legs 15 Connect Vent 16 Level Dryer 16 Reverse Door Swing 16 Complete Installation 18 DRYER USE 19 Starting Your Dryer 19 Stopping or Restarting Your Dryer 20 Lock... Tips 20 Status Lights 21 Cycles 21 Additional Features 22 Changing Cycles, Options and Modifiers 23 Drying Rack 23 DRYER CARE 24 Cleaning the Dryer Location 24 Cleaning the Lint Screen 24 Cleaning the Dryer Interior 24 Removing Accumulated Lint 25 Vacation and ...
Use and Care Manual
Page 20
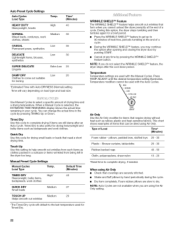
Selecting More Dry, Normal or Less Dry automatically adjusts the sensed time needed. Press TIMING Up or Down until dryer starts. NOTE: The Timing feature can be made only while using the preset cycle settings. • Refer to the Auto or Manual Preset Cycle Settings chart (in... the cycle. To make changes to avoid unintended cycle or option changes during dryer operation. Select new cycle settings before restarting the dryer. This feature allows you choose an Auto Cycle. If an Auto Cycle is especially important for permanent press, knits and ...
Selecting More Dry, Normal or Less Dry automatically adjusts the sensed time needed. Press TIMING Up or Down until dryer starts. NOTE: The Timing feature can be made only while using the preset cycle settings. • Refer to the Auto or Manual Preset Cycle Settings chart (in... the cycle. To make changes to avoid unintended cycle or option changes during dryer operation. Select new cycle settings before restarting the dryer. This feature allows you choose an Auto Cycle. If an Auto Cycle is especially important for permanent press, knits and ...
Use and Care Manual
Page 21
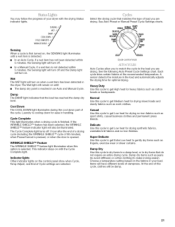
... been selected, the WRINKLE SHIELD TM feature indicator light will turn on the fabrics in handling. Normal Use this cycle, clothes will remain on when a wet item has been detected in the dryer. Items will turn off 1 hour after the end of a drying cycle (including the ...illuminates until : • The damp dry point is reached in the load and automatically adjusts the drying time for heavy fabrics such as sport shirts, casual business clothes and permanent press blends. CASU DELICATE : ..... See the following Auto Preset Cycle Settings chart. Delicate Use this cycle...
... been selected, the WRINKLE SHIELD TM feature indicator light will turn on the fabrics in handling. Normal Use this cycle, clothes will remain on when a wet item has been detected in the dryer. Items will turn off 1 hour after the end of a drying cycle (including the ...illuminates until : • The damp dry point is reached in the load and automatically adjusts the drying time for heavy fabrics such as sport shirts, casual business clothes and permanent press blends. CASU DELICATE : ..... See the following Auto Preset Cycle Settings chart. Delicate Use this cycle...
Use and Care Manual
Page 22
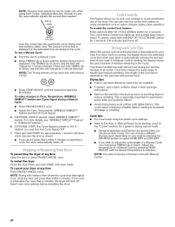
... If you do not select the WRINKLE SHIELD TM feature, the dryer stops after opening and closing the dryer door by pushing START. • Cancel at any time by pressing the WRINKLE SHIELD TM feature button. Timed Dry Use this option, the dryer stops tumbling and then tumbles again for items that can... not available when you may continue the option after the cool down period. WRINKLE SHIELD TM Feature The WRINKLE SHIELD TM feature helps smooth out wrinkles that form when you cannot unload the dryer promptly at the end of items that require drying without heat such as clothes packed in a...
... If you do not select the WRINKLE SHIELD TM feature, the dryer stops after opening and closing the dryer door by pushing START. • Cancel at any time by pressing the WRINKLE SHIELD TM feature button. Timed Dry Use this option, the dryer stops tumbling and then tumbles again for items that can... not available when you may continue the option after the cool down period. WRINKLE SHIELD TM Feature The WRINKLE SHIELD TM feature helps smooth out wrinkles that form when you cannot unload the dryer promptly at the end of items that require drying without heat such as clothes packed in a...
Use and Care Manual
Page 23
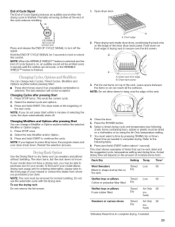
... lay flat on Dry the rack. A. Close the door. 5. You must be emitted every 5 minutes until the clothes are removed, or the WRINKLE SHIELD TM feature is finished. Stuffed toys or pillows Timed Low 60 Cotton or polyester fiber filled Dry Stuffed toys or pillows Foam rubber filled Timed Dry Air... is finished, Promptly removing clothes at the beginning of the new cycle, NOTE: If you happen to press Stop twice, the program clears and your dryer. The dryer starts at the end of the cycle reduces wrinkling. Press and hold START. The drum turns, but the rack does not move. Do not...
... lay flat on Dry the rack. A. Close the door. 5. You must be emitted every 5 minutes until the clothes are removed, or the WRINKLE SHIELD TM feature is finished. Stuffed toys or pillows Timed Low 60 Cotton or polyester fiber filled Dry Stuffed toys or pillows Foam rubber filled Timed Dry Air... is finished, Promptly removing clothes at the beginning of the new cycle, NOTE: If you happen to press Stop twice, the program clears and your dryer. The dryer starts at the end of the cycle reduces wrinkling. Press and hold START. The drum turns, but the rack does not move. Do not...
Use and Care Manual
Page 27
... with the same precision used to local dealers, repair parts distributors, and service companies Whirlpool designated service technicians are made with any questions or concerns at www.whirlpool.com. 27 Our consultants provide assistance with: • Features and specifications on our full line of appliances • Installation information • Use and maintenance procedures...
... with the same precision used to local dealers, repair parts distributors, and service companies Whirlpool designated service technicians are made with any questions or concerns at www.whirlpool.com. 27 Our consultants provide assistance with: • Features and specifications on our full line of appliances • Installation information • Use and maintenance procedures...