Use and Care Manual
Page 1
www.whidpooLcom parts, Table of Contents 2 8578899 ELECTRONIC ELECTRIC DRYER For questions about features, operation/performance, accessories or service, call: 1-800-253-1301 or visit our website at...
www.whidpooLcom parts, Table of Contents 2 8578899 ELECTRONIC ELECTRIC DRYER For questions about features, operation/performance, accessories or service, call: 1-800-253-1301 or visit our website at...
Use and Care Manual
Page 2
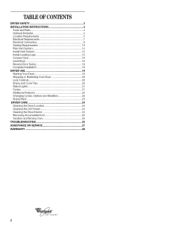
... Requirements 5 Electrical Requirements 7 Electrical Connection 8 Venting Requirements 13 Plan Vent System 14 Install Vent System 15 Install Leveling Legs 15 Connect Vent 16 Level Dryer 16 Reverse Door Swing 16 Complete Installation 18 DRYER USE 19 Starting Your Dryer 19 Stopping or Restarting Your Dryer 20 Lock...21 Additional Features 22 Changing Cycles, Options and Modifiers 23 Drying Rack 23 DRYER CARE 24 Cleaning the Dryer Location 24 Cleaning the Lint Screen 24 Cleaning the Dryer Interior 24 Removing Accumulated Lint 25 Vacation and Moving Care 25 TROUBLESHOOTING 25 ...
... Requirements 5 Electrical Requirements 7 Electrical Connection 8 Venting Requirements 13 Plan Vent System 14 Install Vent System 15 Install Leveling Legs 15 Connect Vent 16 Level Dryer 16 Reverse Door Swing 16 Complete Installation 18 DRYER USE 19 Starting Your Dryer 19 Stopping or Restarting Your Dryer 20 Lock...21 Additional Features 22 Changing Cycles, Options and Modifiers 23 Drying Rack 23 DRYER CARE 24 Cleaning the Dryer Location 24 Cleaning the Lint Screen 24 Cleaning the Dryer Interior 24 Removing Accumulated Lint 25 Vacation and Moving Care 25 TROUBLESHOOTING 25 ...
Use and Care Manual
Page 3
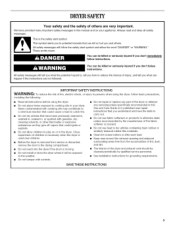
... you don't immediately follow basic precautions, including the following: [] Read all safety messages. DRYERSAFETY Your safety and the safety of the dryer and exhaust vent should be exposed to the weather. [] Do not tamper with gasoline, drycleaning solvents, or other flammable or explosive substances... can kill or hurt you how to reduce the chance of fire, electric shock, or injury to dry articles containing foam rubber or similarly textured rubber-like materials. [] Clean lint screen before using the dryer. [] Do not place items exposed to cooking oils in your appliance....
... you don't immediately follow basic precautions, including the following: [] Read all safety messages. DRYERSAFETY Your safety and the safety of the dryer and exhaust vent should be exposed to the weather. [] Do not tamper with gasoline, drycleaning solvents, or other flammable or explosive substances... can kill or hurt you how to reduce the chance of fire, electric shock, or injury to dry articles containing foam rubber or similarly textured rubber-like materials. [] Clean lint screen before using the dryer. [] Do not place items exposed to cooking oils in your appliance....
Use and Care Manual
Page 4
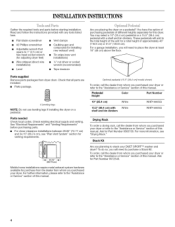
... installations) • 1/4"nut driver or socket wrench (recommended) • Tape measure Parts supplied Remove parts packages from whom you purchased your dryer or refer to the "Assistance or Service" section of approximately 46" (116.8 cm) or 51.5" (130.8 cm). Check that opens to... electrical supply and venting. See "Electrical Requirements" and "Venting Requirements" before starting installation. Optional pedestal (15.5" [39.4 cm] model shown) To order, call the dealer from whom you planning to stack your dryer. Stack Kit Are you purchased your DUET SPORT TM washer and dryer?...
... installations) • 1/4"nut driver or socket wrench (recommended) • Tape measure Parts supplied Remove parts packages from whom you purchased your dryer or refer to the "Assistance or Service" section of approximately 46" (116.8 cm) or 51.5" (130.8 cm). Check that opens to... electrical supply and venting. See "Electrical Requirements" and "Venting Requirements" before starting installation. Optional pedestal (15.5" [39.4 cm] model shown) To order, call the dealer from whom you planning to stack your dryer. Stack Kit Are you purchased your DUET SPORT TM washer and dryer?...
Use and Care Manual
Page 5
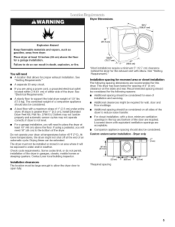
... death, explosion, or fire. The combined weight of the dryer. If using a power cord, a grounded electrical outlet located within 2 ft (61 cm) of either side of 127 Ibs (57.6 kg). Dryer Dimensions ExplosionHazard Keep flammable materials and vapors, such as gasoline, away from dryer, Place dryer at least 18 inches (46 cm) above the floor...
... death, explosion, or fire. The combined weight of the dryer. If using a power cord, a grounded electrical outlet located within 2 ft (61 cm) of either side of 127 Ibs (57.6 kg). Dryer Dimensions ExplosionHazard Keep flammable materials and vapors, such as gasoline, away from dryer, Place dryer at least 18 inches (46 cm) above the floor...
Use and Care Manual
Page 7
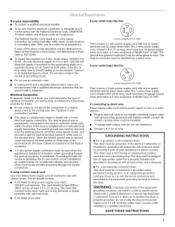
... (10-30R) Then choose a 3-wire power supply cord with flexible metallic conduit. WARNING: Improper connection of the line. Electrical Connection To properly install your dryer, you must have a proper outlet installed by direct wire: Power supply cable must be insulated. [] 10-gauge solid copper... spade terminals and UL listed strain relief. Do not modify the plug on the dryer. It is your responsibility [] To contact a qualified electrical installer. [] To be sure that the electrical connection is adequate and in conformance with ring or spade terminals and UL listed strain...
... (10-30R) Then choose a 3-wire power supply cord with flexible metallic conduit. WARNING: Improper connection of the line. Electrical Connection To properly install your dryer, you must have a proper outlet installed by direct wire: Power supply cable must be insulated. [] 10-gauge solid copper... spade terminals and UL listed strain relief. Do not modify the plug on the dryer. It is your responsibility [] To contact a qualified electrical installer. [] To be sure that the electrical connection is adequate and in conformance with ring or spade terminals and UL listed strain...
Use and Care Manual
Page 9
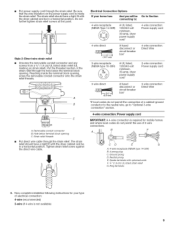
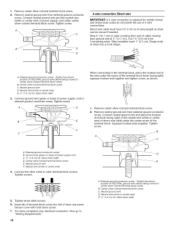
...screws from a %" (1.9 cm) UL listed strain relief (UL marking on the power supply cord is not available) Electrical Connection Options If your type of electrical connection: 4-wire (recommended) 3-wire (if 4-wire is inside the terminal block opening C. Ground prong D. Hole below ...threads. A B A. Removable conduit connector B. Strain relief threads Put direct wire cable through the strain relief. Spade terminals with the dryer cabinet and be in a horizontal position. Ring terminals 4. Put power supply cord through the strain relief. Put the threaded section ...
...screws from a %" (1.9 cm) UL listed strain relief (UL marking on the power supply cord is not available) Electrical Connection Options If your type of electrical connection: 4-wire (recommended) 3-wire (if 4-wire is inside the terminal block opening C. Ground prong D. Hole below ...threads. A B A. Removable conduit connector B. Strain relief threads Put direct wire cable through the strain relief. Spade terminals with the dryer cabinet and be in a horizontal position. Ring terminals 4. Put power supply cord through the strain relief. Put the threaded section ...
Use and Care Manual
Page 10
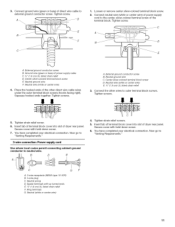
...conductor screw. A. External ground conductor screw - When connecting to external ground conductor screw. Tighten screw. Ground wire (green or bare) of dryer rear panel. Insert tab of terminal block cover into a hook shape. Neutral wire (white or center wire) E. Connect neutral ground wire and... (white or center wire) of direct wire cable under the center screw of extra length so dryer can be moved if needed. Direct wire cable must have completed your electrical connection. Remove neutral ground wire from end of wires into slot of power supply cord C. ...
...conductor screw. A. External ground conductor screw - When connecting to external ground conductor screw. Tighten screw. Ground wire (green or bare) of dryer rear panel. Insert tab of terminal block cover into a hook shape. Neutral wire (white or center wire) E. Connect neutral ground wire and... (white or center wire) of direct wire cable under the center screw of extra length so dryer can be moved if needed. Direct wire cable must have completed your electrical connection. Remove neutral ground wire from end of wires into slot of power supply cord C. ...
Use and Care Manual
Page 11
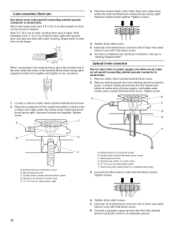
...neutral wire. 3. Neutral wire (white or center wire) E. _" (1.9 cm) UL Iisted strain relief 3. You have completed your electrical connection. Now go to outer terminal block screws. Neutral (white or center wire) 11 Squeeze hooked ends together. Tighten strain relief ... terminals with hold -down screw. 7. Tighten screw. 1. Place the hooked ends of dryer rear panel. Tighten screws. !! !! 5. External ground conductor screw B. Ground wire (green or bare) of dryer rear panel. Neutral prong D. A. Center silver-colored terminal block screw E, Neutral ground wire...
...neutral wire. 3. Neutral wire (white or center wire) E. _" (1.9 cm) UL Iisted strain relief 3. You have completed your electrical connection. Now go to outer terminal block screws. Neutral (white or center wire) 11 Squeeze hooked ends together. Tighten strain relief ... terminals with hold -down screw. 7. Tighten screw. 1. Place the hooked ends of dryer rear panel. Tighten screws. !! !! 5. External ground conductor screw B. Ground wire (green or bare) of dryer rear panel. Neutral prong D. A. Center silver-colored terminal block screw E, Neutral ground wire...
Use and Care Manual
Page 12
...). Remove center silver-colored terminal block screw. 2. Direct wire cable must have completed your electrical connection. Insert tab of terminal block cover into slot of dryer rear panel. Tighten screws. !! !! 4. Insert tab of terminal block cover into slot of dryer rear panel. Externalground conductor screw B. Place the hooked ends of extra length so...
...). Remove center silver-colored terminal block screw. 2. Direct wire cable must have completed your electrical connection. Insert tab of terminal block cover into slot of dryer rear panel. Tighten screws. !! !! 4. Insert tab of terminal block cover into slot of dryer rear panel. Externalground conductor screw B. Place the hooked ends of extra length so...
Use and Care Manual
Page 14
...Dryer B. Wall D. Clamps F. This dryer can result in : [] Moisture damage to a noncombustible portion of the exhaust (such as flowers, rocks or bushes, snow line, etc.). Exhaust hood must be at least 12" (30.5 cm) from the ground or any object that may result in death, fire, electrical...for close clearance alternate installations are available for your exhaust installation type Recommended exhaust installations Typical installations vent the dryer from entering the home. A. Exhaust outlet Optional exhaust installations X ..... Over-the-top installation (also ...
...Dryer B. Wall D. Clamps F. This dryer can result in : [] Moisture damage to a noncombustible portion of the exhaust (such as flowers, rocks or bushes, snow line, etc.). Exhaust hood must be at least 12" (30.5 cm) from the ground or any object that may result in death, fire, electrical...for close clearance alternate installations are available for your exhaust installation type Recommended exhaust installations Typical installations vent the dryer from entering the home. A. Exhaust outlet Optional exhaust installations X ..... Over-the-top installation (also ...
Use and Care Manual
Page 18
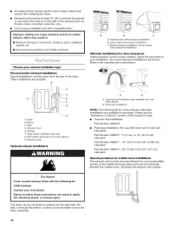
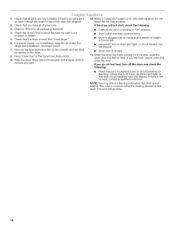
... has been pushed firmly. • Dryer is level. NOTE: You may be 2 household fuses or circuit breakers for heat. Check the dryer's final location. Check that all packaging materials. 4. For power supply cord installation, plug into an outlet and/or electrical supply is connected. • Household ...fuse is intact and tight, or circuit breaker has not tripped. • Dryer door is first used...
... has been pushed firmly. • Dryer is level. NOTE: You may be 2 household fuses or circuit breakers for heat. Check the dryer's final location. Check that all packaging materials. 4. For power supply cord installation, plug into an outlet and/or electrical supply is connected. • Household ...fuse is intact and tight, or circuit breaker has not tripped. • Dryer door is first used...
Use and Care Manual
Page 19
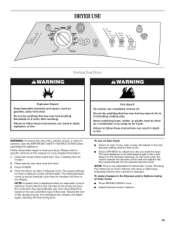
... of oil on the Dryness selected. WARNING: To reduce the risk of the cycle based on it (even after washing). Place laundry into dryer and shut door. 3. Point the dial to follow these instructions can completely remove oil. Auto cycles will default to the last dryness setting ...has ever had anything that the time cannot be dried on it (including cooking oils). The time displayed is an estimated length of fire, electric shock, or injury to specific sections of the load and adjusts the time automatically for more detailed information. 1. Do not dry anything flammable on...
... of oil on the Dryness selected. WARNING: To reduce the risk of the cycle based on it (even after washing). Place laundry into dryer and shut door. 3. Point the dial to follow these instructions can completely remove oil. Auto cycles will default to the last dryness setting ...has ever had anything that the time cannot be dried on it (including cooking oils). The time displayed is an estimated length of fire, electric shock, or injury to specific sections of the load and adjusts the time automatically for more detailed information. 1. Do not dry anything flammable on...
Use and Care Manual
Page 25
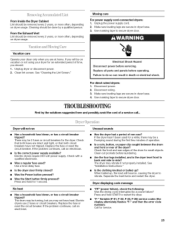
...Use masking tape to side? Dryer will bounce, causing the dryer to secure dryer door. Replace the fuse or reset the circuit breaker. Was the Start button firmly pressed? Electric dryers use ? The dryer may be removed every 2 years, or more often, depending on dryer usage. From the Exhaust Vent ...Lint should be on vacation or not using your dryer only when you may be 2 fuses or circuit ...
...Use masking tape to side? Dryer will bounce, causing the dryer to secure dryer door. Replace the fuse or reset the circuit breaker. Was the Start button firmly pressed? Electric dryers use ? The dryer may be removed every 2 years, or more often, depending on dryer usage. From the Exhaust Vent ...Lint should be on vacation or not using your dryer only when you may be 2 fuses or circuit ...
Use and Care Manual
Page 26
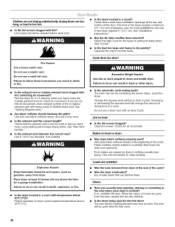
... your hand under the outside exhaust hood clogged with temperature below 45°F (7°0)? Use 4" (10.2 cm) diameter vent material. The front of the dryer requires a minimum of 1" (2.5 cm) of airspace, and, for the types of drying time in a cycle. Fire Hazard Use a heavy metal vent....exhaust vent with an Auto Cycle. Do not use a plastic vent. Clean lint screen. Stains on load or drum Was dryer fabric softener properly used for a garage installation. Loads are gone from dryer. The new electric heating element may not be cleaned before each load.
... your hand under the outside exhaust hood clogged with temperature below 45°F (7°0)? Use 4" (10.2 cm) diameter vent material. The front of the dryer requires a minimum of 1" (2.5 cm) of airspace, and, for the types of drying time in a cycle. Fire Hazard Use a heavy metal vent....exhaust vent with an Auto Cycle. Do not use a plastic vent. Clean lint screen. Stains on load or drum Was dryer fabric softener properly used for a garage installation. Loads are gone from dryer. The new electric heating element may not be cleaned before each load.


