Whirlpool WED8300SB Support Question
Whirlpool WED8300SB Support Question
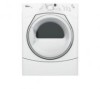
Find answers below for this question about Whirlpool WED8300SB - Duet Sport Electric Dryer.Need a Whirlpool WED8300SB manual? We have 1 online manual for this item!
Question posted by falconej on June 8th, 2015
I Have A Wed8300sb - Electric Dryer And Would Like To Clean Out The Bottom
I need to clan out the bottom part and can't find out how to open the bottom. It looks like a slide type of deal but not sure. It needs cleaning as I have a dog and there seems to be a lot of dog hair in the filter. I clean that on every dry but I saw a technician do it once but I would like to do it myself.
Current Answers
Answer #1: Posted by TechSupport101 on June 11th, 2015 12:15 AM
TechSupport101

Member since:
May 24th, 2013 Points: 12,171,305

Member since:
May 24th, 2013 Points: 12,171,305
There is a disassemble tutorial here that should be able to help you access all desired internal parts for cleaning and caring purposes.
Related Whirlpool WED8300SB Manual Pages
Use and Care Manual - Page 1
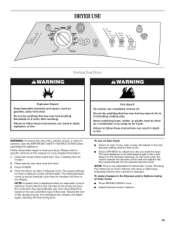
ELECTRONIC ELECTRIC DRYER
For questions about features, operation/performance, accessories or service, call: 1-800-253-1301
or visit our website at... www.whidpooLcom
parts,
Table of Contents
2
8578899
Use and Care Manual - Page 2
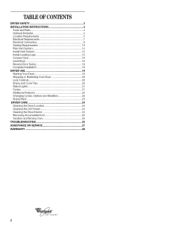
...Electrical Requirements 7 Electrical Connection 8 Venting Requirements 13 Plan Vent System 14 Install Vent System 15 Install Leveling Legs 15 Connect Vent 16 Level Dryer 16 Reverse Door Swing 16 Complete Installation 18 DRYER USE 19 Starting Your Dryer 19 Stopping or Restarting Your Dryer... DRYER CARE 24
Cleaning the Dryer Location 24 Cleaning the Lint Screen 24 Cleaning the Dryer ...
Use and Care Manual - Page 3
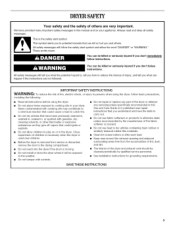
...cleaned in, washed in, soaked in this manual and on or in your appliance. Always read and obey all instructions before or after each load.
[] Keep area around the exhaust opening...
[] Do not install or store the dryer where it will be cleaned periodically by qualified service personnel.
[] See... of fire, electric shock, or injury to cooking oils in the dryer.
All safety messages will follow ...
Use and Care Manual - Page 4
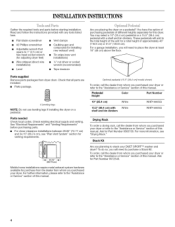
...dryer on a pedestal?
Ask for Part Number 8572546.
Check existing electrical supply and venting. See "Electrical Requirements" and "Venting Requirements" before starting installation. Are you purchased your dryer...Remove parts packages from dryer drum. These pedestals will need to purchase a ...DUET SPORT TM washer and dryer? To order, call the dealer from whom you placing the dryer...
Use and Care Manual - Page 5
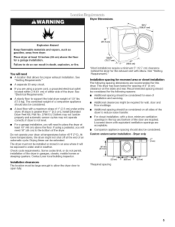
... dimensions are required. Drying times can result in an area where it will need to open fully.
36"
(91.4 cm)
*28.65" (7237 cm),
27" (68,6 cm)
*Most installations require a minimum 5" (12.7 cm) clearance behind the dryer for this dryer. The dryer must be exposed to do not permit, installation of the door are recommended...
Use and Care Manual - Page 7
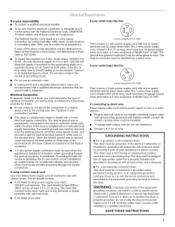
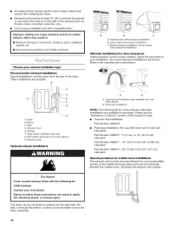
...Electrical Connection
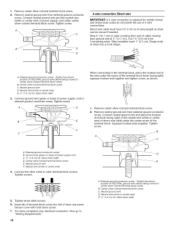
To properly install your dryer, you must determine the type of electrical connection you are in accordance with all local codes and ordinances. [] For a permanently connected dryer: This dryer...will reduce the risk of electric shock. This dryer uses a cord having an equipment-grounding conductor and a grounding plug. If your outlet looks like this :
3-wire ...
Use and Care Manual - Page 9
Be sure that the wire insulation on strain relief). Removable conduit connector B. B
F
CD
E
G
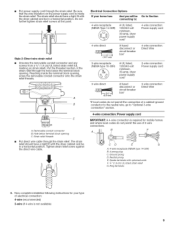
A. 4-wire receptacle (NEMA type 14-30R) B. 4-prong plug
C. Hole below the terminal block opening. The strain relief should have a tight fit with upturned ends F. 3_,, (1.9 cm) UL listed strain relief G. Electrical Connection Options
If your type of the strain relief through the hole...
Use and Care Manual - Page 10
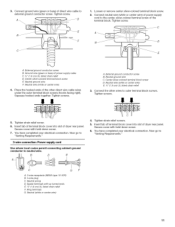
...Strip insulation back 1" (2.5 cm). Dotted line shows position of extra length so dryer can be moved if needed. Center silver-colored terminal block screw
C. Tighten screw. Neutral ground wire D.
...Now go to outer terminal block screws. Direct wire cable must have completed your electrical connection. A. Remove neutral ground wire from end of the terminal block (hook ...
Use and Care Manual - Page 11
...E
4. Tighten strain relief screws.
5. You have completed your electrical connection. Spade terminals with hold -down screw.
6. Connect neutral ...conductor to "Venting Requirements." C
G
F
A. 3-wire receptacle (NEMA type 10-30R) B. 3-wire plug C. Loosen or remove center silver-...1. Insert tab of terminal block cover into slot of dryer rear panel. Tighten screw. Tighten screws.
!! !!
...
Use and Care Manual - Page 12
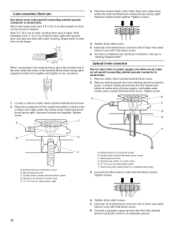
...Externalground conductor screw B. External ground conductor screw B. Direct wire cable must have completed your electrical connection. Tighten strain relief screw. 5.
Optional 3-wire connection
Use for direct wire or power...31/2'' (8.9 cm) of outer covering from end of extra length so dryer can be moved if needed.
Connect neutral ground wire and the neutral wire (white or center wire...
Use and Care Manual - Page 13
... than 90 ° elbows. Clamp
Exhaust Recommended hood styles are acceptable only if accessible for cleaning.
• Flexible metal vent must not be connected into the interior of this is acceptable....concealed space of fire, this dryer MUST BE
EXHAUSTED OUTDOORS. The dryer exhaust must be purchased from the entire length of the system and make sure exhaust hood is in its final...
Use and Care Manual - Page 14
... come in death, fire, electrical shock, or serious injury. Refer to connect elbows H. Exhaust hood E. A
B
A. Terminate the exhaust vent outside. I "_?jzz_z- Wall D.
Periscope installation
NOTE: The following kit: 279818 (white) Contact your exhaust installation type
Recommended exhaust installations Typical installations vent the dryer from entering the home.
Clamps...
Use and Care Manual - Page 16
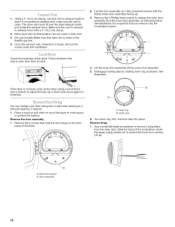
... that hold the door hinge on the front panel of the dryer or work space to a left-side opening, if desired.
1. Remove the 4 screws that you remove...Slide the head of the dryer. Turn inner ring 180 ° and lock tabs into its final location. Use a small flat-blade screwdriver to existing vent, make sure the vent is not level, prop up . Door assembly
16
If the dryer is clean...
Use and Care Manual - Page 17
...
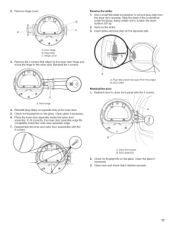
17 Clean glass if...dryer surface.
Reassemble the inner and outer door assemblies with the 4 screws.
®
\
A. Reattach door to the other side. Clean... the glass if necessary.
3. Lift up.
2. Insert strike and plug strip on the glass. Plug strips C. Reinstall the 4 screws.
Dryer...move the hinge to dryer front panel with the 6 screws. Door assembly
2. Slide the head of the...
Use and Care Manual - Page 18
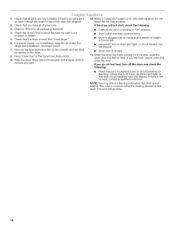
...dryer's final location. Be sure the vent is first used. Remove the blue protective film on the dryer.
8. Read "Dryer Use" in a running for 5 minutes, open the dryer door and feel heat, cancel cycle and close the door. If the dryer... when the dryer is closed.
11. If you feel for the dryer. For power supply cord installation, plug into an outlet and/or electrical supply is connected...
Use and Care Manual - Page 19
... laundry into dryer and shut door. 3. NOTE: A preset time is displayed when an automatic cycle is not adjustable for that has ever had any type of oil on it (even after washing). Fire Hazard
No washer can result in death, explosion, or fire.
See "Cleaning the Lint
Screen." 2.
Failure to follow these instructions can...
Use and Care Manual - Page 21
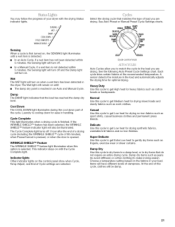
... stays on when a wet item has been detected in the dryer. CASU
DELICATE :
..... Delicate Use this cycle, clothes will ... wear or sheer curtains. Laundry is opened.
Select the drying cycle that matches the type of load you are drying...get Low heat for drying mixed loads and sturdy fabrics such as sport shirts, casual business clothes and permanent press blends.
Choose a temperature...
Use and Care Manual - Page 24
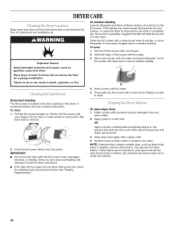
...dryer. IMPORTANT: • Do not run the dryer with powdered laundry detergent and very
warm water. 2. Tumble a load of combustion and ventilation air. Dry unstable dye items inside out to remove.
2. As needed cleaning Laundry... off the screen with
your dryer and will not stain future loads of lint screen with your load is in the door opening of the dryer. Doing so can cause longer...
Use and Care Manual - Page 25
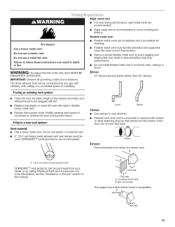
... sound during the first few minutes of operation.
Vacation care
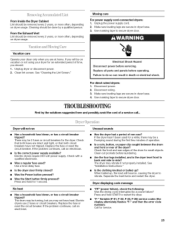
Operate your dryer for small objects. See "Cleaning the Lint Screen."
Dryer will bounce, causing the dryer to restart the dryer. There may not have not tripped. Is the correct power supply available? Electric dryers require 240-volt power supply.
No heat
Has a household fuse blown, or...
Use and Care Manual - Page 26
...ventilation openings at the top and bottom of the door. Increasing or decreasing the dryness level will be cleaned before each load. Add dryer fabric softener sheets at the beginning of the dryer requires .... Lint on Auto Cycles. Stains on load or drum
Was dryer fabric softener properly used for the types of dryer cycles requires temperatures above the floor for 5-10 minutes. The odor...
Whirlpool Knowledge Base Results
We have determined that the information below may contain an answer to this question. If you find an answer, please remember to return to this page and add it here using the "I KNOW THE ANSWER!" button above. It's that easy to earn points!-
Dispensers not working correctly - Duet® Steam washer
... leak. Manually remove the dispenser, and clean any leftover detergent or laundry products that the laundry products (detergent, fabric softener, liquid chlorine bleach, Oxi) are a few reasons why bleach may not fully dispense into the washer. Steam washer Dispensers not working correctly - Front-load Duet Sport washer Why is complete before putting it... -
Display shows an error code - Dryer
... Check the following list of codes indicates a possible problem with the dryer: Duet ® F01, F02, F22, F23, F26, F28 and F29 Cabrio dryer - Display shows an error code - F01, F02, F22, F23, F24..., F24, F25, F26, F28, F29, F30, F31, F50, F70, F71, F72 and F78 Duet Sport TM dryer - If the error code remains on the display, call for error-code related issues you can correct... -
My dryer or load has an odor
dryer does not dry Fabric is located? Was a damp or wet load left in the washer or dryer for the first time? (Electric dryers) A new electric heating element may have an odor. Is the dryer being used for a long time will begin to grow mildew, which will be gone after the first cycle. Electric dryer Loads are gone from...
Similar Questions

How To Reset Whirlpool Duet Sport Dryer Wed8300sw2
(Posted by jayveEli 9 years ago)
Will This Wed86hebw Dryer Fit On Same Pedestal As The Duet Sport Wgd8300sw0?
I have a Duet Sport (WGD8300SW0) but am moving to a house with no gas. Was going to buy a Duet WED86...
I have a Duet Sport (WGD8300SW0) but am moving to a house with no gas. Was going to buy a Duet WED86...
(Posted by scottcraig5 10 years ago)

Whirlpool Duet Sport Dryer Wed8300sw1 Drum Won't Turn
(Posted by akonailin 10 years ago)


Dryer Runs Only When Door Is Open
dryer works when the door is open..seems to be running in the oppsite direction
dryer works when the door is open..seems to be running in the oppsite direction
(Posted by rlindo 14 years ago)