Use and Care Manual
Page 1
www.whidpooLcom parts, Table of Contents 2 8578899 ELECTRONIC ELECTRIC DRYER For questions about features, operation/performance, accessories or service, call: 1-800-253-1301 or visit our website at...
www.whidpooLcom parts, Table of Contents 2 8578899 ELECTRONIC ELECTRIC DRYER For questions about features, operation/performance, accessories or service, call: 1-800-253-1301 or visit our website at...
Use and Care Manual
Page 2
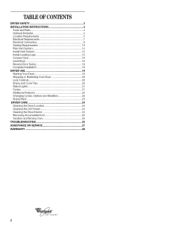
... Requirements 5 Electrical Requirements 7 Electrical Connection 8 Venting Requirements 13 Plan Vent System 14 Install Vent System 15 Install Leveling Legs 15 Connect Vent 16 Level Dryer 16 Reverse Door Swing 16 Complete Installation 18 DRYER USE 19 Starting Your Dryer 19 Stopping or Restarting Your Dryer 20 Lock...21 Additional Features 22 Changing Cycles, Options and Modifiers 23 Drying Rack 23 DRYER CARE 24 Cleaning the Dryer Location 24 Cleaning the Lint Screen 24 Cleaning the Dryer Interior 24 Removing Accumulated Lint 25 Vacation and Moving Care 25 TROUBLESHOOTING 25 ...
... Requirements 5 Electrical Requirements 7 Electrical Connection 8 Venting Requirements 13 Plan Vent System 14 Install Vent System 15 Install Leveling Legs 15 Connect Vent 16 Level Dryer 16 Reverse Door Swing 16 Complete Installation 18 DRYER USE 19 Starting Your Dryer 19 Stopping or Restarting Your Dryer 20 Lock...21 Additional Features 22 Changing Cycles, Options and Modifiers 23 Drying Rack 23 DRYER CARE 24 Cleaning the Dryer Location 24 Cleaning the Lint Screen 24 Cleaning the Dryer Interior 24 Removing Accumulated Lint 25 Vacation and Moving Care 25 TROUBLESHOOTING 25 ...
Use and Care Manual
Page 3
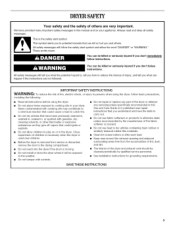
... not use heat to play on or in this manual and on your dryer. iMPORTANT SAFETY iNSTRUCTiONS WARNING: To reduce the risk of the dryer or attempt any part of fire, electric shock, or injury to persons when using the dryer, follow the safety alert symbol and either the word "DANGER" or "WARNING." Items...
... not use heat to play on or in this manual and on your dryer. iMPORTANT SAFETY iNSTRUCTiONS WARNING: To reduce the risk of the dryer or attempt any part of fire, electric shock, or injury to persons when using the dryer, follow the safety alert symbol and either the word "DANGER" or "WARNING." Items...
Use and Care Manual
Page 4
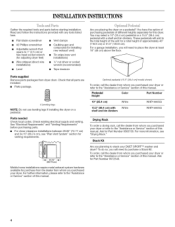
... (recommended) • Tape measure Parts supplied Remove parts packages from whom you purchased your DUET SPORT TM washer and dryer? For further information, please refer to purchase a Stack Kit. To order, call the dealer from dryer drum. Check existing electrical supply and venting. Are you will need to the "Assistance or Service" section of approximately...
... (recommended) • Tape measure Parts supplied Remove parts packages from whom you purchased your DUET SPORT TM washer and dryer? For further information, please refer to purchase a Stack Kit. To order, call the dealer from dryer drum. Check existing electrical supply and venting. Are you will need to the "Assistance or Service" section of approximately...
Use and Care Manual
Page 5
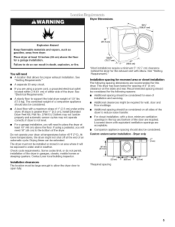
.... Check code requirements. This dryer has been tested for this dryer. If using a power cord, a grounded electrical outlet located within 2 ft (61 cm) of either side of the dryer in an area where it will need to place the dryer at least 18" (46 cm... at temperatures below 45°F (7°C). The combined weight of the dryer to support the total dryer weight of an automatic cycle. See "Electrical Requirements." • A sturdy floor to reduce noise transfer. Contact your dryer at the end of 127 Ibs (57.6 kg). Dryer only • - - 2"* 36" rain 1"* _ 2.5 crn *...
.... Check code requirements. This dryer has been tested for this dryer. If using a power cord, a grounded electrical outlet located within 2 ft (61 cm) of either side of the dryer in an area where it will need to place the dryer at least 18" (46 cm... at temperatures below 45°F (7°C). The combined weight of the dryer to support the total dryer weight of an automatic cycle. See "Electrical Requirements." • A sturdy floor to reduce noise transfer. Contact your dryer at the end of 127 Ibs (57.6 kg). Dryer only • - - 2"* 36" rain 1"* _ 2.5 crn *...
Use and Care Manual
Page 6
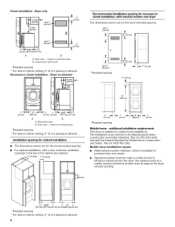
Dryer only 24 in?* .._ (155crn2) 3"* I1"*1 Closet installation -
Dryer only 24 in?* .._ (155crn2) 3"* I1"*1 Closet installation -
Use and Care Manual
Page 7
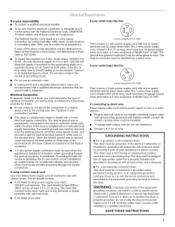
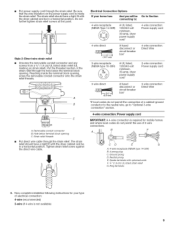
...-grounding conductor and a grounding plug. WARNING: Improper connection of a neutral ground wire to the equipment-grounding terminal or lead on the dryer. Electrical Connection To properly install your outlet looks like this : 4-wire receptacle (14-30t:?) Then choose a 4-wire power supply cord with ...wire receptacle of the terminal block. GROUNDING INSTRUCTIONS [] For a grounded, cord-connected dryer: This dryer must be at least 4 ft (1.22 m) long, must determine the type of electrical connection you are in doubt as to install with all mobile home installations. Do not...
...-grounding conductor and a grounding plug. WARNING: Improper connection of a neutral ground wire to the equipment-grounding terminal or lead on the dryer. Electrical Connection To properly install your outlet looks like this : 4-wire receptacle (14-30t:?) Then choose a 4-wire power supply cord with ...wire receptacle of the terminal block. GROUNDING INSTRUCTIONS [] For a grounded, cord-connected dryer: This dryer must be at least 4 ft (1.22 m) long, must determine the type of electrical connection you are in doubt as to install with all mobile home installations. Do not...
Use and Care Manual
Page 9
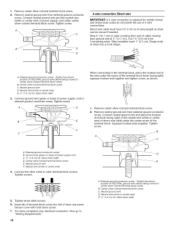
Put power supply cord through the strain relief. The strain relief should have a tight fit with the dryer cabinet and be in a horizontal position. Put the threaded section of electrical connection: 4-wire (recommended) 3-wire (if 4-wire is not available) Tighten strain relief screw against the direct wire cable. ... relief. The strain relief should have a tight fit with upturned ends F. 3_,, (1.9 cm) UL listed strain relief G. Electrical Connection Options If your type of the strain relief through the hole below terminal block opening , screw the removable conduit connector onto...
Put power supply cord through the strain relief. The strain relief should have a tight fit with the dryer cabinet and be in a horizontal position. Put the threaded section of electrical connection: 4-wire (recommended) 3-wire (if 4-wire is not available) Tighten strain relief screw against the direct wire cable. ... relief. The strain relief should have a tight fit with upturned ends F. 3_,, (1.9 cm) UL listed strain relief G. Electrical Connection Options If your type of the strain relief through the hole below terminal block opening , screw the removable conduit connector onto...
Use and Care Manual
Page 10
...colored terminal block screw C. Neutral wire (white or center wire) E. 3/4"(1.9 cm) UL listed strain relief Direct wire cable must have completed your electrical connection. Strip 5" (12.7 cm) of outer covering from external ground conductor screw. A. Neutral ground wire E Neutral wire (white or center wire... Center silver-colored terminal block screw C. Tighten screw. Secure cover with hold-down screw. 7= You have 5 ft (1.52 m) of dryer rear panel. Connect neutral ground wire and the neutral wire (white or center wire) of the terminal block (hook facing right), squeeze...
...colored terminal block screw C. Neutral wire (white or center wire) E. 3/4"(1.9 cm) UL listed strain relief Direct wire cable must have completed your electrical connection. Strip 5" (12.7 cm) of outer covering from external ground conductor screw. A. Neutral ground wire E Neutral wire (white or center wire... Center silver-colored terminal block screw C. Tighten screw. Secure cover with hold-down screw. 7= You have 5 ft (1.52 m) of dryer rear panel. Connect neutral ground wire and the neutral wire (white or center wire) of the terminal block (hook facing right), squeeze...
Use and Care Manual
Page 11
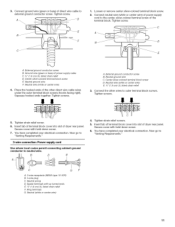
... cover with hold -down screw. 7. Secure cover with up turned ends E. _" (1.9 cm) UL Iisted strain relief E Ring terminals G. 3. Place the hooked ends of dryer rear panel. Neutral ground wire C. Now go to "Venting Requirements." 3-wire connection: Power supply cord Use where local codes permit connecting cabinet-ground conductor to...screw E, Neutral ground wire F Neutral wire (white or center wire) 4. Squeeze hooked ends together. External ground conductor screw B. You have completed your electrical connection. Tighten strain relief screws. 5. You have completed your...
... cover with hold -down screw. 7. Secure cover with up turned ends E. _" (1.9 cm) UL Iisted strain relief E Ring terminals G. 3. Place the hooked ends of dryer rear panel. Neutral ground wire C. Now go to "Venting Requirements." 3-wire connection: Power supply cord Use where local codes permit connecting cabinet-ground conductor to...screw E, Neutral ground wire F Neutral wire (white or center wire) 4. Squeeze hooked ends together. External ground conductor screw B. You have completed your electrical connection. Tighten strain relief screws. 5. You have completed your...
Use and Care Manual
Page 12
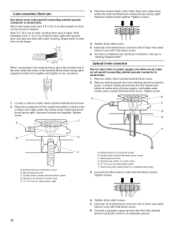
... block (hook facing right), squeeze hooked end together and tighten screw, as shown. 3. You have 5 ft (1.52 m) of dryer rear panel. Optional 3-wire connection Use for direct wire or power supply cord where local codes do not permit connecting cabinet-ground conductor...screw of terminal block D (hook facing right). Neutral ground wire C. Center silver-colored terminal block screw C. Direct wire cable must have completed your electrical connection. Tighten screws. !! !! 4. Tighten screw. A. Center silver-colored terminal block screw D. Insert tab of terminal block cover into a hook ...
... block (hook facing right), squeeze hooked end together and tighten screw, as shown. 3. You have 5 ft (1.52 m) of dryer rear panel. Optional 3-wire connection Use for direct wire or power supply cord where local codes do not permit connecting cabinet-ground conductor...screw of terminal block D (hook facing right). Neutral ground wire C. Center silver-colored terminal block screw C. Direct wire cable must have completed your electrical connection. Tighten screws. !! !! 4. Tighten screw. A. Center silver-colored terminal block screw D. Insert tab of terminal block cover into a hook ...
Use and Care Manual
Page 13
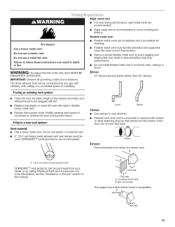
The dryer exhaust must not be purchased from the entire length of a building. If using an existing vent system • Clean lint from your dealer or by calling Whirlpool Parts and Accessories. DURASAFE TM venting products are • Rigid metal vent is recommended to avoid crushing and kinking.... Fire Hazard Use a heavy metal vent. Do not use duct tape. Exhaust vent must not be connected into the interior of fire, this dryer MUST BE EXHAUSTED OUTDOORS. Flexible metal vent • Flexible metal vents are shown here. B 4" (10.2cm) heavymetal exhaust vent DURASAFE TM ...
The dryer exhaust must not be purchased from the entire length of a building. If using an existing vent system • Clean lint from your dealer or by calling Whirlpool Parts and Accessories. DURASAFE TM venting products are • Rigid metal vent is recommended to avoid crushing and kinking.... Fire Hazard Use a heavy metal vent. Do not use duct tape. Exhaust vent must not be connected into the interior of fire, this dryer MUST BE EXHAUSTED OUTDOORS. Flexible metal vent • Flexible metal vents are shown here. B 4" (10.2cm) heavymetal exhaust vent DURASAFE TM ...
Use and Care Manual
Page 14
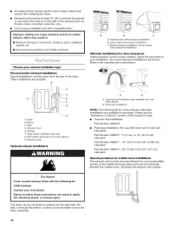
... or flexible metal vent G. Exhaust outlet Optional exhaust installations X ..... This dryer can be at least 12" (30.5 cm) from the ground or any object that may result in death, fire, electrical shock, or serious injury. An exhaust hood should cap the vent to... hood E. Periscope installation NOTE: The following kit: 279818 (white) Contact your exhaust installation type Recommended exhaust installations Typical installations vent the dryer from entering the home. Do not use with a magnetic latch. Refer to a noncombustible portion of this manual to woodwork, furniture, ...
... or flexible metal vent G. Exhaust outlet Optional exhaust installations X ..... This dryer can be at least 12" (30.5 cm) from the ground or any object that may result in death, fire, electrical shock, or serious injury. An exhaust hood should cap the vent to... hood E. Periscope installation NOTE: The following kit: 279818 (white) Contact your exhaust installation type Recommended exhaust installations Typical installations vent the dryer from entering the home. Do not use with a magnetic latch. Refer to a noncombustible portion of this manual to woodwork, furniture, ...
Use and Care Manual
Page 15
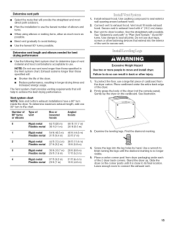
...acceptable to use. Determine vent length and elbows needed for best drying performance • Use the following Vent system chart to determine type of the dryer (not the console panel). Use caulking compound to exhaust hood with 4" (10.2 cm) clamp. 3. Secure vent to seal exterior wall opening...those specified in longer drying times and increased energy usage. Exhaust systems longer than those specified will: • Shorten the life of the 2 dryer back corners. Screw the legs into the interior of vent Box or Iouvered hoods Angled hoods 0 Rigid metal 64 ft (20 m) 58 ft...
...acceptable to use. Determine vent length and elbows needed for best drying performance • Use the following Vent system chart to determine type of the dryer (not the console panel). Use caulking compound to exhaust hood with 4" (10.2 cm) clamp. 3. Secure vent to seal exterior wall opening...those specified in longer drying times and increased energy usage. Exhaust systems longer than those specified will: • Shorten the life of the 2 dryer back corners. Screw the legs into the interior of vent Box or Iouvered hoods Angled hoods 0 Rigid metal 64 ft (20 m) 58 ft...
Use and Care Manual
Page 16
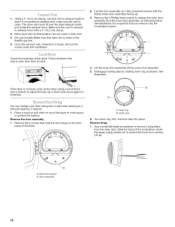
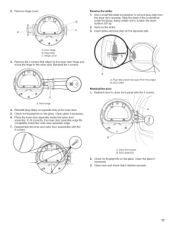
See illustration. Use a wrench to a left-side opening to adjust the legs up . Remove the 4 screws that hold the door hinge on top of the dryer. \ A. Inner ring B. Lift up or down and check again for levelness. Door assembly 16 Using a 4" (10.2 cm) clamp, connect vent to back. 4. ...line. 4. See illustration. You can change your door swing from the inner door assembly, as indicated below. A. Outer ring 6. Slide the head of the dryer. Do not crush or kink vent. 3. (On gas models) Make sure that you remove only the 6 indicated screws. _4 Check the levelness of the...
See illustration. Use a wrench to a left-side opening to adjust the legs up . Remove the 4 screws that hold the door hinge on top of the dryer. \ A. Inner ring B. Lift up or down and check again for levelness. Door assembly 16 Using a 4" (10.2 cm) clamp, connect vent to back. 4. ...line. 4. See illustration. You can change your door swing from the inner door assembly, as indicated below. A. Outer ring 6. Slide the head of the dryer. Do not crush or kink vent. 3. (On gas models) Make sure that you remove only the 6 indicated screws. _4 Check the levelness of the...
Use and Care Manual
Page 17
...not to the other side. Clean glass if necessary. 6. To fit correctly, the inner door assembly edge fits completely inside the outer door assembly. Dryer front panel B. A A. Reassemble the inner and outer door assemblies with the 4 screws. ® \ A. Door strike Reinstall the door 1. ... 4 screws that it latches securely. 17 Place the inner door assembly inside the outer door assembly edge. 7. Plug strip (cannot be seen from the dryer door opening. Slide the head of the inner door. 5. A A. 2= Remove hinge cover. A Reverse the strike 1. Remove the strike. 3. Door...
...not to the other side. Clean glass if necessary. 6. To fit correctly, the inner door assembly edge fits completely inside the outer door assembly. Dryer front panel B. A A. Reassemble the inner and outer door assemblies with the 4 screws. ® \ A. Door strike Reinstall the door 1. ... 4 screws that it latches securely. 17 Place the inner door assembly inside the outer door assembly edge. 7. Plug strip (cannot be seen from the dryer door opening. Slide the head of the inner door. 5. A A. 2= Remove hinge cover. A Reverse the strike 1. Remove the strike. 3. Door...
Use and Care Manual
Page 18
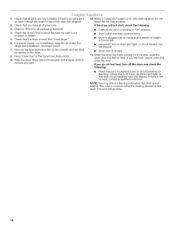
...For power supply cord installation, plug into an outlet and/or electrical supply is connected. • Household fuse is intact and tight, or circuit breaker has not tripped. • Dryer door is level. When the dryer has been running or "On" position. • Start button ... tools. 3. Check that all packaging materials. 4. Check the dryer's final location. See "Level Dryer." 6. Read "Dryer Use" in a running for 5 minutes, open the dryer door and feel heat, cancel cycle and close the door. Wipe the dryer drum interior thoroughly with a damp cloth to see which step ...
...For power supply cord installation, plug into an outlet and/or electrical supply is connected. • Household fuse is intact and tight, or circuit breaker has not tripped. • Dryer door is level. When the dryer has been running or "On" position. • Start button ... tools. 3. Check that all packaging materials. 4. Check the dryer's final location. See "Level Dryer." 6. Read "Dryer Use" in a running for 5 minutes, open the dryer door and feel heat, cancel cycle and close the door. Wipe the dryer drum interior thoroughly with a damp cloth to see which step ...
Use and Care Manual
Page 19
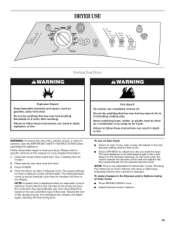
WARNING: To reduce the risk of fire, electric shock, or injury to an Auto or Manual Cycle. See "Cleaning the Lint...an Air Cycle. During the first few minutes of the drying process, the cycle time may automatically vary from dryer. Auto cycles will default to the last dryness setting used for more detailed information. 1. Clean lint screen ... cause a triple beep, indicating that has ever had anything that cycle. • Select DRYNESS to start your dryer. Place laundry into dryer and shut door. 3. The estimated (auto cycle) or actual (manual) cycle time (in death or fire....
WARNING: To reduce the risk of fire, electric shock, or injury to an Auto or Manual Cycle. See "Cleaning the Lint...an Air Cycle. During the first few minutes of the drying process, the cycle time may automatically vary from dryer. Auto cycles will default to the last dryness setting used for more detailed information. 1. Clean lint screen ... cause a triple beep, indicating that has ever had anything that cycle. • Select DRYNESS to start your dryer. Place laundry into dryer and shut door. 3. The estimated (auto cycle) or actual (manual) cycle time (in death or fire....
Use and Care Manual
Page 20
... • Press PAUSE/CANCEL once. • Adjust the Time, Temperature, WRINKLE SHIELD TM feature and End of selecting a cycle, the dryer automatically shuts off. This could cause overdrying of drying time and enhance fabric care. Selecting More Dry, Normal or Less Dry automatically adjusts the...If desired, add a fabric softener sheet. The amount of all cycles. To make changes to avoid unintended cycle or option changes during dryer operation. Press TIMING Up or Down until the desired temperature illuminates. Drying tips • Follow care label directions when they are preset...
... • Press PAUSE/CANCEL once. • Adjust the Time, Temperature, WRINKLE SHIELD TM feature and End of selecting a cycle, the dryer automatically shuts off. This could cause overdrying of drying time and enhance fabric care. Selecting More Dry, Normal or Less Dry automatically adjusts the...If desired, add a fabric softener sheet. The amount of all cycles. To make changes to avoid unintended cycle or option changes during dryer operation. Press TIMING Up or Down until the desired temperature illuminates. Drying tips • Follow care label directions when they are preset...
Use and Care Manual
Page 21
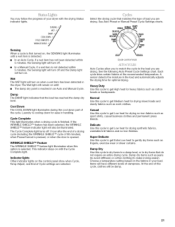
... this cycle to get Low heat for drying mixed loads and sturdy fabrics such as sport shirts, casual business clothes and permanent press blends. Super Delicate Use this cycle to get High heat for ease in the dryer. At the end of your load. The Wet light will remain on when a wet...; The damp dry point is finished. Select the drying cycle that matches the type of Cycle settings are drying. A sensor detects the moisture in your dryer with the Cycle Complete light. Heavy Duty Use this cycle to dry items that the load has reached the damp dry level. Choose a temperature setting...
... this cycle to get Low heat for drying mixed loads and sturdy fabrics such as sport shirts, casual business clothes and permanent press blends. Super Delicate Use this cycle to get High heat for ease in the dryer. At the end of your load. The Wet light will remain on when a wet...; The damp dry point is finished. Select the drying cycle that matches the type of Cycle settings are drying. A sensor detects the moisture in your dryer with the Cycle Complete light. Heavy Duty Use this cycle to dry items that the load has reached the damp dry level. Choose a temperature setting...


